Sunray's Bench
-
Dazzled

- Modelling Gent and Scholar
- Posts: 9592
- Joined: October 1st, 2011, 11:08 pm
- Location: Mid Glamorgan, South Wales
- Contact:
Re: Sunray's Bench
Two brilliant models. The Chipmunk takes me back to my Air Cadet days and I love the dynamic ailerons on the Shooting Star.
COLD WAR S.I.G. LEADER
Wherever there's danger, wherever there's trouble, wherever there's important work to be done....I'll be somewhere else building a model!
Wherever there's danger, wherever there's trouble, wherever there's important work to be done....I'll be somewhere else building a model!
-
Marek

- Modelling Gent and Scholar
- Posts: 2455
- Joined: May 1st, 2011, 8:03 am
- Location: Madison, WI
- Contact:
Re: Sunray's Bench
Amazing work, I really dig this NMF panel modulation. You are bringing me over to the Alclad side.

Re: Sunray's Bench
Cracking with the Shooting Star 
All models are equal. Some models are more equal than others.
Airfix Tribute Forum
Airfix Tribute Forum
-
ShaunW
- NOT the sheep
- Posts: 26188
- Joined: November 26th, 2011, 6:11 pm
- Location: Pontefract West Yorkshire
Re: Sunray's Bench
Great use of the different shades of Alclad on the P-80 Ian, that is an excellent looking NMF.
Doing - Tamiya 1/35th Universal Carrier.
Work is the curse of the modelling classes!
IPMS#12300
Work is the curse of the modelling classes!
IPMS#12300
-
Sunray
- Active Participant
- Posts: 611
- Joined: March 18th, 2014, 4:01 pm
- Location: Penshaw, North East, England
- Contact:
Re: Sunray's Bench
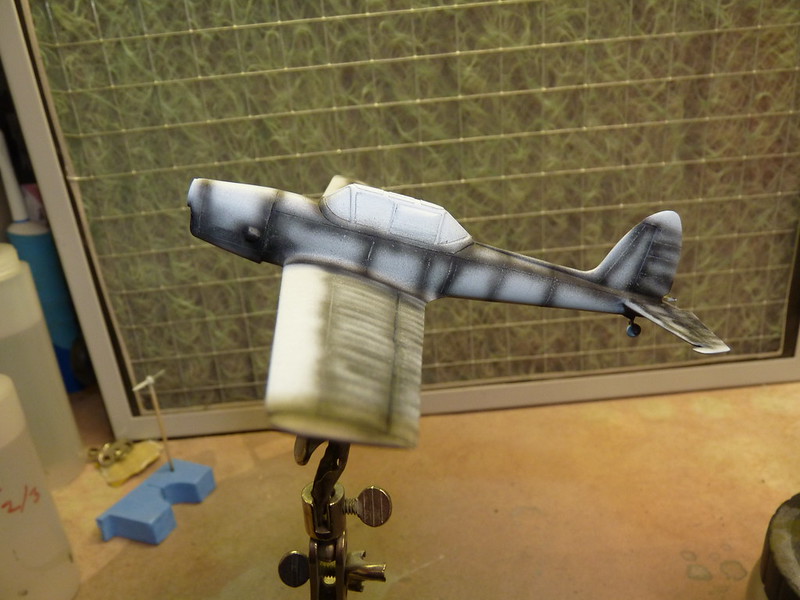
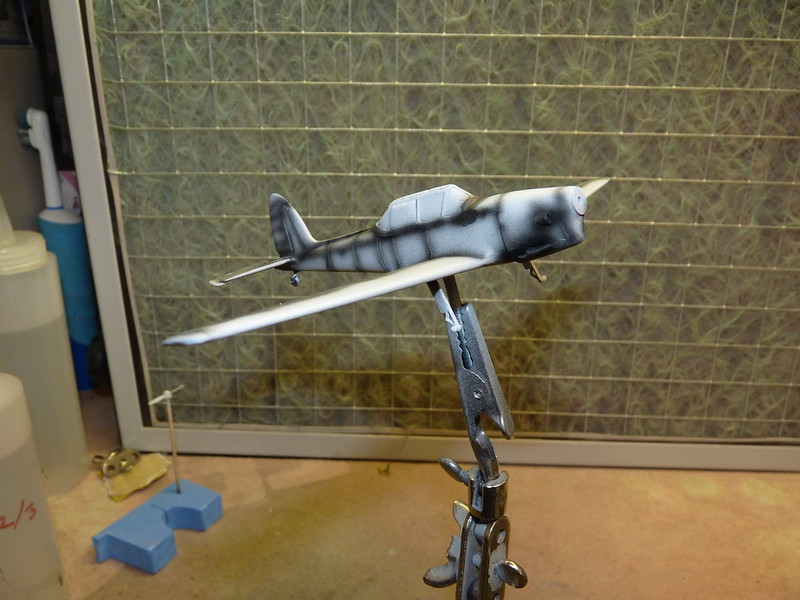
Thanks for the comments lads. Here is my latest offering. On the Chipmunk I have sprayed on the primer by Vallejo, done a bit of pre-shading and started to add the base colours.
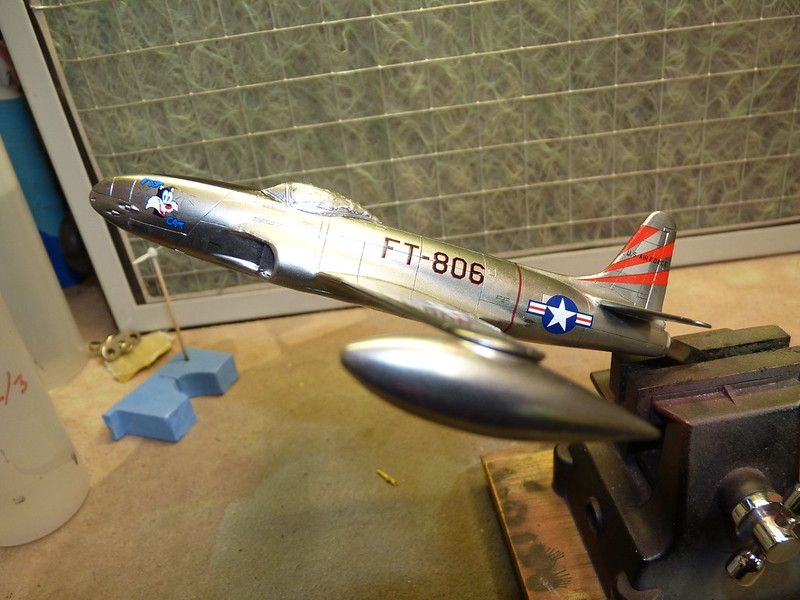
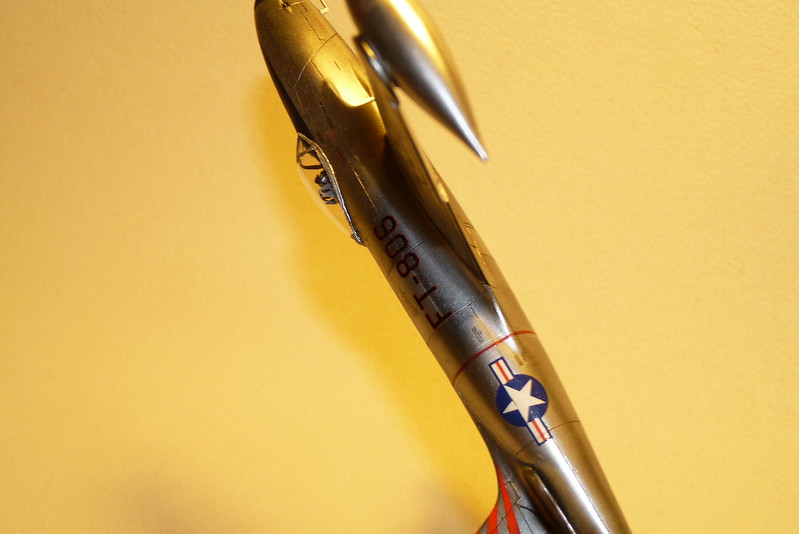
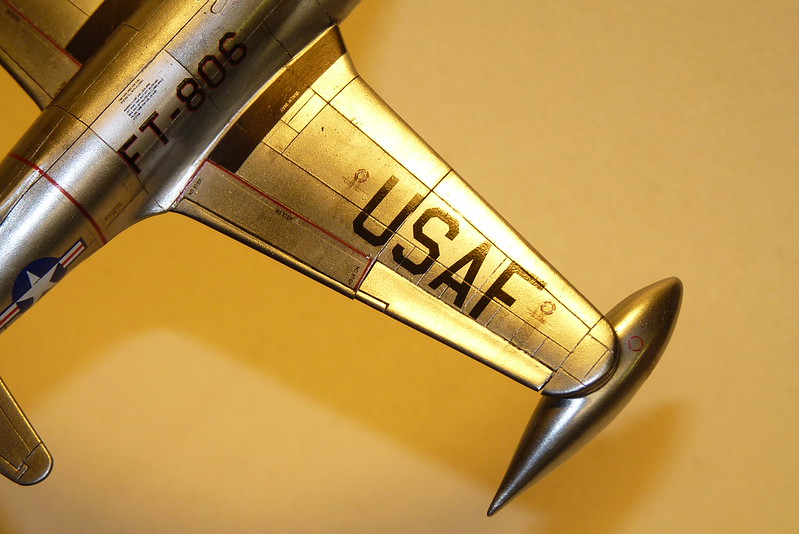
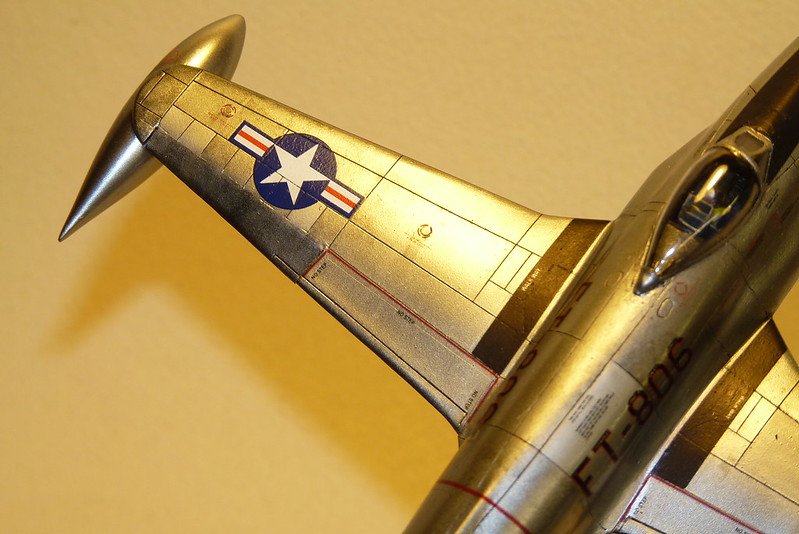
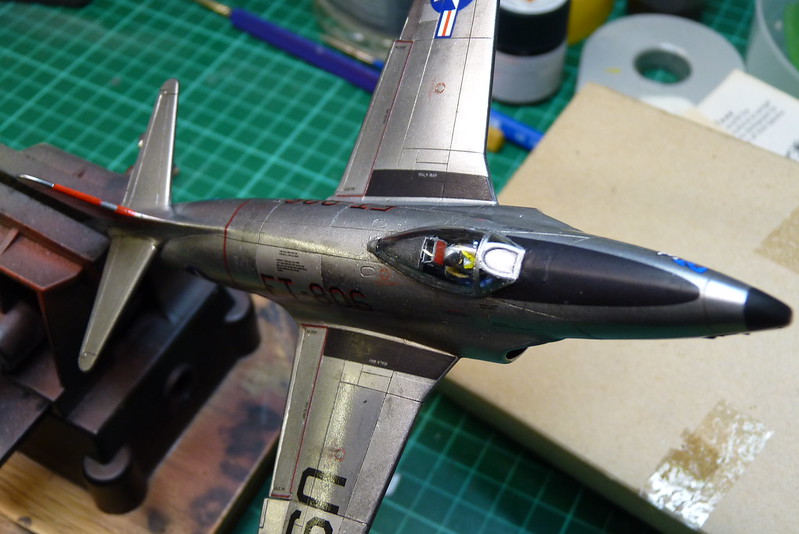
On Shooting Star after the sealer I gave it a few light coats of Humbrol Clear and then started on the decals. This is where I had a problem. Because the kit decals where not at their best I couldn't use the red band for around the fuselage, the red "no step" marking on the flaps and the black "walk way" markings either side of the cockpit. I had aftermarket decals but the weren't on them. I could mask and spray them in but if they are just slightly out of true they would stick out a mile. So I decided to make my own using the old decals, a scanner, photoshop, a colour laser printer and a sheet of printable clear laser water slide decal paper. I also printed the anti-glare patch on the nose.
To make your own decals isn't that hard if you have never done it before. You can use an inkjet printer but with that you have to wait for the ink to dry and then give the whole sheet a coat of acrylic varnish to seal the ink in plus the finished decal are a bit thick. I use a colour laser printer because you can use them almost straight from the printer as you don't have to wait for them to dry, they don't need a coat of varnish and they are very thin. If you do want to have a go the A4 water slide sheets come as white background or clear and cost about £1 each depending how many you buy and where from. Also if you use a clear sheet as I did you should know that your printer doesn't print the colour white and as with everything else you have to be careful of copyright.
Those done I proceeded to use aftermarket decals for everything else and once finished I attached the drop tanks.
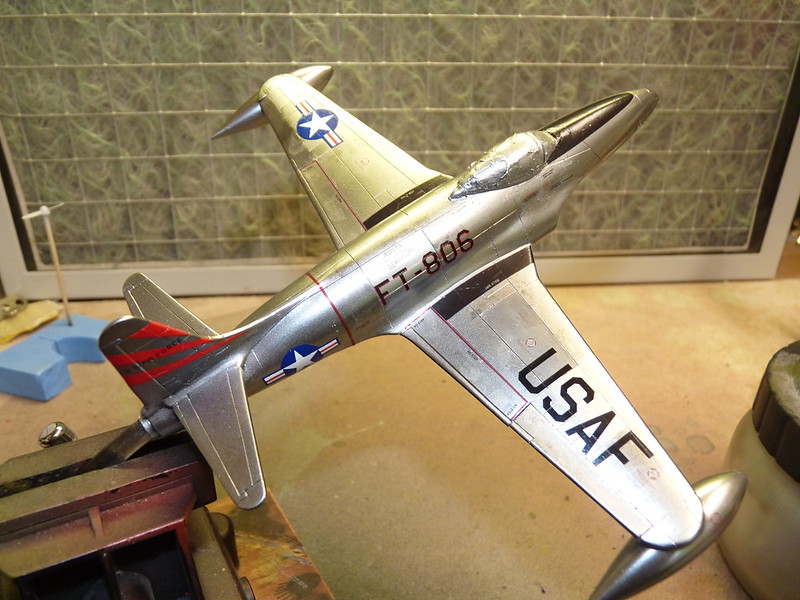
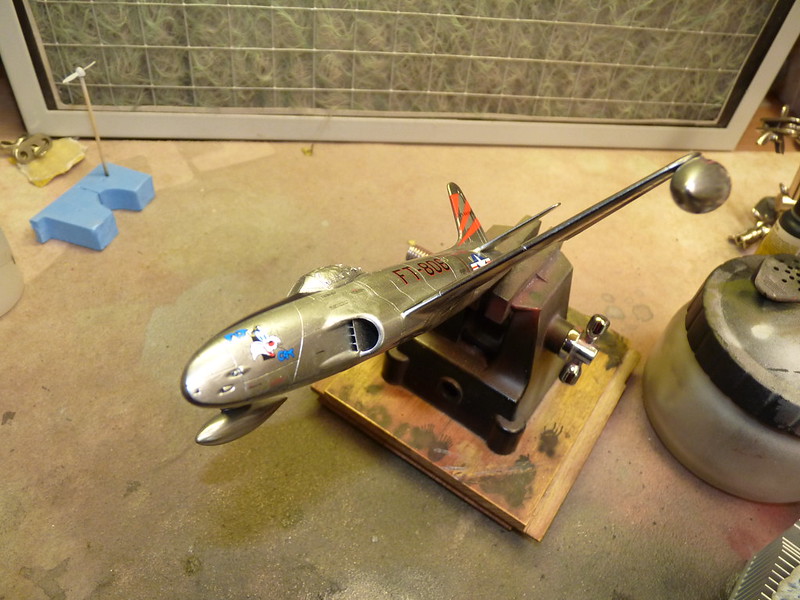
I hope this makes sense as I have just finished night shift but if it doesn't and you have a question just let me know.
On Shooting Star after the sealer I gave it a few light coats of Humbrol Clear and then started on the decals. This is where I had a problem. Because the kit decals where not at their best I couldn't use the red band for around the fuselage, the red "no step" marking on the flaps and the black "walk way" markings either side of the cockpit. I had aftermarket decals but the weren't on them. I could mask and spray them in but if they are just slightly out of true they would stick out a mile. So I decided to make my own using the old decals, a scanner, photoshop, a colour laser printer and a sheet of printable clear laser water slide decal paper. I also printed the anti-glare patch on the nose.
To make your own decals isn't that hard if you have never done it before. You can use an inkjet printer but with that you have to wait for the ink to dry and then give the whole sheet a coat of acrylic varnish to seal the ink in plus the finished decal are a bit thick. I use a colour laser printer because you can use them almost straight from the printer as you don't have to wait for them to dry, they don't need a coat of varnish and they are very thin. If you do want to have a go the A4 water slide sheets come as white background or clear and cost about £1 each depending how many you buy and where from. Also if you use a clear sheet as I did you should know that your printer doesn't print the colour white and as with everything else you have to be careful of copyright.
Those done I proceeded to use aftermarket decals for everything else and once finished I attached the drop tanks.
I hope this makes sense as I have just finished night shift but if it doesn't and you have a question just let me know.
Cheers
Ian
Please click on the web link below to have a look at all my photo's.
https://www.flickr.com/photos/ecirpnai/albums
Ian
Please click on the web link below to have a look at all my photo's.
https://www.flickr.com/photos/ecirpnai/albums
-
ShaunW
- NOT the sheep
- Posts: 26188
- Joined: November 26th, 2011, 6:11 pm
- Location: Pontefract West Yorkshire
Re: Sunray's Bench
Oh man that Shooting Star looks good Ian and your home made replacement decals look spot on to me. Great bit of info on how to make them as well (I'm always impressed by modellers having a go at making their own decals, whether or not they turn out as good as yours. So far, I've stopped short of having a go at decals or plunge moulded replacement parts such as canopies). Top bit of modelling.
Doing - Tamiya 1/35th Universal Carrier.
Work is the curse of the modelling classes!
IPMS#12300
Work is the curse of the modelling classes!
IPMS#12300
-
Clashcityrocker

- Modelling Gent and Scholar
- Posts: 10817
- Joined: May 1st, 2011, 12:31 am
- Location: Adelaide. South Australia
Re: Sunray's Bench
A couple of lovelies here.
Nigel
Nigel
-
Marek
- Modelling Gent and Scholar
- Posts: 2455
- Joined: May 1st, 2011, 8:03 am
- Location: Madison, WI
- Contact:
Re: Sunray's Bench
Really nice finish so far, Ian.
-
Sunray
- Active Participant
- Posts: 611
- Joined: March 18th, 2014, 4:01 pm
- Location: Penshaw, North East, England
- Contact:
Re: Sunray's Bench
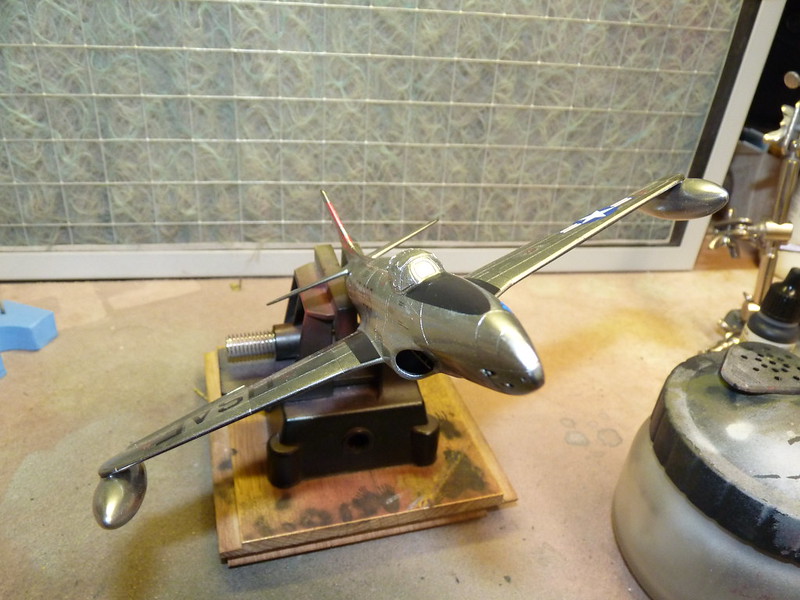
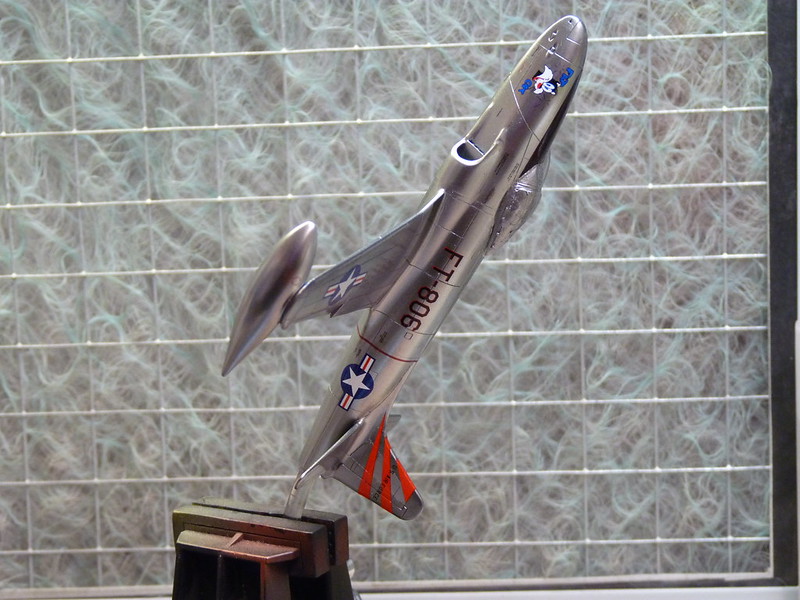
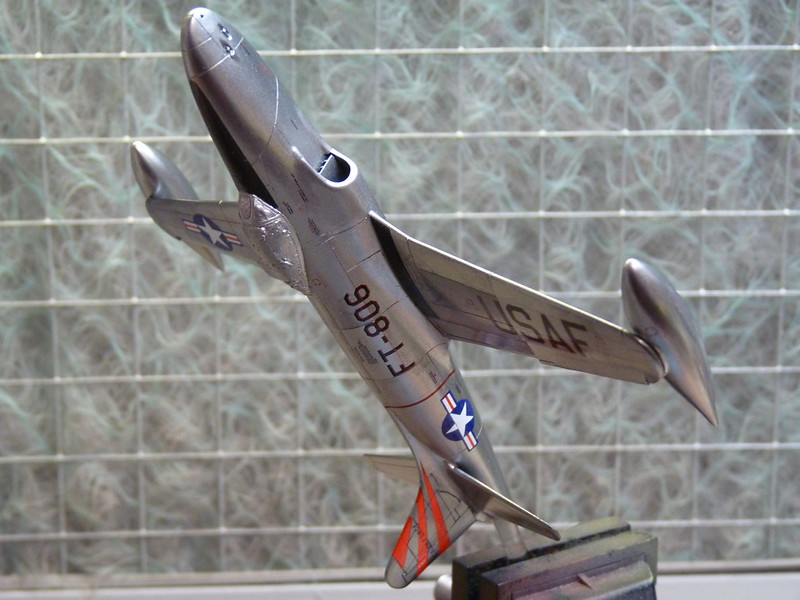
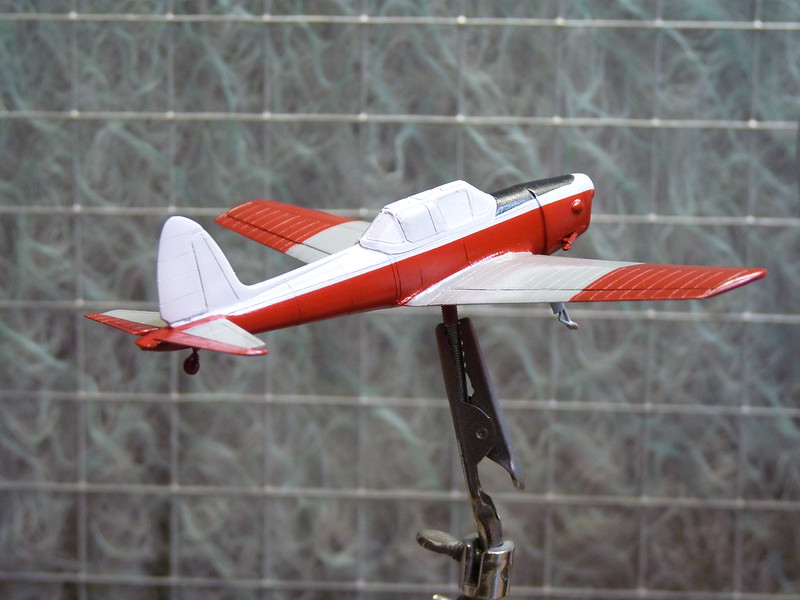
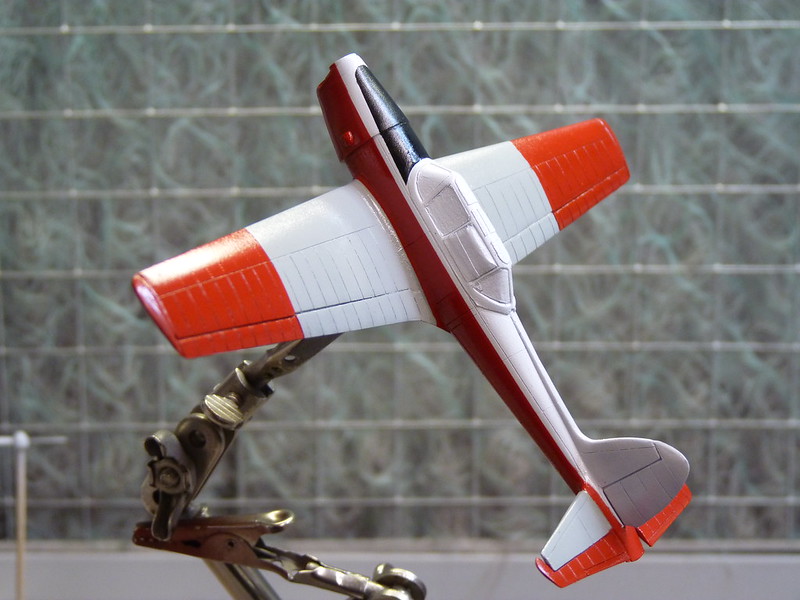
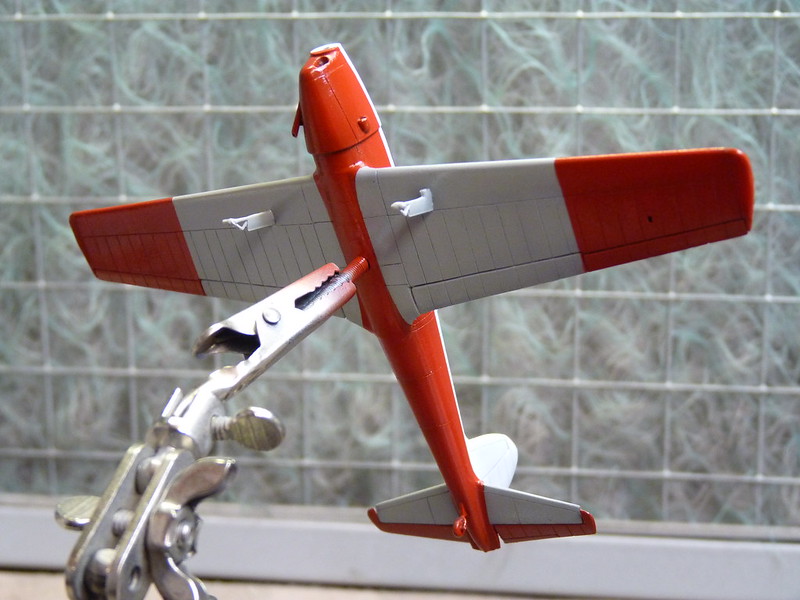
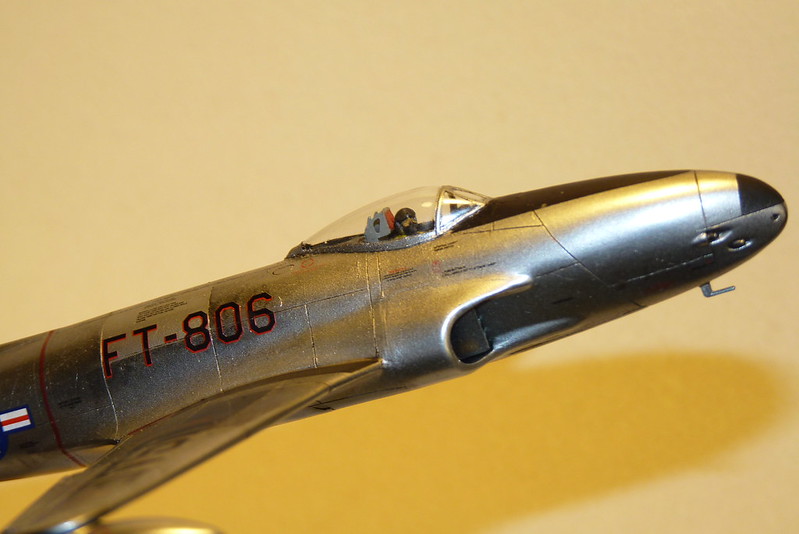
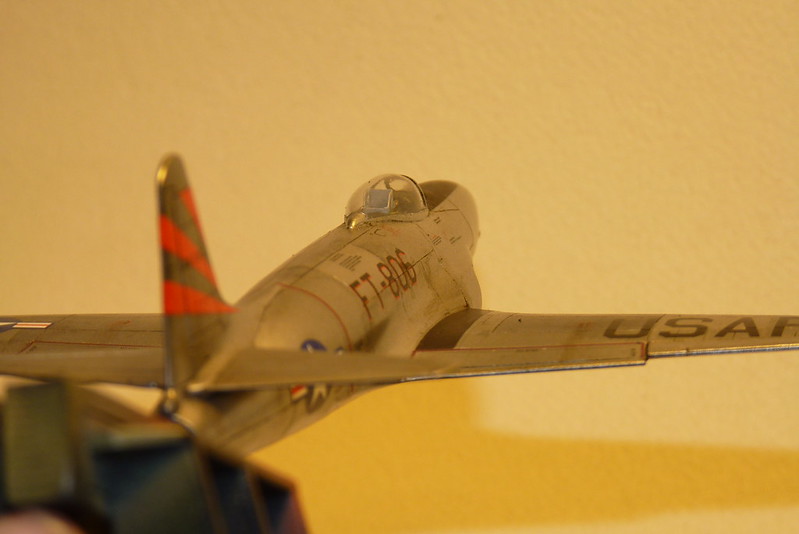
Back again. On the Shooting Star I gave it a few coats of Humbrol Clear to seal the decals ready for black patch on the nose to be sprayed on and the pitot tube to be attached. Then on to the weathering.
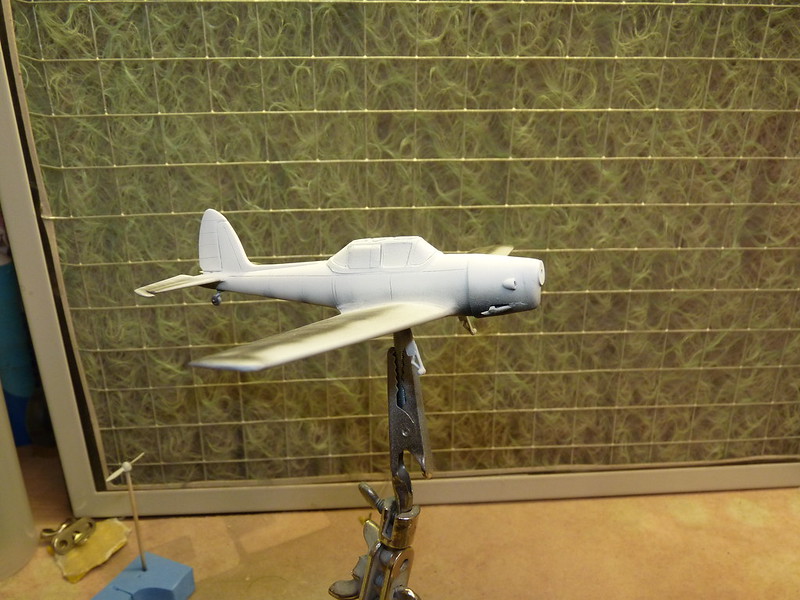
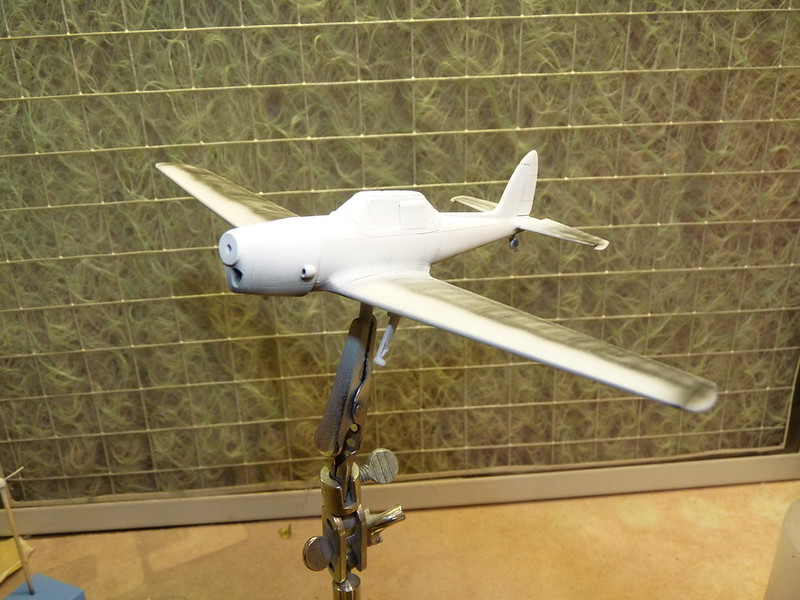
On the Chipmunk I have painted everything apart from the undercarriage and prop. It has also had a few coats of Clear ready for the decals.
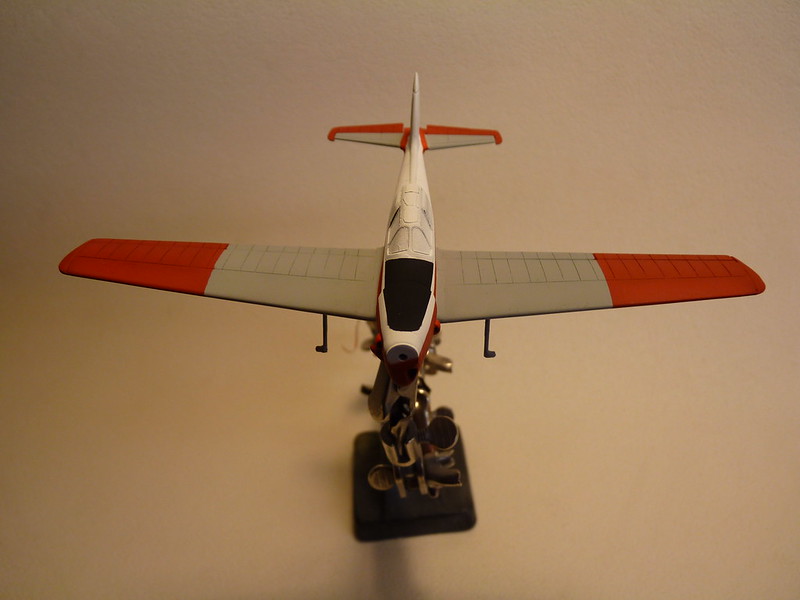
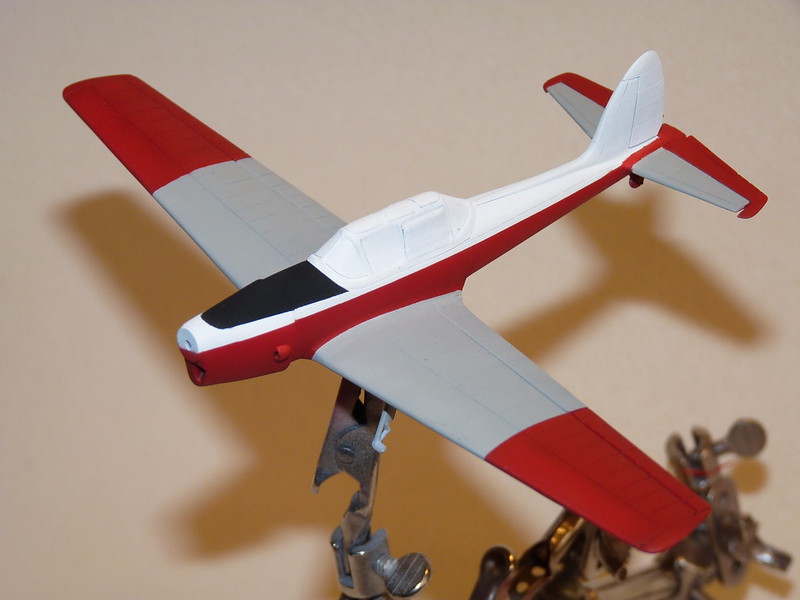
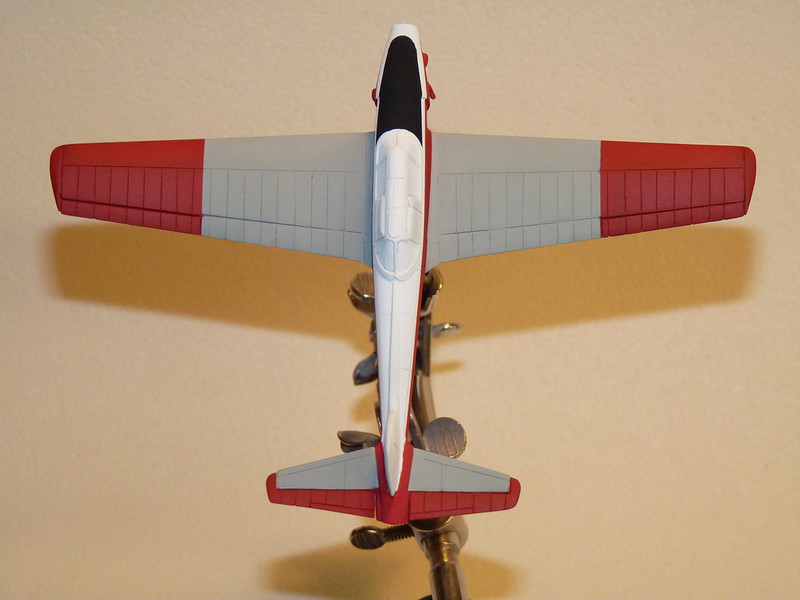
On the Chipmunk I have painted everything apart from the undercarriage and prop. It has also had a few coats of Clear ready for the decals.
Cheers
Ian
Please click on the web link below to have a look at all my photo's.
https://www.flickr.com/photos/ecirpnai/albums
Ian
Please click on the web link below to have a look at all my photo's.
https://www.flickr.com/photos/ecirpnai/albums
-
iggie

- Modelling Gent and Scholar
- Posts: 23437
- Joined: July 31st, 2013, 11:04 am
- Location: North Somercotes, Lincolnshire
- Contact:
Re: Sunray's Bench
Very nice work on both, the Shooting Star is excellent
Best wishes
Jim
If you can walk away from a landing, it's a good landing. If you use the airplane the next day, it's an outstanding landing
"Never put off till tomorrow, what you can do the day after tomorrow"
Jim
If you can walk away from a landing, it's a good landing. If you use the airplane the next day, it's an outstanding landing
"Never put off till tomorrow, what you can do the day after tomorrow"
-
ShaunW
- NOT the sheep
- Posts: 26188
- Joined: November 26th, 2011, 6:11 pm
- Location: Pontefract West Yorkshire
Re: Sunray's Bench
Excellent modelling Ian, those two look great
Doing - Tamiya 1/35th Universal Carrier.
Work is the curse of the modelling classes!
IPMS#12300
Work is the curse of the modelling classes!
IPMS#12300
-
Sunray
- Active Participant
- Posts: 611
- Joined: March 18th, 2014, 4:01 pm
- Location: Penshaw, North East, England
- Contact:
Re: Sunray's Bench
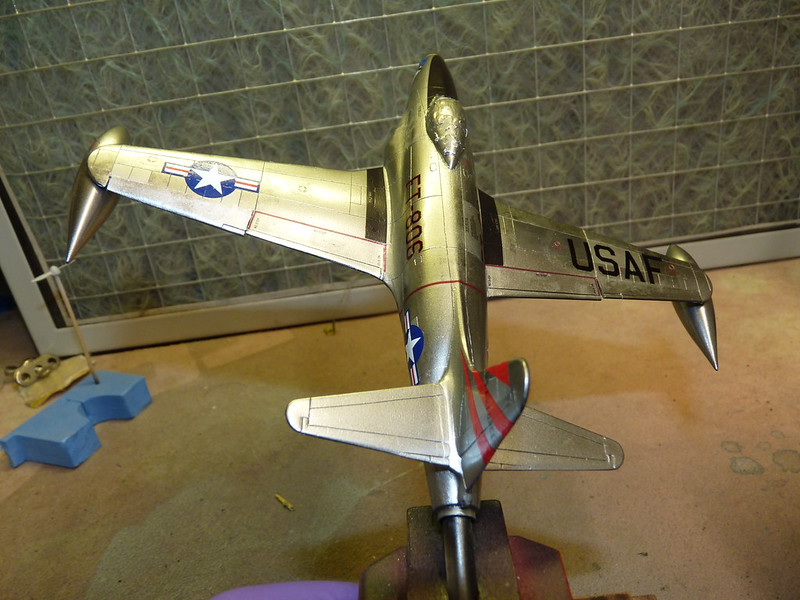
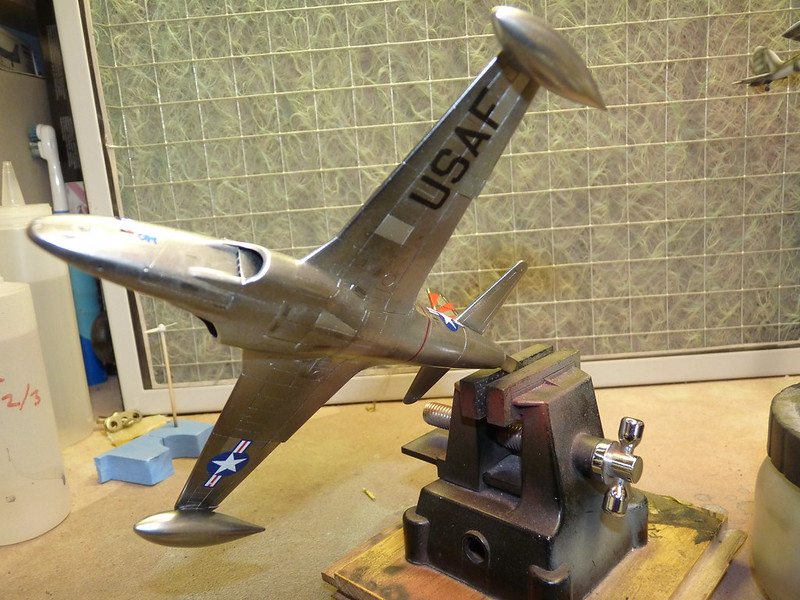
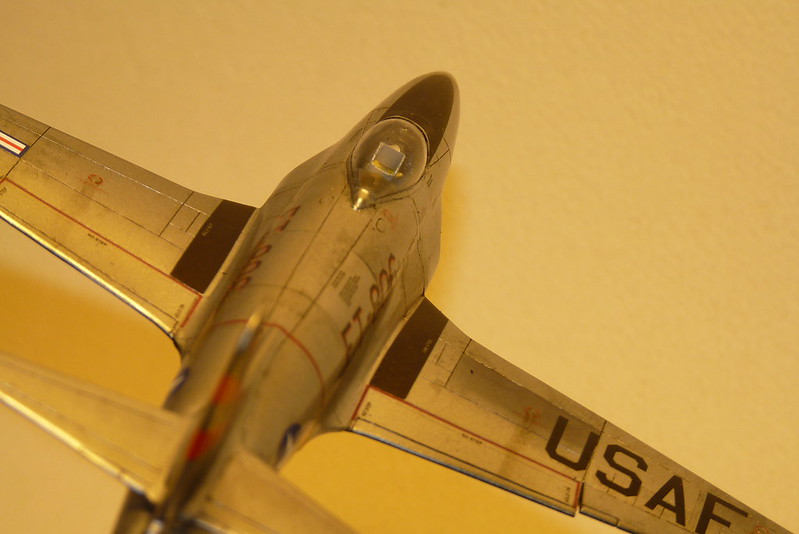
To weather the Shooting Star I decided to use a home made oil wash for the panel lines. If you haven't done it before is easy to do. What you need is an empty clean container, cheap oil paints (burnt umber, raw umber, black, etc) and thinner.
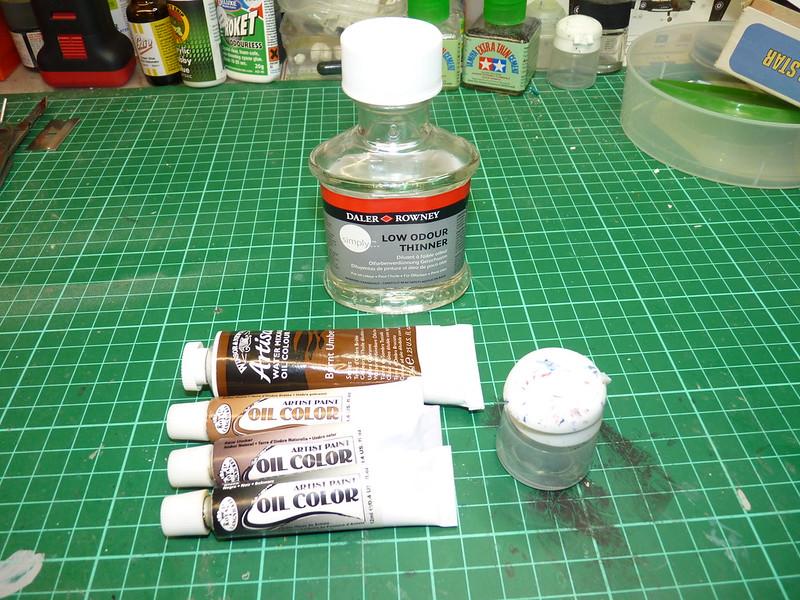
I filled my container to about one third full of thinner and just add the oil paint to the required colour (dark coffee) mixing all the time. The consistency you are after is similar to that of weak coffee.
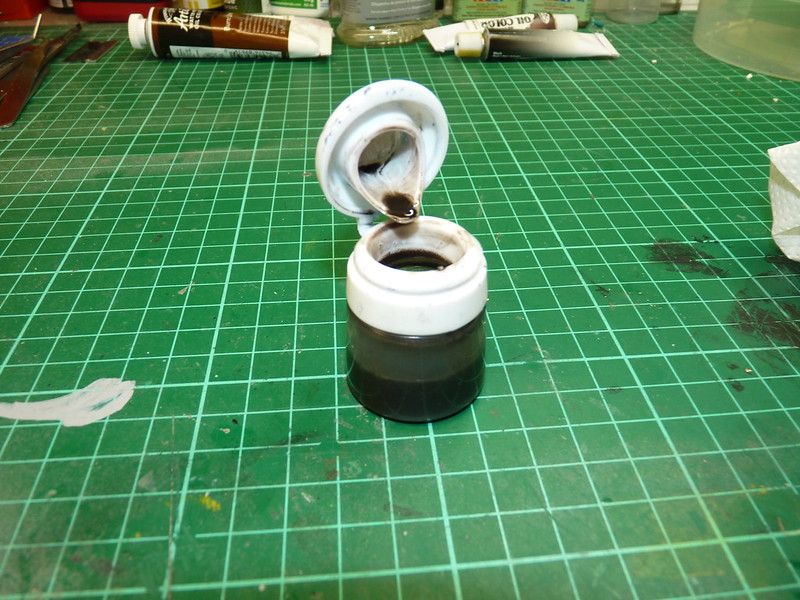
When ready with a fine brush load it with the wash and just touch the panel line and capillary action will take over. Don't worry if you miss the line because when you have finished and the lines, leave to dry for about ten minutes. Then using a cotton bud, dip the tip just in the thinner. You don't want much thinner on the bud. Now with a piece of kitchen roll remove the thinner from the cotton bud until it just feels just damp. Now wipe the bud across your model from front to rear, not sideways or back to front, front to rear to remove any excess wash off the wing and fuselage surfaces leaving it in the panel lines. I also use this wash method for oil and fuel stains which I used on my A-36 Apache Mustang http://www.uamf.org.uk/viewtopic.php?
With that done I painted the black patch on the nose, painted the jet nozzle and added the pitot tube. To finish off I gave it a light coat of matt varnish to seal in the wash and tone down the metal finish. Lastly I removed the canopy mask.

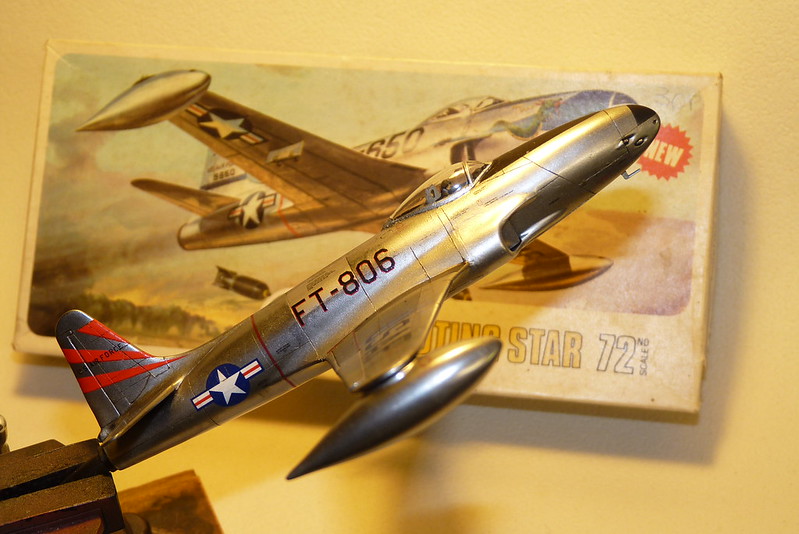
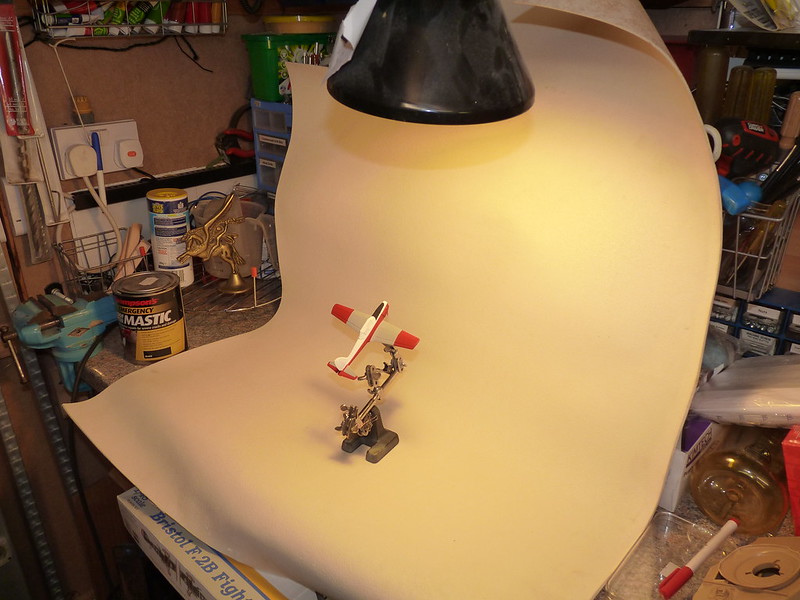
The last thing to do is to make the stand. To be continued.................
I filled my container to about one third full of thinner and just add the oil paint to the required colour (dark coffee) mixing all the time. The consistency you are after is similar to that of weak coffee.
When ready with a fine brush load it with the wash and just touch the panel line and capillary action will take over. Don't worry if you miss the line because when you have finished and the lines, leave to dry for about ten minutes. Then using a cotton bud, dip the tip just in the thinner. You don't want much thinner on the bud. Now with a piece of kitchen roll remove the thinner from the cotton bud until it just feels just damp. Now wipe the bud across your model from front to rear, not sideways or back to front, front to rear to remove any excess wash off the wing and fuselage surfaces leaving it in the panel lines. I also use this wash method for oil and fuel stains which I used on my A-36 Apache Mustang http://www.uamf.org.uk/viewtopic.php?
With that done I painted the black patch on the nose, painted the jet nozzle and added the pitot tube. To finish off I gave it a light coat of matt varnish to seal in the wash and tone down the metal finish. Lastly I removed the canopy mask.
The last thing to do is to make the stand. To be continued.................
Cheers
Ian
Please click on the web link below to have a look at all my photo's.
https://www.flickr.com/photos/ecirpnai/albums
Ian
Please click on the web link below to have a look at all my photo's.
https://www.flickr.com/photos/ecirpnai/albums
-
Clashcityrocker
- Modelling Gent and Scholar
- Posts: 10817
- Joined: May 1st, 2011, 12:31 am
- Location: Adelaide. South Australia
Re: Sunray's Bench
Both looking very nice.
Nigel
Nigel
-
iggie
- Modelling Gent and Scholar
- Posts: 23437
- Joined: July 31st, 2013, 11:04 am
- Location: North Somercotes, Lincolnshire
- Contact:
Re: Sunray's Bench
Great panel line wash advice Ian, thanks for that!
Lovely work on the Shooting Star
Lovely work on the Shooting Star
Best wishes
Jim
If you can walk away from a landing, it's a good landing. If you use the airplane the next day, it's an outstanding landing
"Never put off till tomorrow, what you can do the day after tomorrow"
Jim
If you can walk away from a landing, it's a good landing. If you use the airplane the next day, it's an outstanding landing
"Never put off till tomorrow, what you can do the day after tomorrow"
-
shangos70
- Modelling Gent and Scholar
- Posts: 4422
- Joined: May 1st, 2011, 11:14 am
- Location: Doncaster, Socialist Republic of South Yorkshire.
Re: Sunray's Bench
Brilliant work on both of them, love the finish on the Shooting Star. I really must try Alclad soon.