Agreed; great attention to detail!
Did you also drill through your finger when drilling out the MG barrel? I usually do....
Shaun's 2018/19 Bodging Bench
-
iggie

- Modelling Gent and Scholar
- Posts: 23436
- Joined: July 31st, 2013, 11:04 am
- Location: North Somercotes, Lincolnshire
- Contact:
Re: Shaun's 2018 Bodging Bench
Best wishes
Jim
If you can walk away from a landing, it's a good landing. If you use the airplane the next day, it's an outstanding landing
"Never put off till tomorrow, what you can do the day after tomorrow"
Jim
If you can walk away from a landing, it's a good landing. If you use the airplane the next day, it's an outstanding landing
"Never put off till tomorrow, what you can do the day after tomorrow"
Re: Shaun's 2018 Bodging Bench
Trying to Build kits and not Buy kits
-
Clashcityrocker

- Modelling Gent and Scholar
- Posts: 10817
- Joined: May 1st, 2011, 12:31 am
- Location: Adelaide. South Australia
Re: Shaun's 2018 Bodging Bench
Nice detailing work.
Nigel
Nigel
-
ShaunW
- NOT the sheep
- Posts: 26188
- Joined: November 26th, 2011, 6:11 pm
- Location: Pontefract West Yorkshire
Re: Shaun's 2018 Bodging Bench
Many thanks folks for your continued interest. I do remember that Sunray built an example of this kit on here and I will probably take a look at some point. That said, however, I try to rely more on period photos than other modeller's work no matter how good they are (and Ian [Sunray] is one of the very best) so as to avoid simply making a copy of someone else's work (not easy in Ian's case!) and to thereby avoid duplicating any mistakes they may have made by copying others themselves or by taking a guess (not that I'm saying Ian did either!). It's important to me that what you see in my build threads is my own style of work and interpretation of the facts (a euphemism for guesswork  ) - I actually enjoy poring over photos and the challenge of trying to duplicate visible detail that is either missing from or over simplified in the kit that I am working on. What is of particular interest to me about a thread like Ian's is the techniques that he shows, not that I'm good enough to do half of them
Edit: I've just in fact taken a look at Ian's build and it is excellent. When it comes to replacing certain items though, he has done some I haven't and vice-versa.
Edit: I've just in fact taken a look at Ian's build and it is excellent. When it comes to replacing certain items though, he has done some I haven't and vice-versa.
Doing - Tamiya 1/35th Universal Carrier.
Work is the curse of the modelling classes!
IPMS#12300
Work is the curse of the modelling classes!
IPMS#12300
-
Purplethistle

- Delusional Miniature Killer
- Posts: 4680
- Joined: July 10th, 2014, 1:03 am
- Location: Glasgow
Re: Shaun's 2018 Bodging Bench
That Crusader is shaping up to be a work of art Shaun, the detail is stunning. 
"Spits, SLUFS and Rock 'n' Roll"
-
ShaunW
- NOT the sheep
- Posts: 26188
- Joined: November 26th, 2011, 6:11 pm
- Location: Pontefract West Yorkshire
Re: Shaun's 2018 Bodging Bench
Many thanks, PT, you are very kind.
Sometimes it's necessary to take a step or two backwards with a build before moving forwards. Whilst I was debating whether to scratch up some new side racks this afternoon, I attempted a repair on the right hand front idler wheel that had dropped off the other week. I couldn't get a satisfactory join and realised that I was going to have to effect a proper repair. That meant carefully removing the side skirts, that thankfully Chris had not attached too tightly and then drilling out the hull and wheel to accept a new stub axle made from strong plastic rod. Whilst I was at it, I decided to remove and similarly strengthen the drive sprocket. I don't like dis-assembly of a part-built model as it feels somehow unnatural (I'm a model builder not breaker!) and is not without risk (I'm seriously glad those side skirts came off easily and in one piece - imagine if one had snapped!) but it's the only way I could properly access and repair the wheels.
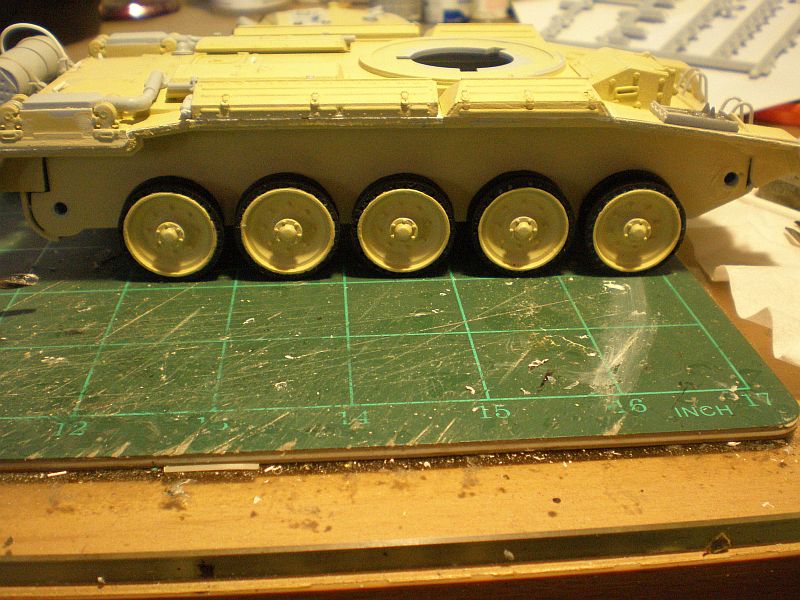
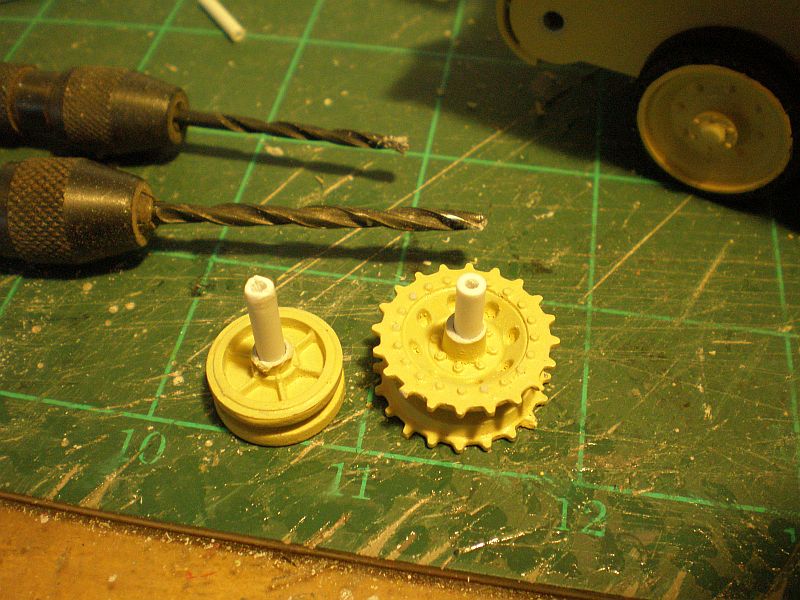
I've removed the side skirts on the other side as well and will also strengthen the idler and drive sprocket wheels on that side too as they are also a little loose. This damage to the wheels was caused by the tension of the 1970's vintage tracks (which I removed before starting work on the model) and this is a common problem with classic armour kits. Track tension can be lessened by removal of some of the drive sprocket teeth, where they engage with the track, or by moving the idler wheels forward a little (which is commonly how correct track tension is maintained on the full-size) although the latter method entails doing the sort of work that I am carrying out here. The other option with vehicles that feature deep side skirts is what I am going to do with this model - miss out the top run of track altogether!
Thanks for looking.
Sometimes it's necessary to take a step or two backwards with a build before moving forwards. Whilst I was debating whether to scratch up some new side racks this afternoon, I attempted a repair on the right hand front idler wheel that had dropped off the other week. I couldn't get a satisfactory join and realised that I was going to have to effect a proper repair. That meant carefully removing the side skirts, that thankfully Chris had not attached too tightly and then drilling out the hull and wheel to accept a new stub axle made from strong plastic rod. Whilst I was at it, I decided to remove and similarly strengthen the drive sprocket. I don't like dis-assembly of a part-built model as it feels somehow unnatural (I'm a model builder not breaker!) and is not without risk (I'm seriously glad those side skirts came off easily and in one piece - imagine if one had snapped!) but it's the only way I could properly access and repair the wheels.
I've removed the side skirts on the other side as well and will also strengthen the idler and drive sprocket wheels on that side too as they are also a little loose. This damage to the wheels was caused by the tension of the 1970's vintage tracks (which I removed before starting work on the model) and this is a common problem with classic armour kits. Track tension can be lessened by removal of some of the drive sprocket teeth, where they engage with the track, or by moving the idler wheels forward a little (which is commonly how correct track tension is maintained on the full-size) although the latter method entails doing the sort of work that I am carrying out here. The other option with vehicles that feature deep side skirts is what I am going to do with this model - miss out the top run of track altogether!
Thanks for looking.
Doing - Tamiya 1/35th Universal Carrier.
Work is the curse of the modelling classes!
IPMS#12300
Work is the curse of the modelling classes!
IPMS#12300
-
Corricon

- Modelling Gent and Scholar
- Posts: 1035
- Joined: September 3rd, 2017, 2:32 pm
- Location: Huntingdon, Cambs
Re: Shaun's 2018 Bodging Bench
Strange that the tracks were tight on this one Shaun, as the version I’m doing at the moment from the 70s, the tracks were actually too long once joined together and very slack. I ended up sticking them to the tops of the road wheels after engaging them in the sprockets to give the correct tension. Had to insert a rod into one of the front wheels on mine too although that was down to the peg being short shot on the hull side.
Steve
Now a full time modeller!
Now a full time modeller!
Re: Shaun's 2018 Bodging Bench
This was moulded kit in a red box with blue grey plastic from a reissue not an old plastic from ages back
Trying to Build kits and not Buy kits
-
ShaunW
- NOT the sheep
- Posts: 26188
- Joined: November 26th, 2011, 6:11 pm
- Location: Pontefract West Yorkshire
Re: Shaun's 2018 Bodging Bench
With classic kits the original issue versions are often the best to have as they were produced when the moulds were new and the fit can actually be better than later reissues but the "red box" releases of their classic range by Airfix are nevertheless very welcome and as a bonus they (thankfully) feature far superior decals to the original kits. I should have described the tracks as 1970's "style" rather than "vintage" in relation to this build but they are nevertheless generally inferior to the tracks found in modern kits and can present the same problems as they did way back when, however, that doesn't particularly bother me or spoil my enjoyment as I'm used to dealing with the foibles of this style of track given my fondness for building classic armour kits.
Doing - Tamiya 1/35th Universal Carrier.
Work is the curse of the modelling classes!
IPMS#12300
Work is the curse of the modelling classes!
IPMS#12300
Re: Shaun's 2018 Bodging Bench
I regularly find that once I have persuaded a rubber band of track to fit, I have issues with the wheels or sprockets and idlers or what have you, and in the act of persuading the track into place I often breaks something off due to tension and the weakness of the plastic locating pin, and have to resort to some stiff wire or brass rod
Trying to Build kits and not Buy kits
-
Lone Modeller
- Modelling Gent and Scholar
- Posts: 5338
- Joined: April 1st, 2013, 6:45 pm
Re: Shaun's 2018 Bodging Bench
I am not an armour builder but I am truly impressed with your work of restoration. Repairing joints in older plastic is a real pain: you seem to have managed an effective and very neat repair - congratulations. The rest of the detail that you are adding is equally impressive - this is going to be a model worth seeing.
-
Corricon
- Modelling Gent and Scholar
- Posts: 1035
- Joined: September 3rd, 2017, 2:32 pm
- Location: Huntingdon, Cambs
Re: Shaun's 2018 Bodging Bench
My mistake Chris I was under the impression it was a 70s kit, now you’ve mentioned it I can fully understand why the tracks may have been a little tight.chrism wrote:This was moulded kit in a red box with blue grey plastic from a reissue not an old plastic from ages back
Steve
Now a full time modeller!
Now a full time modeller!
-
iggie
- Modelling Gent and Scholar
- Posts: 23436
- Joined: July 31st, 2013, 11:04 am
- Location: North Somercotes, Lincolnshire
- Contact:
Re: Shaun's 2018 Bodging Bench
I'm an infrequent armour builder and get frustrated on the rare occasions I do build an AFV when faced by rubber band tracks so I have every admiration for you tackling a restoration of that age!
I much prefer link and length tracks (not that I have extensive experience of them either) and will be interested to see how I get on with the clip together tracks that Takom and Meng provide in their WW1 tank kits
I much prefer link and length tracks (not that I have extensive experience of them either) and will be interested to see how I get on with the clip together tracks that Takom and Meng provide in their WW1 tank kits
Best wishes
Jim
If you can walk away from a landing, it's a good landing. If you use the airplane the next day, it's an outstanding landing
"Never put off till tomorrow, what you can do the day after tomorrow"
Jim
If you can walk away from a landing, it's a good landing. If you use the airplane the next day, it's an outstanding landing
"Never put off till tomorrow, what you can do the day after tomorrow"
-
ShaunW
- NOT the sheep
- Posts: 26188
- Joined: November 26th, 2011, 6:11 pm
- Location: Pontefract West Yorkshire
Re: Shaun's 2018 Bodging Bench
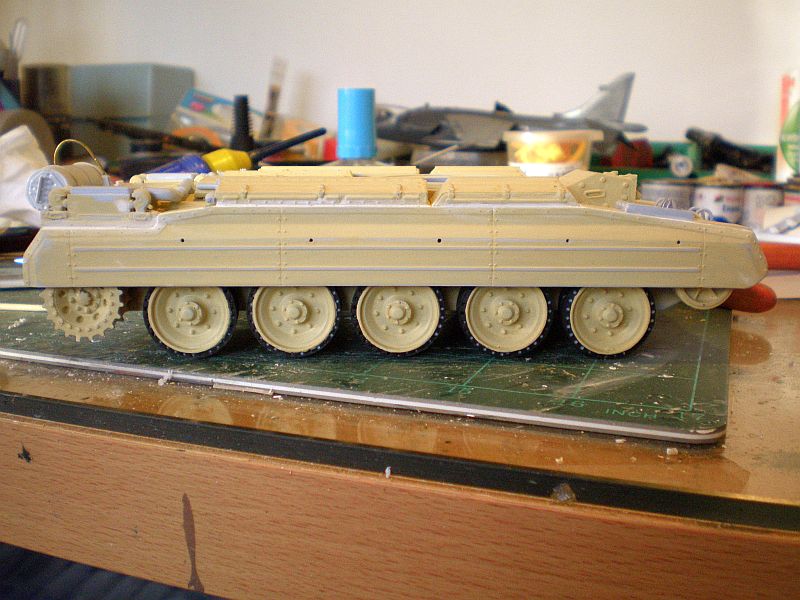
This isn't a resto in actual fact, Jim. The kit was kindly donated to me part-built by Chris M. Anyhoo, onwards and upwards, the drive sprockets and idler wheels are now all good on both sides and the side skirts are back on:
During the course of the repair work to the wheels my pipe to the rear fuel tank took the opportunity to ping off. I decided to make a replacement using brass wire, which is the material I should have used in the first place but was too lazy to find as my wire stock was buried in the bomb site that I call a modelling room! The advantage of using the wire is that it holds its shape whereas the plastic tube is always trying to spring back straight and therefore tends to remain under tension, putting stress on the glue holding it in place. Of course the plastic tube could've been heat formed around a tube or similar using hot water which would help it retain its bent shape but I was too lazy to do that at the time as well
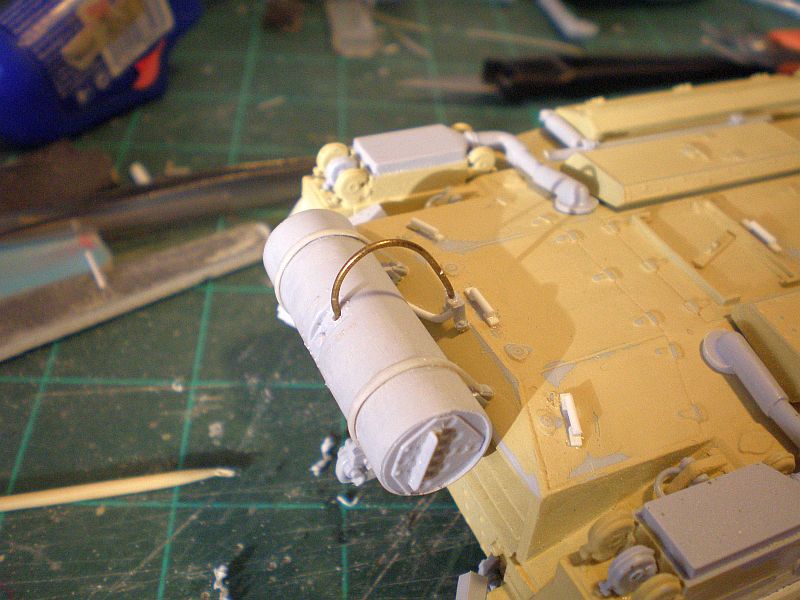
Right, after that excitement I'm back to considering whether to replace the side skirt equipment racks or not!
Thanks for looking.
During the course of the repair work to the wheels my pipe to the rear fuel tank took the opportunity to ping off. I decided to make a replacement using brass wire, which is the material I should have used in the first place but was too lazy to find as my wire stock was buried in the bomb site that I call a modelling room! The advantage of using the wire is that it holds its shape whereas the plastic tube is always trying to spring back straight and therefore tends to remain under tension, putting stress on the glue holding it in place. Of course the plastic tube could've been heat formed around a tube or similar using hot water which would help it retain its bent shape but I was too lazy to do that at the time as well
Right, after that excitement I'm back to considering whether to replace the side skirt equipment racks or not!
Thanks for looking.
Doing - Tamiya 1/35th Universal Carrier.
Work is the curse of the modelling classes!
IPMS#12300
Work is the curse of the modelling classes!
IPMS#12300