It's entirely up to you; it'll mean some fiddly paintwork which if you don't feel confident about could spoil the good work you have done so far.
Perhaps this time it might be better to leave it and try it next time.
Alecras' Workbench
-
iggie

- Modelling Gent and Scholar
- Posts: 23438
- Joined: July 31st, 2013, 11:04 am
- Location: North Somercotes, Lincolnshire
- Contact:
Re: Alecras' Workbench
Best wishes
Jim
If you can walk away from a landing, it's a good landing. If you use the airplane the next day, it's an outstanding landing
"Never put off till tomorrow, what you can do the day after tomorrow"
Jim
If you can walk away from a landing, it's a good landing. If you use the airplane the next day, it's an outstanding landing
"Never put off till tomorrow, what you can do the day after tomorrow"
-
alecras234
- Active Participant
- Posts: 891
- Joined: May 28th, 2013, 3:52 pm
Re: Alecras' Workbench
yes i agree, thank you
-
alecras234
- Active Participant
- Posts: 891
- Joined: May 28th, 2013, 3:52 pm
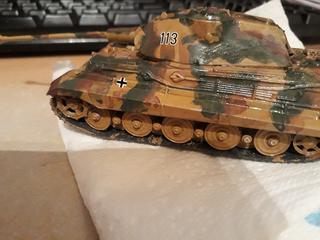
Re: Alecras' Workbench
Hi my tank all finished nearly just a few things to tidy up. I was given the hobbyboss 1:72 JU 88 for Christmas, it's still sealed in its box as I've concentrated on my tank. I always get a little nervous and worried when i have a new kit because i don't know what to do, do i paint parts first, if so which parts. In the past I've opened the box and soaked the sprues in hot water with a little fairy liquid, rinsed in cold water and left to dry, but then the instructions didn't say what colour to paint parts such as the interior. When i have a new kit i tend to put it off for ages because i don't know how to prepare for the build, as in what colours to use, do i mask or nor, i do find it hard to mask. How do you prepare for a build?
Re: Alecras' Workbench
Hi alecras234,I prepare by washing the sprues in warm soapy water,rinse with cold and let dry.Get your tools needed to hand and sort out your paint needed.As for masking,I never bother,I paint freehand as I build my models for relaxation not for competition[not that they are good enough anyway].As for colours most German WW2 aircraft were two greens or two greys up top and light blue or light grey underneath and pale green or dark grey inside depending on early or late war.I hope this helps,just remember this hobby is all about having fun nor matter what so called experts say.
-
iggie
- Modelling Gent and Scholar
- Posts: 23438
- Joined: July 31st, 2013, 11:04 am
- Location: North Somercotes, Lincolnshire
- Contact:
Re: Alecras' Workbench
Hi Ash,
Sorry, didn't see your post and then got side-tracked by shiny things when I did!
Celt's advice is spot on, especially the bit about having fun. It seriously is not the end of the world if you use a paint colour that is not the exact match for the real thing
As far as your Ju-88 is concerned, and mid to dark grey will do for the interior. Pre-painting of small parts can help, but can also interfere with glue when you assemble the model. I pretty much only use Tamiya extra thin liquid poly, and that is 'hot' enough that it seems happy to eat through a layer of paint to get to the plastic and weld it to the other part. I'm not sure if other glues do the same.
Masking of internal details is (for me) a total waste of time at 1/72; too little detail can be seen through canopies anyway so don't bother. For external painting, it depends; straight line schemes (such as German splinter camouflage as your Ju-88 might have) is best done by masking, even if brush painting. Free-form schemes (think Spitfire) can easily be brushed freehand without the need for masking.
Looking forward to seeing this progress!
Best wishes
Jim
If you can walk away from a landing, it's a good landing. If you use the airplane the next day, it's an outstanding landing
"Never put off till tomorrow, what you can do the day after tomorrow"
Jim
If you can walk away from a landing, it's a good landing. If you use the airplane the next day, it's an outstanding landing
"Never put off till tomorrow, what you can do the day after tomorrow"
-
alecras234
- Active Participant
- Posts: 891
- Joined: May 28th, 2013, 3:52 pm
Re: Alecras' Workbench
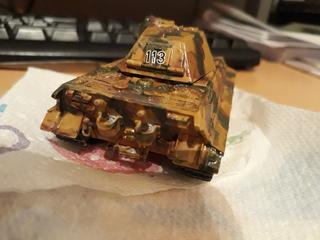
Help! I've put decals on my tank using decalfix. I dabbed the excess decalfix with a tissue and the decal came off, i managed to put the decal back on the model but i cant apply more decalfix to seal down the decal because im affraid they'll move. What do i do?
-
iggie
- Modelling Gent and Scholar
- Posts: 23438
- Joined: July 31st, 2013, 11:04 am
- Location: North Somercotes, Lincolnshire
- Contact:
Re: Alecras' Workbench
If you are happy with the decal and it's position, I would leave well alone for a bit. Then, holding the model so the decal is flat (i.e. horizontal), carefully add a drop of decalfix to one edge of the decal; capillary action should draw the fluid under rthe decal and it should settle down
Best wishes
Jim
If you can walk away from a landing, it's a good landing. If you use the airplane the next day, it's an outstanding landing
"Never put off till tomorrow, what you can do the day after tomorrow"
Jim
If you can walk away from a landing, it's a good landing. If you use the airplane the next day, it's an outstanding landing
"Never put off till tomorrow, what you can do the day after tomorrow"
-
alecras234
- Active Participant
- Posts: 891
- Joined: May 28th, 2013, 3:52 pm
Re: Alecras' Workbench
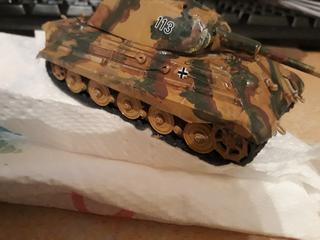
Here is my attempt, not bad but im worried about silvering because those german crosses didnt conform verywell even though i put decalfix on them, they kept sliding.
-
iggie
- Modelling Gent and Scholar
- Posts: 23438
- Joined: July 31st, 2013, 11:04 am
- Location: North Somercotes, Lincolnshire
- Contact:
Re: Alecras' Workbench
leave them to dry and see how they look. If they have silvered, all may not be lost. Thin some clear varnish (any kind) about 50/50 with water and out a drop in the edges of the decal where there is any silvering; once it dries the silvering should be lessened or gone
Best wishes
Jim
If you can walk away from a landing, it's a good landing. If you use the airplane the next day, it's an outstanding landing
"Never put off till tomorrow, what you can do the day after tomorrow"
Jim
If you can walk away from a landing, it's a good landing. If you use the airplane the next day, it's an outstanding landing
"Never put off till tomorrow, what you can do the day after tomorrow"
-
alecras234
- Active Participant
- Posts: 891
- Joined: May 28th, 2013, 3:52 pm
Re: Alecras' Workbench
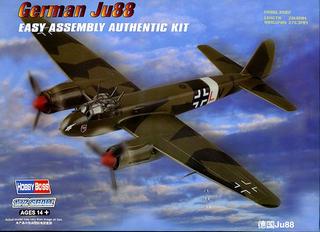
I'm going to start my ju 88 build this weekend, it's the C 6 i think,
what paints do i need? The book says for the cockpit seats use RLM02 but doesn't say what other paints to use.
what paints do i need? The book says for the cockpit seats use RLM02 but doesn't say what other paints to use.
-
iggie
- Modelling Gent and Scholar
- Posts: 23438
- Joined: July 31st, 2013, 11:04 am
- Location: North Somercotes, Lincolnshire
- Contact:
Re: Alecras' Workbench
The topsides will be RLM 70 Schwartzgrun (Humbrol 241) and RLM 71 Dunkelgrun (Humbrol 242). The underside is likely light blue (Humbrol 65) which also wraps around the fuselage just behind the '+'
Best wishes
Jim
If you can walk away from a landing, it's a good landing. If you use the airplane the next day, it's an outstanding landing
"Never put off till tomorrow, what you can do the day after tomorrow"
Jim
If you can walk away from a landing, it's a good landing. If you use the airplane the next day, it's an outstanding landing
"Never put off till tomorrow, what you can do the day after tomorrow"
-
alecras234
- Active Participant
- Posts: 891
- Joined: May 28th, 2013, 3:52 pm
Re: Alecras' Workbench
is this the colour for rlm 02? in the book it says paint cockpit seats rlm 02 grey https://www.emodels.co.uk/humbrol-14ml- ... t-240.html;
-
iggie
- Modelling Gent and Scholar
- Posts: 23438
- Joined: July 31st, 2013, 11:04 am
- Location: North Somercotes, Lincolnshire
- Contact:
Re: Alecras' Workbench
Yep, that's the one
Or just use anything you have that looks similar; no one will know
Or just use anything you have that looks similar; no one will know
Best wishes
Jim
If you can walk away from a landing, it's a good landing. If you use the airplane the next day, it's an outstanding landing
"Never put off till tomorrow, what you can do the day after tomorrow"
Jim
If you can walk away from a landing, it's a good landing. If you use the airplane the next day, it's an outstanding landing
"Never put off till tomorrow, what you can do the day after tomorrow"
-
alecras234
- Active Participant
- Posts: 891
- Joined: May 28th, 2013, 3:52 pm
Re: Alecras' Workbench
what are the revell numbers for RLM 70 Schwartzgrun (Humbrol 241) and RLM 71 Dunkelgrun (Humbrol 242). The underside is likely light blue (Humbrol 65) please
-
DavidWomby

- Modelling Gent and Scholar
- Posts: 11765
- Joined: May 1st, 2011, 8:09 pm
- Location: Florida, USA
Re: Alecras' Workbench
We don't have Revell paints here in the USA, so hopefully somebody from UK or Europe will answer but does this link help? It's a list of all Revell's Aqua colours.
https://www.revell.de/en/products/color ... color.html
I also found these numbers on Britmodeller for Revell paints to use for Luftwaffe colours
RLM 65 Blau = 49 light blue
RLM 70 schwarzgrun = 40 black green
RLM 71 Dunkelgrun = 39 dark green
but really you can use anything that looks close to the colours.
David