Page 1 of 118
Ash's Workbench
Posted: June 3rd, 2013, 5:15 pm
by alecras234
Hi im Ash, im building a mk1 spitfire beginners kit which is going well. i have painted the pilot, put him in and stuck the fuselage together and put the wings on. I'm disabled and have difficulty with my hands, i cant open those little pots of acrylic paint that came with the kit because the lid is on so tight. How can i get around this please, can i unscrew the lid somehow or do i have to pull it open?
Re: Ash's Workbench
Posted: June 3rd, 2013, 5:30 pm
by JamesPerrin
Those tiny pots are difficult enough for those without physical challenges - the paint usual gets splattered everywhere once you manage to pop them open. I would have suggested getting a friend to transfer the paint into some larger screw top jars, however the small mount of paint in those tubs is likely to dry out in anything bigger than a thimble. A small flat head screwdriver inserted under the lid and twisted could work?
You may be best of buying the paint in the normal sized pots if you have a local model shop (LMS) that sells them. I believe the Humbrol Acrylic ones give you the option of a flip lid or turn them upside down and unscrew the bottom.
Re: Ash's Workbench
Posted: June 4th, 2013, 11:30 am
by AndrewR
Hello Ash
I'm sorry for not replying before, but I had to do a couple of experiments to find the best way to open these pots.
I'm assuming here that you have some mobility in both hands, if that's not the case, then let me know what your movement range is like (send me a personal message) and I'll have a rethink.
I'll assume you are right handed for this (I'm a leftie).
Get an ordinary table knife with a reasonably thin blade. No sharp knives or screwdrivers, in case you slip.
Hold the paint pot firmly in the left hand with thumb and forefinger, with the little opening tab pointing outwards away from your hand.
Hold the knife in your right hand gripping it tightly using your fingers, your right thumb needs to be free.
Put the knife blade under the opening tab of the pot, and your right thumb on the top of the pot (this stops the lid flying off

)
Use your fingers to push the knife blade up so the plastic tab starts to bend a little. Your thumb is used to keep the pot stationary. Don't try to lever the top off in one go. If you feel the plastic tab bend slightly, relax again. Keep repeating this until the tab works loose. When I tried it, I took about 5 cycles like this to open the top.
If you need any more help, just ask. I'm in Canada so I'm 5 hours behind UK time.
Cheers
Andrew
First build spitfire mk1
Posted: September 1st, 2013, 11:56 am
by alecras234
Hi all, im Ash and im building my first model aircraft. i've done the build, need to paint it now. i need advice. i glued the undercarriage, its down but when i put the model on a table the undercarriage isn't level, one side is higher than the other. i think i had a build up of glue. i havent glued the wheels on, what can i do so both wheels are level?
Re: First build spitfire mk1
Posted: September 1st, 2013, 3:46 pm
by PaulBradley
What is the difference in height? If it isn't too much - say a mm or so - you can sand a little bit off the bottom of the opposite wheel. If it's more than that, you might consider a small diorama base, where the difference can be put down to 'uneven ground.'
Re: First build spitfire mk1
Posted: September 2nd, 2013, 5:02 am
by fredk
Can you post up a picture? so we can see what the problem looks like.
Re: First build spitfire mk1
Posted: September 2nd, 2013, 5:54 pm
by gomergizmo
Is it possible you put the nose gear in the wing?
Re: First build spitfire mk1
Posted: September 2nd, 2013, 9:10 pm
by Ian
I don't think even I managed to do that, prof!
Re: First build spitfire mk1
Posted: September 3rd, 2013, 12:14 am
by AndrewR
Hi Ash, could you show us a picture?
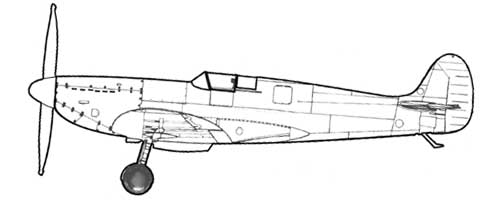
Also look at your model from the side and compare it to this picture.
http://www.3dhistory.co.uk/fact-sheet/i ... ire-01.jpg;
The undercarriage is raked forwards when looked at from the side. Are both set at the correct angles?
Now look at the model from head on and compare to this photo
http://www.spitfiresite.com/photos/hist ... 735768.jpg;
As you can see the undercarriage is very slightly splayed outwards. If this angle is not correct, then reset this angle. This will change the angle when looked at from the side again, so go back and check that again. Eventually you get the correct position.
If the legs are different lengths after all that, then you probably haven't pushed one of the locating pins in far enough. Go easy here, it's easy to break the pin off in the hole!
I hope that helps.
Cheers
Andrew
Re: First build spitfire mk1
Posted: September 3rd, 2013, 6:00 pm
by alecras234
how do i attach photos?
Re: First build spitfire mk1
Posted: September 3rd, 2013, 7:11 pm
by gomergizmo
Re: First build spitfire mk1
Posted: September 3rd, 2013, 7:35 pm
by alecras234
i dont understand. how do i attach from my documents
Re: First build spitfire mk1
Posted: September 3rd, 2013, 9:30 pm
by Ian
You can't. You need to upload them to a photo hosting website first.
Re: First build spitfire mk1
Posted: September 3rd, 2013, 9:32 pm
by AndrewR
alecras234 wrote:i dont understand. how do i attach from my documents
Unfortunately, you can't do it that way. The photos have to go on an image host website, not on this forum.
The forum then looks for them on the image server...
Cheers
Andrew
Re: First build spitfire mk1
Posted: September 3rd, 2013, 9:46 pm
by Ian