Page 42 of 118
Re: Alecras' Workbench
Posted: October 22nd, 2016, 6:21 pm
by alecras234
I attempted to apply decals to my hurricane using humbrol decalfix but i ruined the decals. I applied the first decal fine, the serial number but then i tried putting on the letters on the fuselage. I brushed on the decalfix onto the decal to soften it so it would slide off the backing paper, i waited ages for the decal to loosen, then i applied to the model, as i slide it on the lettering broke and then it got stuck to the decal i previously applied which came off and the two decals were stuck together. I'm obviously doing something wrong with the decalfix, could you give me some help on how to use it please, is brushing it on ok or do i need to submerge the decal in decalfix?
Re: Alecras' Workbench
Posted: October 22nd, 2016, 6:47 pm
by Ratch
For the best results that eliminate silvering, it is advisable that decals are applied to a glossy surface. Matt surfaces are rough and can capture air bubbles between the decal film and the matt surface: It is therefore advisable that any matt surface be changed to gloss. You may well have read that Klear is the recommended medium, another suitable product is Humbrol Gloss Cote and there are others.

My weapon of choice is Klear. I have got away applying a single coat, but three coats are normally recommended to ensure that glossy surface. It may be applied with an airbrush, but I find a good, soft, wide brush adequate. Each coat of Klear takes approximately twenty minutes to dry, so progress on your build will not be delayed too long. Remember to rinse the bristles of the brush in warm, soapy water after applying the Klear.

What tools and equipment? Scissors – you’ll need to cut the individual decals from the backing paper. Dish – most manufacturers recommend warm water to soak the decal in and loosen it from the backing paper. I’m not sure why; although I always start with warm water, after ten minutes or so in the dish, the water is less than tepid and yet the decals still slip off (eventually). Tweezers – to extract the decal (on the backing paper) from the dish and transfer it to the model. Paint brush – to apply Micro Set, position the decal on the model, and apply Micro Sol. Micro Set aids the adherence of the decal to the model and Micro Sol helps the decal conform to any curvature of the surface.

Referring to the instruction sheet, identify the decal and the position on the model where it requires placing. Cut the decal from the sheet and place it in the dish of water. Apply Micro Set to the area on the model where the decal will be positioned. Check the decal for movement on the backing sheet: The backing paper should be thoroughly soaked (no dry spots), be careful not to damage the decal film, use a soft brush to test whether the decal is slippery on the backing sheet. You will find that the decals from some manufacturers loosen from the backing paper much quicker than those of other manufacturers. Indeed, some take an age to loosen; be patient, it will come off in the end! Extract the backing sheet from the dish with the tweezers. Use the brush to slide the decal from the backing sheet onto the model, and then use the bush to position the decal correctly. Repeat as necessary.


When the decals have been positioned for approximately fifteen minutes, Micro Sol can be brushed over the decal(s) to ensure they conform to any curves (complex or simple) on the model.

When thoroughly dry the decals should be sealed under a varnish of your choice (Matt, Satin or Gloss). This will protect the decals from damage. Its as simple as that.

Re: Alecras' Workbench
Posted: October 23rd, 2016, 4:26 am
by Clashcityrocker
Following Ratch's excellent advice, you can't go wrong.
Nigel
Re: Alecras' Workbench
Posted: November 11th, 2016, 4:44 pm
by alecras234
Hi ci'm building a 1:72 Red Arrows Gnat with the undercarriage up, i want to build a stand for it and i'd like it to look like it's taking off on the stand. How do i go about making the stand? i found this,
https://www.amazon.co.uk/Square-Clear-A ... crylic+rod;
Re: Alecras' Workbench
Posted: November 11th, 2016, 5:20 pm
by iggie
I'd suggest going for round perspex rod, 3 or 4mm diameter and then mount the Gnat on that either by drilling a 3 or 4mm hole in the underside and gluing the rod in place at the angle you want, or if you are feeling adventurous, you can heat the rod and bend it, then insert it into the jet pipe.
For both options, choose a nice wooden base (a timber off-cut sanded smooth and varnished (or anything else that takes your fancy) and then drill an appropriate hole in the base for the rod to fit into; cut the rod to the length required before gluing all together!
Funnily enough I am part way through doing the exact same thing

The rod can be got from eBay:
ebay perspex rod
Re: Alecras' Workbench
Posted: December 29th, 2017, 6:46 pm
by alecras234
For weathering my tank I think i'll do a sludge wash. Do i brush the wash on, let it dry then wipe off but not everywhere, so it looks dirty? Afterwards, when i apply a matt coat can i stipple on some soft crayon dust into the matt coat to give more of a rust look?
Re: Alecras' Workbench
Posted: December 29th, 2017, 7:36 pm
by iggie
Yes to both questions!
I would experiment with the crayon dust and matt coat on some spare plastic or an old kit if this will be the first time you try the technique especially to see how long you have to work with the wet matt coat before it dries
Re: Alecras' Workbench
Posted: December 30th, 2017, 9:56 am
by alecras234
is Windsor and Newton Galeria matt varnish ok to use on models?
Re: Alecras' Workbench
Posted: December 30th, 2017, 10:07 am
by iggie
Yes! It works really well and gives a very flat finish with little or no shine at all
Re: Alecras' Workbench
Posted: December 30th, 2017, 9:08 pm
by alecras234
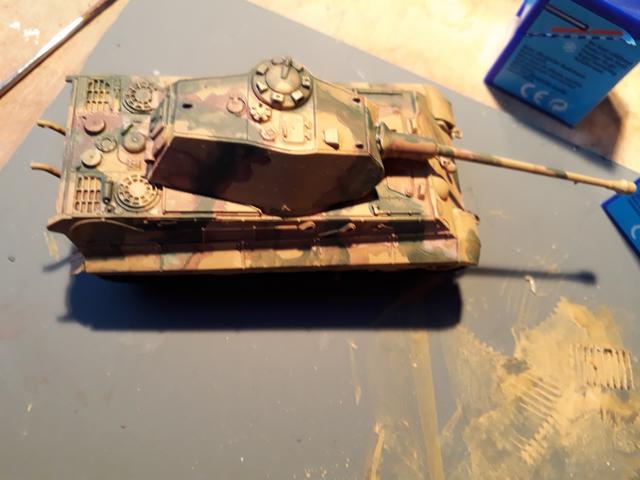
This is how far i've got with my model. I'm going to gloss varnish it before deceling but i haven't got matt varnish, should i not decal until i have matt varnish?
Re: Alecras' Workbench
Posted: December 30th, 2017, 11:25 pm
by iggie
I'd carry on and gloss varnish and apply decals while you wait to get hold of some matt varnish.
Your tank is looking great so far btw!
Re: Alecras' Workbench
Posted: December 31st, 2017, 9:27 am
by alecras234
which matt varnish should i get?
Re: Alecras' Workbench
Posted: December 31st, 2017, 3:07 pm
by alecras234
When i gloss varnish do i gloss the tank tracks aswell, how do i make the tracks look dirty and muddy? Also what matt varnish should i use?
Re: Alecras' Workbench
Posted: December 31st, 2017, 3:48 pm
by iggie
I would gloss varnish everything before weathering, it makes it easier to get a better finish. I've mixed ground up chalk (artists chalks) with thinned pva adhesive or with acrylic varnish to make mud, which can be spread onto tracks and wheels to build up mud.
I use Winsor & Newton Galeria Matt varnish for most of my builds, but any brand will do the job I expect. I have had problems with Humbrol clear and their matt varnishes before so tend to steer clear of them.
Weathering is really a 'suck it and see' operation to be honest, so it's difficult to give definitive guidance; there are lots of books and online sites dedicated to the art which may be worth a look, but use an old model to just get stuck in and see what works for you!
Re: Alecras' Workbench
Posted: January 3rd, 2018, 11:45 am
by alecras234
Would varnishing the rubber tracks ruin them?