Fred's Breakfast Bar

Show us a view of your workbench / work in progress and build reports too.
User avatar
Canuck2016
Active Participant
Posts: 535
Joined: March 6th, 2016, 4:03 pm

Re: Fred's Breakfast Bar

Post by Canuck2016 »

Thank you, ShaunW!

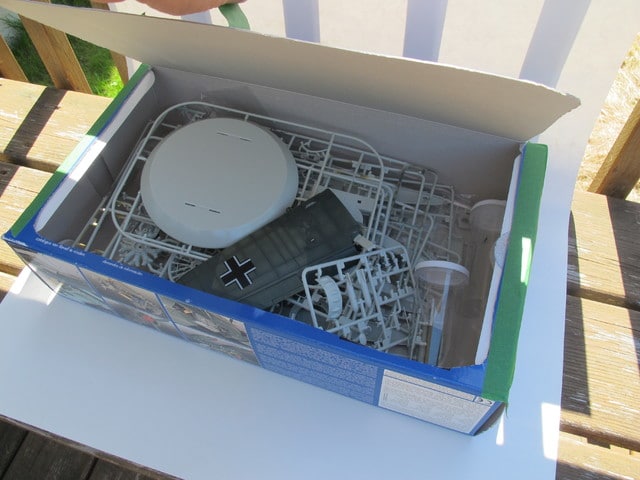
Good day, all. Progress has been slow, although I did finally finish the starboard wing. I won't bother you with photos, as it looks pretty much like the port one. However, I would like to share my idea for improving Revell's much-despised end-opening box. Just tape the ends of the box shut, then cut out three sides of a rectangle on the underside, leaving the fourth side uncut to act as a hinge. A tab of tape gives you a lifting handle, and hey presto, you have a lid! Easier than stuffing all the sprues through the narrow end of the box, and everything is much easier to see. Also, I found I'm less liable to accidentally knock parts off the sprue this way.

Have a great weekend!
Image
User avatar
iggie
Modelling Gent and Scholar
Posts: 23415
Joined: July 31st, 2013, 11:04 am
Location: North Somercotes, Lincolnshire
Contact:

Re: Fred's Breakfast Bar

Post by iggie »

Now that's a good idea!
Best wishes

Jim
If you can walk away from a landing, it's a good landing. If you use the airplane the next day, it's an outstanding landing
"Never put off till tomorrow, what you can do the day after tomorrow"
ShaunW
NOT the sheep
Posts: 26180
Joined: November 26th, 2011, 6:11 pm
Location: Pontefract West Yorkshire

Re: Fred's Breakfast Bar

Post by ShaunW »

iggie wrote:Now that's a good idea!
+1 from me Fred. I'm generally a fan of Revell kits but I bloody hate those end-openers with a passion :evil:
Doing - Tamiya 1/35th Universal Carrier.

Work is the curse of the modelling classes!
IPMS#12300
gbrwn56
The Bug Has Well And Truly Bitten
Posts: 493
Joined: June 5th, 2015, 12:29 am
Location: Livingston, Scotland

Re: Fred's Breakfast Bar

Post by gbrwn56 »

Great work and idea, thanks for sharing.
George B.
User avatar
Canuck2016
Active Participant
Posts: 535
Joined: March 6th, 2016, 4:03 pm

Re: Fred's Breakfast Bar

Post by Canuck2016 »

Hello all, and happy Canada Day weekend (as appropriate)!

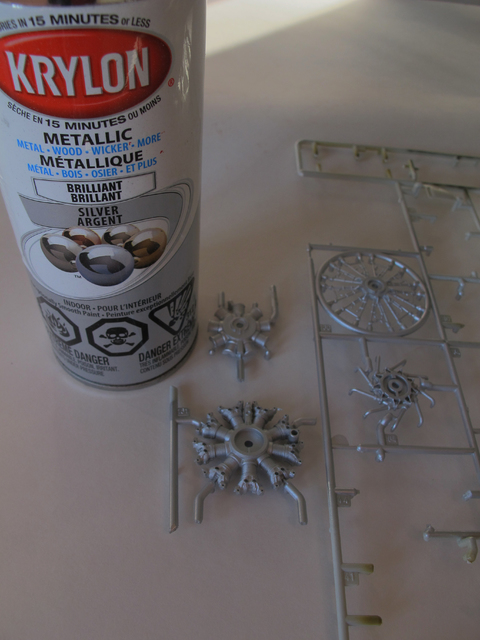
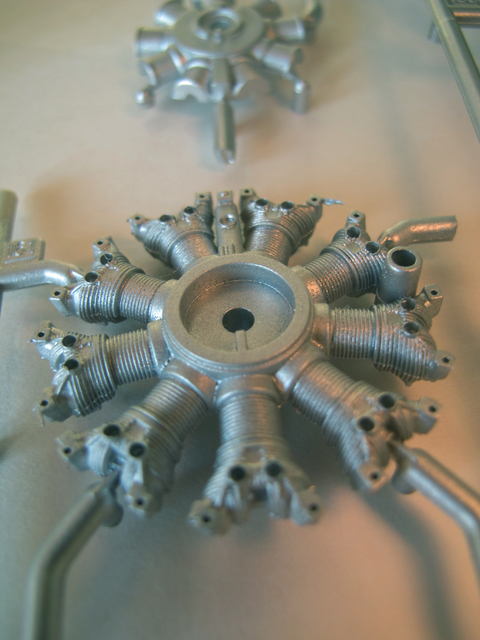
It's been a busy time lately, but I finally got back to the "work" bench, and started on the Arado's engine. I started by spraying it with Krylon metallic "Brilliant Silver", which is supposed to give a chrome-like finish. This has worked very well in the past, but this time it turned out very dull, with a finish like brushed aluminium. Almost plain white, actually. :sad: I don't understand it, but it was very hot and humid yesterday, so maybe that has something to do with it.

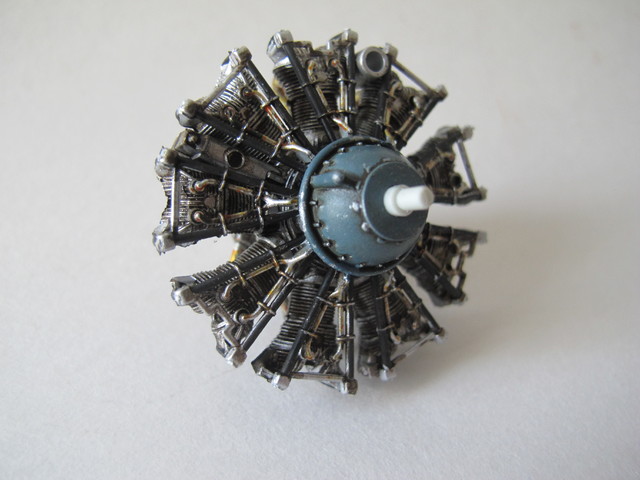
I painted the other parts in accordance with the instructions, then coated it with a thin wash of dark brown artist's oil paint. This settled into the cooling fins and other recesses very nicely. Revell really has done a very good job moulding this kit.

Exhausts go on next, then the engine gets attached to the fuselage. Nice to finally be moving forward on this build again!
Image

Image

Image
ShaunW
NOT the sheep
Posts: 26180
Joined: November 26th, 2011, 6:11 pm
Location: Pontefract West Yorkshire

Re: Fred's Breakfast Bar

Post by ShaunW »

Blimey, Fred, that is some engine! fantastic work. Hope you are enjoying a good Canada Day weekend over there. My wife and I visited Canada in the late 90's and enjoyed it very much.
Doing - Tamiya 1/35th Universal Carrier.

Work is the curse of the modelling classes!
IPMS#12300
User avatar
iggie
Modelling Gent and Scholar
Posts: 23415
Joined: July 31st, 2013, 11:04 am
Location: North Somercotes, Lincolnshire
Contact:

Re: Fred's Breakfast Bar

Post by iggie »

+1 on the engine; that is a work of art and no mistake!
Best wishes

Jim
If you can walk away from a landing, it's a good landing. If you use the airplane the next day, it's an outstanding landing
"Never put off till tomorrow, what you can do the day after tomorrow"
User avatar
Canuck2016
Active Participant
Posts: 535
Joined: March 6th, 2016, 4:03 pm

Re: Fred's Breakfast Bar

Post by Canuck2016 »

Thank you Shaun W and Iggie! Shaun, I'm very glad to hear you enjoyed your visit to Canada. It's very pleasant here now, after a rather long, cool spring!

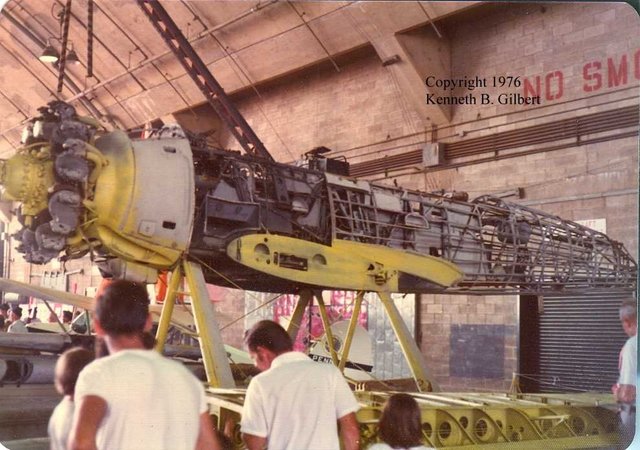
This may be of interest to some. Too late, but I found this photo of an Arado 196 with its skin off. Looking at this, you can see the longerons which gave the fabric part of the fuselage its shape. They run outboard of the cockpit frame, so I think my attempt with the styrene strips earlier was reasonably close to the mark. However, there are also some pretty prominent formers running transversely every couple of feet, and I missed these completely. Oh well, you win some, you lose some! :)

Image
ShaunW
NOT the sheep
Posts: 26180
Joined: November 26th, 2011, 6:11 pm
Location: Pontefract West Yorkshire

Re: Fred's Breakfast Bar

Post by ShaunW »

That's a handy under the skin photo of the Arado, Fred. Isn't it always the case though? add what you think is the right detail and once you've finished, along comes a photo to prove otherwise :roll: :ha:
Doing - Tamiya 1/35th Universal Carrier.

Work is the curse of the modelling classes!
IPMS#12300
User avatar
Canuck2016
Active Participant
Posts: 535
Joined: March 6th, 2016, 4:03 pm

Re: Fred's Breakfast Bar

Post by Canuck2016 »

ShaunW wrote:That's a handy under the skin photo of the Arado, Fred. Isn't it always the case though? add what you think is the right detail and once you've finished, along comes a photo to prove otherwise :roll: :ha:
Too true! It never fails! ;-)
dollar19
Modelling Gent and Scholar
Posts: 1342
Joined: May 1st, 2011, 1:11 am
Location: Bristol, Va. USA

Re: Fred's Breakfast Bar

Post by dollar19 »

Nice photo.
User avatar
Canuck2016
Active Participant
Posts: 535
Joined: March 6th, 2016, 4:03 pm

Re: Fred's Breakfast Bar

Post by Canuck2016 »

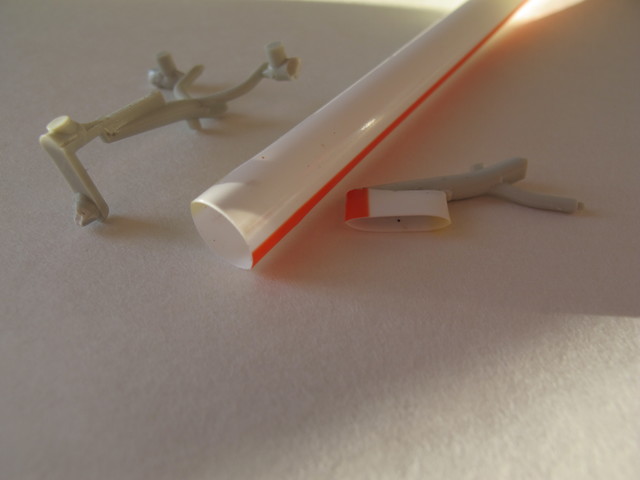
Baby steps on the Arado. The real plane had exhausts which ended as narrow slits, and these are moulded as solid blocks on the kit. I tried to hollow the ends out with a drill and a scribing tool, but the parts were too tiny for my ham-fisted attempts, and it ended in failure. Finally I cut a short section from a plastic drinking straw, squashed it into a narrow elliptical shape, and glued it onto the end of the kit part. This leaves a bit of a step where the straw meets the part, but since the exhausts are semi-recessed into the fuselage, I think this will be hidden on the completed model. It certainly doesn't look good now, but I'm hoping it will look OK under some paint. If not, I can just pop it off, and paint the end of the kit part black. On the left of the photo you can see the part for the other exhaust, with its solid end.
Image
User avatar
PGAS
Active Participant
Posts: 826
Joined: December 17th, 2015, 2:37 am
Location: Ontario, Canada

Re: Fred's Breakfast Bar

Post by PGAS »

Cool work on the exhausts Fred. I think they will look fine under a coat of paint. Also, I really like your work on the engine. Very sweet! See you in a couple days.
Paul

This is it. The moment we should have trained for.
User avatar
Canuck2016
Active Participant
Posts: 535
Joined: March 6th, 2016, 4:03 pm

Re: Fred's Breakfast Bar

Post by Canuck2016 »

PGAS wrote:Cool work on the exhausts Fred. I think they will look fine under a coat of paint. Also, I really like your work on the engine. Very sweet! See you in a couple days.
Thanks Paul! Let me know when you'll get here!
User avatar
Canuck2016
Active Participant
Posts: 535
Joined: March 6th, 2016, 4:03 pm

Re: Fred's Breakfast Bar

Post by Canuck2016 »

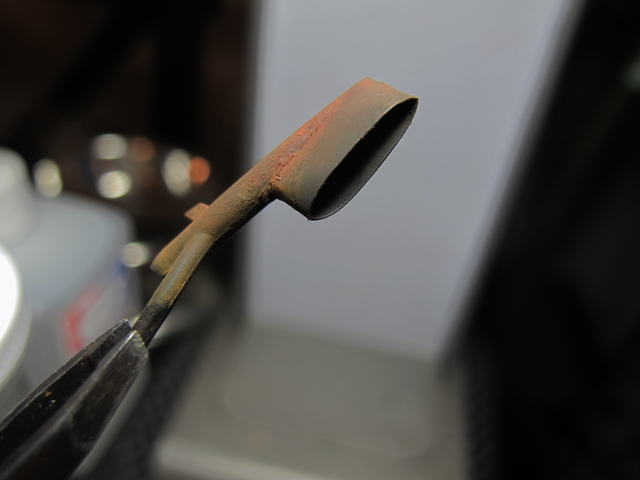
Good day all! Here's the exhaust after a coat of matte black paint and a dusting of rust-coloured pigments. Even though the shape may not be quite right, I still think it this looks better than the solid, closed-off end, and it's certainly better than my poor attempt to hollow out the kit part. Anyhow, I'll try the same thing on the other side and see how it goes.

Have a great weekend!
Image
Post Reply

Return to “Workbench Window”