David's Dithering Desk - Southern Edition
-
iggie

- Modelling Gent and Scholar
- Posts: 23437
- Joined: July 31st, 2013, 11:04 am
- Location: North Somercotes, Lincolnshire
- Contact:
Re: David's Desk
Tamiya white tape? It's a bit thick, but does conform to compound curves very well....
Best wishes
Jim
If you can walk away from a landing, it's a good landing. If you use the airplane the next day, it's an outstanding landing
"Never put off till tomorrow, what you can do the day after tomorrow"
Jim
If you can walk away from a landing, it's a good landing. If you use the airplane the next day, it's an outstanding landing
"Never put off till tomorrow, what you can do the day after tomorrow"
-
DavidWomby

- Modelling Gent and Scholar
- Posts: 11760
- Joined: May 1st, 2011, 8:09 pm
- Location: Florida, USA
Re: David's Desk
Yes, great minds, etc. because I was just looking at that, Iggie. Thanks. It's way too wide too but I thought I might be able to cut narrower strips.
David
David
-
DavidWomby
- Modelling Gent and Scholar
- Posts: 11760
- Joined: May 1st, 2011, 8:09 pm
- Location: Florida, USA
Re: David's Desk
Another thought is lots and lots of tiny lengths of decal - 1-2mm long each.
Time to go experiment a bit more (now that I have calmed down from my last decalling attempt!!!!)
David
Time to go experiment a bit more (now that I have calmed down from my last decalling attempt!!!!)
David
-
DavidWomby
- Modelling Gent and Scholar
- Posts: 11760
- Joined: May 1st, 2011, 8:09 pm
- Location: Florida, USA
Re: David's Desk
I couldn't get the Tamiya white tape thin enough without it breaking when stretching round the curve. So I ended up using rubdown white stripe (like Letraset) and applied it in small 2mm lengths around the curved area. It was really hard to get the stripes to stay where I wanted them while rubbing them down and looked pretty awful.
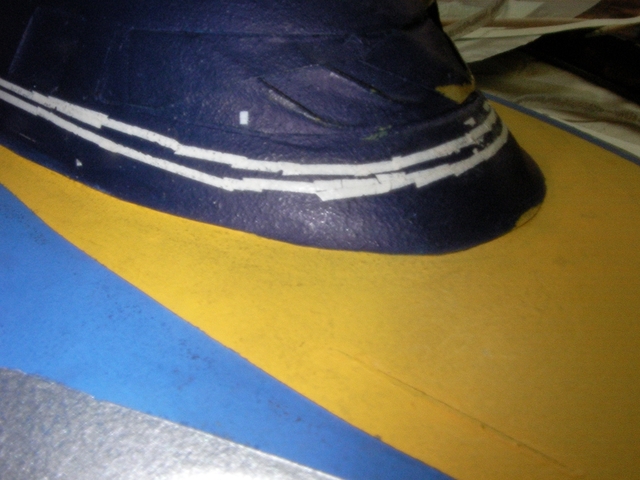
I've spent ages touching up white and dark blue using a brush with about 2 bristles but I don't think any more touching up will help. It's still far from perfect (lines not totally parallel and or varying width in places) but this will have to do.

David
I've spent ages touching up white and dark blue using a brush with about 2 bristles but I don't think any more touching up will help. It's still far from perfect (lines not totally parallel and or varying width in places) but this will have to do.
David
-
SJPONeill

- Modelling Gent and Scholar
- Posts: 3525
- Joined: May 1st, 2011, 12:01 am
- Location: Near the Spiral, NZ.
- Contact:
Re: David's Desk
Would you be able to trace the curve and then lay it flat so that you could either make a mask or cut the decal from white decal sheet to fit? You would need a steady hand and probably parallel cutters to get a consistent line...then again the problem area us only that beneath the front curve of the windscreen so you'd probably be OK with straight decal strip running from the curve back down the hull...
Another approach might be to use a contour gauge to measure the curve on the upper and lower edges of the curve to make a cutting guide to cut a mask I.e. horizontal guides that fits along the upper and lower edges of the stripe...?
Another approach might be to use a contour gauge to measure the curve on the upper and lower edges of the curve to make a cutting guide to cut a mask I.e. horizontal guides that fits along the upper and lower edges of the stripe...?
Please critique my posts honestly i.e. say what you think so I can learn and improve...
The World According To Me
The World According To Me
-
ShaunW
- NOT the sheep
- Posts: 26188
- Joined: November 26th, 2011, 6:11 pm
- Location: Pontefract West Yorkshire
Re: David's Desk
IMHO that type of fine stripe is one of modelling's more difficult challenges and I've tried to mask and paint thin lines like that with poor success. In the event that you decide to repaint that section I'm afraid that I can't offer any tips for that type of striping other than the hope that you might be able to locate some suitable aftermarket stripes. Overall, it's still a good looking model!
Doing - Tamiya 1/35th Universal Carrier.
Work is the curse of the modelling classes!
IPMS#12300
Work is the curse of the modelling classes!
IPMS#12300
-
DavidWomby
- Modelling Gent and Scholar
- Posts: 11760
- Joined: May 1st, 2011, 8:09 pm
- Location: Florida, USA
Re: David's Desk
Thank you. Excellent suggestion but in practice ('cos I did just try it), my hands don't seem able to hold the paper still enough to get the curve right. It may be OK if it's only 'close' to right since the decals would be a bit malleable. However, I think I'll leave this one as it is because I think that if I strip that area, or overpaint it, I will probably not produce a good result.SJPONeill wrote:Would you be able to trace the curve and then lay it flat so that you could either make a mask or cut the decal from white decal sheet to fit? You would need a steady hand and probably parallel cutters to get a consistent line...then again the problem area us only that beneath the front curve of the windscreen so you'd probably be OK with straight decal strip running from the curve back down the hull...
Another approach might be to use a contour gauge to measure the curve on the upper and lower edges of the curve to make a cutting guide to cut a mask I.e. horizontal guides that fits along the upper and lower edges of the stripe...?
I will bear your suggestions in mind when I have to deal with the same pinstripes on the Comet Stingray vacform I have in the stash. In fact, this Lee one was originally just going to be chucked together until I had learned enough about vacs to tackle the Comet one!!!!
David
-
DavidWomby
- Modelling Gent and Scholar
- Posts: 11760
- Joined: May 1st, 2011, 8:09 pm
- Location: Florida, USA
Re: David's Desk
I agree -these were a real challenge and I think I'll leave it as it is because if I strip that area, or overpaint it, I will probably make an even worse mess. The white stripes are decals stripes with some touchups and are OK except they dip a bit too low below the port side of the windscreen but from most angles it doesn't show.ShaunW wrote:IMHO that type of fine stripe is one of modelling's more difficult challenges and I've tried to mask and paint thin lines like that with poor success. In the event that you decide to repaint that section I'm afraid that I can't offer any tips for that type of striping other than the hope that you might be able to locate some suitable aftermarket stripes. Overall, it's still a good looking model!
Frankly there's some rough bits elsewhere on the model too and I am beginning to rationalize it as I am building Stingray showing sloppy repaints by field repair teams rather than pristine from the builder's yard!!!!
David
-
DavidWomby
- Modelling Gent and Scholar
- Posts: 11760
- Joined: May 1st, 2011, 8:09 pm
- Location: Florida, USA
Re: David's Desk
Slowly progressing on Stingray. Today I painted the large dark blue oval underneath and then, literally, put the skids under her.
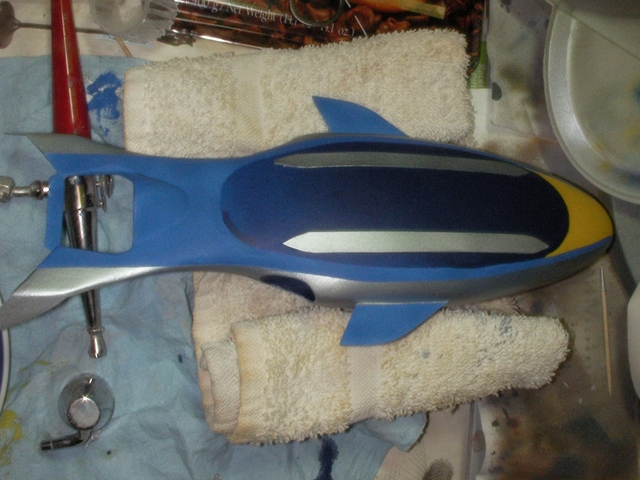
They are strips of plastic card cut to shape and painted and they conform quite well to the double curvature of the hull bottom by tacking them down with CA in the middle and at each end of the skid.
I leave on vacation on Sunday for several weeks. I hope to get her finished before I go.............
David
-
ShaunW
- NOT the sheep
- Posts: 26188
- Joined: November 26th, 2011, 6:11 pm
- Location: Pontefract West Yorkshire
Re: David's Desk
Nice looking underside to Stingray David and hopefully you will be able to finish her up before your vacation.
Doing - Tamiya 1/35th Universal Carrier.
Work is the curse of the modelling classes!
IPMS#12300
Work is the curse of the modelling classes!
IPMS#12300
-
DavidWomby
- Modelling Gent and Scholar
- Posts: 11760
- Joined: May 1st, 2011, 8:09 pm
- Location: Florida, USA
Re: David's Desk
Sorry, Shaun, it's not to be. Too much real life (work yesterday) got in the way. There'll be no more progress on Stingray or the Flipper until I am back in late August.....
David
David
-
DavidWomby
- Modelling Gent and Scholar
- Posts: 11760
- Joined: May 1st, 2011, 8:09 pm
- Location: Florida, USA
Re: David's Desk
Well, I've been home almost 2 weeks now and had no urge to model until today. Stingray is held up for lack of suitable white decals lettering but that is en route from UK. So I decided to try get the Flipper finished but it didn't go well.
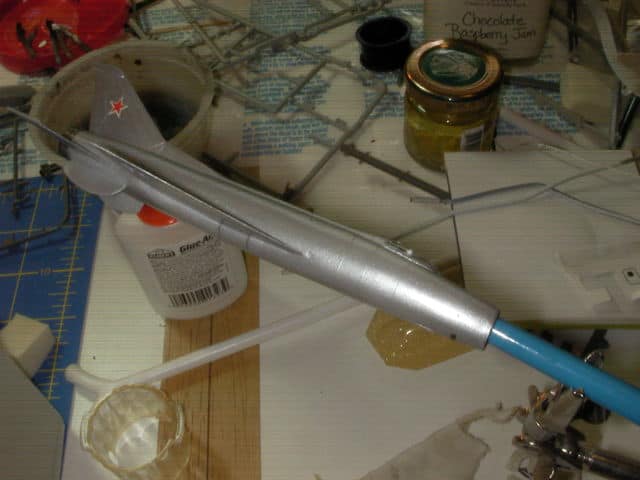
Frankly, I shouldn't have modelled with so little mojo. I'm not very happy with the Flipper. I drew the main UC doors on with a pencil and they are a bit rough but then so is the rest of this build. The ARII decals had been very yellowed but a month in the Florida sun did wonders. Unfortunately, they were VERY reluctant to leave the backing paper and I messed up two of them. I managed to touch up one and replaced the other with one from another unbuilt Flipper. Then to add to the problems, my nice green decal band around the nose detached almost completely when I brushed the model with Future. So here it is while the Future dries and I ponder making another strip of green decal for the nose band.
I really wanted to clear the desk to be ready for the Whatif GB but now it looks like I may be away from home again and have to pull out of that
David
-
DavidWomby
- Modelling Gent and Scholar
- Posts: 11760
- Joined: May 1st, 2011, 8:09 pm
- Location: Florida, USA
Re: David's Desk
Well, for better or worse, I'm declaring the Flipper done.

There's a few more pics here: http://uamf.org.uk/viewtopic.php?f=19&t=14321.
Now Stingray is alone on the bench. There's a few small things I can do to her while I wait for the decals.
David
There's a few more pics here: http://uamf.org.uk/viewtopic.php?f=19&t=14321.
Now Stingray is alone on the bench. There's a few small things I can do to her while I wait for the decals.
David
-
Dazzled

- Modelling Gent and Scholar
- Posts: 9592
- Joined: October 1st, 2011, 11:08 pm
- Location: Mid Glamorgan, South Wales
- Contact:
Re: David's Desk
Just a thought David but have you tried using "nail art tape". It's thin, flexible and cheaply available in a variety of colours on eBay. You could make stripes with it and then seal it in with varnish.
COLD WAR S.I.G. LEADER
Wherever there's danger, wherever there's trouble, wherever there's important work to be done....I'll be somewhere else building a model!
Wherever there's danger, wherever there's trouble, wherever there's important work to be done....I'll be somewhere else building a model!
-
DavidWomby
- Modelling Gent and Scholar
- Posts: 11760
- Joined: May 1st, 2011, 8:09 pm
- Location: Florida, USA
Re: David's Desk
Sounds worth a try. Thanks for the tip.Dazzled wrote:Just a thought David but have you tried using "nail art tape". It's thin, flexible and cheaply available in a variety of colours on eBay. You could make stripes with it and then seal it in with varnish.
David