TeeELLs kitchen crafting kit creations
-
ShaunW
- NOT the sheep
- Posts: 26188
- Joined: November 26th, 2011, 6:11 pm
- Location: Pontefract West Yorkshire
Re: TeeELLs kitchen crafting
This is great, it really is. I love to see someone re-working and detailing classic old kits like this with a bit of proper scratch building - a man after my own heart!
Doing - Tamiya 1/35th Universal Carrier.
Work is the curse of the modelling classes!
IPMS#12300
Work is the curse of the modelling classes!
IPMS#12300
-
TeeELL

- Modelling Gent and Scholar
- Posts: 11616
- Joined: December 28th, 2015, 4:38 pm
- Location: North Wiltshire
Re: TeeELLs kitchen crafting
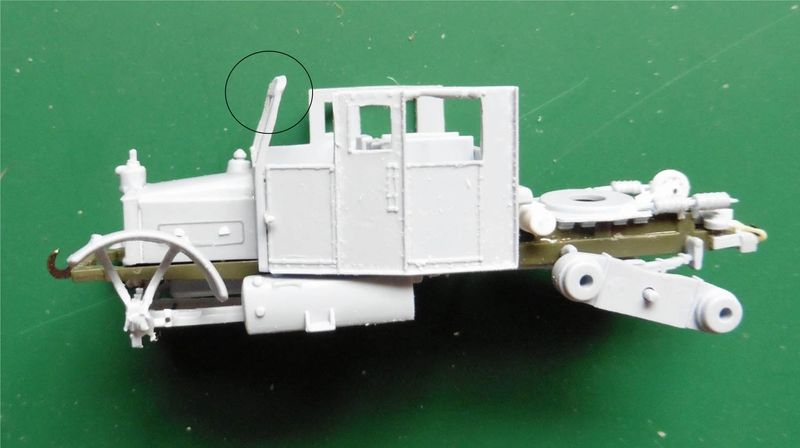
Well Shaun, standby for a bit more. I was informed that he front half of the cab roof is incorrect and the top board is higher and flatter than that on the Aifix kit. Having looked at photos, now that I know, it is quite obvious.
I have some photos but I cannot access Photobucket at present.
I have some photos but I cannot access Photobucket at present.
Tony
The older I get the better I was!
Current build:
Airfix 1:72 Javelin FAW9
Particular modelling interests:
Cuban Airforce aircraft, 29(F) Sqn aircraft, Aircraft I’ve flown
The older I get the better I was!
Current build:
Airfix 1:72 Javelin FAW9
Particular modelling interests:
Cuban Airforce aircraft, 29(F) Sqn aircraft, Aircraft I’ve flown
-
Stuart

- Raider of the Lost Ark Royal
- Posts: 19449
- Joined: February 25th, 2013, 4:55 pm
- Location: North Wales
- Contact:
Re: TeeELLs kitchen crafting
TeeELL wrote:
.
Stuart Templeton I may not be good but I'm slow...
My Blog: https://stuartsscalemodels.blogspot.com/
My Blog: https://stuartsscalemodels.blogspot.com/
-
TeeELL
- Modelling Gent and Scholar
- Posts: 11616
- Joined: December 28th, 2015, 4:38 pm
- Location: North Wiltshire
Re: TeeELLs kitchen crafting
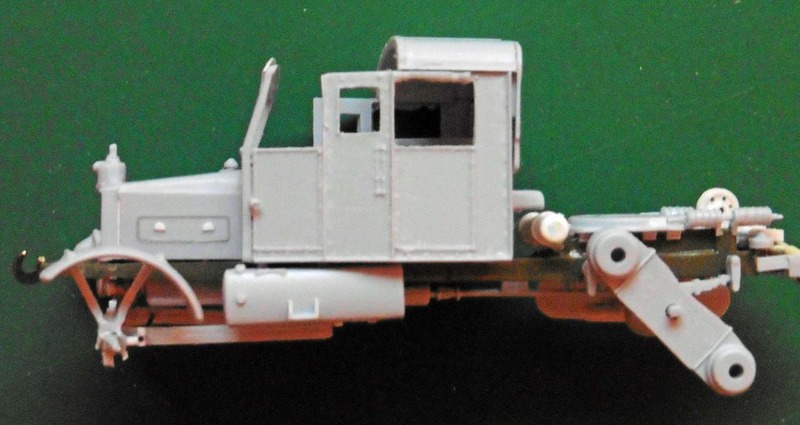
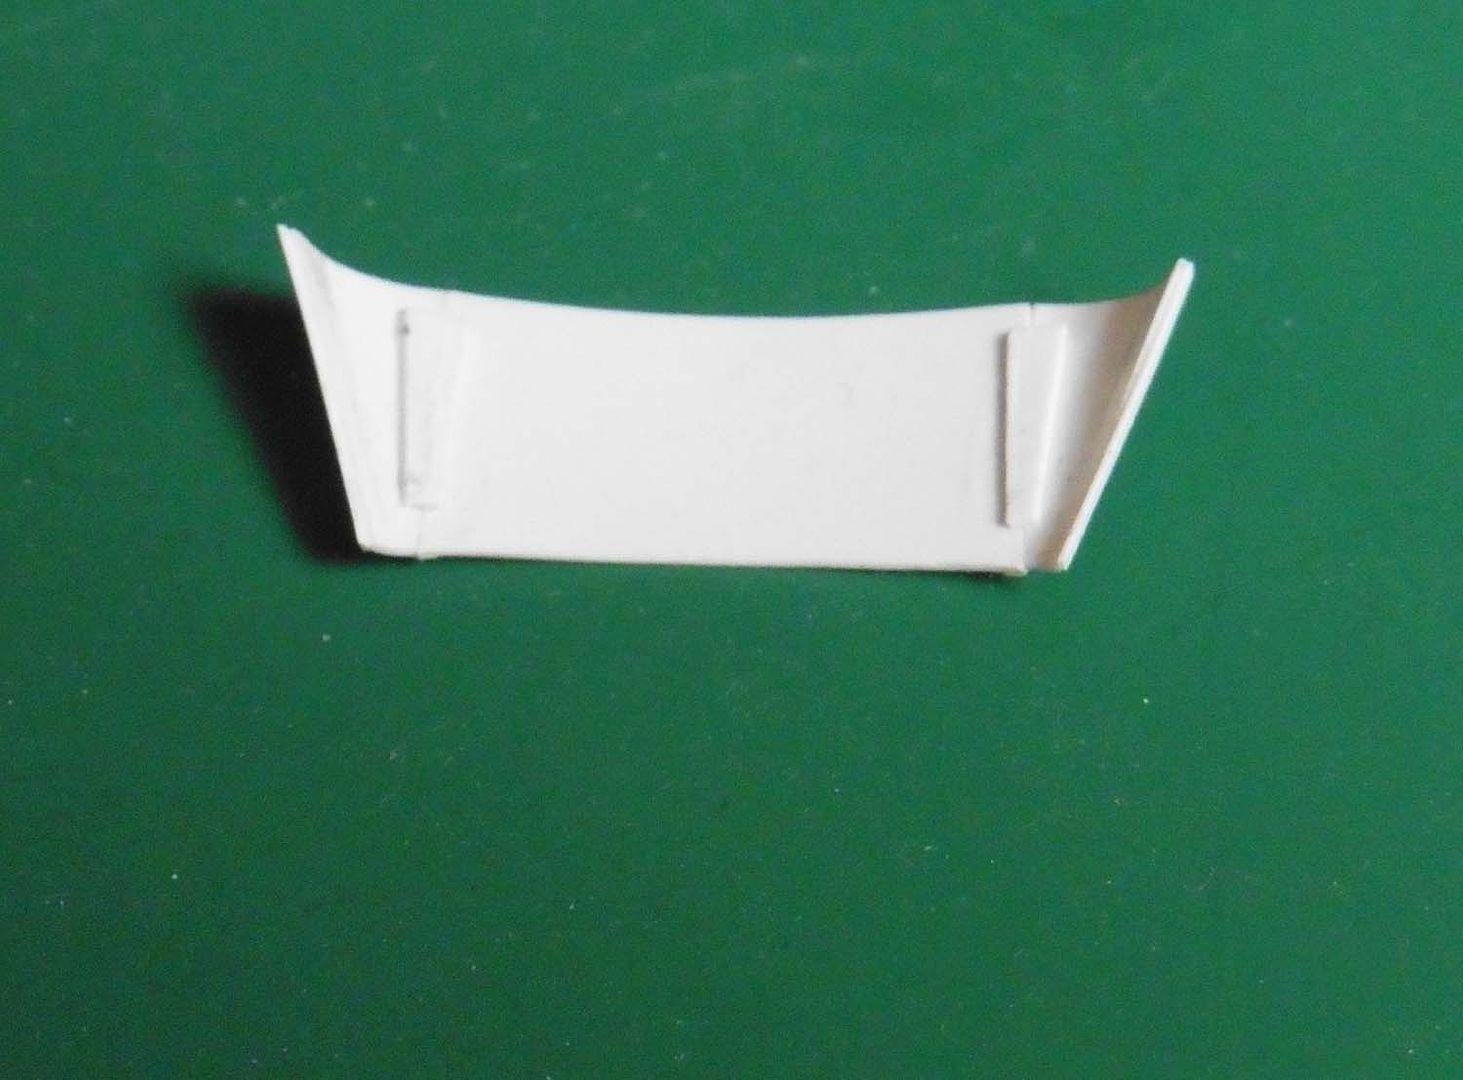
The original Airfix top board has been filed back to flat so that I can fit the new correctly shaped part. (Getting that sorted was a challenge in itself!)

Here is a view of the cab with the modified top board
The difference is more obvious from inside
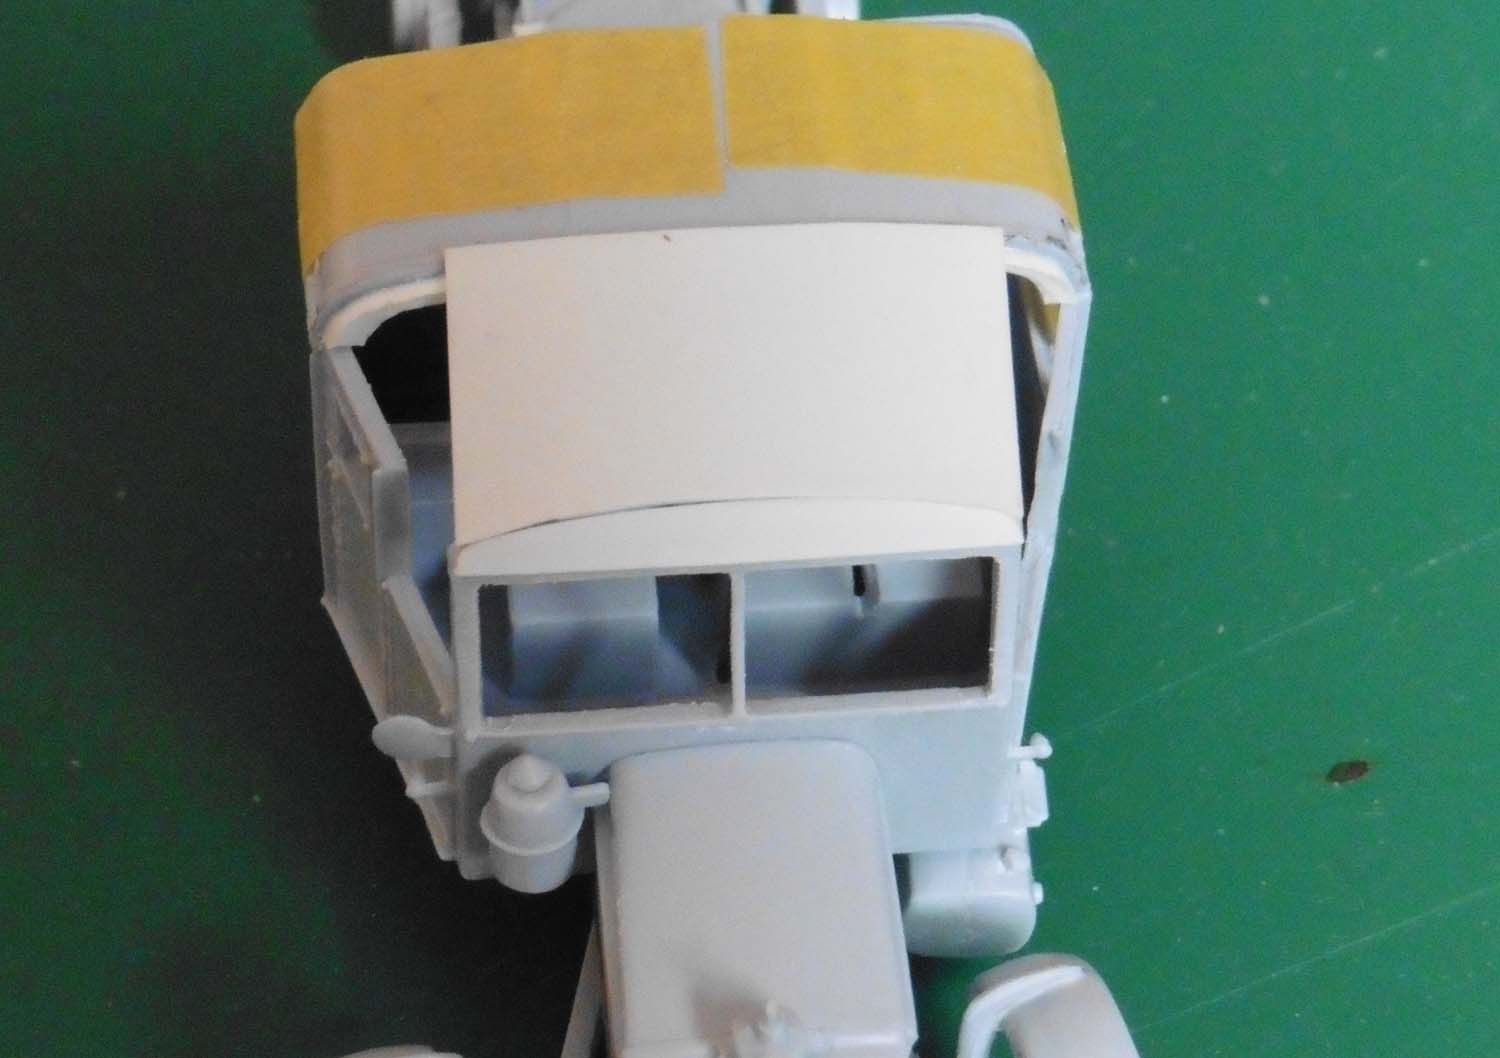
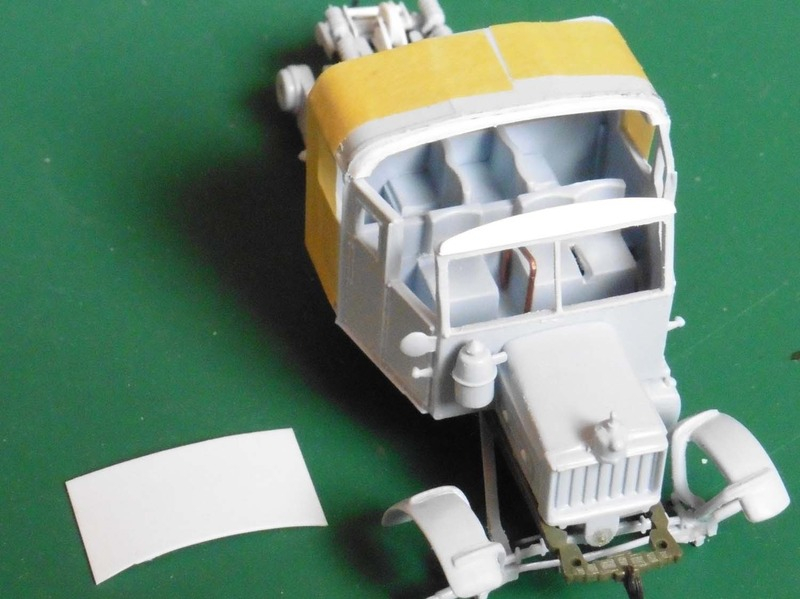
Careful application of a razor saw removed the front half of the cab roof
I have started on the 'easy' centre section of the roof, I've created a styrene 'shelf' that is cemented to the rear part of the roof and this will support and shape the new section.
A bit of head scratching going on to determive how to do the 2side panels, which are quarter cone shapes in essence.


Here is a view of the cab with the modified top board
The difference is more obvious from inside
Careful application of a razor saw removed the front half of the cab roof
I have started on the 'easy' centre section of the roof, I've created a styrene 'shelf' that is cemented to the rear part of the roof and this will support and shape the new section.
A bit of head scratching going on to determive how to do the 2side panels, which are quarter cone shapes in essence.
Tony
The older I get the better I was!
Current build:
Airfix 1:72 Javelin FAW9
Particular modelling interests:
Cuban Airforce aircraft, 29(F) Sqn aircraft, Aircraft I’ve flown
The older I get the better I was!
Current build:
Airfix 1:72 Javelin FAW9
Particular modelling interests:
Cuban Airforce aircraft, 29(F) Sqn aircraft, Aircraft I’ve flown
-
TeeELL
- Modelling Gent and Scholar
- Posts: 11616
- Joined: December 28th, 2015, 4:38 pm
- Location: North Wiltshire
Re: TeeELLs kitchen crafting
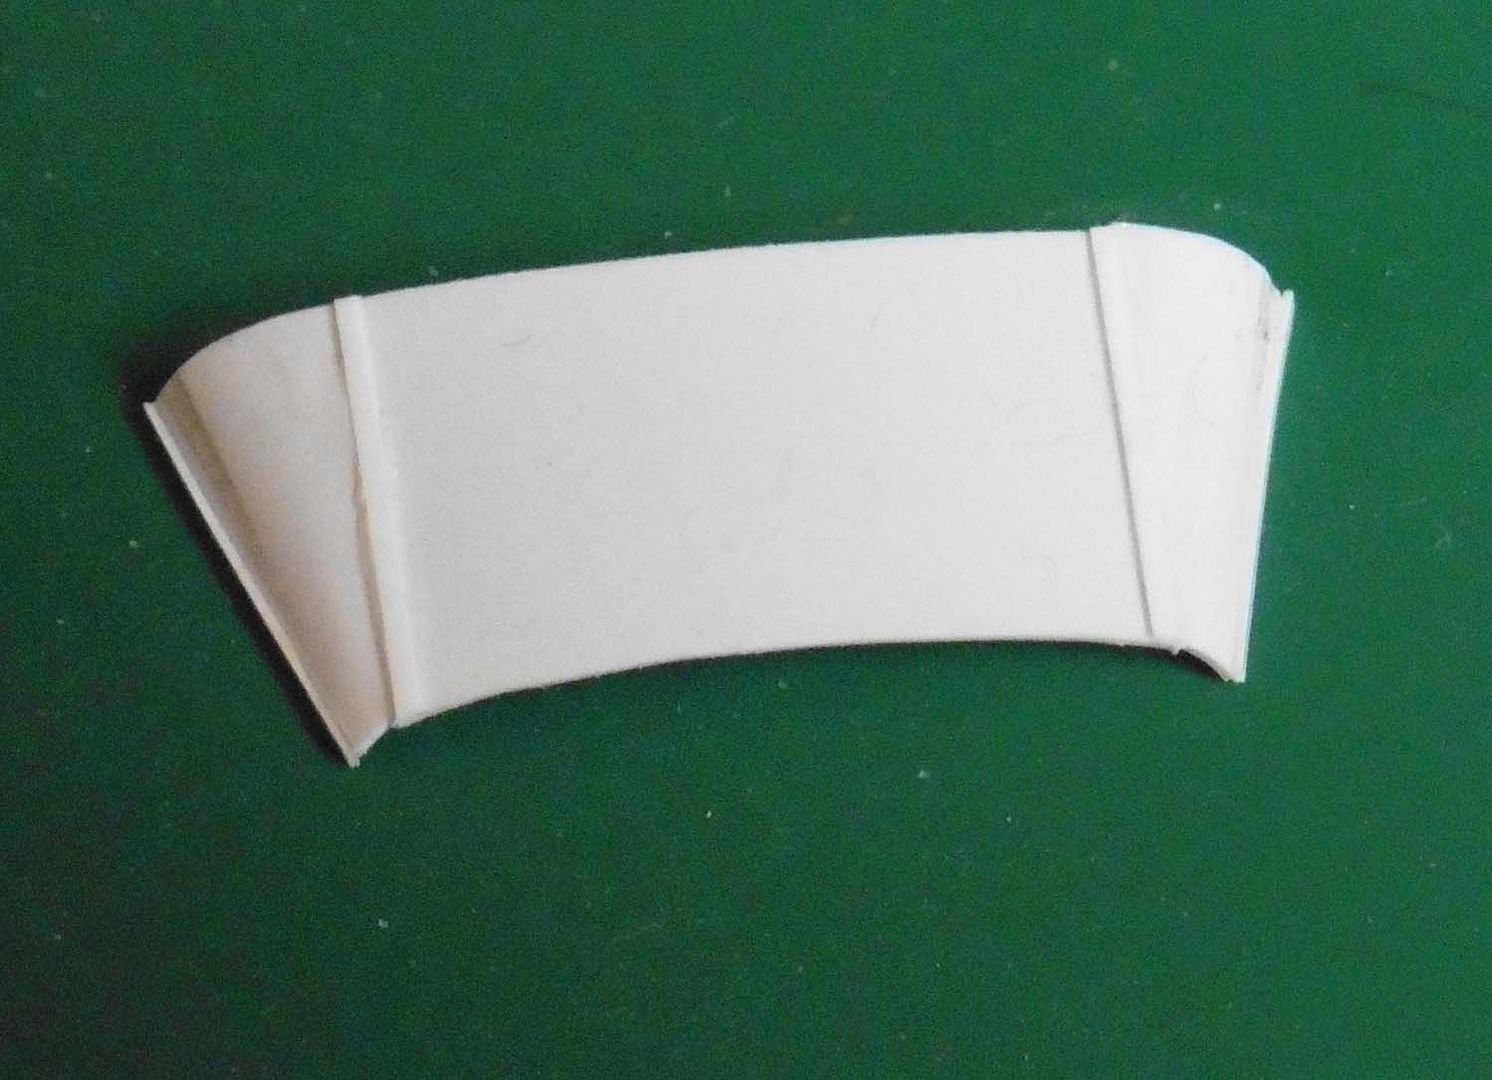
The replacement roof centre panel has been cut, shaped and given a curve. Although slightly more curved than required, I thought it would be easier to remove the excess curve when cementing in place than trying to introduce it. You can see the support section, for the rear of the replacement panel, on the front of the original roof section.

With the panel in place a slight skew can be seen, the panel was square so the model must be slightly out of true. Fortunately I have a little spare material in the panel so I can correct that.
Once that is trued up I shall have a go at the corner sections. Either using the same method - if I had a tapered 'something' to form it around ........? or by shaping from a solid.
Tony
The older I get the better I was!
Current build:
Airfix 1:72 Javelin FAW9
Particular modelling interests:
Cuban Airforce aircraft, 29(F) Sqn aircraft, Aircraft I’ve flown
The older I get the better I was!
Current build:
Airfix 1:72 Javelin FAW9
Particular modelling interests:
Cuban Airforce aircraft, 29(F) Sqn aircraft, Aircraft I’ve flown
-
TeeELL
- Modelling Gent and Scholar
- Posts: 11616
- Joined: December 28th, 2015, 4:38 pm
- Location: North Wiltshire
Re: TeeELLs kitchen crafting
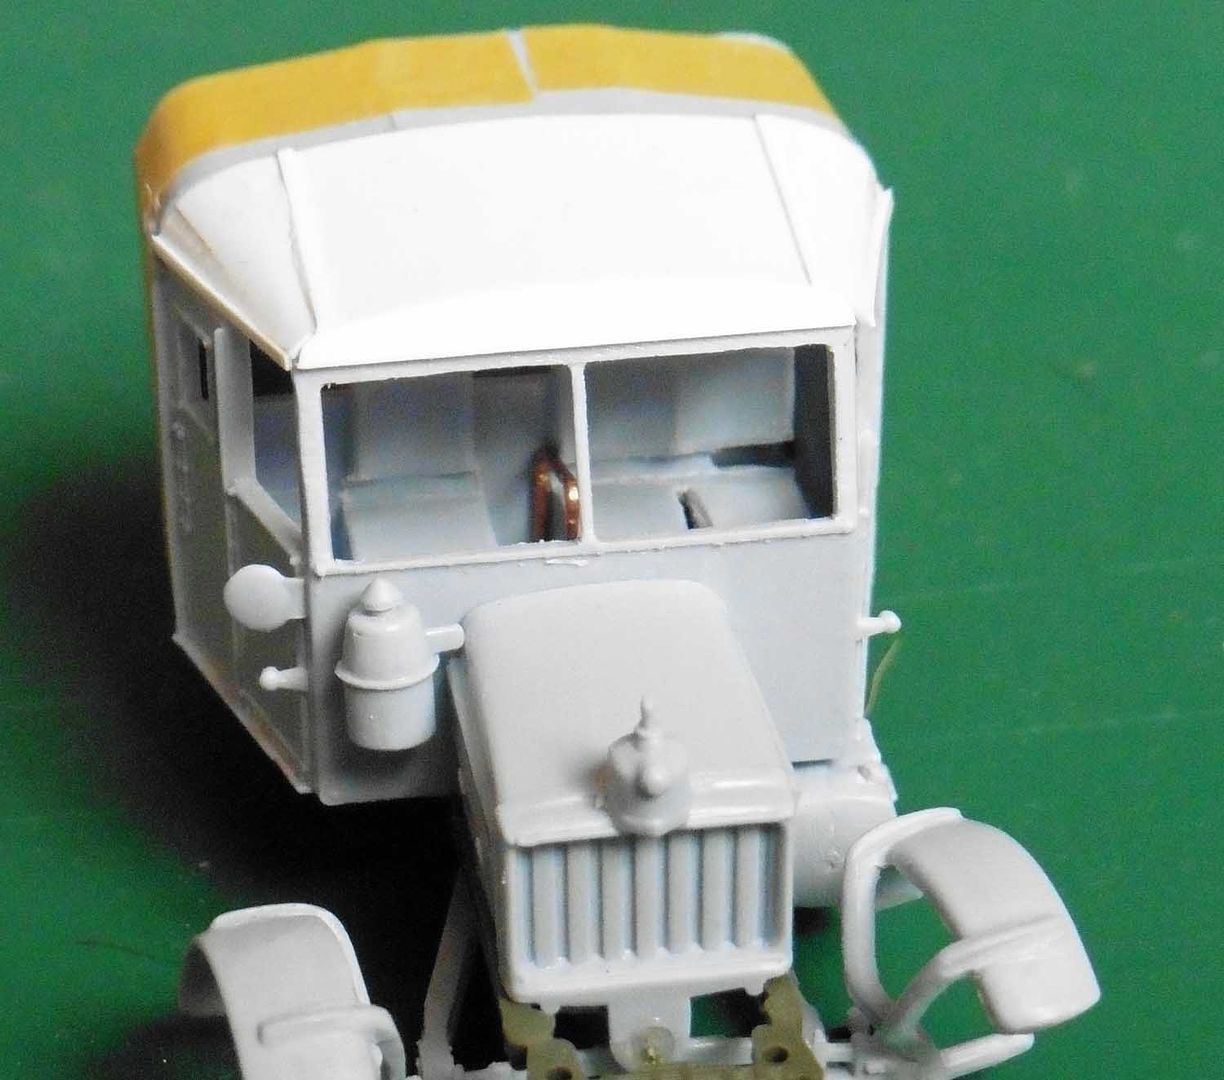
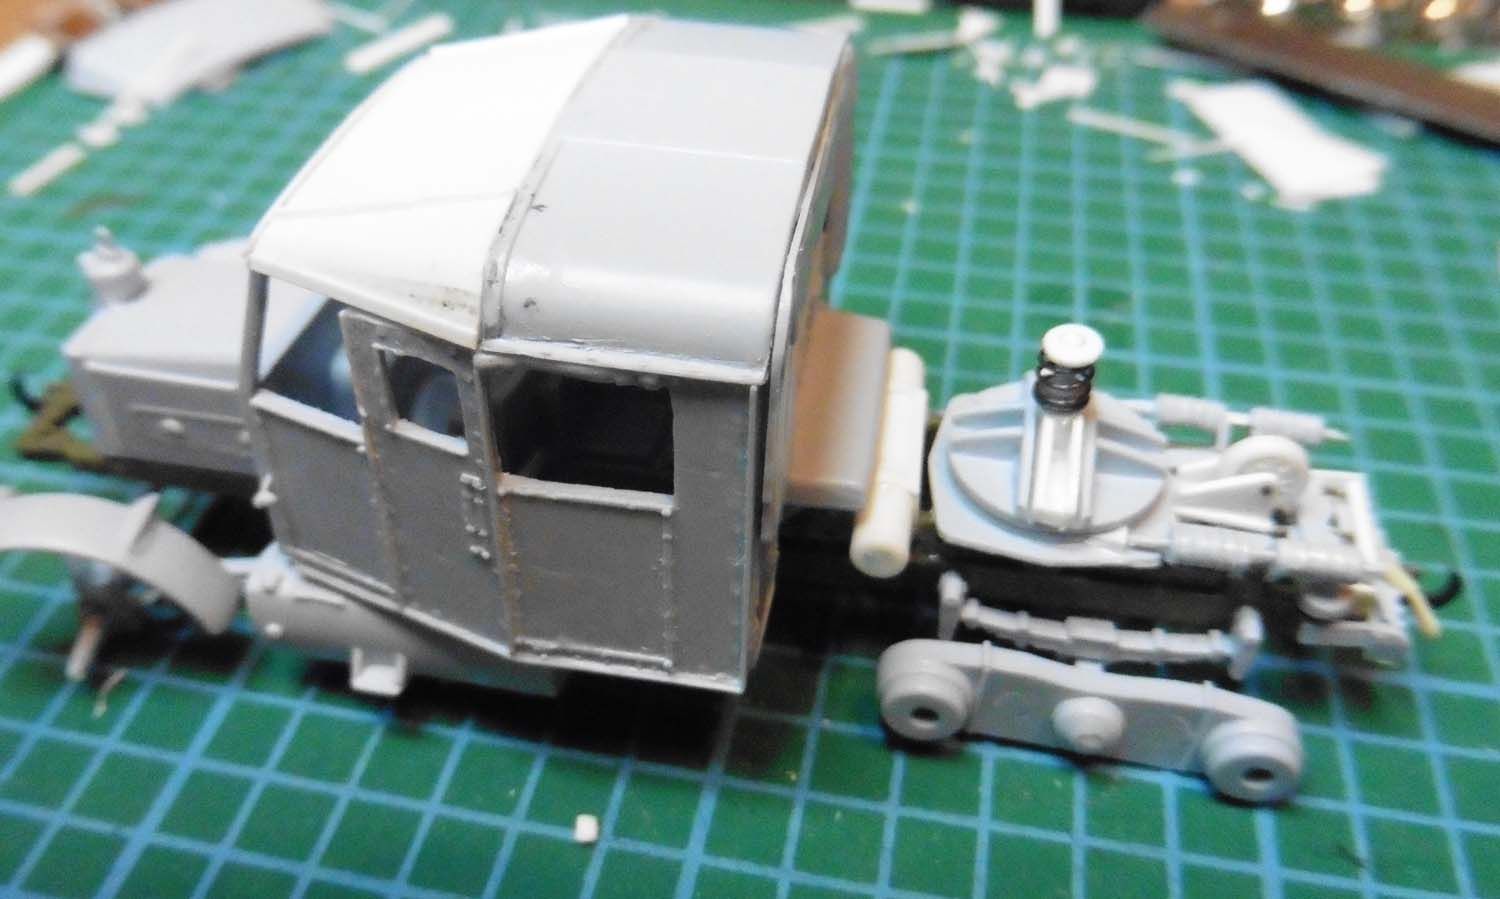
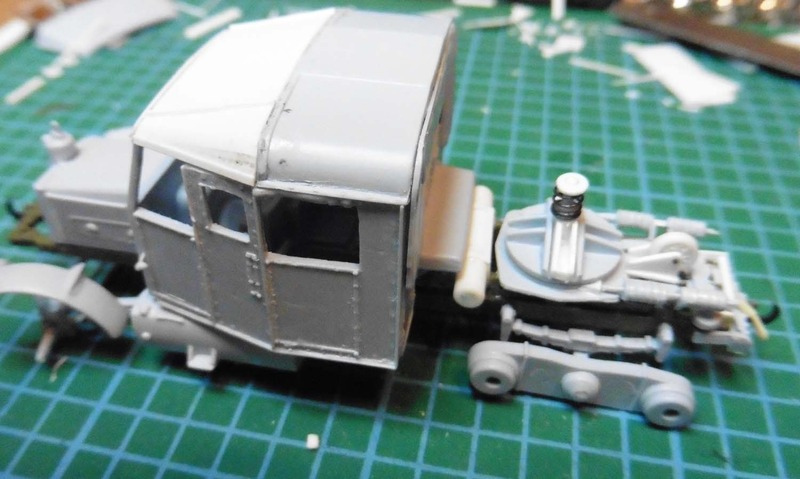
I have finished creating the new roof and I am quite pleased with it:
So, the front end, with modified board and new roof looks thus:
 vs
vs 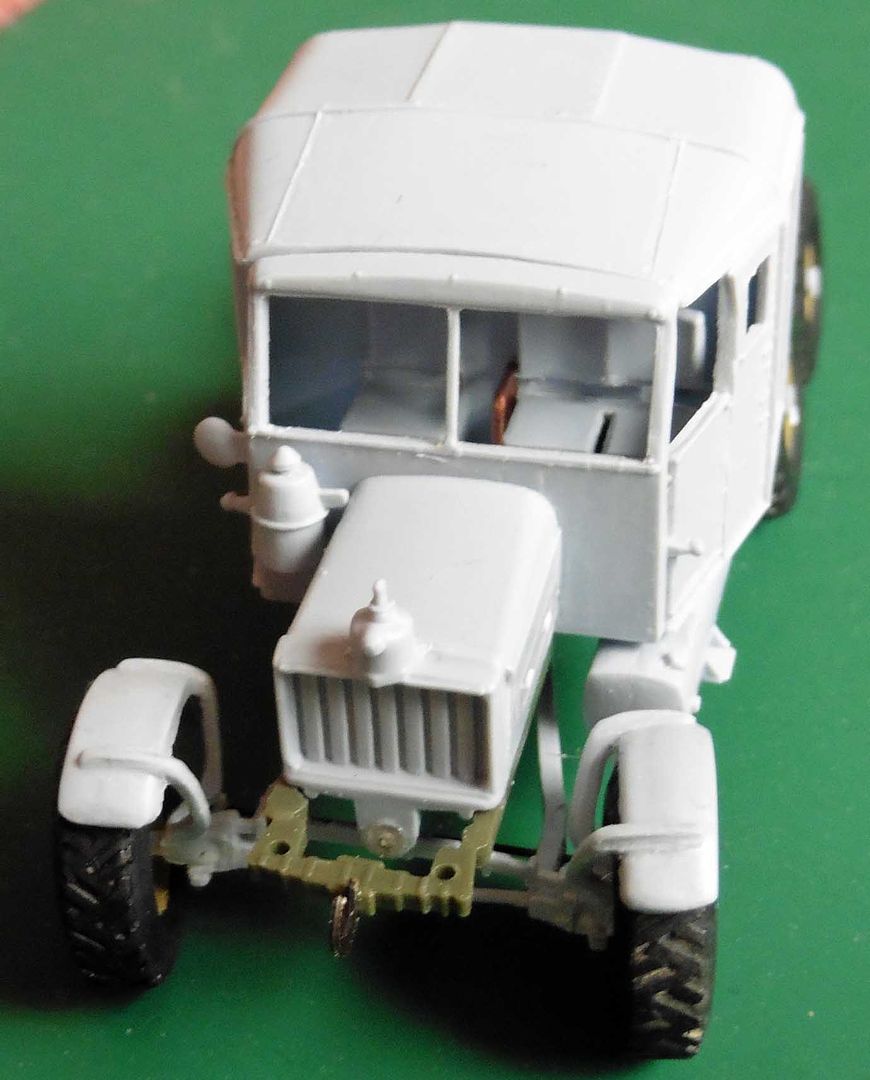

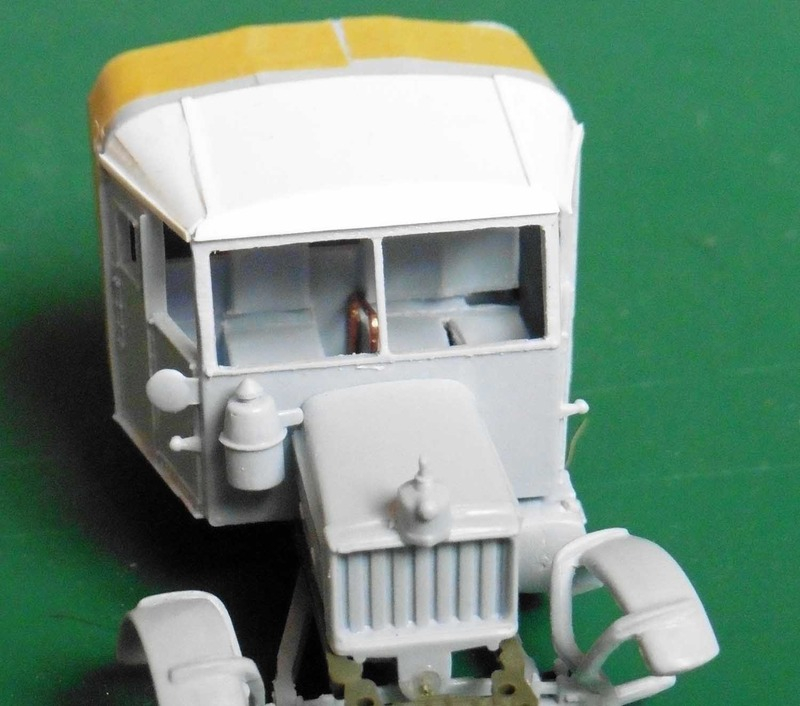

So, the front end, with modified board and new roof looks thus:
vs Tony
The older I get the better I was!
Current build:
Airfix 1:72 Javelin FAW9
Particular modelling interests:
Cuban Airforce aircraft, 29(F) Sqn aircraft, Aircraft I’ve flown
The older I get the better I was!
Current build:
Airfix 1:72 Javelin FAW9
Particular modelling interests:
Cuban Airforce aircraft, 29(F) Sqn aircraft, Aircraft I’ve flown
-
ShaunW
- NOT the sheep
- Posts: 26188
- Joined: November 26th, 2011, 6:11 pm
- Location: Pontefract West Yorkshire
Re: TeeELLs kitchen crafting
Very nicely done. This is fast turning into a masterclass on how to correct the old Airfix Scammell!
Doing - Tamiya 1/35th Universal Carrier.
Work is the curse of the modelling classes!
IPMS#12300
Work is the curse of the modelling classes!
IPMS#12300
-
JamesPerrin

- Looks like his avatar
- Posts: 13687
- Joined: April 5th, 2011, 8:09 pm
- Location: W. Yorkshire
- Contact:
Re: TeeELLs kitchen crafting
Scratch work on the Scammell is superb, how did you make the rings for the shocks?
Classic British Kits SIG Leader Better to fettle than to fill
(2024 A:B 5:2) (2023 13:8:7) (2022 21:11) (2021 15:8) (2020 8:4:4)
(2024 A:B 5:2) (2023 13:8:7) (2022 21:11) (2021 15:8) (2020 8:4:4)
-
TeeELL
- Modelling Gent and Scholar
- Posts: 11616
- Joined: December 28th, 2015, 4:38 pm
- Location: North Wiltshire
Re: TeeELLs kitchen crafting
James,
To make the rings for the shock absorbers:
Create streched sprue as small as possible
Cut a length and attach one end to a metal rod of the required diameter
Attach a weight to the tail end of the sprue (I used a small pair of clamping tweezers)
Rotate the rod, whilst pouring boiling water over the rod, such that the sprue sits right next to the previous turn.
Once you have enough (+ spares of course) run everything under the cold tap
Slide the spiral of stretched sprue off the rod, place it on a cutting mat and, with a very sharp blade cut one side, you will now have lots of rings of sprue.
Slide each piece onto the original representation of the shock absorber and cement in place - eh voila!
Tony
The older I get the better I was!
Current build:
Airfix 1:72 Javelin FAW9
Particular modelling interests:
Cuban Airforce aircraft, 29(F) Sqn aircraft, Aircraft I’ve flown
The older I get the better I was!
Current build:
Airfix 1:72 Javelin FAW9
Particular modelling interests:
Cuban Airforce aircraft, 29(F) Sqn aircraft, Aircraft I’ve flown
-
TeeELL
- Modelling Gent and Scholar
- Posts: 11616
- Joined: December 28th, 2015, 4:38 pm
- Location: North Wiltshire
Re: TeeELLs kitchen crafting
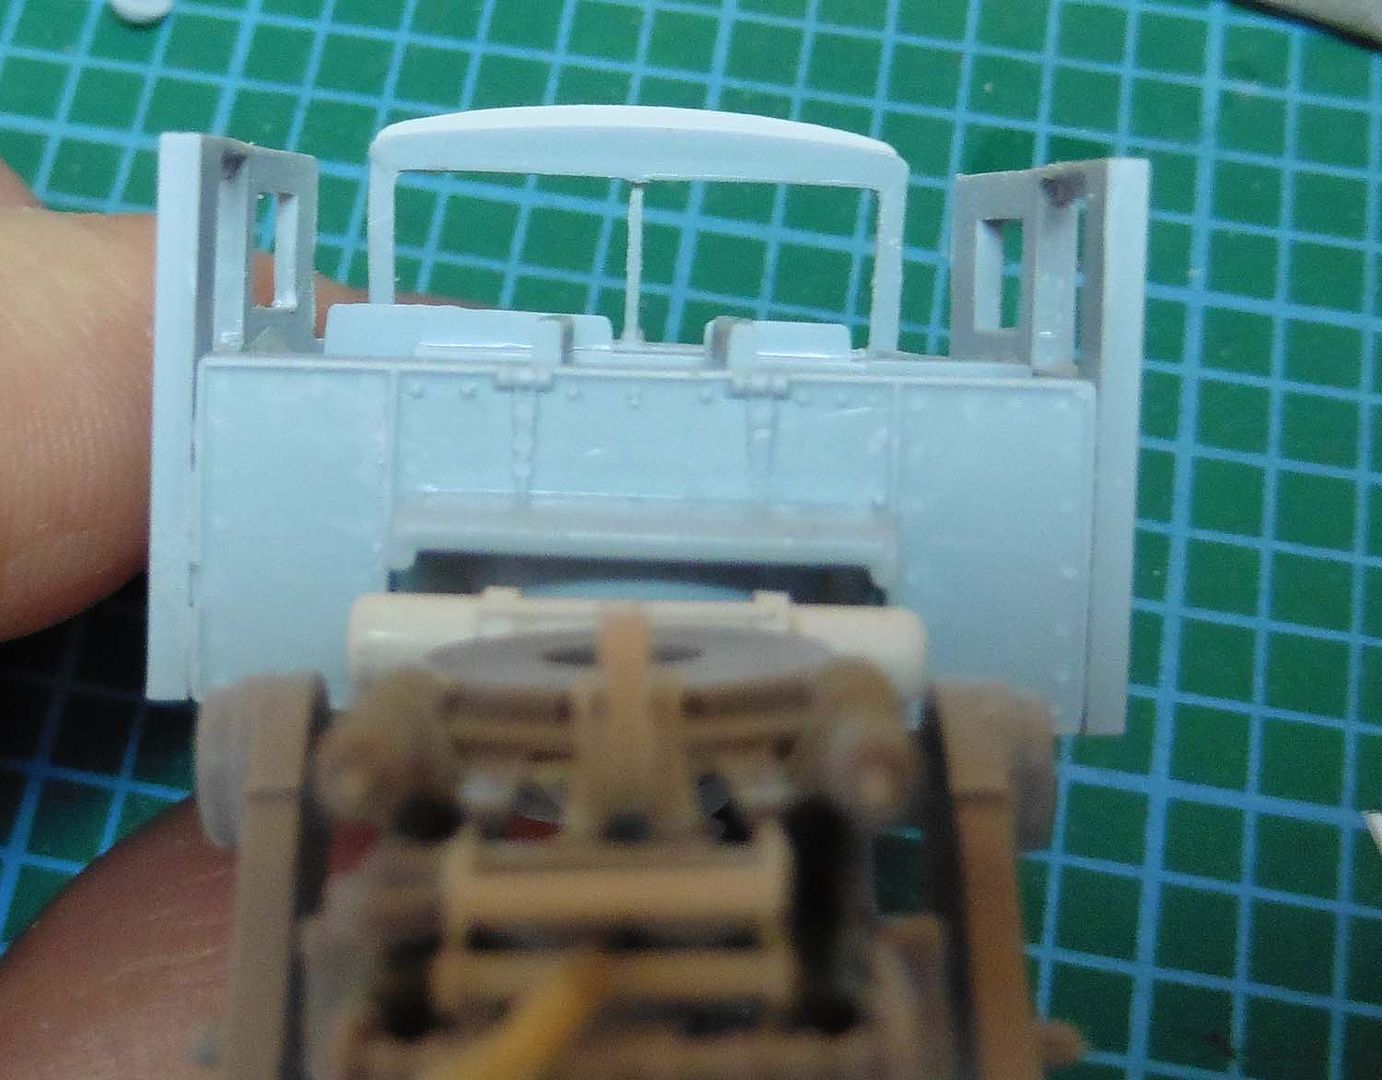
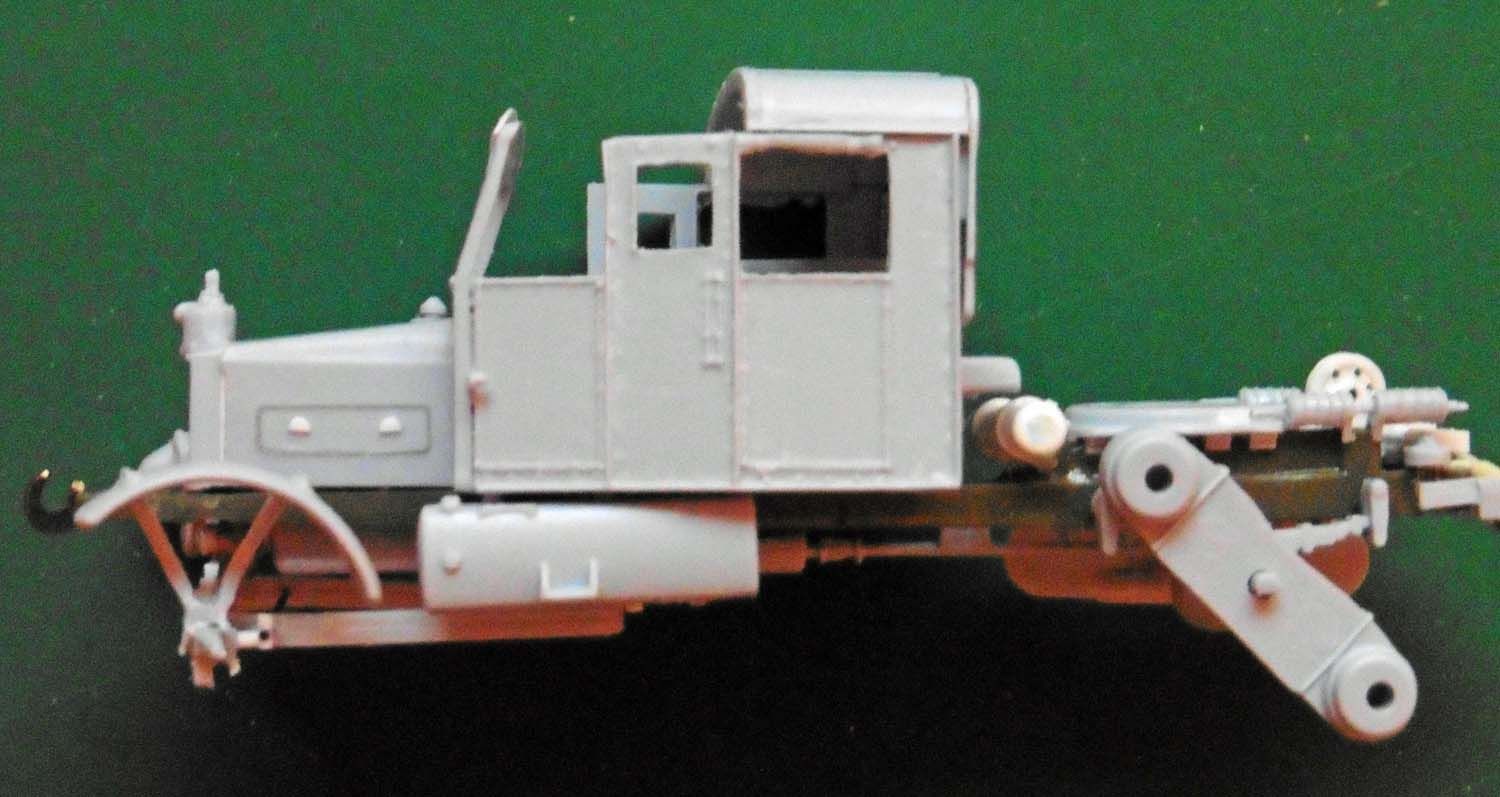
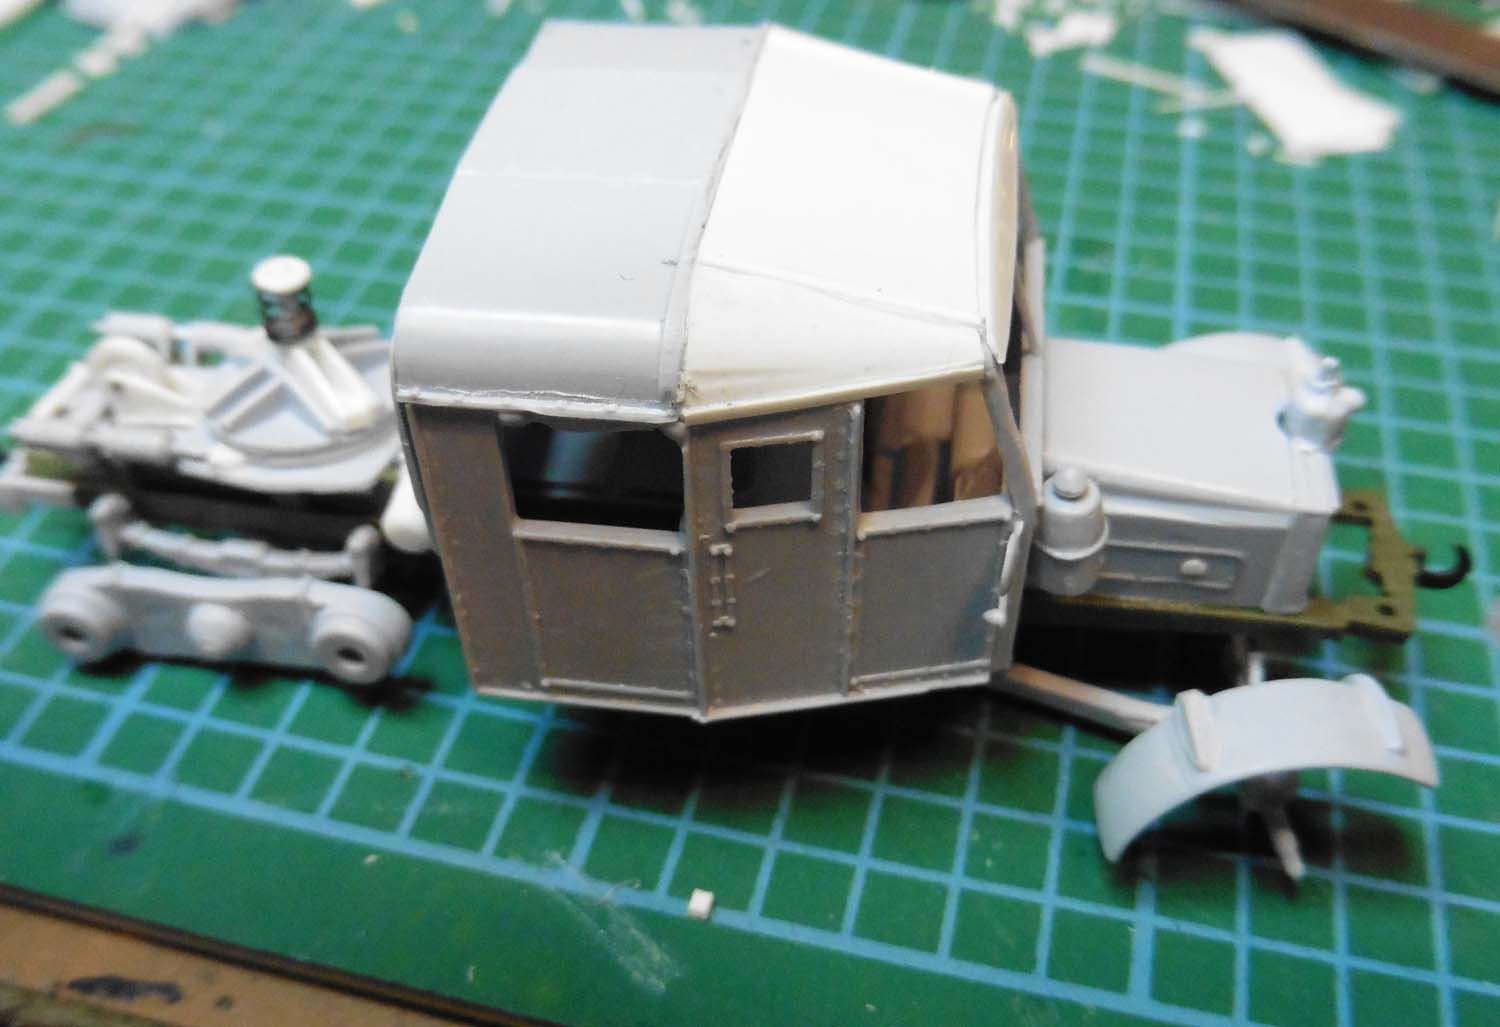
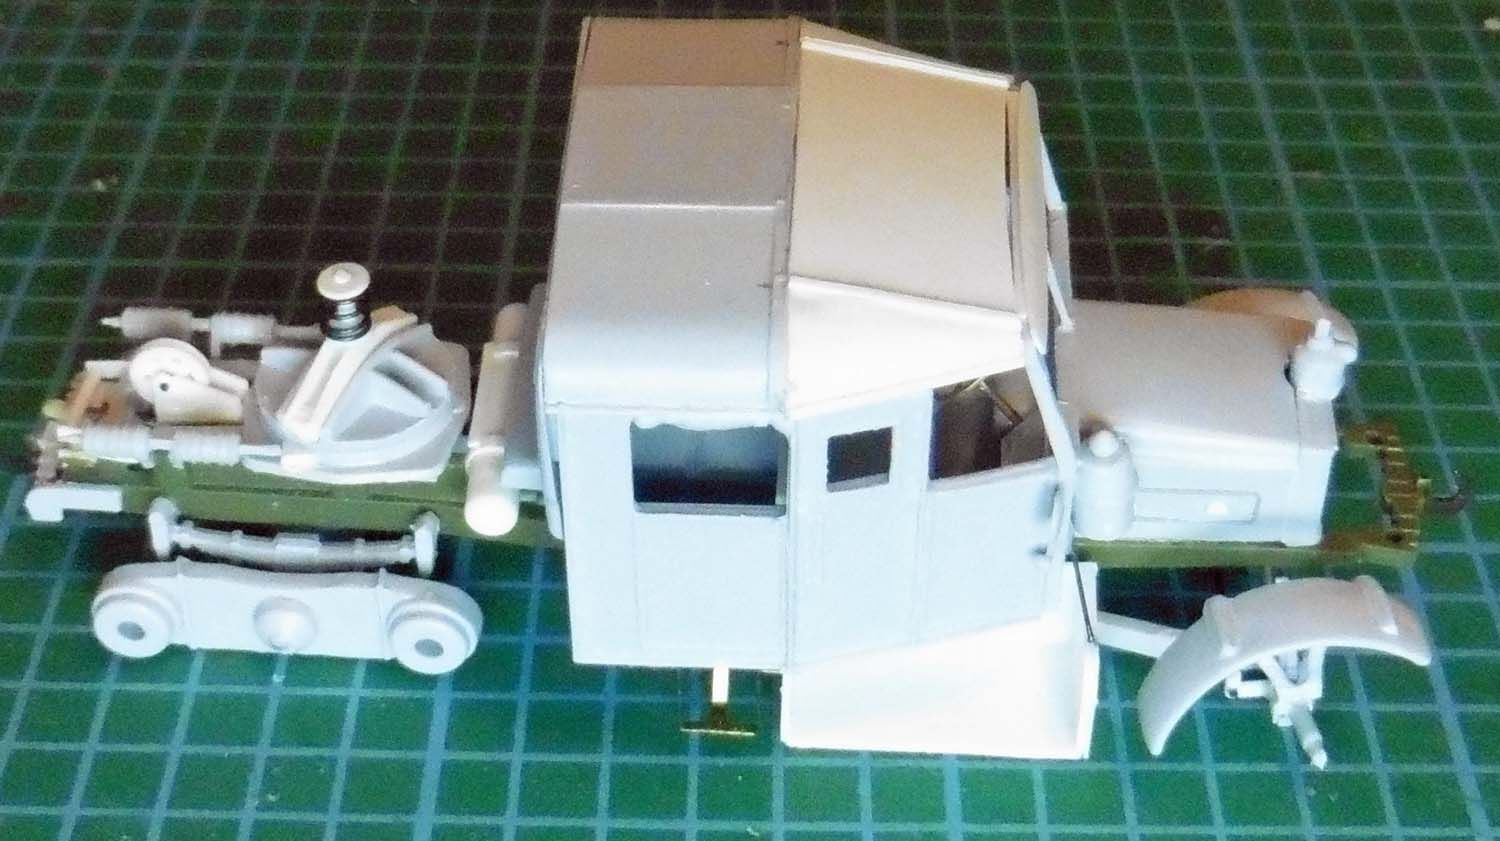
The finished front section of the roof has been cemented to the original rear end - I used Tamiya 'Extra thin' first, which allowed me to set the curve of the roof, I then strengthened the join using 'Blue Light' glue.
This is a view of the completed roof positioned in place. I am pleased with this because it means I can get all the airbrushing and painting done on the interior after doing the exterior and add the roof at the end.
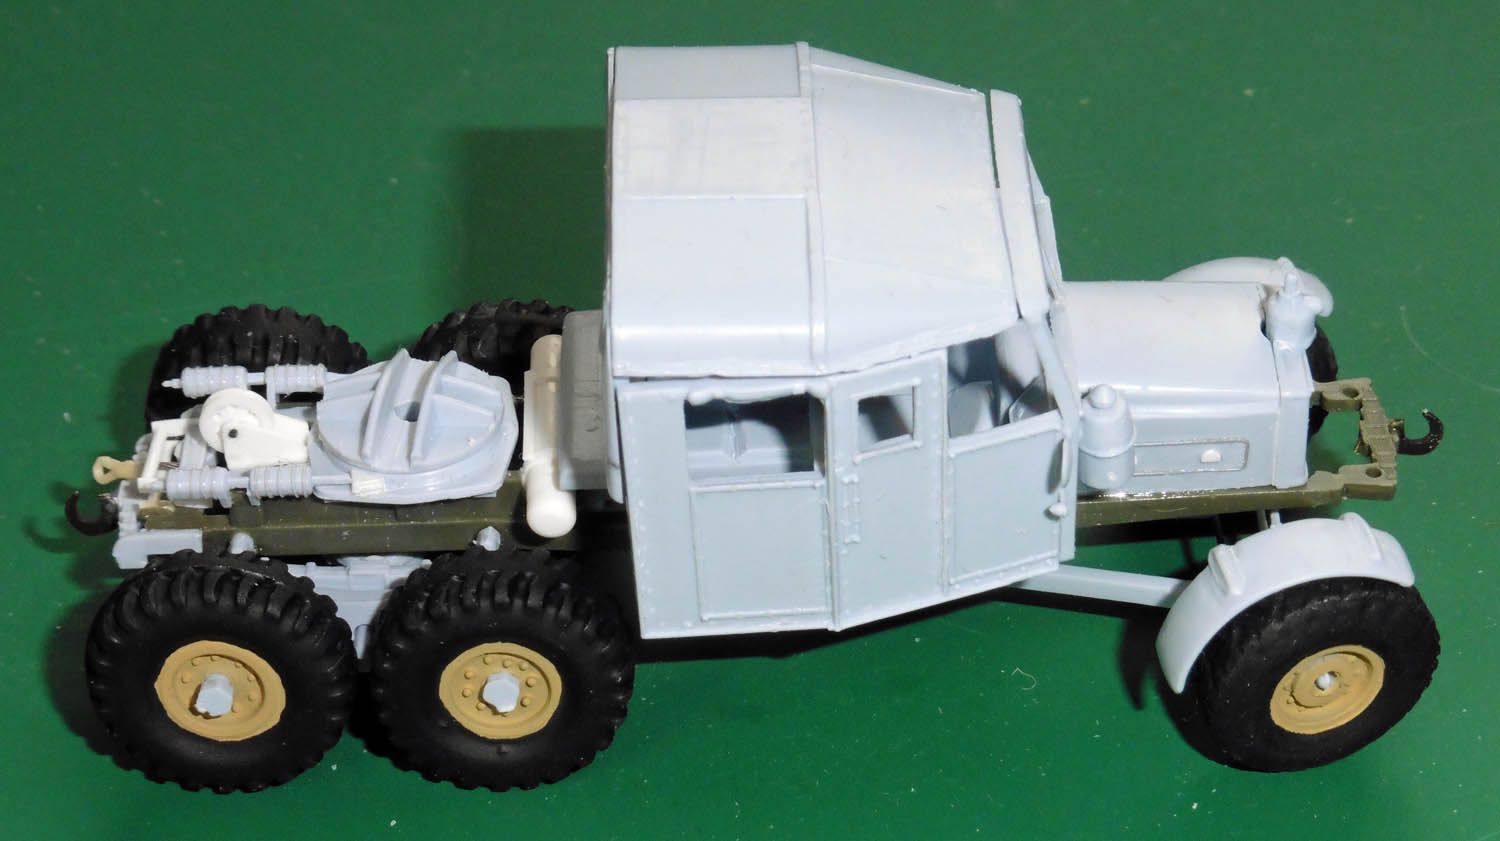
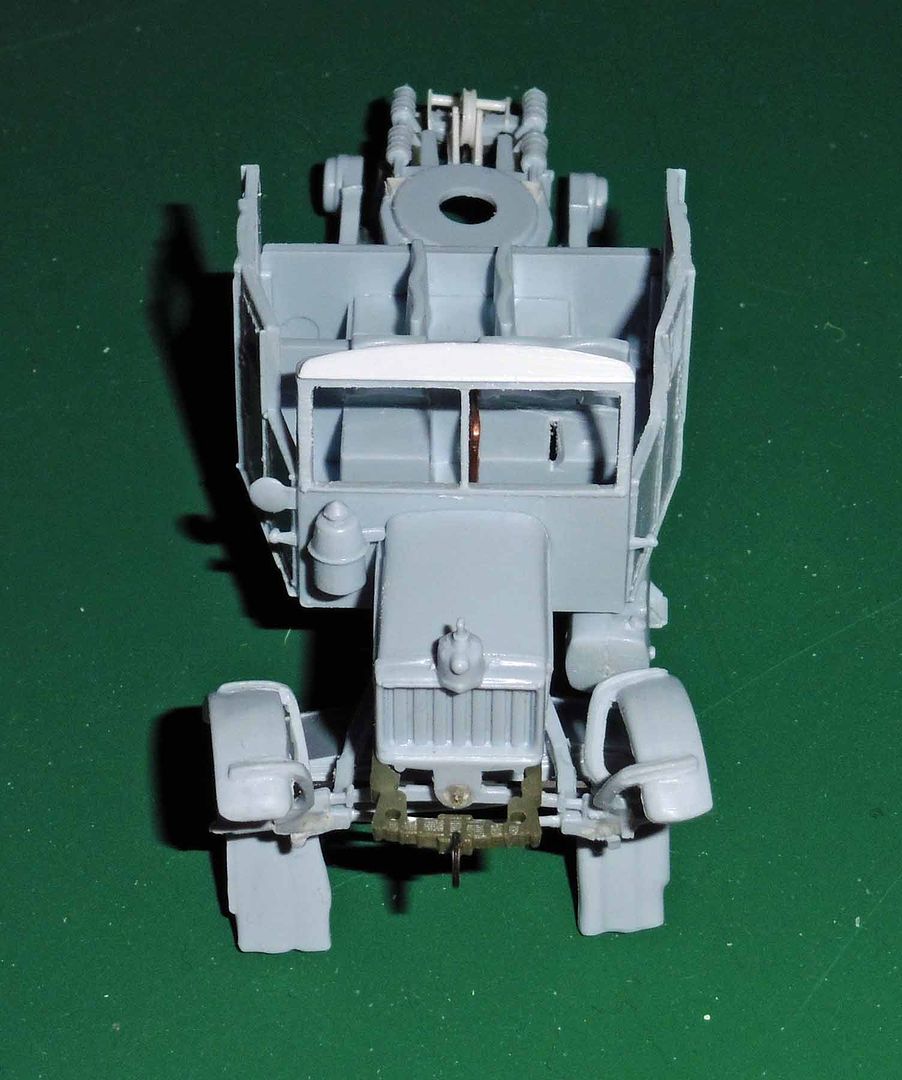
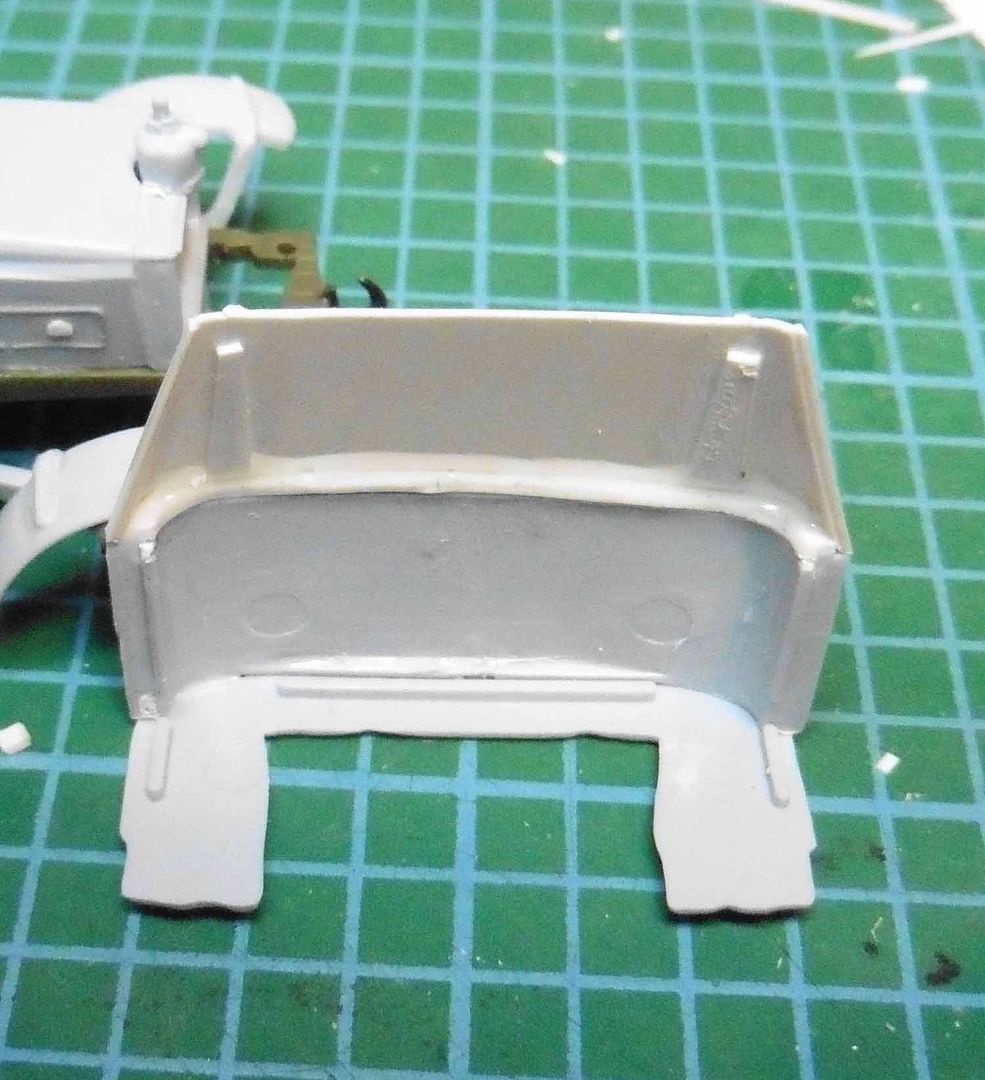
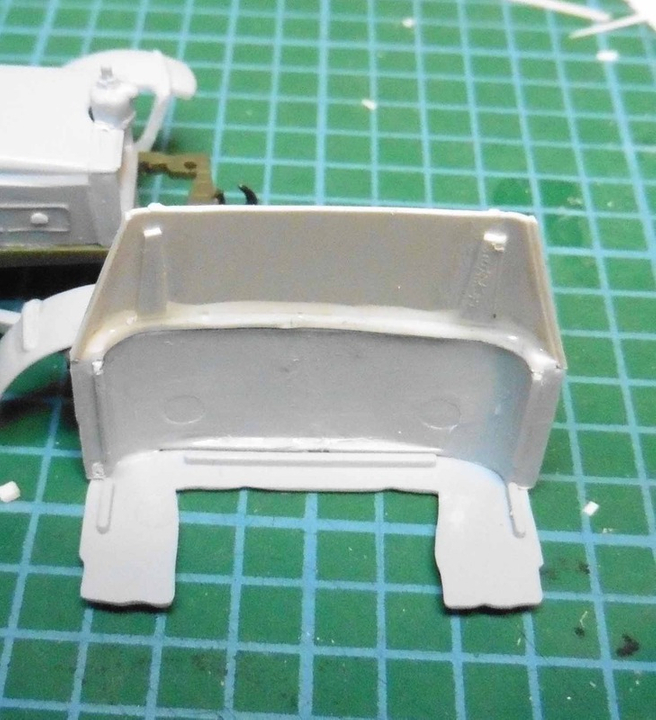
At the back of the tractor I have completed the (totally uneccessary) trailer yoke - this is the part that Airfix provide as part of the trailer. If, however, you wish to show the unit without the trailer then this is essential.
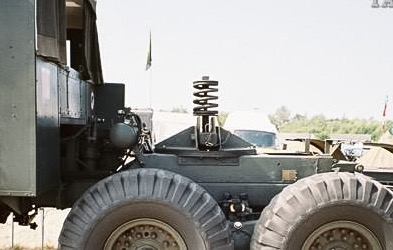
The spring is real - in hind sight, I could have made the pillar from brass and had it operational - now that really eould have been a total waste of time!!
This is how it shoould look:

Cf
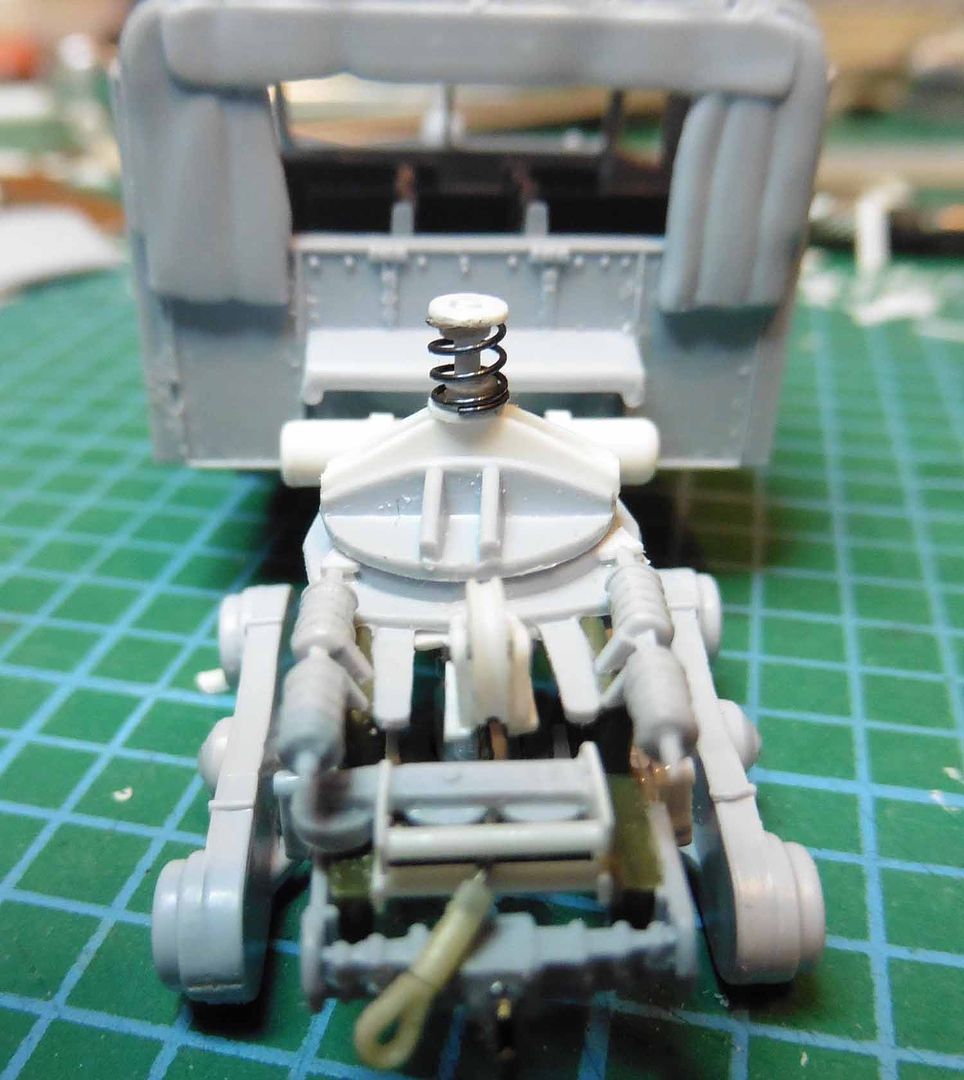
I've been quite lucky today, the floor monster is clearly satiated and I have not only found the various tiny items I have dropped today, but also the rear suspention 'walking arm' retaining bush that pinged off the tweezers yesterday!!!
I decided that, to ensure things didn't get gummed up, I would drill out the retaining bushes, fit them quit tightly and secure them in place with the 'Blue Light' glue. It worked well, the BL glue is runny enough to go into the join but zapping it straight away stops it progressing down to the moving parts.
I have also managed to thin down the mudguard supports for the left hand front mudguard, without having to cut it off to do so. So, all in all, a fairly happy bunny.
The tractor unit is about as done as it can be so definately off to paintshops next week. The trailer is not far behind (no pun intended).


This is a view of the completed roof positioned in place. I am pleased with this because it means I can get all the airbrushing and painting done on the interior after doing the exterior and add the roof at the end.
At the back of the tractor I have completed the (totally uneccessary) trailer yoke - this is the part that Airfix provide as part of the trailer. If, however, you wish to show the unit without the trailer then this is essential.
The spring is real - in hind sight, I could have made the pillar from brass and had it operational - now that really eould have been a total waste of time!!
This is how it shoould look:
Cf
I've been quite lucky today, the floor monster is clearly satiated and I have not only found the various tiny items I have dropped today, but also the rear suspention 'walking arm' retaining bush that pinged off the tweezers yesterday!!!
I decided that, to ensure things didn't get gummed up, I would drill out the retaining bushes, fit them quit tightly and secure them in place with the 'Blue Light' glue. It worked well, the BL glue is runny enough to go into the join but zapping it straight away stops it progressing down to the moving parts.
I have also managed to thin down the mudguard supports for the left hand front mudguard, without having to cut it off to do so. So, all in all, a fairly happy bunny.
The tractor unit is about as done as it can be so definately off to paintshops next week. The trailer is not far behind (no pun intended).
Tony
The older I get the better I was!
Current build:
Airfix 1:72 Javelin FAW9
Particular modelling interests:
Cuban Airforce aircraft, 29(F) Sqn aircraft, Aircraft I’ve flown
The older I get the better I was!
Current build:
Airfix 1:72 Javelin FAW9
Particular modelling interests:
Cuban Airforce aircraft, 29(F) Sqn aircraft, Aircraft I’ve flown
-
skypirate

- Modelling Gent and Scholar
- Posts: 7300
- Joined: May 1st, 2011, 6:13 am
- Location: Port Macquarie, Australia
Re: TeeELLs kitchen crafting
All this effort is what makes this model unique and yours alone!
cheers,
David
cheers,
David
-
ShaunW
- NOT the sheep
- Posts: 26188
- Joined: November 26th, 2011, 6:11 pm
- Location: Pontefract West Yorkshire
Re: TeeELLs kitchen crafting
Astounding! I'm running out of superlatives for this build!
Doing - Tamiya 1/35th Universal Carrier.
Work is the curse of the modelling classes!
IPMS#12300
Work is the curse of the modelling classes!
IPMS#12300
-
Softscience

- Staring out the window
- Posts: 7484
- Joined: April 5th, 2011, 4:34 pm
- Location: Maryland, near Washington DC
Re: TeeELLs kitchen crafting
Goodness! This thread is invaluable for scratch-build tips. Thank you for sharing, and I'm anticipating seeing more.
-
TeeELL
- Modelling Gent and Scholar
- Posts: 11616
- Joined: December 28th, 2015, 4:38 pm
- Location: North Wiltshire
Re: TeeELLs kitchen crafting
Crikey people! You make it sound as if I know what I am doing!! This is only the third soft skin vehicle I've built since returning to the hobby 3 years ago, and the first where I have made any attempt at 'proper' and significant scratch building. I am learning as I go on! The new roof was giving me sleepless nights, it never dawned on me to simply employ the original roof 'as is' and build it up with plasicard and filler (I was passed that tip about an hour after I had finished my effort! :-( ). As for all the other bits, well having made the decision to get rid of the over prominent rivets, I would be daft not to add all the prominent parts that really should be there, parts which create the character of this Scammell dinosaur.
Work done today:
Removal of fuel tank, addition of filler cap to same. The fuel tank was then repositioned about 1mm further forward.
On the other side the scratch built storage box (for the 'wheel tracks') was fitted, again positioned correctly - further forward, and the support stay fitted. I used the Blue-Light glue (BLg) for securing the stay - easy peasy. Looking it the final article, I am not sure that it shouldn't be very slightly longer!??
The steps to the rear cabin were made from fine brass strip and attached, agai using BLg, in hind-sight I should have used a razor saw to cut fine slits where the steps are fitted. Still you can't see where they are glued in place unless you turn the tractor over.
I am definately finding BLg to be a very useful addition.
Tony
The older I get the better I was!
Current build:
Airfix 1:72 Javelin FAW9
Particular modelling interests:
Cuban Airforce aircraft, 29(F) Sqn aircraft, Aircraft I’ve flown
The older I get the better I was!
Current build:
Airfix 1:72 Javelin FAW9
Particular modelling interests:
Cuban Airforce aircraft, 29(F) Sqn aircraft, Aircraft I’ve flown
-
syd-baines
- Modelling Gent and Scholar
- Posts: 1050
- Joined: September 10th, 2013, 4:22 pm
Re: TeeELLs kitchen crafting
the build is coming along nicely great scratch building looking forward to seeing the rest of the build