TeeELLs kitchen crafting kit creations
Re: TeeELLs kitchen crafting kit creations
Fantastic flat iron,well tidy indeed.
-
TeeELL

- Modelling Gent and Scholar
- Posts: 11593
- Joined: December 28th, 2015, 4:38 pm
- Location: North Wiltshire
Re: TeeELLs kitchen crafting kit creations
Hi everyone, I am back from this years cruise. I have a number of modelling tasks to tackle, my first priority is to build and complete (by sunday 17th Sep) the Airfix JP3A, as the JP3 in which I flew my 'first solo' on Jun 22nd 1972. Once that is done, I will be getting on with the Airfix Mk1/II tank conversion.
Tony
The older I get the better I was!
Current build:
Airfix 1:72 Javelin FAW9
Particular modelling interests:
Cuban Airforce aircraft, 29(F) Sqn aircraft, Aircraft I’ve flown
The older I get the better I was!
Current build:
Airfix 1:72 Javelin FAW9
Particular modelling interests:
Cuban Airforce aircraft, 29(F) Sqn aircraft, Aircraft I’ve flown
-
TeeELL
- Modelling Gent and Scholar
- Posts: 11593
- Joined: December 28th, 2015, 4:38 pm
- Location: North Wiltshire
Re: TeeELLs kitchen crafting kit creations
I took some reference photos of the JP3A at RAF Linton-on-Ouse earlier in the year, of course looking through them now, there are so many other photos I failed to get! What I do have is the Aircrew Manual for the JP 3A, which includes the details for the seat apron fitted on the right hand seat for when I flew the solo trip.
Tony
The older I get the better I was!
Current build:
Airfix 1:72 Javelin FAW9
Particular modelling interests:
Cuban Airforce aircraft, 29(F) Sqn aircraft, Aircraft I’ve flown
The older I get the better I was!
Current build:
Airfix 1:72 Javelin FAW9
Particular modelling interests:
Cuban Airforce aircraft, 29(F) Sqn aircraft, Aircraft I’ve flown
-
TeeELL
- Modelling Gent and Scholar
- Posts: 11593
- Joined: December 28th, 2015, 4:38 pm
- Location: North Wiltshire
Re: TeeELLs kitchen crafting kit creations
I have been working on the JP cockpit and 'mini me'. The aircraft is a JP 3 so some of the aerial details need to go (such as that for the ILS Glide slope, on the nose) and the prominent Eureka/Rebecca aerials need to be added under the wings. (In this respect, the JP3 Grey scheme with day-glo markings in the kit are inappropriate, as this would have been a JP 3 not a 3A).
Here are some photos - cruelly enlarged, as ever!!
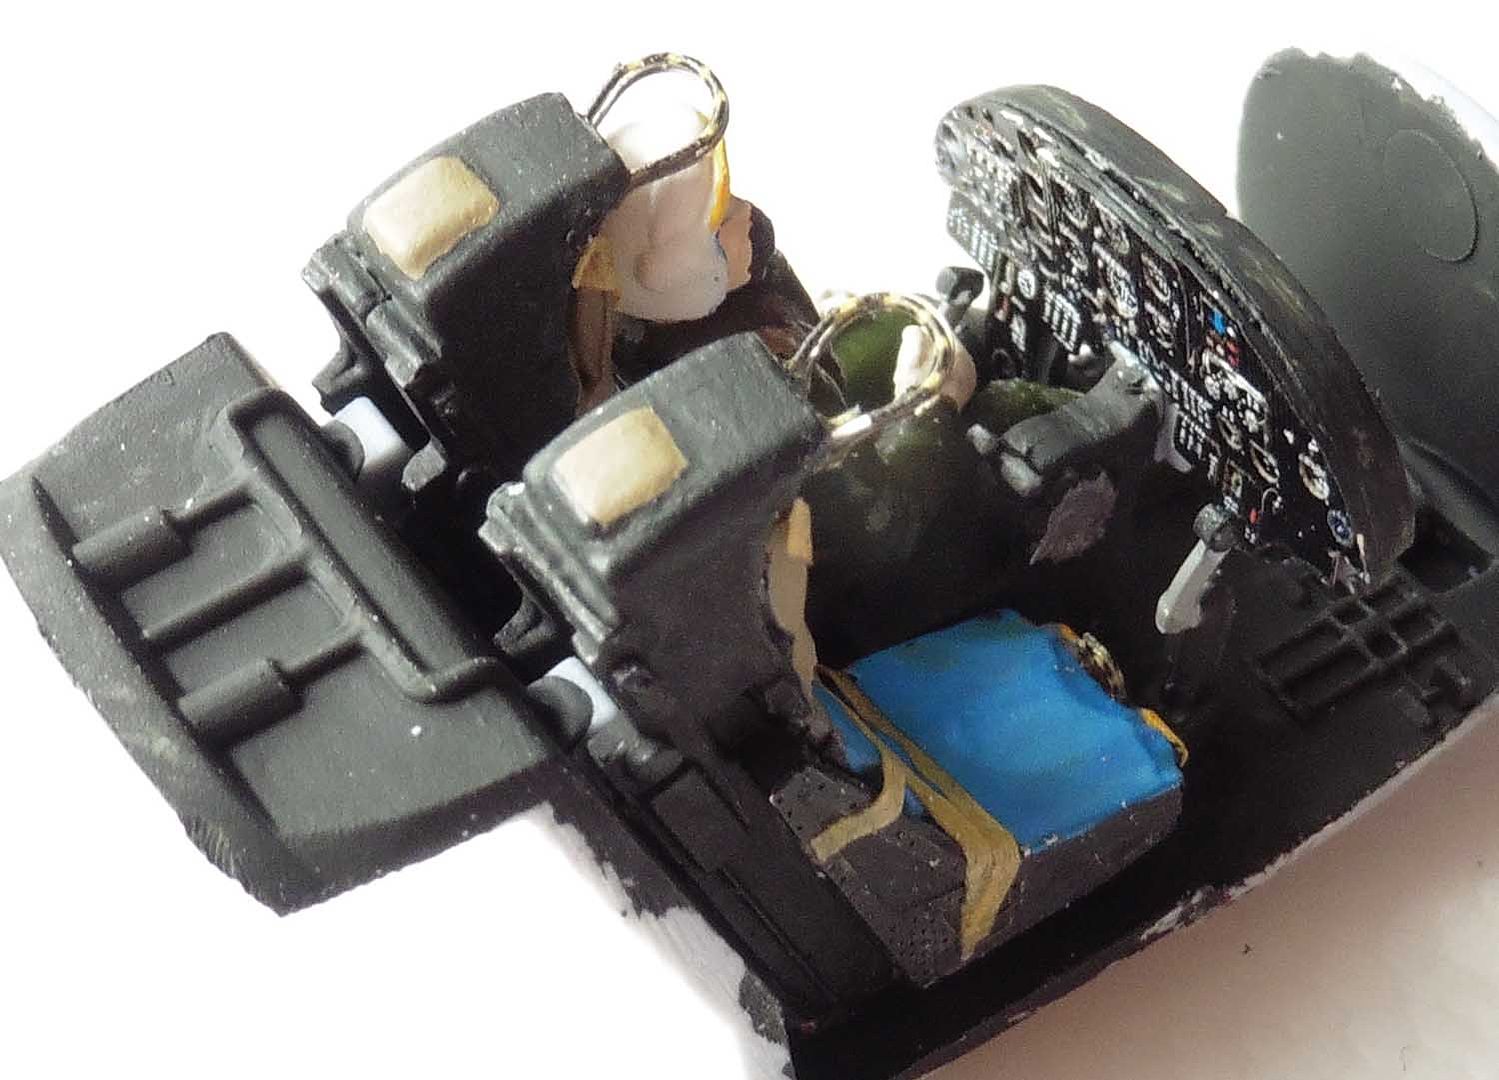
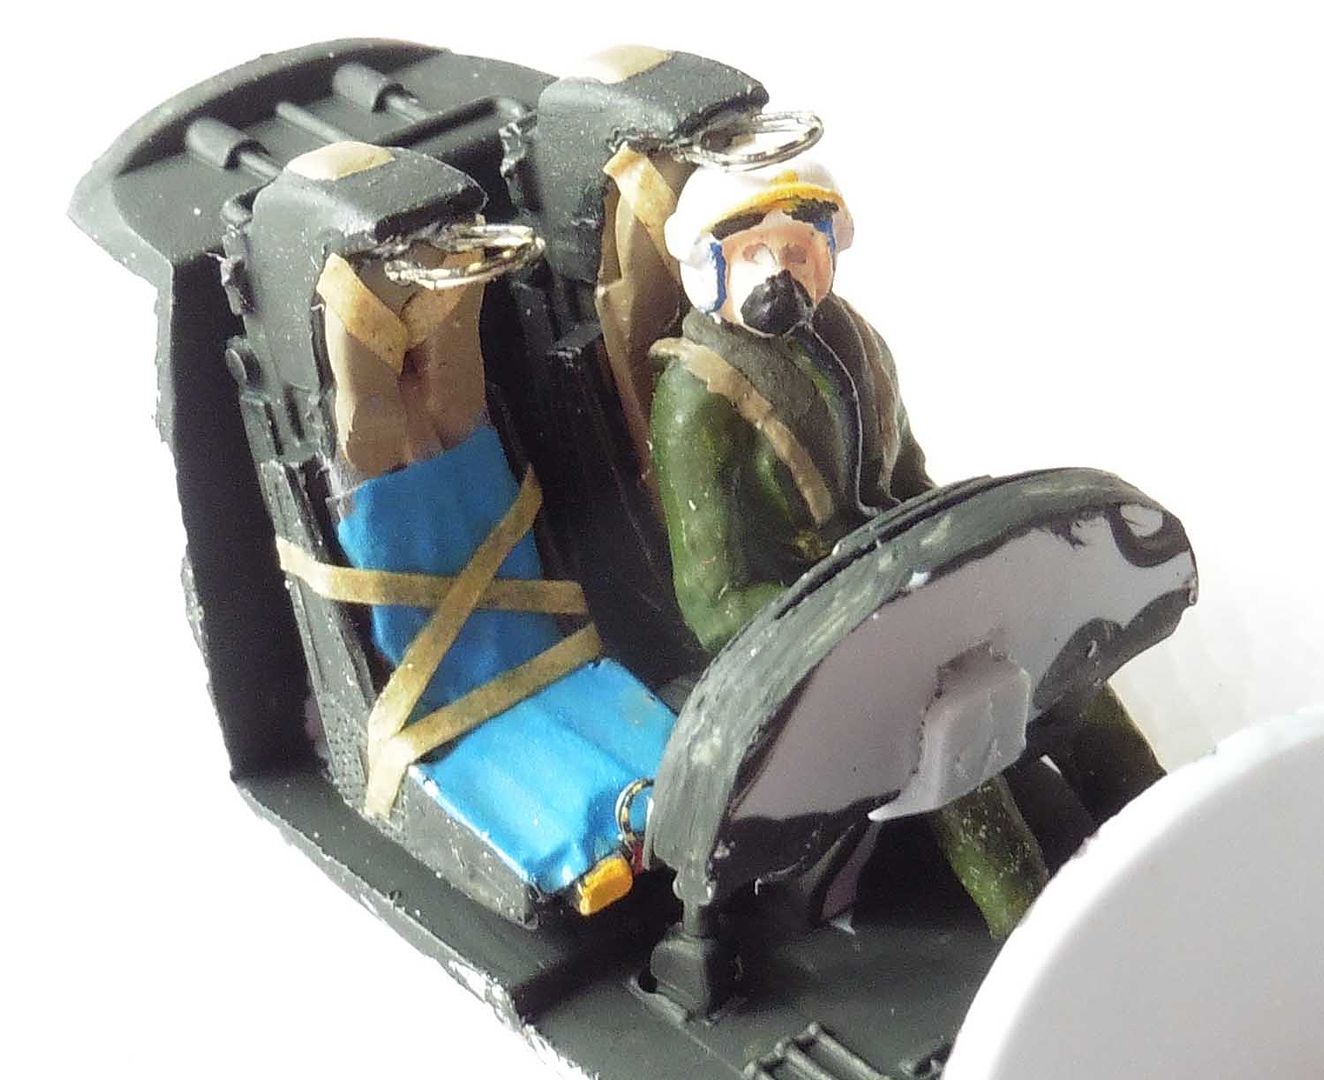
The apron fitted to the right hand seat prevented the seat straps from moving around (although they were all connected and tightened). The details of the strap arrangement I have taken straight from the Aircrew Manual diagram. You may notice that 'mini me' has had the outer side of his leg removed! The JP is quite a snug fit and the excess plastic of the kit exacerbates the problem. But you will not see it .....
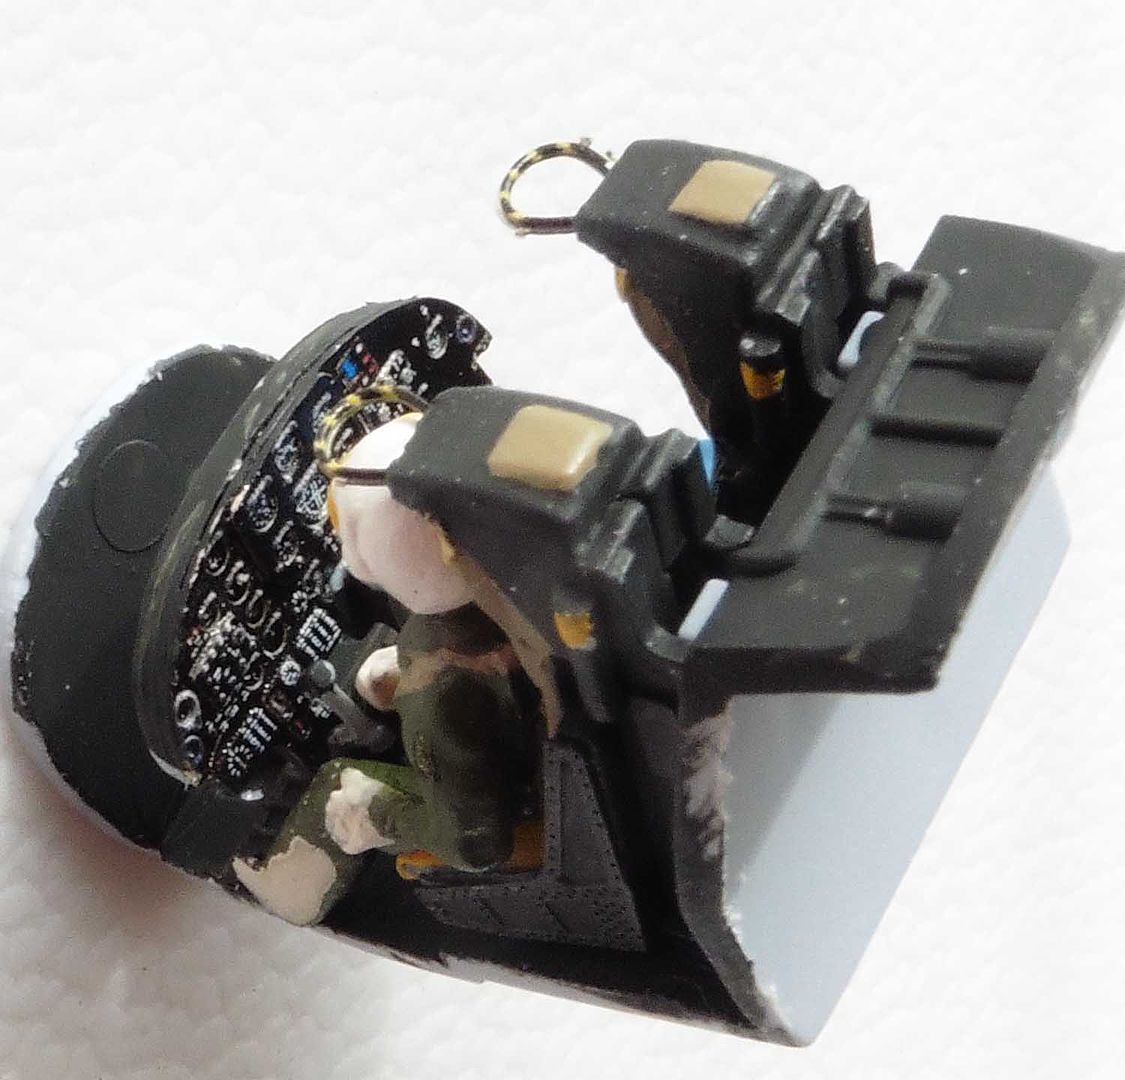
The top of the head box should have more 'canvas' extending almost to the front. At the rear end should be the 'scissor shackle' for the drogue parachute I might just paint those in before buttoning up the fuselage.
There are some significant errors with the ejection seats, but I shall live with them. The pilot figure is amazing in terms of detail and my painting skills do not do it justice. That said, the seat/parachute straps moulded aside the Life Jacket (LSJ), on the figure, are inappropriate as those straps sit under the LSJ lobes. However, the helmet is an amazing representation of a Mk 2A and is wholly appropriate for 'mini me' - the visor, when raised, was mostly contained within a protective cover and was operated by pulling on a yellow bar. The 2A was a monster and not very popular with the instructors - we students had no choice though.
Here are some photos - cruelly enlarged, as ever!!
The apron fitted to the right hand seat prevented the seat straps from moving around (although they were all connected and tightened). The details of the strap arrangement I have taken straight from the Aircrew Manual diagram. You may notice that 'mini me' has had the outer side of his leg removed! The JP is quite a snug fit and the excess plastic of the kit exacerbates the problem. But you will not see it .....
The top of the head box should have more 'canvas' extending almost to the front. At the rear end should be the 'scissor shackle' for the drogue parachute I might just paint those in before buttoning up the fuselage.
There are some significant errors with the ejection seats, but I shall live with them. The pilot figure is amazing in terms of detail and my painting skills do not do it justice. That said, the seat/parachute straps moulded aside the Life Jacket (LSJ), on the figure, are inappropriate as those straps sit under the LSJ lobes. However, the helmet is an amazing representation of a Mk 2A and is wholly appropriate for 'mini me' - the visor, when raised, was mostly contained within a protective cover and was operated by pulling on a yellow bar. The 2A was a monster and not very popular with the instructors - we students had no choice though.
Tony
The older I get the better I was!
Current build:
Airfix 1:72 Javelin FAW9
Particular modelling interests:
Cuban Airforce aircraft, 29(F) Sqn aircraft, Aircraft I’ve flown
The older I get the better I was!
Current build:
Airfix 1:72 Javelin FAW9
Particular modelling interests:
Cuban Airforce aircraft, 29(F) Sqn aircraft, Aircraft I’ve flown
-
TeeELL
- Modelling Gent and Scholar
- Posts: 11593
- Joined: December 28th, 2015, 4:38 pm
- Location: North Wiltshire
Re: TeeELLs kitchen crafting kit creations
I've done some minor work on the head boxes of the ejection seats but decided to tackle to issue with the main canopy.
Airfix have moulded a longitudinal frame along the top centre of the sliding canopy. No such frame exists although there is an internal strengthening bar in the same place.
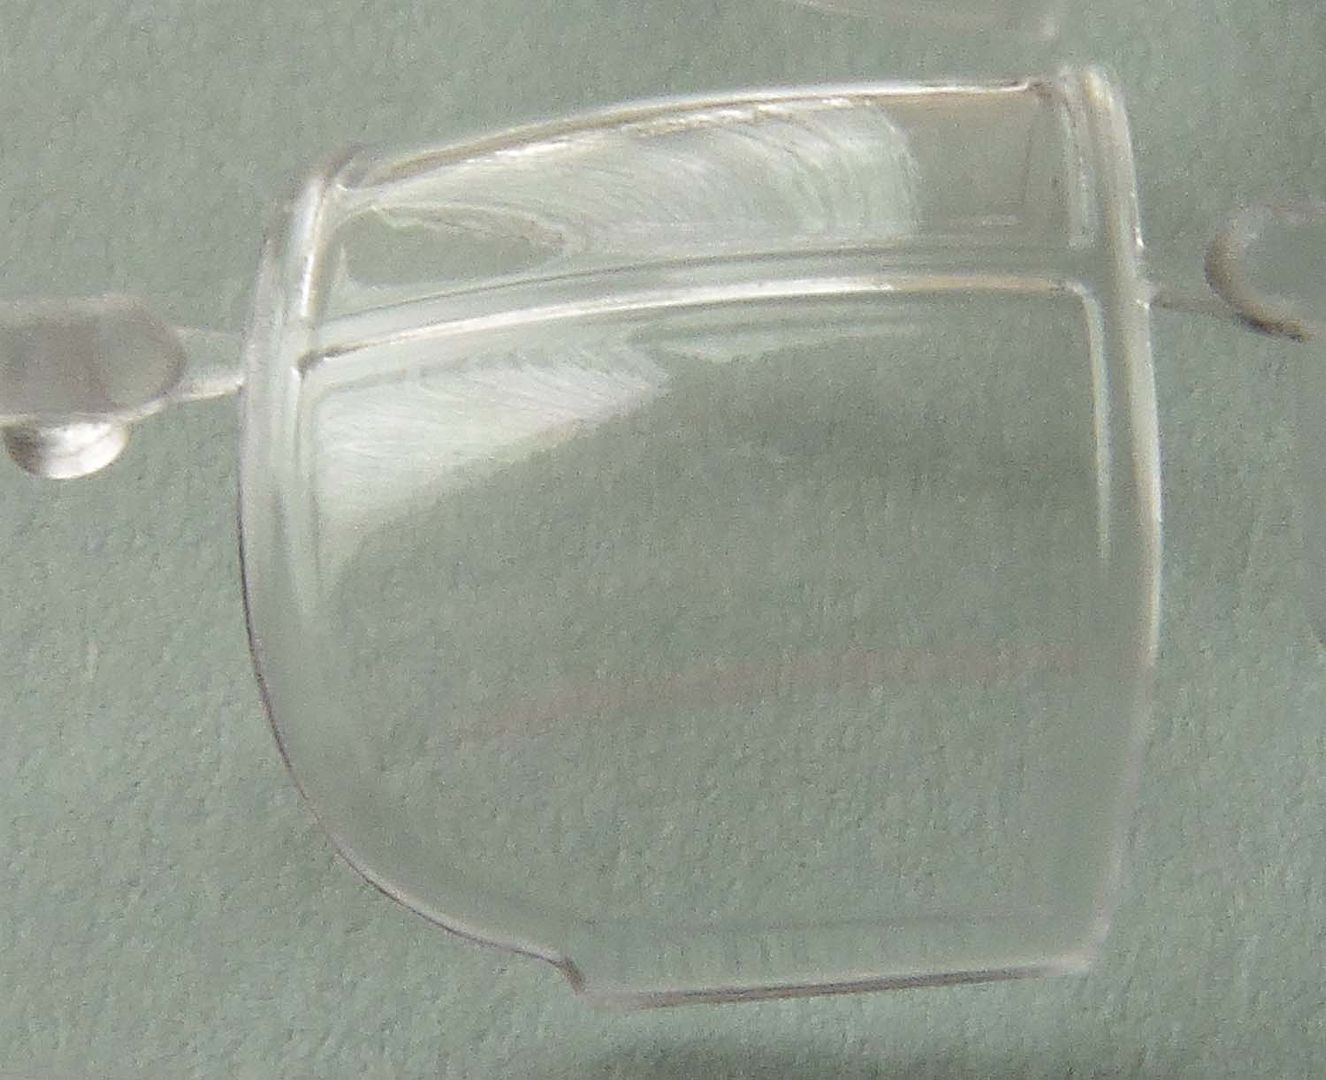
Using a fine file, followed by various finer grades of micromesh and a final polish with some acrylic polishing compound, I ended up with this:
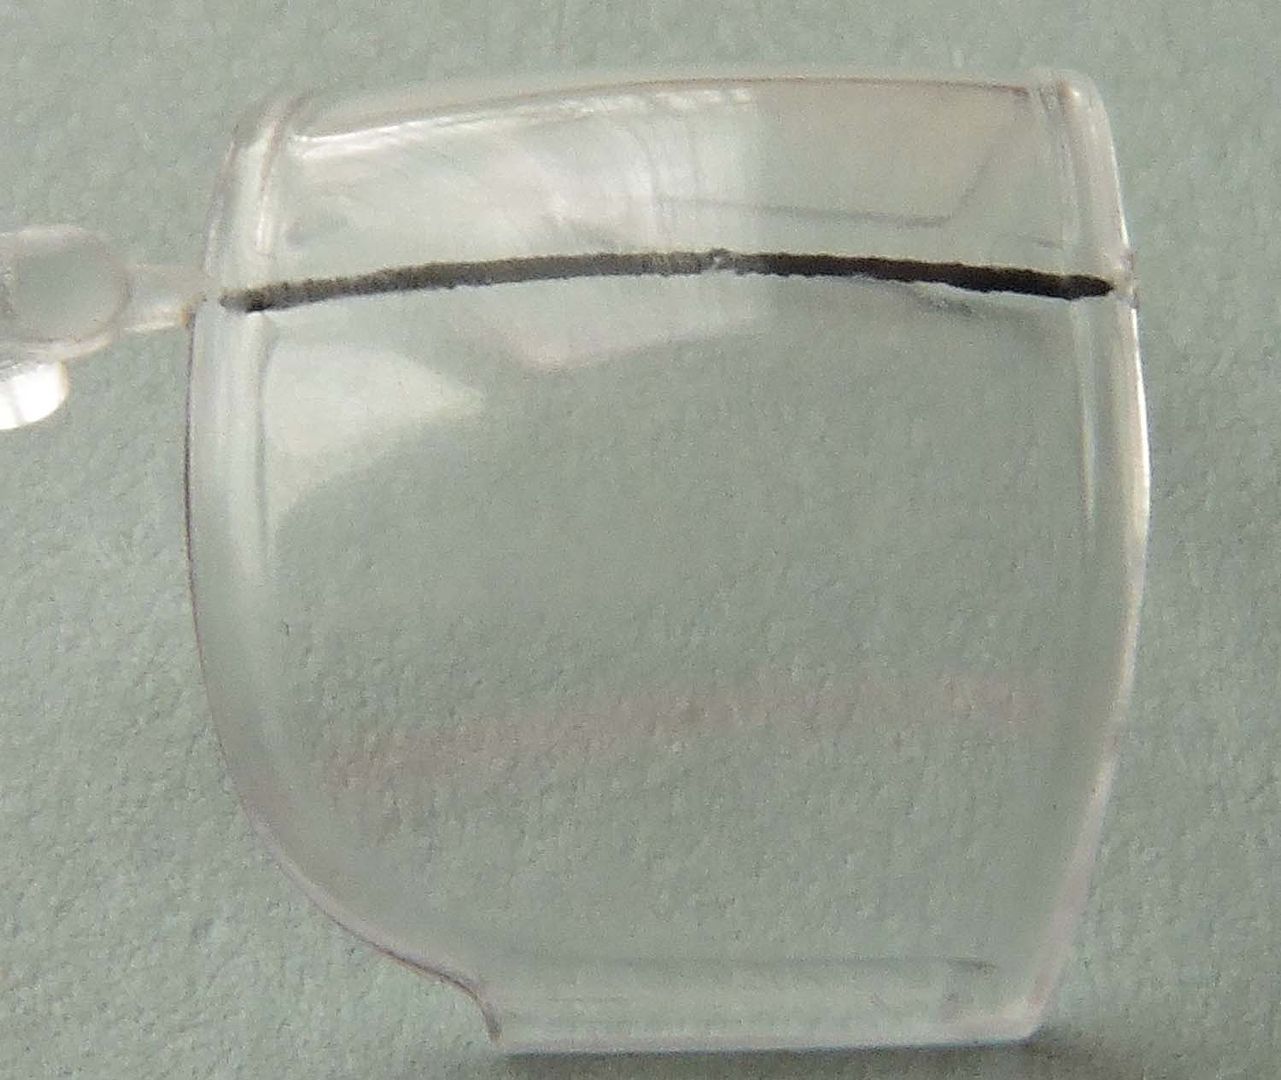
The black paint on the inside represents the strengthening bar - I guess I need to do it again as handling the canopy has caused some paint to be removed!
After I have re-painted the bar a dip in Klear should put the final sparkle onto the canopy.
Airfix have moulded a longitudinal frame along the top centre of the sliding canopy. No such frame exists although there is an internal strengthening bar in the same place.
Using a fine file, followed by various finer grades of micromesh and a final polish with some acrylic polishing compound, I ended up with this:
The black paint on the inside represents the strengthening bar - I guess I need to do it again as handling the canopy has caused some paint to be removed!
After I have re-painted the bar a dip in Klear should put the final sparkle onto the canopy.
Tony
The older I get the better I was!
Current build:
Airfix 1:72 Javelin FAW9
Particular modelling interests:
Cuban Airforce aircraft, 29(F) Sqn aircraft, Aircraft I’ve flown
The older I get the better I was!
Current build:
Airfix 1:72 Javelin FAW9
Particular modelling interests:
Cuban Airforce aircraft, 29(F) Sqn aircraft, Aircraft I’ve flown
-
iggie

- Modelling Gent and Scholar
- Posts: 23418
- Joined: July 31st, 2013, 11:04 am
- Location: North Somercotes, Lincolnshire
- Contact:
Re: TeeELLs kitchen crafting kit creations
Good to see you are back from your cruise safe and sound; any problems with the boat while you were out?
The JP looks to be coming along nicely btw
The JP looks to be coming along nicely btw
Best wishes
Jim
If you can walk away from a landing, it's a good landing. If you use the airplane the next day, it's an outstanding landing
"Never put off till tomorrow, what you can do the day after tomorrow"
Jim
If you can walk away from a landing, it's a good landing. If you use the airplane the next day, it's an outstanding landing
"Never put off till tomorrow, what you can do the day after tomorrow"
-
TeeELL
- Modelling Gent and Scholar
- Posts: 11593
- Joined: December 28th, 2015, 4:38 pm
- Location: North Wiltshire
Re: TeeELLs kitchen crafting kit creations
Hi Iggie,
No significant problems with the boat until we got back to the marina - significant fuel leak. I think I have cured it, I have my Boat Safety week after next so the main stop cocks have been left off 'just in case'.
No significant problems with the boat until we got back to the marina - significant fuel leak. I think I have cured it, I have my Boat Safety week after next so the main stop cocks have been left off 'just in case'.
Tony
The older I get the better I was!
Current build:
Airfix 1:72 Javelin FAW9
Particular modelling interests:
Cuban Airforce aircraft, 29(F) Sqn aircraft, Aircraft I’ve flown
The older I get the better I was!
Current build:
Airfix 1:72 Javelin FAW9
Particular modelling interests:
Cuban Airforce aircraft, 29(F) Sqn aircraft, Aircraft I’ve flown
-
dollar19
- Modelling Gent and Scholar
- Posts: 1342
- Joined: May 1st, 2011, 1:11 am
- Location: Bristol, Va. USA
Re: TeeELLs kitchen crafting kit creations
That a lot of work but well worth it!
-
ShaunW
- NOT the sheep
- Posts: 26180
- Joined: November 26th, 2011, 6:11 pm
- Location: Pontefract West Yorkshire
Re: TeeELLs kitchen crafting kit creations
Excellent work with the JP, Tony and the extra details you have been able to add using your personal experience really add to the build. I recently completed a JP T.5 build using the old Airfix Strikemaster kit and a similar error had been made with a moulded on centre frame on the front of the canopy. As you are probably aware, the full-size has a bar behind the glass which the Airfix designers must have misinterpreted as a canopy frame. In the end I didn't go the whole hog in removing the offending frame and painted it black to represent the internal bar.
Doing - Tamiya 1/35th Universal Carrier.
Work is the curse of the modelling classes!
IPMS#12300
Work is the curse of the modelling classes!
IPMS#12300
-
Marek

- Modelling Gent and Scholar
- Posts: 2455
- Joined: May 1st, 2011, 8:03 am
- Location: Madison, WI
- Contact:
Re: TeeELLs kitchen crafting kit creations
I am learning quite a lot from you, both about modelling and the aircraft you model. Unbelievable value! Thank You.
-
TeeELL
- Modelling Gent and Scholar
- Posts: 11593
- Joined: December 28th, 2015, 4:38 pm
- Location: North Wiltshire
Re: TeeELLs kitchen crafting kit creations
Thise of you planning on building this JP3 model (or the 'JP4') should note the following:
If you are fitting a pilot/the pilots the instruction would have you omit parts A01/A02 which are the seat details. This is wrong and you would end up with the pilot sitting 'in' the seat. The seat inserts (described by Mike Grant in the Nov 2016 Airfix Model World magazine as 'cushions') are representing the parachute and the life raft. We sat on them and very unforgiving they were too! In my day, the life raft was packed in a canvass container and the level of comfort (or, in truth, disomfort) was determined by how well the raft and all the other survival equipment had been packed. In latter years a fibre glass box was substituted, the top of which was 'bottom shaped' and a whole lot more comfortable.
I have positioned 'mini me' on the seat insert, although I did remove the strap details, and the sitting position is more accurate than being placed 'in' the seat. If you are putting a single pilot in then remember the seat apron, which was fitted for solo flights.
Tony
The older I get the better I was!
Current build:
Airfix 1:72 Javelin FAW9
Particular modelling interests:
Cuban Airforce aircraft, 29(F) Sqn aircraft, Aircraft I’ve flown
The older I get the better I was!
Current build:
Airfix 1:72 Javelin FAW9
Particular modelling interests:
Cuban Airforce aircraft, 29(F) Sqn aircraft, Aircraft I’ve flown
-
dollar19
- Modelling Gent and Scholar
- Posts: 1342
- Joined: May 1st, 2011, 1:11 am
- Location: Bristol, Va. USA
Re: TeeELLs kitchen crafting kit creations
Some good information there!
-
Stuart

- Raider of the Lost Ark Royal
- Posts: 19417
- Joined: February 25th, 2013, 4:55 pm
- Location: North Wales
- Contact:
Re: TeeELLs kitchen crafting kit creations
That's great info Tony - Thanks!
Stuart Templeton I may not be good but I'm slow...
My Blog: https://stuartsscalemodels.blogspot.com/
My Blog: https://stuartsscalemodels.blogspot.com/
-
TeeELL
- Modelling Gent and Scholar
- Posts: 11593
- Joined: December 28th, 2015, 4:38 pm
- Location: North Wiltshire
Re: TeeELLs kitchen crafting kit creations
The aircraft has received a couple of coats of white primer, just sufficient to cut the grey plastic, rubbed down with fine micro-mesh washed and allowed to dry. I airbrushed satin white on the fuselage without masking and have just spent the last hour masking up for the light grey. Most of the minor peripherals are painted and ready to be added once 'paint shops' are finished. The grey will go on tonight so all should be well and truly dry for the red to be applied tomorrow. The model has to be finished for Sunday so, as always, I have dithered and it will be a beggars rush to finish. I'll not make the same mistake as last year and apply an acrylic varnish.
Tony
The older I get the better I was!
Current build:
Airfix 1:72 Javelin FAW9
Particular modelling interests:
Cuban Airforce aircraft, 29(F) Sqn aircraft, Aircraft I’ve flown
The older I get the better I was!
Current build:
Airfix 1:72 Javelin FAW9
Particular modelling interests:
Cuban Airforce aircraft, 29(F) Sqn aircraft, Aircraft I’ve flown
-
skypirate

- Modelling Gent and Scholar
- Posts: 7294
- Joined: May 1st, 2011, 6:13 am
- Location: Port Macquarie, Australia
Re: TeeELLs kitchen crafting kit creations
Lovely work!
I had a lot of pleasure building my JP as a Mk.4. I did not know what the numerous aerials were under the wings and fuselage, but I put them all on!
Cheers,
David
I had a lot of pleasure building my JP as a Mk.4. I did not know what the numerous aerials were under the wings and fuselage, but I put them all on!
Cheers,
David