James' "Shed"
-
JamesPerrin

- Looks like his avatar
- Posts: 13671
- Joined: April 5th, 2011, 8:09 pm
- Location: W. Yorkshire
- Contact:
Re: James' "Shed"
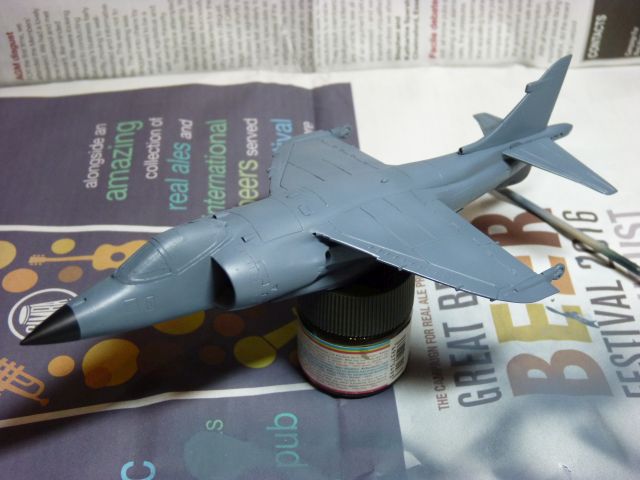
My MB Sea Harrier http://uamf.org.uk/viewtopic.php?f=343&t=13593; was DNF from the recent group build. I wasn't going to complete but a failure with the primer put the nail in the coffin. After a couple of days is didn't look as bad as a first thought and 30mins with a fine sanding sponge sorted it out. I re-appplied primer using my regular airbrush, I'll practice with the new one on test objects not GBs. After a busy couple of weeks I've put the EDSG on. I've used Xtracrylix as it's pot on for colour but lightening it slightly as the SHARs looked pretty worn in the conflict. Even lighter EDSG was applied to the upper surfaces. I even found time to do the radome. Some tricky masking remains to paint the gun pods dark green as I'm informed they were robbed from a GR3.
Classic British Kits SIG Leader Better to fettle than to fill
(2024 A:B 5:2) (2023 13:8:7) (2022 21:11) (2021 15:8) (2020 8:4:4)
(2024 A:B 5:2) (2023 13:8:7) (2022 21:11) (2021 15:8) (2020 8:4:4)
-
DavidWomby

- Modelling Gent and Scholar
- Posts: 11751
- Joined: May 1st, 2011, 8:09 pm
- Location: Florida, USA
Re: James' "Shed"
Glad to see the continuation of this one, James.
David
David

Re: James' "Shed"
This is very sharp James.
Besting 60 years of mediocre building of average kits in the stand off scale
-
ShaunW
- NOT the sheep
- Posts: 26180
- Joined: November 26th, 2011, 6:11 pm
- Location: Pontefract West Yorkshire
Re: James' "Shed"
Nice one James. Masking those gun pods for the airbrush will indeed be tricky. Personally, I think I would brush paint them and save the hassle.
Doing - Tamiya 1/35th Universal Carrier.
Work is the curse of the modelling classes!
IPMS#12300
Work is the curse of the modelling classes!
IPMS#12300
-
JamesPerrin
- Looks like his avatar
- Posts: 13671
- Joined: April 5th, 2011, 8:09 pm
- Location: W. Yorkshire
- Contact:
Re: James' "Shed"
I'd considered brush painting the pods myself and once I managed to find some Hu163 that's what I did.
After a couple of coats of Xtra gloss coat I painted the rear exhausts and exhaust shields. Though I have a half a dozen Alclad paints all are too bright, I therefore used a coat of polished steel and oversprayed with Tamiya smoke to darken it. I then added a tiny drop of clear orange and sprayed a band on the shields. Once drying a coat of matt varnish completed the look.
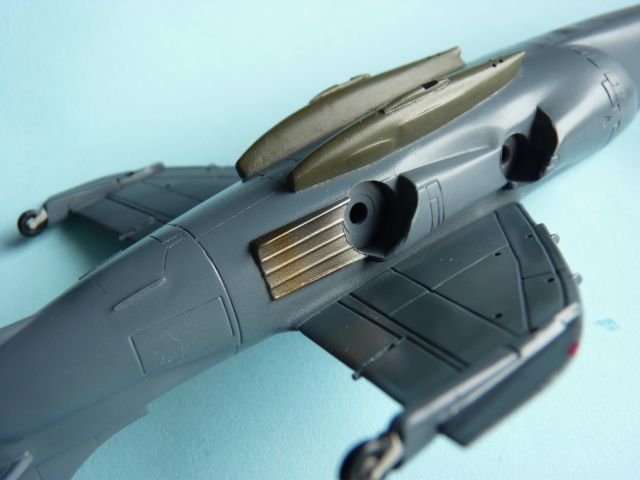
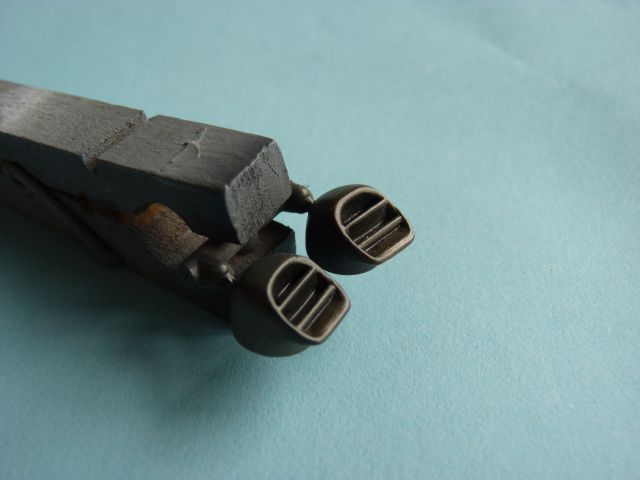
After a couple of coats of Xtra gloss coat I painted the rear exhausts and exhaust shields. Though I have a half a dozen Alclad paints all are too bright, I therefore used a coat of polished steel and oversprayed with Tamiya smoke to darken it. I then added a tiny drop of clear orange and sprayed a band on the shields. Once drying a coat of matt varnish completed the look.
Classic British Kits SIG Leader Better to fettle than to fill
(2024 A:B 5:2) (2023 13:8:7) (2022 21:11) (2021 15:8) (2020 8:4:4)
(2024 A:B 5:2) (2023 13:8:7) (2022 21:11) (2021 15:8) (2020 8:4:4)
-
DavidWomby
- Modelling Gent and Scholar
- Posts: 11751
- Joined: May 1st, 2011, 8:09 pm
- Location: Florida, USA
Re: James' "Shed"
Yes, very convincing finish on the exhaust and those exhaust shields. Nice work.
David
David
-
Dazzled

- Modelling Gent and Scholar
- Posts: 9592
- Joined: October 1st, 2011, 11:08 pm
- Location: Mid Glamorgan, South Wales
- Contact:
Re: James' "Shed"
Nice work James 
COLD WAR S.I.G. LEADER
Wherever there's danger, wherever there's trouble, wherever there's important work to be done....I'll be somewhere else building a model!
Wherever there's danger, wherever there's trouble, wherever there's important work to be done....I'll be somewhere else building a model!
-
ShaunW
- NOT the sheep
- Posts: 26180
- Joined: November 26th, 2011, 6:11 pm
- Location: Pontefract West Yorkshire
Re: James' "Shed"
Nice one James, the gun pods and exhaust gubbins look excellent
Doing - Tamiya 1/35th Universal Carrier.
Work is the curse of the modelling classes!
IPMS#12300
Work is the curse of the modelling classes!
IPMS#12300
-
Zen
- The Bug Has Well And Truly Bitten
- Posts: 271
- Joined: April 20th, 2016, 12:58 am
- Location: Portimão, Algarve, Portugal
Re: James' "Shed"
That Harrier is looking very good indeed, great work! 
Re: James' "Shed"
Very nice "tempered" look to the shields. Looking good James.
Besting 60 years of mediocre building of average kits in the stand off scale
-
JamesPerrin
- Looks like his avatar
- Posts: 13671
- Joined: April 5th, 2011, 8:09 pm
- Location: W. Yorkshire
- Contact:
Re: James' "Shed"
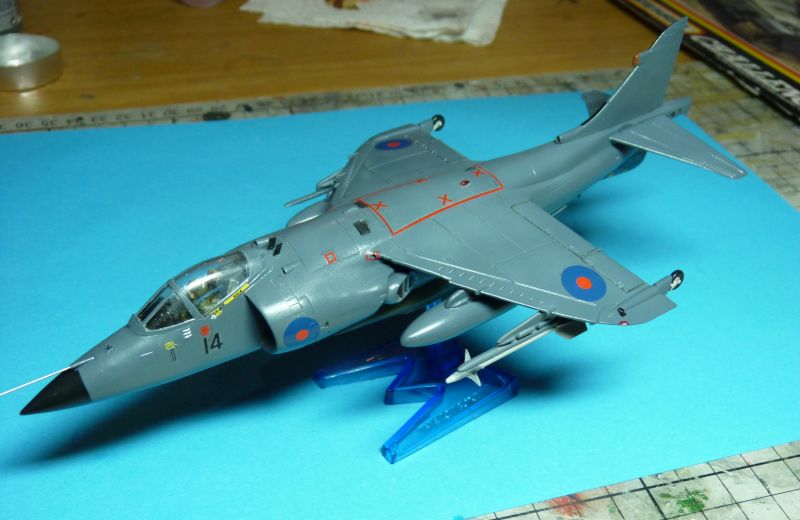
Here's a photo after a week of daily Micro Sol being applied to the decals. I stuck with the ESCI ones that Paul had kindly provided, the spines red markings needed trimming to fit the MB fuselage which was narrower. I only checked afterwards but the MB red markings were actually finer. I've still to add the red squares around the wing root inlets I tried one but wasn't convinced it would ever go down over the multiple curves.
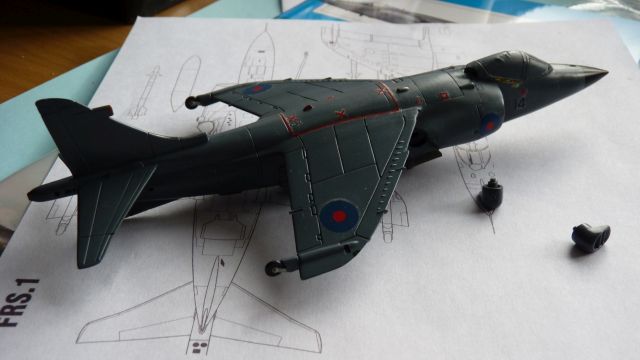
You may also notice that I failed to gloss the model sufficiently and most of the decals have silvered a bit
You may also notice that I failed to gloss the model sufficiently and most of the decals have silvered a bit
Classic British Kits SIG Leader Better to fettle than to fill
(2024 A:B 5:2) (2023 13:8:7) (2022 21:11) (2021 15:8) (2020 8:4:4)
(2024 A:B 5:2) (2023 13:8:7) (2022 21:11) (2021 15:8) (2020 8:4:4)
Re: James' "Shed"
All that nice work, and then the decals silver on you. I feel your pain as its happened to me as well.
I wonder if a dab of Walthers decal set will help, applied gently.
I wonder if a dab of Walthers decal set will help, applied gently.
-
ShaunW
- NOT the sheep
- Posts: 26180
- Joined: November 26th, 2011, 6:11 pm
- Location: Pontefract West Yorkshire
Re: James' "Shed"
Shame about the silvering James, that's a real bind - if it's any consolation the model still looks good to me!
Doing - Tamiya 1/35th Universal Carrier.
Work is the curse of the modelling classes!
IPMS#12300
Work is the curse of the modelling classes!
IPMS#12300
-
Zen
- The Bug Has Well And Truly Bitten
- Posts: 271
- Joined: April 20th, 2016, 12:58 am
- Location: Portimão, Algarve, Portugal
Re: James' "Shed"
And to me!
-
JamesPerrin
- Looks like his avatar
- Posts: 13671
- Joined: April 5th, 2011, 8:09 pm
- Location: W. Yorkshire
- Contact:
Re: James' "Shed"
Well the SHAR ha been lingering for a while, I acquired a couple of different decal softeners but though they slightly improved the conforming to details did little for the silvering. In the end I painted over the worse bits and gave it up as lesson learnt. What's more the Hannants Gloss Acrylic varnish which had gone down smooth had done something weird and had roughed up like a coarse matt finished on top of the fuselage. I think my bottle is going in the bin and I'm going to try Vallejo's Gloss.
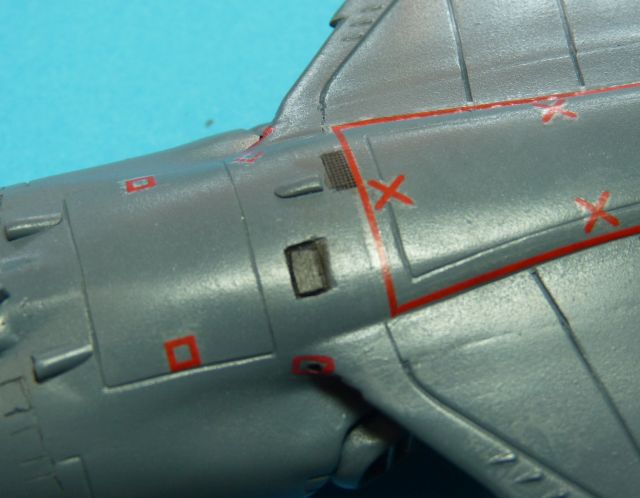
I was going to make grill decals for the top vents but decided to try a variation on a masking technique Matt Bacon has employed. I simple used some scale mesh. The results could have been a bit sharper. I had pre-masked the areas with tape before taping down the mesh so the was a slither or room for under spray. Should be a effective way of faking grills if you can be faffed to but the actual mesh in.

...and so after a lot of faffing around adding a lot of small aerials made fro scrap PE, and then losing the carefully blended in windscreen wiper fairing, and knocking off half the aerials I had added, I have finally finished! Well there seems to be a bit of sponge in the cockpit along with a lot of dust sprites so the canopy may well have to come off again before she goes to Telford.
I'll put up some nicer pics when I get chance to take some.
I was going to make grill decals for the top vents but decided to try a variation on a masking technique Matt Bacon has employed. I simple used some scale mesh. The results could have been a bit sharper. I had pre-masked the areas with tape before taping down the mesh so the was a slither or room for under spray. Should be a effective way of faking grills if you can be faffed to but the actual mesh in.
...and so after a lot of faffing around adding a lot of small aerials made fro scrap PE, and then losing the carefully blended in windscreen wiper fairing, and knocking off half the aerials I had added, I have finally finished! Well there seems to be a bit of sponge in the cockpit along with a lot of dust sprites so the canopy may well have to come off again before she goes to Telford.
I'll put up some nicer pics when I get chance to take some.
Classic British Kits SIG Leader Better to fettle than to fill
(2024 A:B 5:2) (2023 13:8:7) (2022 21:11) (2021 15:8) (2020 8:4:4)
(2024 A:B 5:2) (2023 13:8:7) (2022 21:11) (2021 15:8) (2020 8:4:4)