Shaun's Bodging Bench * replaced for 2018*
-
bilby1968

- Modelling Gent and Scholar
- Posts: 1270
- Joined: May 1st, 2011, 12:19 am
- Location: Adelaide, South Australia
Re: Shaun's Bodging Bench
Looking forward to seeing the 747 as it progresses as it looks very nice so far
3 on the bench at anytime............well sometimes!!
-
ShaunW
- NOT the sheep
- Posts: 26188
- Joined: November 26th, 2011, 6:11 pm
- Location: Pontefract West Yorkshire
Re: Shaun's Bodging Bench
Many thanks for your comments and interest boys. This afternoon I've applied grey to the wings and tailplanes. I haven't a clue really as to what the exact shade should be, so please keep it just between us eh 
After some mulling and chewing I elected to spray Humbrol Gull Grey (129) using the TLAR system, but I might overspray some lighter grey to give a bit of a weathered effect. I still haven't decided on the inner panels yet and I'll have another trawl through images on the internet. Here's what the wings and tailplanes look like so far:
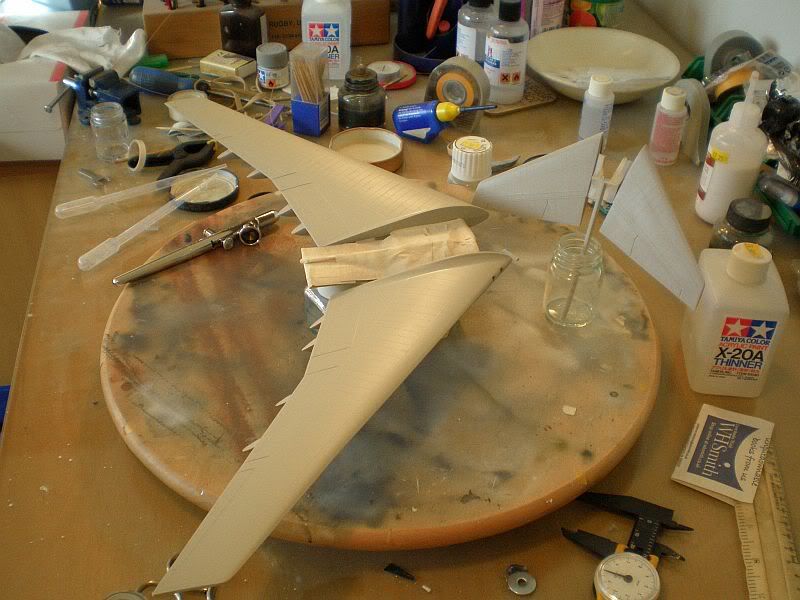
Although the flying surfaces look to be different shades, they aren't in reality and the effect has been caused by my desk lamps. I'm too tired and emotional to retake the pic tonight and must remember to buy some daylight bulbs. Although the tinlet of paint is about 10 years old, the paint airbrushed without any problems. As I'm often pressed for time during weekday evenings, I generally can't be bothered setting up to airbrush so I'll leave the flying surfaces as is for the time being. I will try during the week to commence painting the cabin windows. My master plan for this is to use Tamiya gloss black followed by a tint of clear blue. This has worked fine for me on AFV vision blocks so we will see if it works on Jumbo Jet windows!
Thanks for looking.
After some mulling and chewing I elected to spray Humbrol Gull Grey (129) using the TLAR system, but I might overspray some lighter grey to give a bit of a weathered effect. I still haven't decided on the inner panels yet and I'll have another trawl through images on the internet. Here's what the wings and tailplanes look like so far:
Although the flying surfaces look to be different shades, they aren't in reality and the effect has been caused by my desk lamps. I'm too tired and emotional to retake the pic tonight and must remember to buy some daylight bulbs. Although the tinlet of paint is about 10 years old, the paint airbrushed without any problems. As I'm often pressed for time during weekday evenings, I generally can't be bothered setting up to airbrush so I'll leave the flying surfaces as is for the time being. I will try during the week to commence painting the cabin windows. My master plan for this is to use Tamiya gloss black followed by a tint of clear blue. This has worked fine for me on AFV vision blocks so we will see if it works on Jumbo Jet windows!
Thanks for looking.
Doing - Tamiya 1/35th Universal Carrier.
Work is the curse of the modelling classes!
IPMS#12300
Work is the curse of the modelling classes!
IPMS#12300
-
bromo

- On a long, long journey
- Posts: 1249
- Joined: May 2nd, 2011, 7:05 pm
- Location: Wolverhampton,England
Re: Shaun's Bodging Bench
Glad to see your carrying on with this Shaun,and the white is looking great.
BEEN A WHILE

Re: Shaun's Bodging Bench
Shaun,
Good to see the '47 is still on the go. Airliners are not really my thing, but seeing the attention you've lavished on this, I can't wait to see it finished. Go for it!
PS TLAR is also known as the W-FITA method.
Why? Wet Finger In The Air, of course!
regards,
Martin
Good to see the '47 is still on the go. Airliners are not really my thing, but seeing the attention you've lavished on this, I can't wait to see it finished. Go for it!
PS TLAR is also known as the W-FITA method.
Why? Wet Finger In The Air, of course!
regards,
Martin
-
ShaunW
- NOT the sheep
- Posts: 26188
- Joined: November 26th, 2011, 6:11 pm
- Location: Pontefract West Yorkshire
Re: Shaun's Bodging Bench
Thanks for your kind comments boys. I thought this model would take some effort but I am enjoying the challenge - so far! I've got the day off tomorrow ahead of a week away so I will start painting in the windows I think.
I like the Wet Finger In The Air - sums up the approach that I often take to a build
I like the Wet Finger In The Air - sums up the approach that I often take to a build
Doing - Tamiya 1/35th Universal Carrier.
Work is the curse of the modelling classes!
IPMS#12300
Work is the curse of the modelling classes!
IPMS#12300
-
ShaunW
- NOT the sheep
- Posts: 26188
- Joined: November 26th, 2011, 6:11 pm
- Location: Pontefract West Yorkshire
Re: Shaun's Bodging Bench
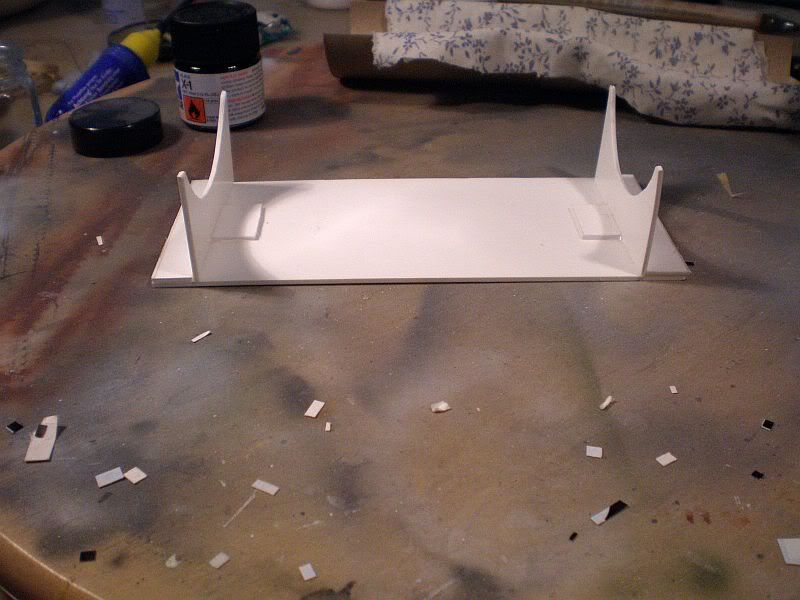
I've been away for a week's skiing with Mrs W and thus not much has been going on modelling wise. However, I managed to get some in today on the 747, which I have to say has become one of the most bonkers projects that I've become involved in of late. This thing is seriously challenging. I seem to recall making some blase (sorry can't work the accents on this laptop so you'll have to imagine it on the "e"!) comment about painting in the windows early on in the Four or More Engines GB. How easy the words, how difficult the task!!
To begin with, the size of the model hindered my attempts to apply the window paint so I knocked together a cradle out of scrap plastic card, in order to hold the fuselage at a roughly 45 degree angle.
Once that was organised, I began to paint in the windows using Tamiya gloss black. Unfortunately not all of the windows were perfectly formed and those at the rear in particular resisted any attempt at a reasonably neat finish. I had a dig around in my decal bank and came up with a set of Normandy invasion stripes from a 1/48th Tamiya P51D that I built back in the late 90's (never throw anything away!).
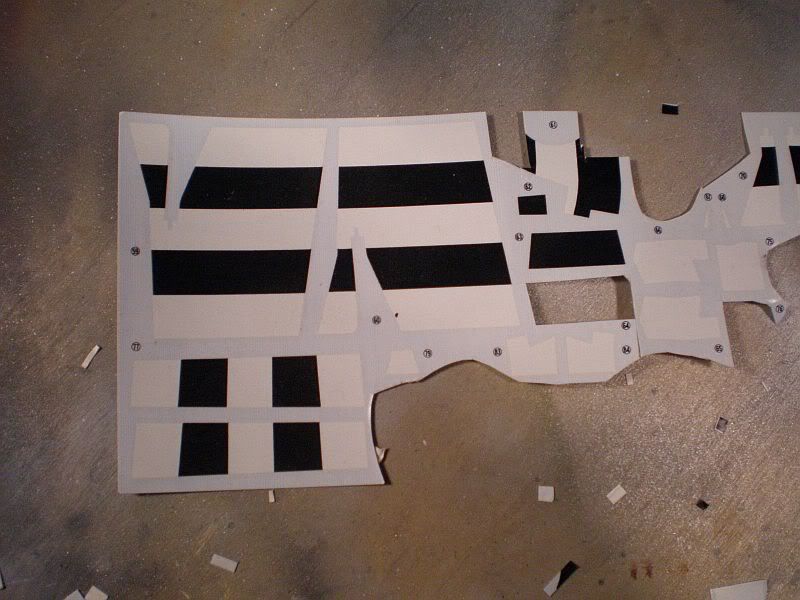
Using some of the white decal from the stripes as a backing followed by the black cut into window shapes (or as near as I could get them!) I have started to even up the window profiles. Below is the fuselage on the cradle during the painting and decalling excercise.

As of yet, there is further work to do, particularly with the windows at the back.
Once I'm happy with the overall look, I'll apply a little clear blue to the windows and, all being well, will repeat on the other side after which is the flightdeck. What a slog this model is but morale is reasonably high, I just hope that I'm not boring everyone as I appreciate that airliners are a bit of a minority interest. That said, I also have my long suffering F100D lurking in the background and I may well have a break sorting out some scorched tail end on that. Thanks for looking.
To begin with, the size of the model hindered my attempts to apply the window paint so I knocked together a cradle out of scrap plastic card, in order to hold the fuselage at a roughly 45 degree angle.
Once that was organised, I began to paint in the windows using Tamiya gloss black. Unfortunately not all of the windows were perfectly formed and those at the rear in particular resisted any attempt at a reasonably neat finish. I had a dig around in my decal bank and came up with a set of Normandy invasion stripes from a 1/48th Tamiya P51D that I built back in the late 90's (never throw anything away!).
Using some of the white decal from the stripes as a backing followed by the black cut into window shapes (or as near as I could get them!) I have started to even up the window profiles. Below is the fuselage on the cradle during the painting and decalling excercise.
As of yet, there is further work to do, particularly with the windows at the back.
Once I'm happy with the overall look, I'll apply a little clear blue to the windows and, all being well, will repeat on the other side after which is the flightdeck. What a slog this model is but morale is reasonably high, I just hope that I'm not boring everyone as I appreciate that airliners are a bit of a minority interest. That said, I also have my long suffering F100D lurking in the background and I may well have a break sorting out some scorched tail end on that. Thanks for looking.
Doing - Tamiya 1/35th Universal Carrier.
Work is the curse of the modelling classes!
IPMS#12300
Work is the curse of the modelling classes!
IPMS#12300
-
Migrant

- Happily Landed after Many Circuits and Bumps
- Posts: 2428
- Joined: April 5th, 2011, 8:33 pm
- Location: Calgary, Canada
Re: Shaun's Bodging Bench
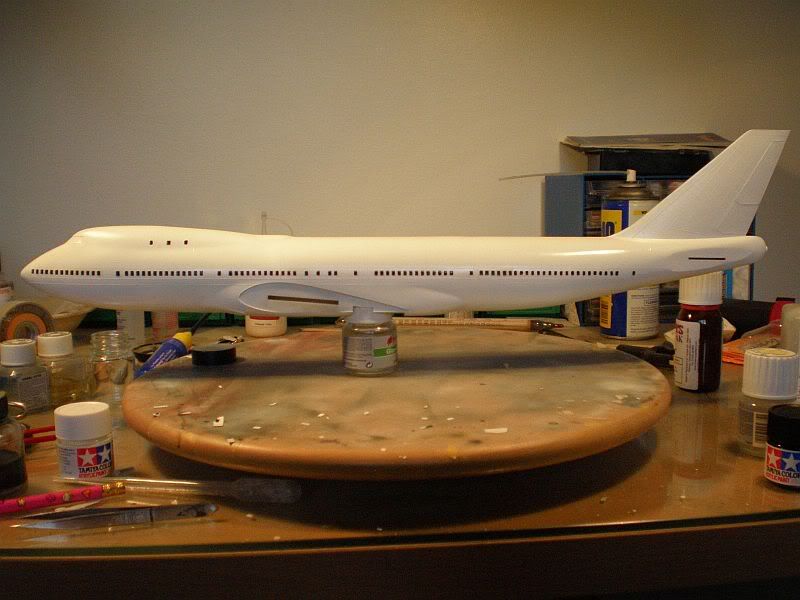
It looks great so far Shaun. So, are the windows painted, or pieces of black decal? They look extremely neat and equally spaced...
-
johnsan

- Modelling Gent and Scholar
- Posts: 1358
- Joined: May 1st, 2011, 12:27 am
- Location: Just to the left of the great salt lake.
Re: Shaun's Bodging Bench
Nice. Very clean.
I agree. Never throw away anything.
I agree. Never throw away anything.
Really nothing pithy to say.

Re: Shaun's Bodging Bench
It's really a mistery to me, how to build a civilian... They need to be so clean !
Salute e Latinum per tutti !
-
ShaunW
- NOT the sheep
- Posts: 26188
- Joined: November 26th, 2011, 6:11 pm
- Location: Pontefract West Yorkshire
Re: Shaun's Bodging Bench
Thanks for your comments and interest boys. The windows are mostly painted save for the first ones after the door window towards the rear, which are decals. Cutting the decals and attempting to make them equal is, however, one of the most frustrating modelling tasks I've ever set myself and frankly, Mr Shankly, is a PIA!! In order to progress the 747 build I'm going to have to come up with something better. The problem is that the sanding work which was necessary on the rear fuselage join effectively knackered some of the windows to the point where I can't paint them neatly enough, hence the attempted use of decals. What looks ok in a pic however looks less so in reality. I'm looking at two possible ways forward now. Firstly masking, which will be a bit of a pain, or looking on line to see if I can locate some window decals that might do the job a little easier. Whilst I'm pondering that I've started having a look at my F100 which has been patiently waiting in the wings these last weeks. The challenge with that build is the scorched rear fuselage area which is so characteristic of the full-size aircraft. I'll have a bash this afternoon. Both of these models are now becoming established workbench queens and I need to get something finished!!
Doing - Tamiya 1/35th Universal Carrier.
Work is the curse of the modelling classes!
IPMS#12300
Work is the curse of the modelling classes!
IPMS#12300
-
MerlinJones
Re: Shaun's Bodging Bench
Suggested reminder;ShaunW wrote:Whilst I'm pondering that I've started having a look at my F100 which has been patiently waiting in the wings these last weeks. The challenge with that build is the scorched rear fuselage area which is so characteristic of the full-size aircraft.
http://gregers.7.forumer.com/viewtopic. ... sc&start=0;
Regards,
Bruce
-
ShaunW
- NOT the sheep
- Posts: 26188
- Joined: November 26th, 2011, 6:11 pm
- Location: Pontefract West Yorkshire
Re: Shaun's Bodging Bench
Many thanks Bruce, I think you've shown me your build before and your technique is very interesting. In between having to do other things this aft such as, er, gardening  I've been having a bit of a go but haven't managed to do as much as I would have liked. With a bit of luck I'll get some time during the week as work is a little quieter at the moment (famous last words!) and I'll put up some pics in due course.
Doing - Tamiya 1/35th Universal Carrier.
Work is the curse of the modelling classes!
IPMS#12300
Work is the curse of the modelling classes!
IPMS#12300

Re: Shaun's Bodging Bench
Hi ShaunW
Nice work
Mary
Nice work
Mary
-
Dazzled

- Modelling Gent and Scholar
- Posts: 9592
- Joined: October 1st, 2011, 11:08 pm
- Location: Mid Glamorgan, South Wales
- Contact:
Re: Shaun's Bodging Bench
Great work Shaun. It's nice to see the big Boeing progressing 
COLD WAR S.I.G. LEADER
Wherever there's danger, wherever there's trouble, wherever there's important work to be done....I'll be somewhere else building a model!
Wherever there's danger, wherever there's trouble, wherever there's important work to be done....I'll be somewhere else building a model!
-
ShaunW
- NOT the sheep
- Posts: 26188
- Joined: November 26th, 2011, 6:11 pm
- Location: Pontefract West Yorkshire
Re: Shaun's Bodging Bench
Alas at the moment Dazzled, work has come to a stop on the 747 whilst I search for some useable window decals. If I can't find anything suitable I will have to mask off the windows I can't paint neatly. In the meantime I've been fettling my F100 build and at least seem to be making some progress there. I'll put some pics up asap.
Doing - Tamiya 1/35th Universal Carrier.
Work is the curse of the modelling classes!
IPMS#12300
Work is the curse of the modelling classes!
IPMS#12300