No it's not Chris. I dislike any strong coloured plastic being used for kits, including white and at the risk of being deemed a heretic, I especially dislike the multi-coloured plastics produced by Matchbox. I can understand why manufacturers do it, to appeal to younger or inexperienced modellers so that they can, in theory, build without painting and have a model in more or less the correct colour. As I always paint models and have done since my teens, I prefer neutral colours, such as a light grey, to work with.chrism wrote:That red plastic cannot be any worse than the yellow in the old seaking box I have got at present
Shaun's Bodging Bench * replaced for 2018*
-
ShaunW
- NOT the sheep
- Posts: 26188
- Joined: November 26th, 2011, 6:11 pm
- Location: Pontefract West Yorkshire
Re: Shaun's Bodging Bench
Doing - Tamiya 1/35th Universal Carrier.
Work is the curse of the modelling classes!
IPMS#12300
Work is the curse of the modelling classes!
IPMS#12300
-
Stamford

- Modelling Gent and Scholar
- Posts: 2240
- Joined: May 1st, 2011, 7:42 am
- Location: Klågerup Sweden
Re: Shaun's Bodging Bench
I could never take Matchbox kits seriously as a nipper because they came multi coloured. I still have a strong nostalgic attachment to light blue from the very first kits I made.
running at the edge of their world
-
ShaunW
- NOT the sheep
- Posts: 26188
- Joined: November 26th, 2011, 6:11 pm
- Location: Pontefract West Yorkshire
Re: Shaun's Bodging Bench
You need shades on for some of those old MB kits Stamford!
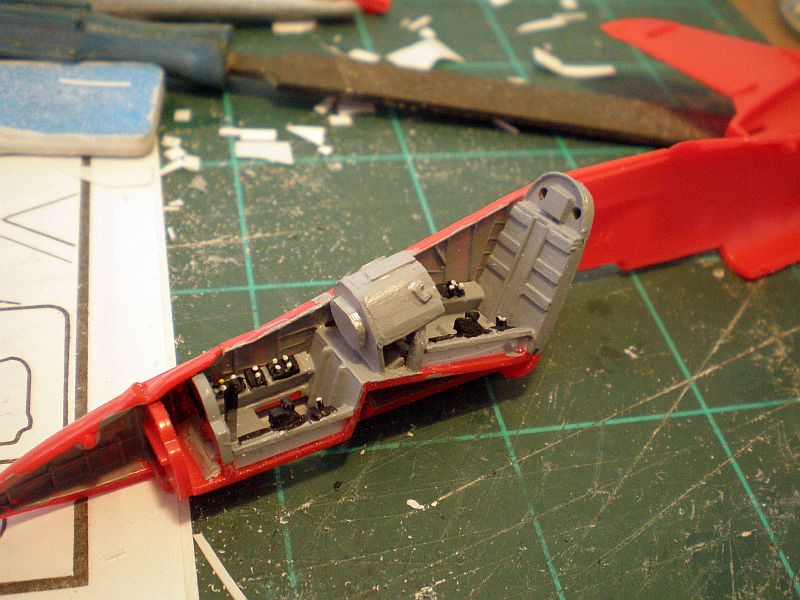
A quick update on the Hawk. I have now finished and painted the cockpit interior, which has been attached to the starboard fuselage half.
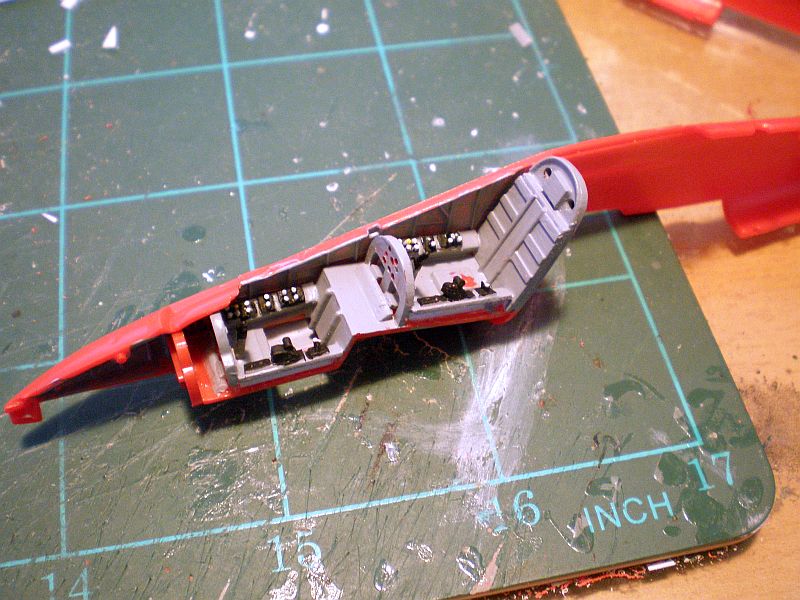
A trawl through my decals did not turn up any suitable ones for this small cockpit and therefore I went old skool and decided to paint the detail. I initially tried to paint switches onto the side consoles but could not get them to look anything like. To make a neater effort, I cut small pieces of plastic rod and glued them to the consoles following which the ends of the rod pieces were carefully painted to give a more round finish than I could achieve freehand. Cutting the rod was, however, a complete PITA!! I also made some throttle quadrants and levers for front and rear out of plastic rod and card off-cuts. This all looks a bit crude and there aren't nearly enough switches but it is remarkably passable once the fuselage halves are mated.
Next up I will have to make a new centre shroud to fit over the rear instrument panel as the one provided OOB is completely the wrong shape in that it is half round whereas the real thing is shorter and angled. I tried sanding the Airfix part to a better shape without success so I now have a bit of a challenge but that's part of the fun
Thanks for looking.
A quick update on the Hawk. I have now finished and painted the cockpit interior, which has been attached to the starboard fuselage half.
A trawl through my decals did not turn up any suitable ones for this small cockpit and therefore I went old skool and decided to paint the detail. I initially tried to paint switches onto the side consoles but could not get them to look anything like. To make a neater effort, I cut small pieces of plastic rod and glued them to the consoles following which the ends of the rod pieces were carefully painted to give a more round finish than I could achieve freehand. Cutting the rod was, however, a complete PITA!! I also made some throttle quadrants and levers for front and rear out of plastic rod and card off-cuts. This all looks a bit crude and there aren't nearly enough switches but it is remarkably passable once the fuselage halves are mated.
Next up I will have to make a new centre shroud to fit over the rear instrument panel as the one provided OOB is completely the wrong shape in that it is half round whereas the real thing is shorter and angled. I tried sanding the Airfix part to a better shape without success so I now have a bit of a challenge but that's part of the fun
Thanks for looking.
Doing - Tamiya 1/35th Universal Carrier.
Work is the curse of the modelling classes!
IPMS#12300
Work is the curse of the modelling classes!
IPMS#12300
-
shangos70
- Modelling Gent and Scholar
- Posts: 4422
- Joined: May 1st, 2011, 11:14 am
- Location: Doncaster, Socialist Republic of South Yorkshire.
Re: Shaun's Bodging Bench
Dedication to the cause Shaun, or the terrible disease of AMS. You realise I will now put my part started Hawk and JP back on the shelf of shame until people forget all about your detailed builds! Love jobs on both btw.
-
iggie

- Modelling Gent and Scholar
- Posts: 23436
- Joined: July 31st, 2013, 11:04 am
- Location: North Somercotes, Lincolnshire
- Contact:
Re: Shaun's Bodging Bench
Great work on the cockpit Shaun; have you tried a sharp cocktail stick to put tiny dots of paint onto instrument panels?
Best wishes
Jim
If you can walk away from a landing, it's a good landing. If you use the airplane the next day, it's an outstanding landing
"Never put off till tomorrow, what you can do the day after tomorrow"
Jim
If you can walk away from a landing, it's a good landing. If you use the airplane the next day, it's an outstanding landing
"Never put off till tomorrow, what you can do the day after tomorrow"
-
skypirate

- Modelling Gent and Scholar
- Posts: 7299
- Joined: May 1st, 2011, 6:13 am
- Location: Port Macquarie, Australia
Re: Shaun's Bodging Bench
Very neat, Shaun. This will be great!
cheers,
David
cheers,
David
-
JamesPerrin

- Looks like his avatar
- Posts: 13684
- Joined: April 5th, 2011, 8:09 pm
- Location: W. Yorkshire
- Contact:
Re: Shaun's Bodging Bench
Cockpit looks very crisp the details are sharp and clear.
Classic British Kits SIG Leader Better to fettle than to fill
(2024 A:B 5:2) (2023 13:8:7) (2022 21:11) (2021 15:8) (2020 8:4:4)
(2024 A:B 5:2) (2023 13:8:7) (2022 21:11) (2021 15:8) (2020 8:4:4)
-
ShaunW
- NOT the sheep
- Posts: 26188
- Joined: November 26th, 2011, 6:11 pm
- Location: Pontefract West Yorkshire
Re: Shaun's Bodging Bench
Many thanks for your kind comments folks. Yes, Iggie I have tried the cocktail stick method for painting switches etc but with varying results so this time I thought I would try something different.
Doing - Tamiya 1/35th Universal Carrier.
Work is the curse of the modelling classes!
IPMS#12300
Work is the curse of the modelling classes!
IPMS#12300
-
Purplethistle

- Delusional Miniature Killer
- Posts: 4680
- Joined: July 10th, 2014, 1:03 am
- Location: Glasgow
Re: Shaun's Bodging Bench
Nice 'pits Shaun. Surely making a Matchbox kit 'pit look that good qualifies for The Magic Circle?
"Spits, SLUFS and Rock 'n' Roll"
-
ShaunW
- NOT the sheep
- Posts: 26188
- Joined: November 26th, 2011, 6:11 pm
- Location: Pontefract West Yorkshire
Re: Shaun's Bodging Bench
Thanks PT and no doubt Mrs W would agree with your description of me as a magician as I always disappear when there is DIY to be done around chez W  The kit is, however, Airfix and not Matchbox - must be the coloured plastic that is making you think MB!
Anyway, a little more progress on the Hawk in that I have now finished off the replacement centre console between the two cockpits. After various failed trials involving plastic card I eventually stumbled upon some plastic tube in my odds and ends box which, when cut in half, was just right to start making the console. The half-round tube was filed to give the faceted look that I was after and it was relatively simple job thereafter to make a couple of bulkheads front and rear from scrap plastic card to fit the cockpit. A few bits of detail were added using yet more scrap plastic card (never throw anything away! I keep any handy looking off-cuts of plastic card in a tub on the workbench) to give more of an authentic look but real Hawk enthusiasts/former pilots might wish to look away now
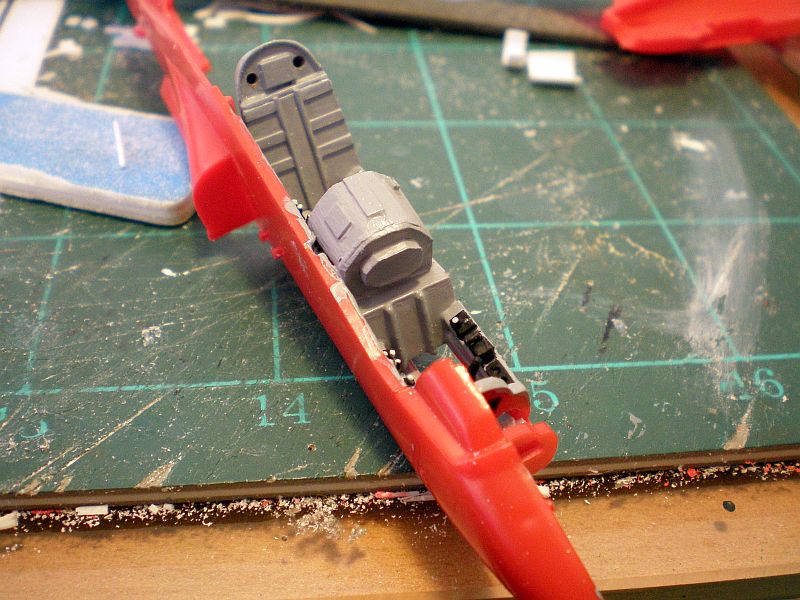
The console is near enough for jazz and IMHO is certainly better than the OOB effort, which was probably based on a prototype or mock-up of the aircraft. I'll give the console another lick of paint and then I can consider closing up the fuselage halves and moving on. The seats need work and will be fitted after the main airframe painting.
Thanks for looking.
Anyway, a little more progress on the Hawk in that I have now finished off the replacement centre console between the two cockpits. After various failed trials involving plastic card I eventually stumbled upon some plastic tube in my odds and ends box which, when cut in half, was just right to start making the console. The half-round tube was filed to give the faceted look that I was after and it was relatively simple job thereafter to make a couple of bulkheads front and rear from scrap plastic card to fit the cockpit. A few bits of detail were added using yet more scrap plastic card (never throw anything away! I keep any handy looking off-cuts of plastic card in a tub on the workbench) to give more of an authentic look but real Hawk enthusiasts/former pilots might wish to look away now
The console is near enough for jazz and IMHO is certainly better than the OOB effort, which was probably based on a prototype or mock-up of the aircraft. I'll give the console another lick of paint and then I can consider closing up the fuselage halves and moving on. The seats need work and will be fitted after the main airframe painting.
Thanks for looking.
Doing - Tamiya 1/35th Universal Carrier.
Work is the curse of the modelling classes!
IPMS#12300
Work is the curse of the modelling classes!
IPMS#12300
-
Stuart

- Raider of the Lost Ark Royal
- Posts: 19447
- Joined: February 25th, 2013, 4:55 pm
- Location: North Wales
- Contact:
Re: Shaun's Bodging Bench
Awesomeness!!
Stuart Templeton I may not be good but I'm slow...
My Blog: https://stuartsscalemodels.blogspot.com/
My Blog: https://stuartsscalemodels.blogspot.com/
-
ShaunW
- NOT the sheep
- Posts: 26188
- Joined: November 26th, 2011, 6:11 pm
- Location: Pontefract West Yorkshire
Re: Shaun's Bodging Bench
Cheers, Stuart! There's a bit of filler needed round the fuselage now I've bunged it together but, hey ho, I'm used to that sort of thing!
Doing - Tamiya 1/35th Universal Carrier.
Work is the curse of the modelling classes!
IPMS#12300
Work is the curse of the modelling classes!
IPMS#12300
-
Migrant

- Happily Landed after Many Circuits and Bumps
- Posts: 2428
- Joined: April 5th, 2011, 8:33 pm
- Location: Calgary, Canada
Re: Shaun's Bodging Bench
Looks great Shaun 
-
skypirate
- Modelling Gent and Scholar
- Posts: 7299
- Joined: May 1st, 2011, 6:13 am
- Location: Port Macquarie, Australia
Re: Shaun's Bodging Bench
Don't worry; it will all look amazing under the canopy.
cheers,
David
cheers,
David
-
Marek

- Modelling Gent and Scholar
- Posts: 2455
- Joined: May 1st, 2011, 8:03 am
- Location: Madison, WI
- Contact:
Re: Shaun's Bodging Bench
nice progress