Shaun's Bodging Bench * replaced for 2018*
-
ShaunW
- NOT the sheep
- Posts: 26180
- Joined: November 26th, 2011, 6:11 pm
- Location: Pontefract West Yorkshire
Re: Shaun's Bodging Bench
Thanks, David. I'm going to make a start shortly as I've now finished my household chores!
Doing - Tamiya 1/35th Universal Carrier.
Work is the curse of the modelling classes!
IPMS#12300
Work is the curse of the modelling classes!
IPMS#12300
-
ShaunW
- NOT the sheep
- Posts: 26180
- Joined: November 26th, 2011, 6:11 pm
- Location: Pontefract West Yorkshire
Re: Shaun's Bodging Bench
OK, for those of you who may not have seen the Airfix new tool Spit 22, here's the obligatory sprue shots:
There are three sprues in the box plus clear parts which are bagged separately (not shown as I've left them in the bag to avoid damage):
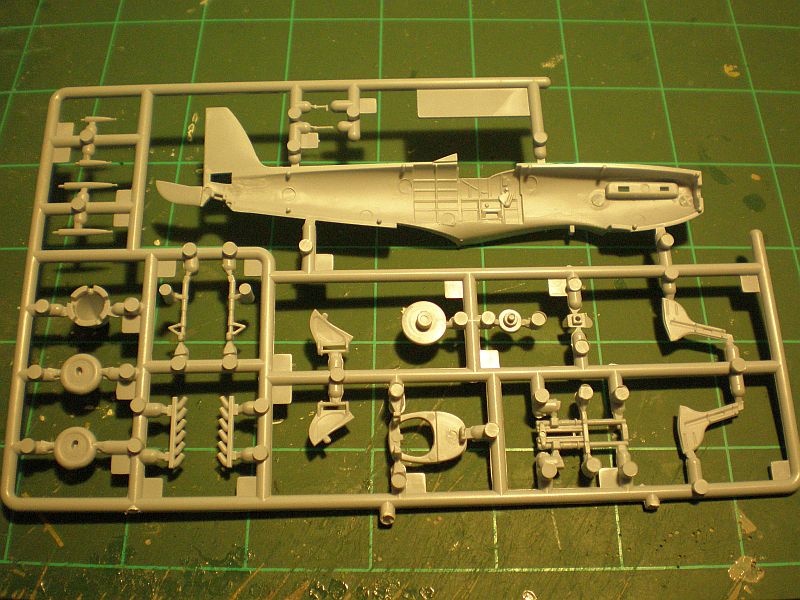

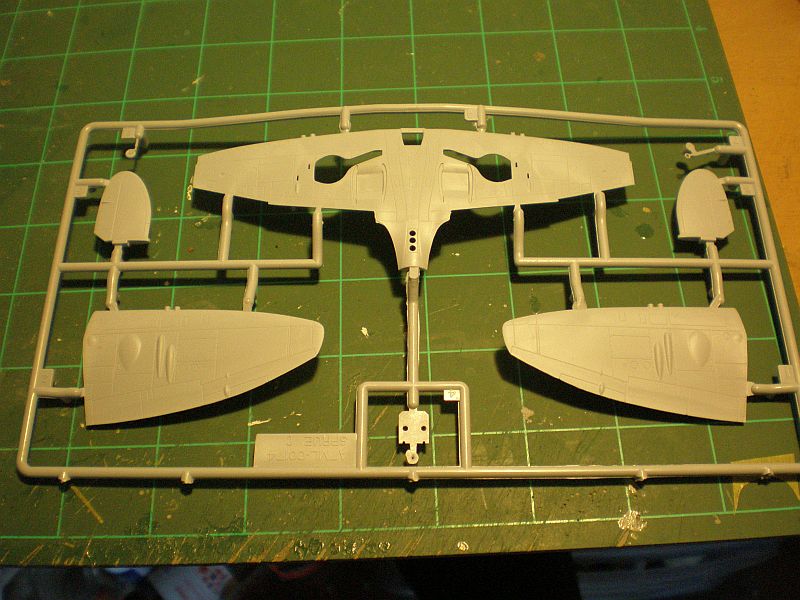
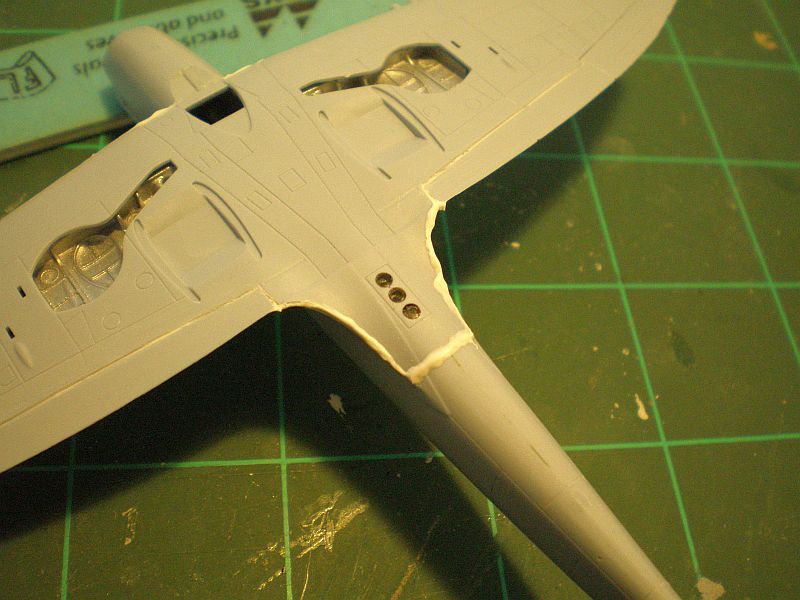
Surface detail is nicely done although, as with a number of these new tool kits, the panel lines are a little deep. In my experience of these newer products though the panel lines should look OK under paint. The sprue gates are bonkers thick though IMHO and care will have to be taken when removing the parts to avoid damage.
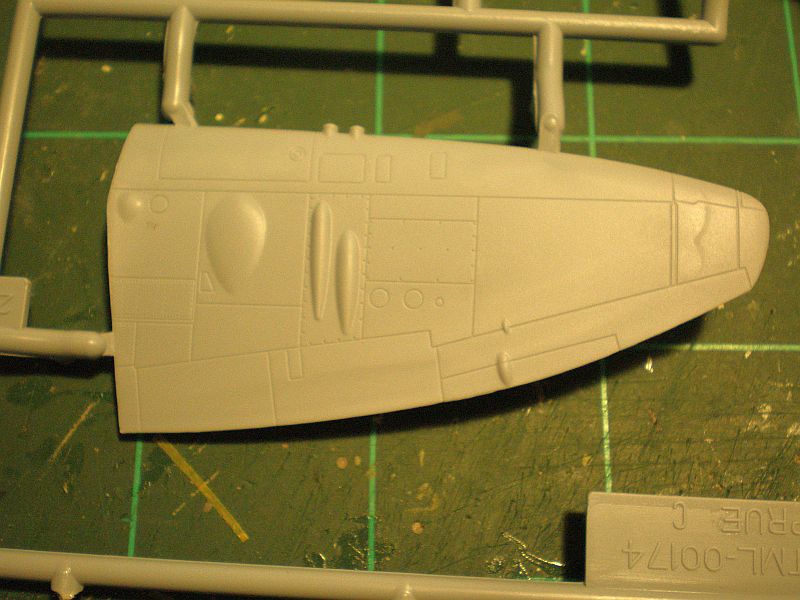
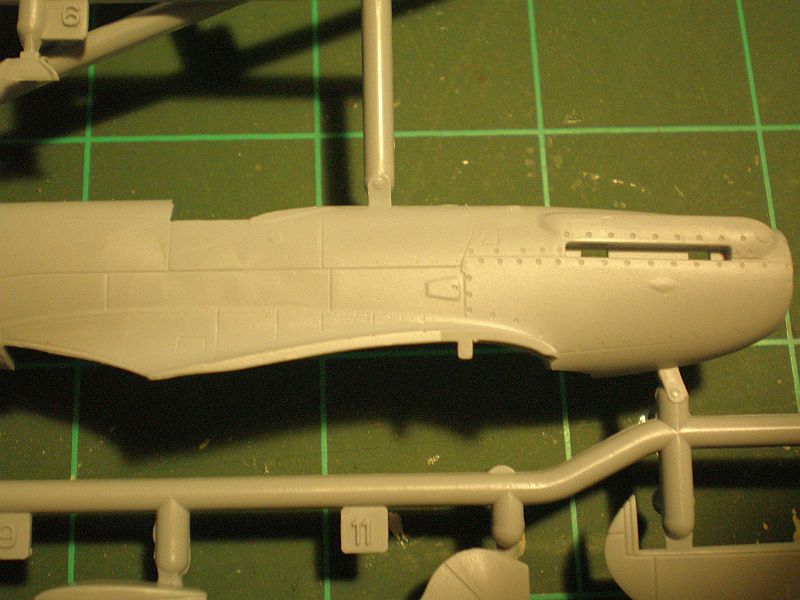
Cockpit side wall detail is decent for the scale and certainly better than the old days! Rather disappointingly there are some deep ejector pin marks but hopefully these won't be visible when I dry run the cockpit interior or otherwise it will be out with the filler
I've now made a start painting the interior bits and I'll post up some shots when I'm a bit further down the line.
Thanks for looking.
There are three sprues in the box plus clear parts which are bagged separately (not shown as I've left them in the bag to avoid damage):
Surface detail is nicely done although, as with a number of these new tool kits, the panel lines are a little deep. In my experience of these newer products though the panel lines should look OK under paint. The sprue gates are bonkers thick though IMHO and care will have to be taken when removing the parts to avoid damage.
Cockpit side wall detail is decent for the scale and certainly better than the old days! Rather disappointingly there are some deep ejector pin marks but hopefully these won't be visible when I dry run the cockpit interior or otherwise it will be out with the filler
I've now made a start painting the interior bits and I'll post up some shots when I'm a bit further down the line.
Thanks for looking.
Doing - Tamiya 1/35th Universal Carrier.
Work is the curse of the modelling classes!
IPMS#12300
Work is the curse of the modelling classes!
IPMS#12300

Re: Shaun's Bodging Bench
Are you salivating 
All models are equal. Some models are more equal than others.
Airfix Tribute Forum
Airfix Tribute Forum
-
Michael modeller 48
Re: Shaun's Bodging Bench
Shawn, I thought you were getting a kittyhawk....? Nice looking Spit kit....
-
ShaunW
- NOT the sheep
- Posts: 26180
- Joined: November 26th, 2011, 6:11 pm
- Location: Pontefract West Yorkshire
Re: Shaun's Bodging Bench
No, Michael. I have bought the new Airfix 1/48th Tomahawk:Michael modeller 48 wrote:Shawn, I thought you were getting a kittyhawk....? Nice looking Spit kit....
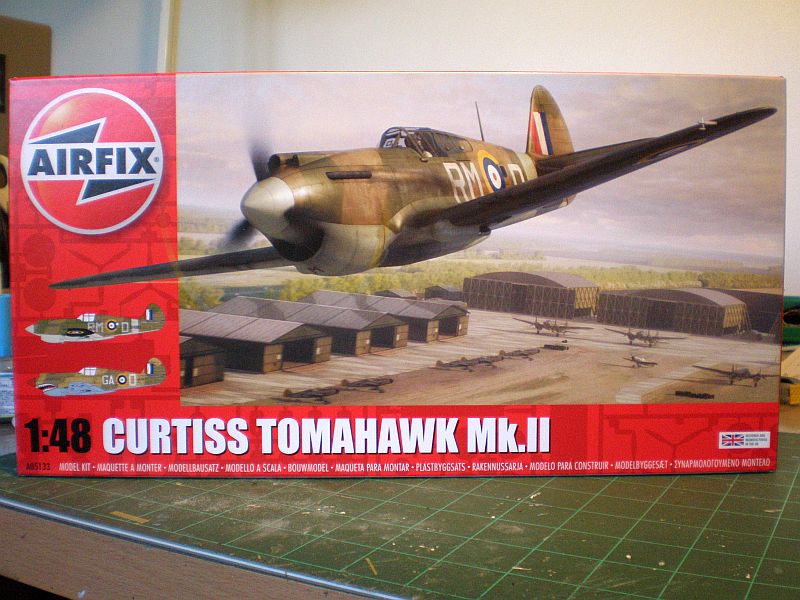
The Tomahawk is based on an earlier version of the P-40 than the Kittyhawk - the two types look similar but there are various differences between the two and indeed between both types and their equivalents in U.S. service. I have chosen to start the Spitfire as I want what I hope will be a quite straightforward build to get back into modelling after a bit of a break due to mojo failure!
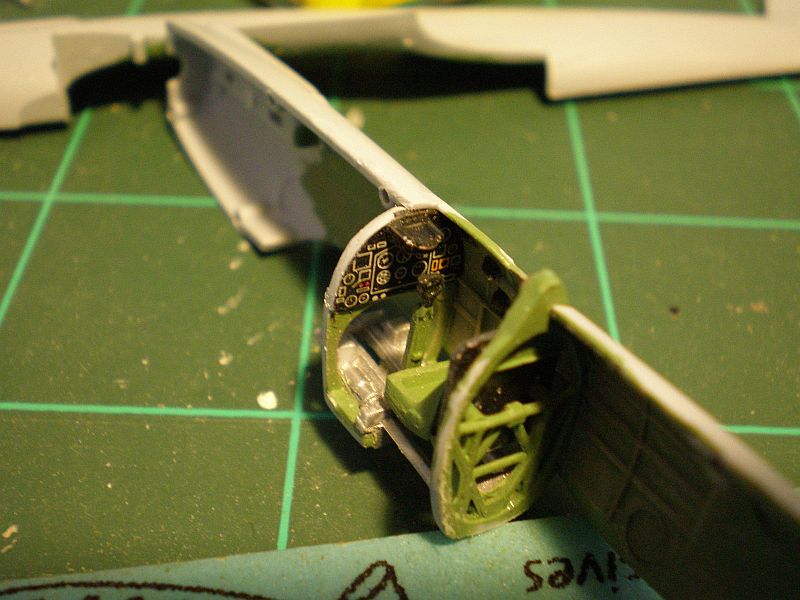
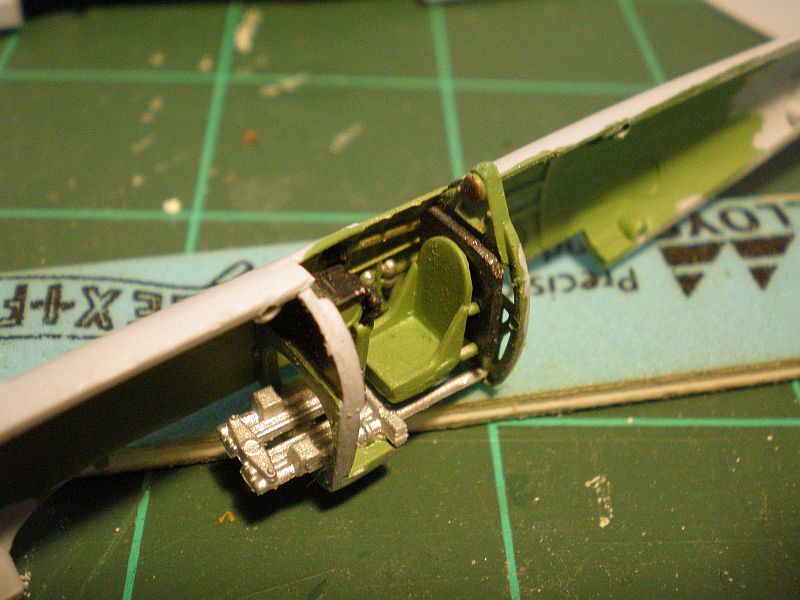
Anyhoo, talking of the Spitfire, the build has commenced. First up, as usual, was the cockpit and this is decently detailed for the scale. The IP is by way of a decal, which is typical of these Airfix new tool kits and it needed a little trimming in order to fit properly. I always find these Airfix IP decals to look a little garish at first glance but they generally look OK under the glass.
On the underside filler was needed at the rear of the wing underside and I also applied a smidgen into the flap areas as I felt they were a little deep if left alone.
Topside filler includes a little in the wing root areas and rather more in front of the cockpit!
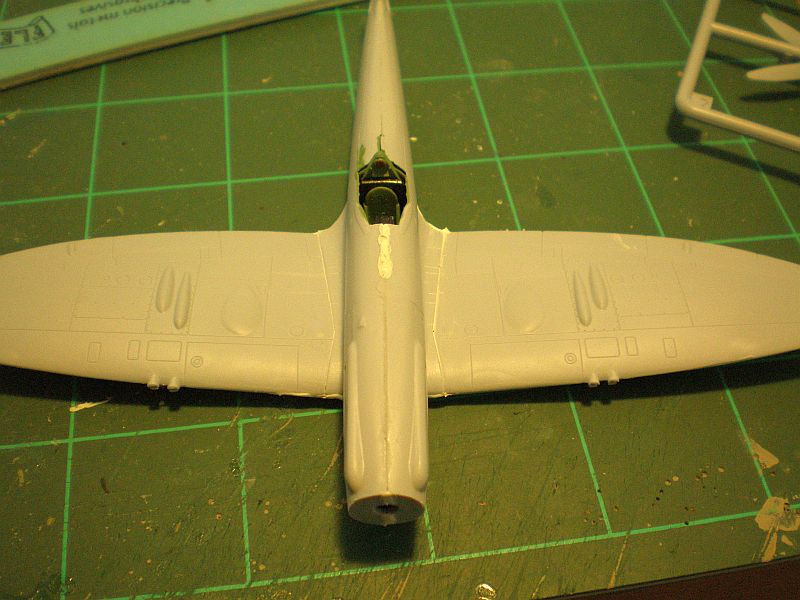
The use of a bit of filler is par for the course as far as I'm concerned (as an adult modeller I don't think I've ever built a kit of whatever vintage without using at least some filler) and certainly doesn't mean that I think this is in anyway a bad kit.
Thanks for looking.
Doing - Tamiya 1/35th Universal Carrier.
Work is the curse of the modelling classes!
IPMS#12300
Work is the curse of the modelling classes!
IPMS#12300
-
Michael modeller 48
Re: Shaun's Bodging Bench
Nice....kit
Making quick working of this Spit
It is ready to take on 109 and Stukas
I know what you mean my Ju 52 blunder and p-40 paint mishap....
Mojo is back!
Making quick working of this Spit
It is ready to take on 109 and Stukas
I know what you mean my Ju 52 blunder and p-40 paint mishap....
Mojo is back!
-
ShaunW
- NOT the sheep
- Posts: 26180
- Joined: November 26th, 2011, 6:11 pm
- Location: Pontefract West Yorkshire
Re: Shaun's Bodging Bench
I don't really know why my mojo deserted me, Michael, but the Spit is only the third model that I have started this year. I've lost mojo before and find that it is best not to try to force the issue but to let it come back of its own accord. A visit to the main IPMS model show over here at Telford over last weekend helped to inspire me. I will now let the filler dry overnight before sanding smooth tomorrow.
Doing - Tamiya 1/35th Universal Carrier.
Work is the curse of the modelling classes!
IPMS#12300
Work is the curse of the modelling classes!
IPMS#12300
Re: Shaun's Bodging Bench
Great that you're building again Shaun 
All models are equal. Some models are more equal than others.
Airfix Tribute Forum
Airfix Tribute Forum
-
ShaunW
- NOT the sheep
- Posts: 26180
- Joined: November 26th, 2011, 6:11 pm
- Location: Pontefract West Yorkshire
Re: Shaun's Bodging Bench
Thanks, Ratch
Doing - Tamiya 1/35th Universal Carrier.
Work is the curse of the modelling classes!
IPMS#12300
Work is the curse of the modelling classes!
IPMS#12300
-
iggie

- Modelling Gent and Scholar
- Posts: 23417
- Joined: July 31st, 2013, 11:04 am
- Location: North Somercotes, Lincolnshire
- Contact:
Re: Shaun's Bodging Bench
Nice to see that the Spit is coming along nicely Shaun. I wonder if Airfix go a little bold on the IP decal so it will show through the (scale-wise) un-naturally thick canopy glazing?
Best wishes
Jim
If you can walk away from a landing, it's a good landing. If you use the airplane the next day, it's an outstanding landing
"Never put off till tomorrow, what you can do the day after tomorrow"
Jim
If you can walk away from a landing, it's a good landing. If you use the airplane the next day, it's an outstanding landing
"Never put off till tomorrow, what you can do the day after tomorrow"
-
ShaunW
- NOT the sheep
- Posts: 26180
- Joined: November 26th, 2011, 6:11 pm
- Location: Pontefract West Yorkshire
Re: Shaun's Bodging Bench
Cheers, Iggie. You might be right - the canopy is a shade on the thick side, which is a little disappointing given that this is a modern kit.
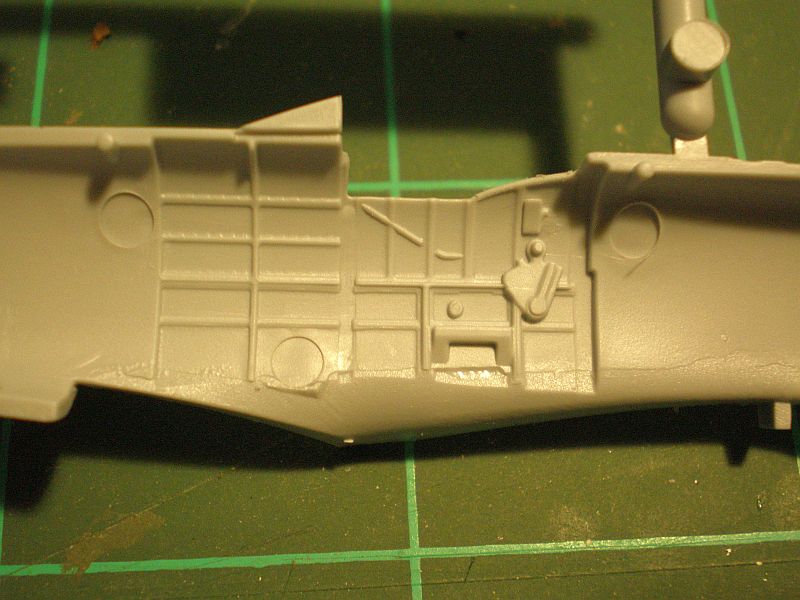
The airframe is now completed and ready for final polishing with Micromesh cloths prior to painting. A little filler was needed, by me at any rate others may have built the kit without, around the usual areas such as the wing roots and fuselage joins but all in all the kit built up nicely enough.
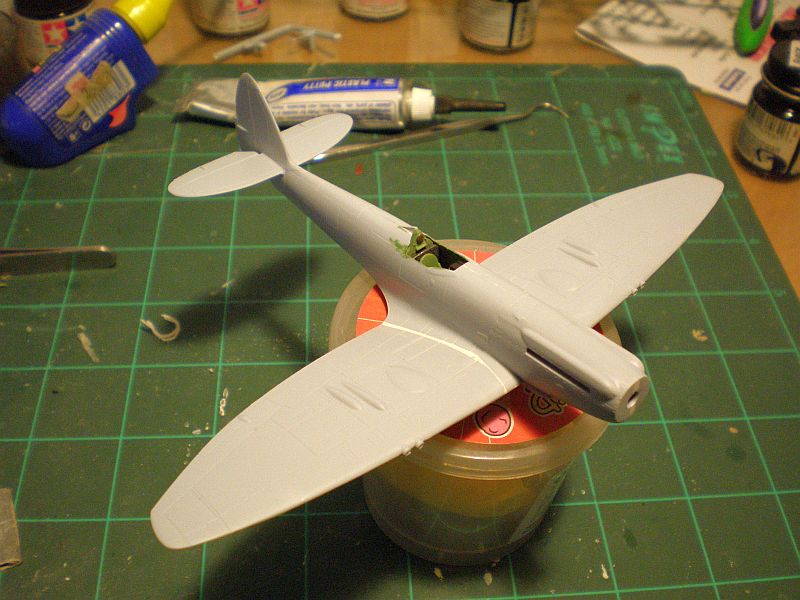
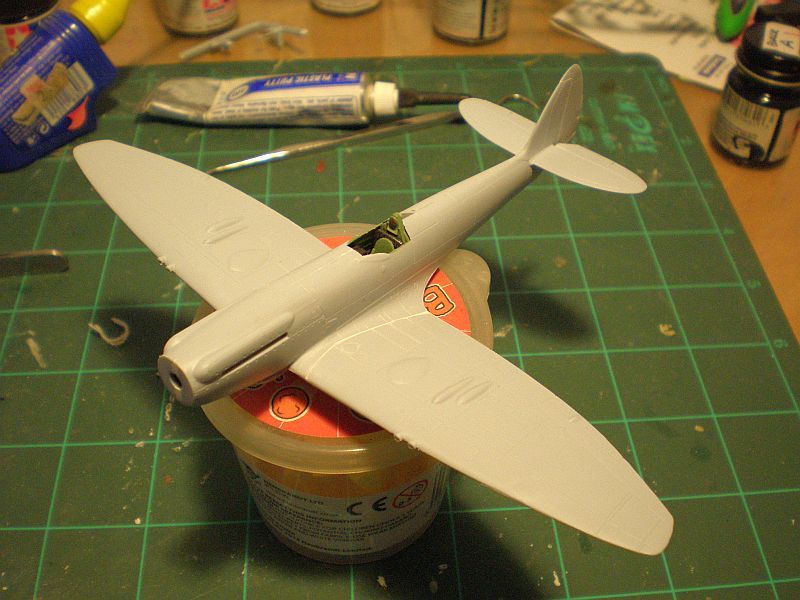

One area of criticism that I do have though concerns the rudder. Airfix provide a separate rudder, which is fair enough except that the bottom portion is moulded integrally with the fuselage halves. Why have they done this? Because of the fixed lower portion the separate rudder cannot be displayed with deflection on as one would expect without removing the fixed lower halves from the fuselage and attaching them to the rest. As I'm building this strictly OOB (almost a first for me on here!) the rudder is mounted without any deflection but I now have a join to fill and smooth:
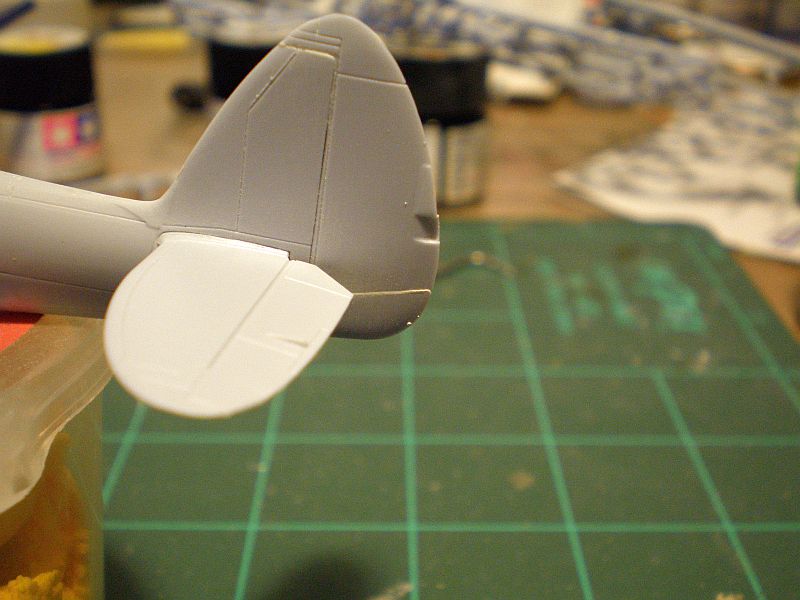
I could have done without that given that I'm intending to go with the silver finish. I think it might have been better if Airfix had just moulded the rudder integrally on both halves of the fuselage in the time honoured manner. I'm no real expert on the Spitfire so could it be that by adding a slightly different shaped rudder another late mark of the aircraft could be produced using the same fuse halves?
Thanks for looking.
The airframe is now completed and ready for final polishing with Micromesh cloths prior to painting. A little filler was needed, by me at any rate others may have built the kit without, around the usual areas such as the wing roots and fuselage joins but all in all the kit built up nicely enough.
One area of criticism that I do have though concerns the rudder. Airfix provide a separate rudder, which is fair enough except that the bottom portion is moulded integrally with the fuselage halves. Why have they done this? Because of the fixed lower portion the separate rudder cannot be displayed with deflection on as one would expect without removing the fixed lower halves from the fuselage and attaching them to the rest. As I'm building this strictly OOB (almost a first for me on here!) the rudder is mounted without any deflection but I now have a join to fill and smooth:
I could have done without that given that I'm intending to go with the silver finish. I think it might have been better if Airfix had just moulded the rudder integrally on both halves of the fuselage in the time honoured manner. I'm no real expert on the Spitfire so could it be that by adding a slightly different shaped rudder another late mark of the aircraft could be produced using the same fuse halves?
Thanks for looking.
Doing - Tamiya 1/35th Universal Carrier.
Work is the curse of the modelling classes!
IPMS#12300
Work is the curse of the modelling classes!
IPMS#12300
-
Michael modeller 48
Re: Shaun's Bodging Bench
Shawn, you have build one clean and well put together Spitfire. Looking forward the finish.
What are Micromesh cloths and the purpose?
What are Micromesh cloths and the purpose?
-
ShaunW
- NOT the sheep
- Posts: 26180
- Joined: November 26th, 2011, 6:11 pm
- Location: Pontefract West Yorkshire
Re: Shaun's Bodging Bench
Many thanks, Michael. Micromesh is the brand name for special polishing cloths that modellers can use to fine finish sanded join lines, polish models prior to painting and suchlike and they can also be used to restore clarity to clear parts although I'm not sure they will be capable of restoring clarity to clear parts that have been fogged by glues. The cloths come in a variety of grades, in a similar fashion to sandpaper but generally much finer and although they are not cheap they last a long time. I have been using these cloths for a few years now and I don't know how I managed without them! The company is based in Iowa according to my box.
Doing - Tamiya 1/35th Universal Carrier.
Work is the curse of the modelling classes!
IPMS#12300
Work is the curse of the modelling classes!
IPMS#12300

Re: Shaun's Bodging Bench
Spitfire is coming along nicely Shaun. I have the same unbuilt kit but I never noticed the tail issue. I'll look out for that when I get around to it.
Stu
Stu
Old fashioned paint brush user.
-
ShaunW
- NOT the sheep
- Posts: 26180
- Joined: November 26th, 2011, 6:11 pm
- Location: Pontefract West Yorkshire
Re: Shaun's Bodging Bench
Cheers, Stu. In some respects the new tool kits haven't advanced much further than their older brethren IMHO. As well as this quirky rudder issue, the demarcation twixt wheel hubs and tyres is quite soft, making painting bit tricky - not unlike what I would expect in a 1970's vintage offering!
Doing - Tamiya 1/35th Universal Carrier.
Work is the curse of the modelling classes!
IPMS#12300
Work is the curse of the modelling classes!
IPMS#12300