Shaun's Bodging Bench * replaced for 2018*
-
JamesPerrin

- Looks like his avatar
- Posts: 13669
- Joined: April 5th, 2011, 8:09 pm
- Location: W. Yorkshire
- Contact:
Re: Shaun's Bodging Bench
Love the work on the JP. As you appear to be going the whole hog you may want to look at fixing the rear canopy frame line. When in place it should be vertical but the kit parts slopes backwards. Using some dymo tape it is quite easy to fill in the missing bit.
Classic British Kits SIG Leader Better to fettle than to fill
(2024 A:B 5:2) (2023 13:8:7) (2022 21:11) (2021 15:8) (2020 8:4:4)
(2024 A:B 5:2) (2023 13:8:7) (2022 21:11) (2021 15:8) (2020 8:4:4)
-
ejsnotgrass

- The Bug Has Well And Truly Bitten
- Posts: 280
- Joined: May 2nd, 2011, 6:59 am
Re: Shaun's Bodging Bench
Your kit of the Hawk I think was based on the prototype,as there are no wing fences,which need to be added to make it more accurate.
-
Stuart

- Raider of the Lost Ark Royal
- Posts: 19415
- Joined: February 25th, 2013, 4:55 pm
- Location: North Wales
- Contact:
Re: Shaun's Bodging Bench
Arrrrgggghhhh!!! red!!! RED!!!! My eyes....!!!!
Great looking SM Shaun - That SB back panel will look great when fitted and painted.
Great looking SM Shaun - That SB back panel will look great when fitted and painted.
Stuart Templeton I may not be good but I'm slow...
My Blog: https://stuartsscalemodels.blogspot.com/
My Blog: https://stuartsscalemodels.blogspot.com/
-
ShaunW
- NOT the sheep
- Posts: 26180
- Joined: November 26th, 2011, 6:11 pm
- Location: Pontefract West Yorkshire
Re: Shaun's Bodging Bench
Thanks for your comments boys and for the info regarding the JP and the Hawk, but you do realise that my AMS means I will have to try and incorporate those mods into the builds, I have no choice 
I have to wear shades every time I look at the Hawk kit in its raw form Stuart
I have to wear shades every time I look at the Hawk kit in its raw form Stuart
Doing - Tamiya 1/35th Universal Carrier.
Work is the curse of the modelling classes!
IPMS#12300
Work is the curse of the modelling classes!
IPMS#12300
-
Marek

- Modelling Gent and Scholar
- Posts: 2455
- Joined: May 1st, 2011, 8:03 am
- Location: Madison, WI
- Contact:
Re: Shaun's Bodging Bench
Really cool work on barrier and your JP comes along well.
-
JamesPerrin
- Looks like his avatar
- Posts: 13669
- Joined: April 5th, 2011, 8:09 pm
- Location: W. Yorkshire
- Contact:
Re: Shaun's Bodging Bench
Oh yeah I forgot that the central windscreen frame is not actually there, instead it is bar on the inside that hold some instruments.ShaunW wrote:Thanks for your comments boys and for the info regarding the JP and the Hawk, but you do realise that my AMS means I will have to try and incorporate those mods into the builds, I have no choice

Classic British Kits SIG Leader Better to fettle than to fill
(2024 A:B 5:2) (2023 13:8:7) (2022 21:11) (2021 15:8) (2020 8:4:4)
(2024 A:B 5:2) (2023 13:8:7) (2022 21:11) (2021 15:8) (2020 8:4:4)
-
ShaunW
- NOT the sheep
- Posts: 26180
- Joined: November 26th, 2011, 6:11 pm
- Location: Pontefract West Yorkshire
Re: Shaun's Bodging Bench
Ah, yes, I was casually ignoring this feature of the JP's cockpit in 1/72nd scale. Although I hadn't picked up on the rear frame issue, I was aware of the front for some reason - probably someone has mentioned it on the forum before at some point. After making a replacement inner bar (the easy bit!) it might be possible to shave off the moulded on front frame and then restore the front canopy area with Micromesh cloths or it would be a question of making a replacement part - one area that my AMS hasn't taken me is making replacement canopies, that is filed under "too difficult"
A handy view of the cockpit in any event James that nicely shows the rear view mirrors, which are worth making and also shows the crash pylon.
A handy view of the cockpit in any event James that nicely shows the rear view mirrors, which are worth making and also shows the crash pylon.
Doing - Tamiya 1/35th Universal Carrier.
Work is the curse of the modelling classes!
IPMS#12300
Work is the curse of the modelling classes!
IPMS#12300
-
ShaunW
- NOT the sheep
- Posts: 26180
- Joined: November 26th, 2011, 6:11 pm
- Location: Pontefract West Yorkshire
Re: Shaun's Bodging Bench
And off we go with the Hawk build.
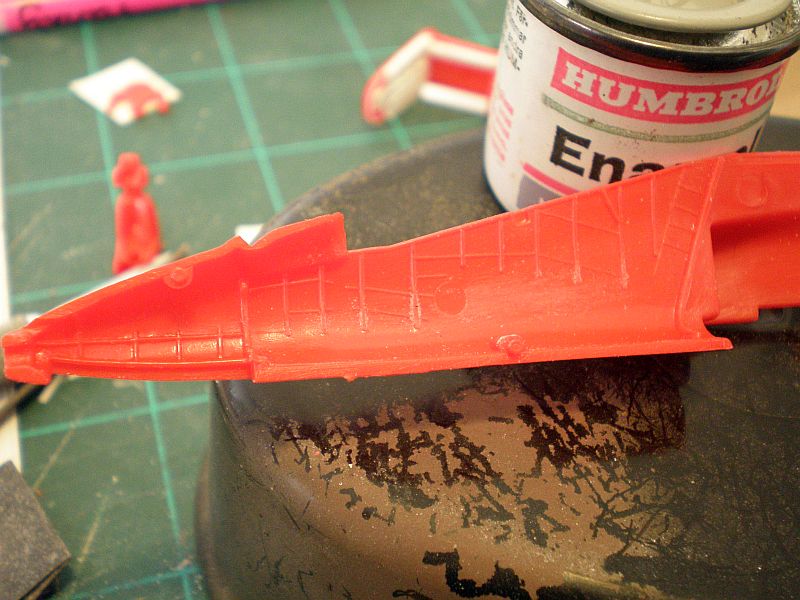
Despite my reservations about the colour of the plastic, this is in fact not a bad old kit which was released in its original form in the mid-1970's and Airfix was starting to provide more than just a couple of pegs for seats in the cockpit. In the case of the Hawk, side panel rib detail was provided as well as a cockpit floor, reasonable instrument panels and bulkheads.
Here is the side ribbing, although I have sanded it a little to allow a better fit of the cockpit tub, which has now been modified - as an aside, the tinlet of Humbrol 40 light grey propping up the fuselage half dates from the late 1970's and has never been opened. I'm going to give it a whirl for the cockpit interior colour, provided the paint is not a dried up hulk by now of course!
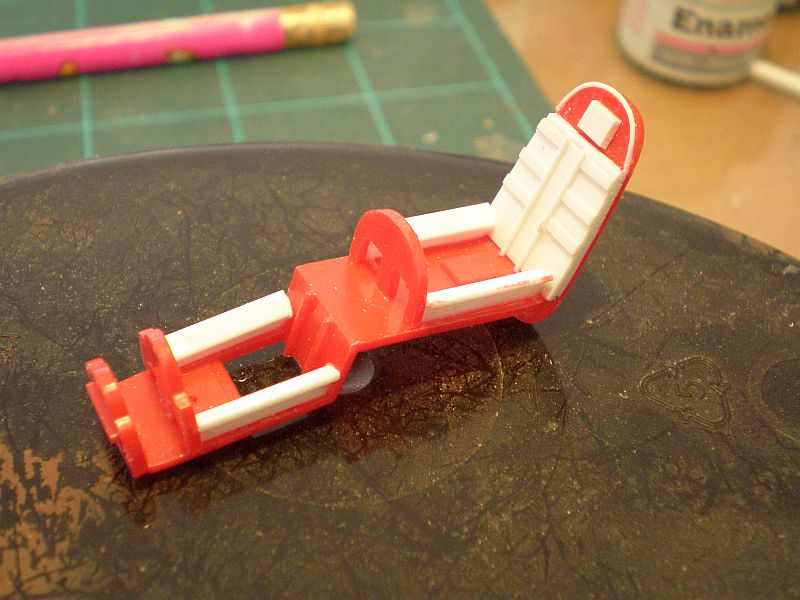
I have made some additions to the cockpit after consulting images on Google. The rear cockpit bulkhead is plain OOB, which does not reflect reality. Additional detail to the bulkhead has been added using plastic card, rod and strip. The cockpit side consoles are made from 90 degree angled strip that I bought at Telford with a view to this kind of application. All in all this is not difficult stuff, although it was a little time consuming, but I enjoy this sort of work as it satisfies my inner geek The IP's are not cemented in place but are temporarily fixed by their mounting holes in order to allow measurement and fitting of the side consoles.
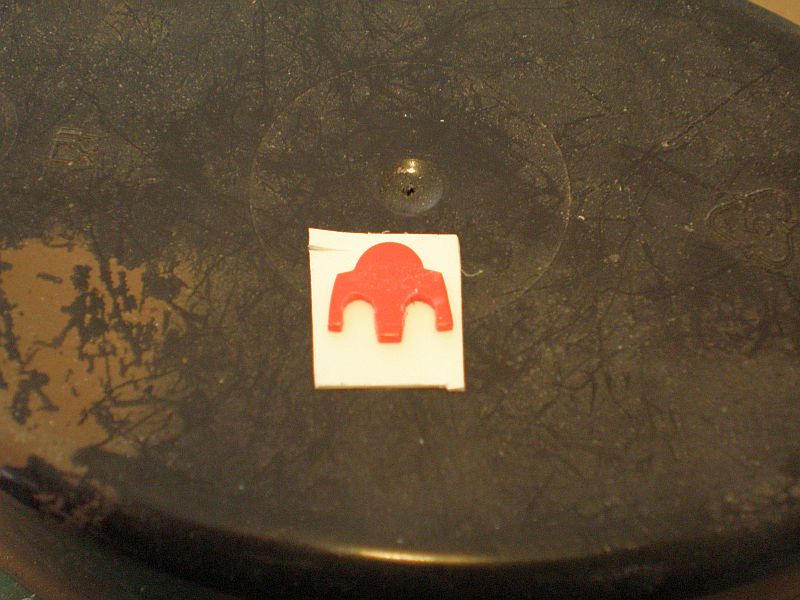
I have also modded the front IP as Airfix moulded it as a solid piece when, in fact, there should be cut-outs for the pilot's legs to allow access to the rudder pedals. The pilot figure provided for the front seat actually comes with his legs already amputated!! I modified the IP by initially chain drilling and then shaping the cut-outs using fine files (the IP has been placed on an off-cut of white plastic card for better clarity in the photo) and a little bit more work is required to tidy this up ready for paint.
As usual for a kit in the "pocket money" price range from this era there is a fair bit of missing and/or over-simplified detail in the cockpit area, although as I have said above this kit is a big improvement over many of Airfix's earlier kits. I will add some other detail in order to present something that is more like but, as usual, I will be going more for the feel of the thing rather than 100% accuracy.
Thanks for looking.
Despite my reservations about the colour of the plastic, this is in fact not a bad old kit which was released in its original form in the mid-1970's and Airfix was starting to provide more than just a couple of pegs for seats in the cockpit. In the case of the Hawk, side panel rib detail was provided as well as a cockpit floor, reasonable instrument panels and bulkheads.
Here is the side ribbing, although I have sanded it a little to allow a better fit of the cockpit tub, which has now been modified - as an aside, the tinlet of Humbrol 40 light grey propping up the fuselage half dates from the late 1970's and has never been opened. I'm going to give it a whirl for the cockpit interior colour, provided the paint is not a dried up hulk by now of course!
I have made some additions to the cockpit after consulting images on Google. The rear cockpit bulkhead is plain OOB, which does not reflect reality. Additional detail to the bulkhead has been added using plastic card, rod and strip. The cockpit side consoles are made from 90 degree angled strip that I bought at Telford with a view to this kind of application. All in all this is not difficult stuff, although it was a little time consuming, but I enjoy this sort of work as it satisfies my inner geek
I have also modded the front IP as Airfix moulded it as a solid piece when, in fact, there should be cut-outs for the pilot's legs to allow access to the rudder pedals. The pilot figure provided for the front seat actually comes with his legs already amputated!! I modified the IP by initially chain drilling and then shaping the cut-outs using fine files (the IP has been placed on an off-cut of white plastic card for better clarity in the photo) and a little bit more work is required to tidy this up ready for paint.
As usual for a kit in the "pocket money" price range from this era there is a fair bit of missing and/or over-simplified detail in the cockpit area, although as I have said above this kit is a big improvement over many of Airfix's earlier kits. I will add some other detail in order to present something that is more like but, as usual, I will be going more for the feel of the thing rather than 100% accuracy.
Thanks for looking.
Doing - Tamiya 1/35th Universal Carrier.
Work is the curse of the modelling classes!
IPMS#12300
Work is the curse of the modelling classes!
IPMS#12300
-
iggie

- Modelling Gent and Scholar
- Posts: 23418
- Joined: July 31st, 2013, 11:04 am
- Location: North Somercotes, Lincolnshire
- Contact:
Re: Shaun's Bodging Bench
Overlooking (if possible!) the slightly scary plastic colour, that looks like a good start on the cockpit!
Best wishes
Jim
If you can walk away from a landing, it's a good landing. If you use the airplane the next day, it's an outstanding landing
"Never put off till tomorrow, what you can do the day after tomorrow"
Jim
If you can walk away from a landing, it's a good landing. If you use the airplane the next day, it's an outstanding landing
"Never put off till tomorrow, what you can do the day after tomorrow"

Re: Shaun's Bodging Bench
Fine work as usual 
All models are equal. Some models are more equal than others.
Airfix Tribute Forum
Airfix Tribute Forum
Re: Shaun's Bodging Bench
Looks good .... I like the red plastic;
Trying to Build kits and not Buy kits
-
Sunray
- Active Participant
- Posts: 611
- Joined: March 18th, 2014, 4:01 pm
- Location: Penshaw, North East, England
- Contact:
Re: Shaun's Bodging Bench
Excellent work Shaun. You are building two of my favourite aircraft. I have one or two photo's of both on my flickr page that might be of help.
https://www.flickr.com/search/?user_id= ... view_all=1
https://www.flickr.com/search/?user_id= ... d%20arrows
https://www.flickr.com/search/?user_id= ... view_all=1
https://www.flickr.com/search/?user_id= ... d%20arrows
Cheers
Ian
Please click on the web link below to have a look at all my photo's.
https://www.flickr.com/photos/ecirpnai/albums
Ian
Please click on the web link below to have a look at all my photo's.
https://www.flickr.com/photos/ecirpnai/albums
-
skypirate

- Modelling Gent and Scholar
- Posts: 7293
- Joined: May 1st, 2011, 6:13 am
- Location: Port Macquarie, Australia
Re: Shaun's Bodging Bench
I nearly had a heart attack! It is the JP.5, thank goodness!JamesPerrin wrote: Oh yeah I forgot that the central windscreen frame is not actually there, instead it is bar on the inside that hold some instruments.
David
-
ShaunW
- NOT the sheep
- Posts: 26180
- Joined: November 26th, 2011, 6:11 pm
- Location: Pontefract West Yorkshire
Re: Shaun's Bodging Bench
I think that might also apply to the Strikemaster as well David.skypirate wrote:I nearly had a heart attack! It is the JP.5, thank goodness!JamesPerrin wrote: Oh yeah I forgot that the central windscreen frame is not actually there, instead it is bar on the inside that hold some instruments.
David
Many thanks for your kind comments and info folks and at least one of us likes red plastic!!
Doing - Tamiya 1/35th Universal Carrier.
Work is the curse of the modelling classes!
IPMS#12300
Work is the curse of the modelling classes!
IPMS#12300
Re: Shaun's Bodging Bench
That red plastic cannot be any worse than the yellow in the old seaking box I have got at present
Trying to Build kits and not Buy kits