Shaun's Bodging Bench * replaced for 2018*
Re: Shaun's Bodging Bench
Your not the only one with enforced duties of the hacking back vegitation type
Trying to Build kits and not Buy kits
-
Stuart

- Raider of the Lost Ark Royal
- Posts: 19415
- Joined: February 25th, 2013, 4:55 pm
- Location: North Wales
- Contact:
Re: Shaun's Bodging Bench
Great looking pair Shaun!
Stuart Templeton I may not be good but I'm slow...
My Blog: https://stuartsscalemodels.blogspot.com/
My Blog: https://stuartsscalemodels.blogspot.com/

Re: Shaun's Bodging Bench
Nice work with thee decals Shaun. Looking forward to seeing the finished pics.
Stu
Stu
Old fashioned paint brush user.
Re: Shaun's Bodging Bench
Well tidy pair of trainers,well tidy indeed.
-
Dazzled

- Modelling Gent and Scholar
- Posts: 9592
- Joined: October 1st, 2011, 11:08 pm
- Location: Mid Glamorgan, South Wales
- Contact:
Re: Shaun's Bodging Bench
Terrific looking trainers Shaun. IMHO in the best ever colour scheme too 
COLD WAR S.I.G. LEADER
Wherever there's danger, wherever there's trouble, wherever there's important work to be done....I'll be somewhere else building a model!
Wherever there's danger, wherever there's trouble, wherever there's important work to be done....I'll be somewhere else building a model!
-
ShaunW
- NOT the sheep
- Posts: 26180
- Joined: November 26th, 2011, 6:11 pm
- Location: Pontefract West Yorkshire
Re: Shaun's Bodging Bench
Many thanks guys. Things have been a little slow lately, even by my standards, as I've had stuff to do round the house and garden. Anyway, it hasn't all been spades and lawnmowers, some progress has been made!
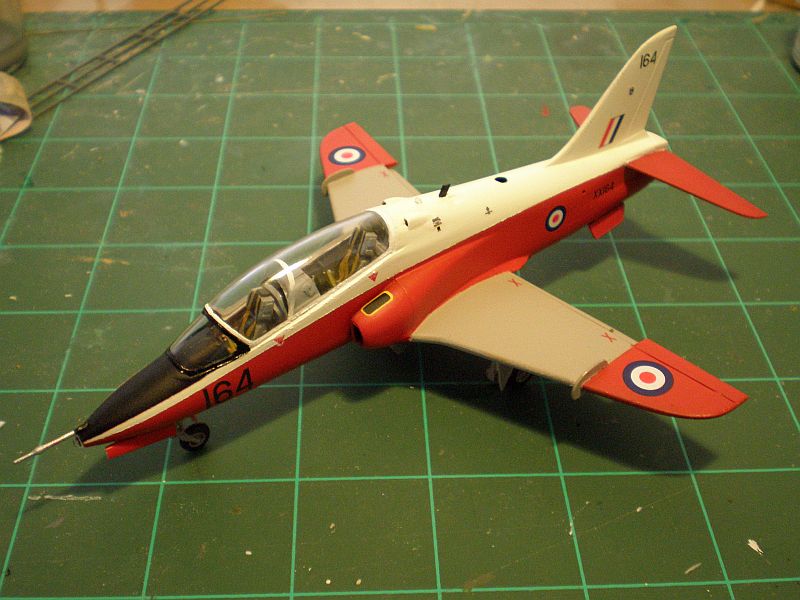
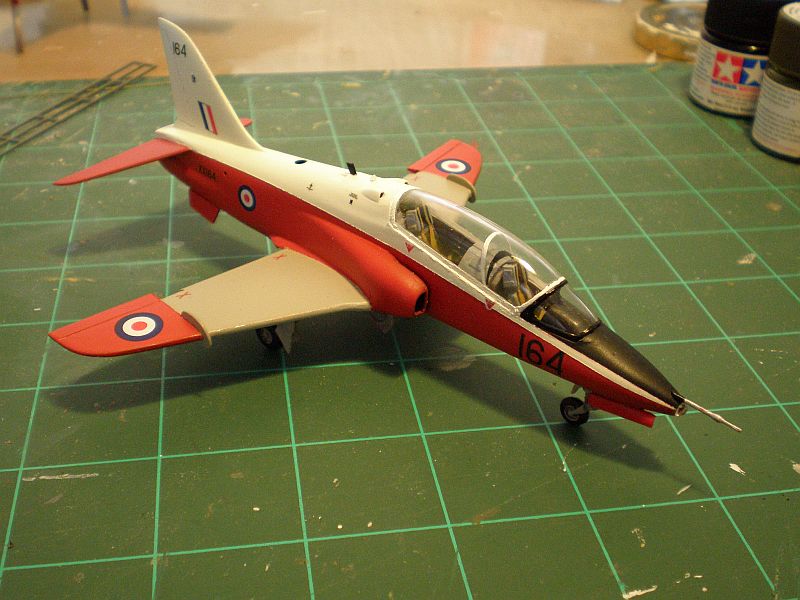
First up, the Hawk is now almost finished. The seats were detailed with bits of plastic card and rod and Tamiya tape belts were added - nothing fantastic but enough to improve the look of the seats under the glass. I made a new internal screen from a leftover portion of clear "glass" from a Revell Mercedes Wolf 4x4 build. The outer edge of the screen was painted white to replicate the canopy framing over the screen. In actual fact, this frame should be on the outside of the canopy but I didn't fancy painting direct onto the glazing with no frame line for guidance and figured that this cheat would give a neater result. There should be detonation cord in the roof of the canopy but I wasn't going there in attempting to replicate that - I do believe it can be done but I'll leave such to better modellers than me! The undercarriage and associated doors gave no issues nor did the pitot or the nose light glazing. Antennae were made from plastic card. Now there is just a little touch up required here and there and I will post up some final shots in the aviation section:
In other news, I have now begun final work on the JP. I decided to get the most difficult bit out of the way first. The framing on the rear canopy is wrong, Airfix moulded it at too steep an angle towards the rear. I almost left it alone as the potential to write off the canopy in the course of the corrective surgery is great. After a bit of mulling and chewing I decided to bite the bullet and made a new rear frame out of a strip of fine plastic card, attached making reference to photos. I had to be extremely careful in attaching the strip using liquid cement in order to avoid fogging the canopy forward of the new frame work. The rear panel is all painted anyway so fogging there was of no consequence - in any case as you can see, I'm in the process of sanding ten bells out of it in order to eradicate the OOB framing The internal bulkhead for the canopy was scratch built from plastic card and rod a little while ago.

Thanks for looking.
First up, the Hawk is now almost finished. The seats were detailed with bits of plastic card and rod and Tamiya tape belts were added - nothing fantastic but enough to improve the look of the seats under the glass. I made a new internal screen from a leftover portion of clear "glass" from a Revell Mercedes Wolf 4x4 build. The outer edge of the screen was painted white to replicate the canopy framing over the screen. In actual fact, this frame should be on the outside of the canopy but I didn't fancy painting direct onto the glazing with no frame line for guidance and figured that this cheat would give a neater result. There should be detonation cord in the roof of the canopy but I wasn't going there in attempting to replicate that - I do believe it can be done but I'll leave such to better modellers than me! The undercarriage and associated doors gave no issues nor did the pitot or the nose light glazing. Antennae were made from plastic card. Now there is just a little touch up required here and there and I will post up some final shots in the aviation section:
In other news, I have now begun final work on the JP. I decided to get the most difficult bit out of the way first. The framing on the rear canopy is wrong, Airfix moulded it at too steep an angle towards the rear. I almost left it alone as the potential to write off the canopy in the course of the corrective surgery is great. After a bit of mulling and chewing I decided to bite the bullet and made a new rear frame out of a strip of fine plastic card, attached making reference to photos. I had to be extremely careful in attaching the strip using liquid cement in order to avoid fogging the canopy forward of the new frame work. The rear panel is all painted anyway so fogging there was of no consequence - in any case as you can see, I'm in the process of sanding ten bells out of it in order to eradicate the OOB framing
Thanks for looking.
Doing - Tamiya 1/35th Universal Carrier.
Work is the curse of the modelling classes!
IPMS#12300
Work is the curse of the modelling classes!
IPMS#12300
-
JamesPerrin

- Looks like his avatar
- Posts: 13669
- Joined: April 5th, 2011, 8:09 pm
- Location: W. Yorkshire
- Contact:
Re: Shaun's Bodging Bench
Nice work on the canopy
Classic British Kits SIG Leader Better to fettle than to fill
(2024 A:B 5:2) (2023 13:8:7) (2022 21:11) (2021 15:8) (2020 8:4:4)
(2024 A:B 5:2) (2023 13:8:7) (2022 21:11) (2021 15:8) (2020 8:4:4)

Re: Shaun's Bodging Bench
Great Hawk Shaun. Very nice looking especially with he flaps down.
Did you cut and re-position the rear part of the canopy to reduce the angle or sand it to shape? Brave man!
Did you cut and re-position the rear part of the canopy to reduce the angle or sand it to shape? Brave man!
Paul
This is it. The moment we should have trained for.
This is it. The moment we should have trained for.

Re: Shaun's Bodging Bench
Nice Hawk Shaun
All models are equal. Some models are more equal than others.
Airfix Tribute Forum
Airfix Tribute Forum
-
Stuart
- Raider of the Lost Ark Royal
- Posts: 19415
- Joined: February 25th, 2013, 4:55 pm
- Location: North Wales
- Contact:
Re: Shaun's Bodging Bench
Very impressive work Shaun - That Hawk looks amazing.
Stuart Templeton I may not be good but I'm slow...
My Blog: https://stuartsscalemodels.blogspot.com/
My Blog: https://stuartsscalemodels.blogspot.com/
-
dollar19
- Modelling Gent and Scholar
- Posts: 1342
- Joined: May 1st, 2011, 1:11 am
- Location: Bristol, Va. USA
Re: Shaun's Bodging Bench
Yes it sure does!
Re: Shaun's Bodging Bench
Paul
This is it. The moment we should have trained for.
This is it. The moment we should have trained for.
-
ShaunW
- NOT the sheep
- Posts: 26180
- Joined: November 26th, 2011, 6:11 pm
- Location: Pontefract West Yorkshire
Re: Shaun's Bodging Bench
Many thanks chaps, the Hawk is now finished and I've posted pics in the aviation section. It's been a slow and steady build year for me so far, even by my glacial standards - the Hawk is my first completion and we're halfway through, near as damn it 
That's OK, Paul - somehow I managed to get my hands steady enough to apply both the plastic card strip and liquid glue without there being either a glazing fogging disaster or a knocking over of the liquid glue bottle and no-one is more surprised than me
That's OK, Paul - somehow I managed to get my hands steady enough to apply both the plastic card strip and liquid glue without there being either a glazing fogging disaster or a knocking over of the liquid glue bottle and no-one is more surprised than me
Doing - Tamiya 1/35th Universal Carrier.
Work is the curse of the modelling classes!
IPMS#12300
Work is the curse of the modelling classes!
IPMS#12300
-
ShaunW
- NOT the sheep
- Posts: 26180
- Joined: November 26th, 2011, 6:11 pm
- Location: Pontefract West Yorkshire
Re: Shaun's Bodging Bench
I'm now in the final stages of finishing the Jet Provost and will post up some images asap. Once that is done, I will more than likely be closing down the Bodging Bench, which I have run on here since Christmas Eve 2011 and which currently stands at around 111 pages and over 35000 views (thank you all!), as it will be shot through with "update your account" graphics from Photobucket rather than photos as I used PB exclusively up to the start of this year. No doubt most of you have now seen the kerfuffle with PB and it would appear that the site has decided to stop the free hosting of images and now wants $400.00 per year for the privilege. I haven't bothered converting 400 of the President's dollars into the Queen's pounds but it ain't cheap and besides that it's the bloody principal of the thing - PB is effectively trying to hold people to ransom and I'm not having it!
I'll start up a new Bodging Bench in due course. Most annoying
I'll start up a new Bodging Bench in due course. Most annoying
Doing - Tamiya 1/35th Universal Carrier.
Work is the curse of the modelling classes!
IPMS#12300
Work is the curse of the modelling classes!
IPMS#12300
-
Stamford

- Modelling Gent and Scholar
- Posts: 2240
- Joined: May 1st, 2011, 7:42 am
- Location: Klågerup Sweden
Re: Shaun's Bodging Bench
Good job you made a nice interior - you really can see inside that dome! Very sweet finish.
running at the edge of their world