Simon's Space

Show us a view of your workbench / work in progress and build reports too.
User avatar
MrDyzio
The Bug Has Well And Truly Bitten
Posts: 353
Joined: May 2nd, 2011, 12:24 am
Location: DC Metro Area
Contact:

Re: Simon's Space

Post by MrDyzio »

SJPONeill wrote:Sure is...and a delight to build...I got it on special at Miniature Hobby in Marina Square in Singapore for about half price so I definitely think it's worth the money but would have been happy as to pay full price for it once I knew what a gem it was to build...no vices as a kit apart from some fiddly and, IMHO, unnecessary PE brass...

Just have the fiddly track bits leave to assemble and fit...
Skip PE parts :ha:
I think with proper painting you can make a beauty out of it. I know the green equipment is hard one to tackle but possible.
My modeling Blog Dyzio Scale Models
User avatar
Asoka
Modelling Gent and Scholar
Posts: 1486
Joined: May 1st, 2011, 2:26 am
Location: Sri Lanka

Re: Simon's Space

Post by Asoka »

You are a very brave man! Those paper models look fantastic!

And I am sure I saw that Vulcan on a cryptozoology site, and they were trying to identify it! :-D
Skill, Patience and Humbrol, with a hairy stick!
User avatar
SJPONeill
Modelling Gent and Scholar
Posts: 3524
Joined: May 1st, 2011, 12:01 am
Location: Near the Spiral, NZ.
Contact:

Re: Simon's Space

Post by SJPONeill »

I have been sick at home all week, mainly so I don't spread bugs at work but have been feeling a bit poorly so I have been working remotely (technology can be such a marvelous thing at times) and having early nights and long sleeps...

Felt a bit chirpier today (I work a Tuesday-Saturday week so, no, not an attack of wellness brought on by the onset of the weekend, thank you!!) and progressed a few projects...

Image

Not much change here from the last pic but have filled the remaining sinkhole where previous filler had shrunk: think I've got them all now so will be able to sand it all once it's cured.

Image

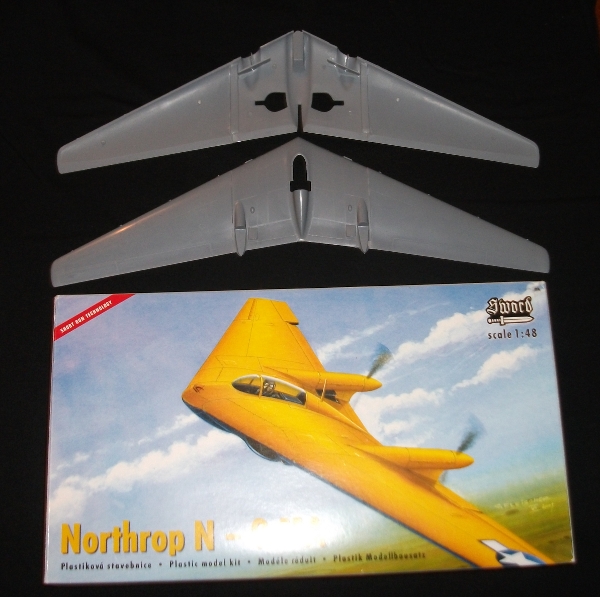
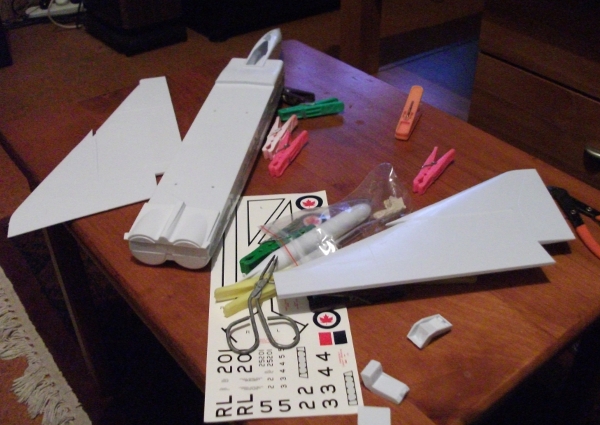
This is the Sword Northrop N9M in 1/48...I bought it as one of the many many NKR Models discount deals around 2003 (Earl NKR and Bill @ Hobby HQ, both in OZ were two of the most evil influences on my stash!!). I started it as soon as it arrived, as was my habit back then, and then it sat in the stash til today.

I used a trick I picked up from the FSM 1987 review of the Revell 1/72 Advanced Tactical Bomber and joined the 6 piece wing pieces horizontally before attempting to join them vertically: the theory is that, this way, you only have to worry about cleaning up the seam along the leading and trailing edges. It worked great on the ATB but I rushed it here or put it away before it was fully cured and there are some small steps between pieces. It should clean up OK but will need more care that should have been necessary. Tonight I added the wing air intakes for the engines and the nose gear bay.

Even though the actual colour scheme for this plane is quite colourful and distinctive, I've always envisaged it as an operational platform and I intend to complete it as a whiffer Korean War night-fighter used to counter the North Korean Bed-check Charlie nuisance bombers...all-over black with walk ways, 50cal or 20mm armament and possibly a wing-mounted radar pod a la the F4U night-fighter variant...

Image

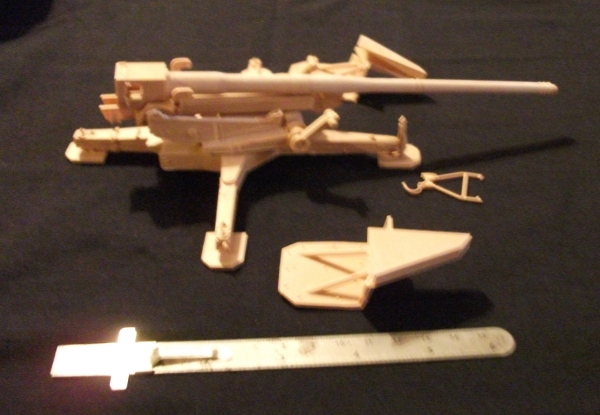
This is the Trumpeter Pak 43 128mm anti-tank gun that I picked up in the US on my April trip...it is another in the Trumpeter big gun series but unlike the B-4 203mm cannon which almost fell together on its own, it is quite a bit of work to build: the instructions are not very clear in many places, some parts are handed but that is not clear, and there are mandatory PE parts to be used in the construction. The actual fit of parts is brilliant, which only adds to the problem as parts not intended to go together often fit really well together!!

This pic (camera setting must be screwed up somewhere as it is quite fuzzy but have already packed up for the night) show the main assemblies to date roughly assembled to give an idea of the size of this beastie (the shiny thing in the foreground is a 6" measure). I think it will look quite spectacular when complete especially when displayed alongside the much smaller 88mm AA and AT versions...

Scale Models Expo 2011 is less than two months away and I will need to pull finger to have something to put on the table this time...my very sincere intention is to do a little modelling each day until pops out completed...
Please critique my posts honestly i.e. say what you think so I can learn and improve...
The World According To Me
User avatar
malepo
Active Participant
Posts: 782
Joined: May 1st, 2011, 4:04 pm
Location: Germany

Re: Simon's Space

Post by malepo »

you are doing some very unusual stuff - looks great
Cheers
Martin
User avatar
SJPONeill
Modelling Gent and Scholar
Posts: 3524
Joined: May 1st, 2011, 12:01 am
Location: Near the Spiral, NZ.
Contact:

Re: Simon's Space

Post by SJPONeill »

Thanks, Martin...

Got a few minor bits'n'pieces done last night but have misplaced the camera and the phone was flat so now pics...

Added more fiddly detail parts to the PAK44 and completed the barrel assembly - although there are detents in all the barrel parts to ensure that it comes up square I still ended up with the muzzle brake 45 degrees out from the breech...snapped it apart before it was fully cured and I think it's OK now and still straight...

The instructions on this kit are really vague as to placement of much of the detail bits so and it's been a case of check, check and check again before giving the plastic even a whiff of glue...

I see that Trumpeter are now going to do a SP version of the PAK44, released in August...hmmmm...

Also did some minor assembly on the Lindberg X-3, engines, nose cone etc but have still to go firm on a version - only D so far is that it will be gear up as the undercarriage was missing from the kit when I got it...not sure whether to paint over the cockpit windows or dig out a pilot and scratch a bit of a cockpit - am quite inspired by how Merlin has developed the interior of the Huskie...so will cogitate on this during the week...

Suppressed the urge to hook into the Dragon Ju-88P I scored last week as a 'quick build' - big 'wows' to me for NOT starting another build!!
Please critique my posts honestly i.e. say what you think so I can learn and improve...
The World According To Me
User avatar
JamesPerrin
Looks like his avatar
Posts: 13669
Joined: April 5th, 2011, 8:09 pm
Location: W. Yorkshire
Contact:

Re: Simon's Space

Post by JamesPerrin »

Lots of interesting stuff here. The N9M looks like it should be easy to finish ;-)
Classic British Kits SIG Leader Better to fettle than to fill
(2024 A:B 5:2) (2023 13:8:7) (2022 21:11) (2021 15:8) (2020 8:4:4)
User avatar
SJPONeill
Modelling Gent and Scholar
Posts: 3524
Joined: May 1st, 2011, 12:01 am
Location: Near the Spiral, NZ.
Contact:

Re: Simon's Space

Post by SJPONeill »

Yes, James...and I'm asking myself why I didn't complete it when I first started it as it does go together quite well, especially for a short-run kit, and is quite simple while building into a decent size model...now that I have been left 'home alone' again for the rest of the weekend, I might pull it out and do some more work on it...although I suspect that some long overdue airbrush maintenance should really be the next task as I seem to have a bit of a bottleneck in the paint shop at the moment...
Please critique my posts honestly i.e. say what you think so I can learn and improve...
The World According To Me
User avatar
SJPONeill
Modelling Gent and Scholar
Posts: 3524
Joined: May 1st, 2011, 12:01 am
Location: Near the Spiral, NZ.
Contact:

Re: Simon's Space

Post by SJPONeill »

Had a bit of a windfall with the N9M (need to think up a name for it as well, something batty I think as it will be a nocturnal hunter) - after dinner, I pulled out a bunch of my spares boxes (I seem to to misplaced a couple otherwise it would have been all of them) to rummage through for some parts for the Stiletto.

While that search came up cold apart from a potential pilot, I found a bag of bits from the Monogram 1/48 P-39 which included four very nice gun barrels complete with cooling slots, a seat that was even painted already with very fine work on the belts and undercarriage parts that look better than the short-run items in the Sword kit...and even a pilot too...

About five years a go I bought a bulk lot of 'model stuff' from a secondhand shop in Hunterville of all places - it had broad selection of kit spares from someone who had clearly not been that into undercarriages, cockpits or external weapons...an interesting find but one of dubious utility til tonight...I did manage to break even on it by selling off the built up kits and railways bits'n'bobs in the box while keeping some other kits, mainly Airfix 1/76 armour for myself plus these eclectic bags of bits...even more so now, one of my best modelling deals...

Still no joy on locating the camera - can only hope that I left it at work on Friday - so pics may have to wait til next weekend...
Please critique my posts honestly i.e. say what you think so I can learn and improve...
The World According To Me
User avatar
SJPONeill
Modelling Gent and Scholar
Posts: 3524
Joined: May 1st, 2011, 12:01 am
Location: Near the Spiral, NZ.
Contact:

Re: Simon's Space

Post by SJPONeill »

Well, that was lucky...

I had a modelling admin night last night and pulled both airbrushes to bits and them both a really good clean out...I have two: a Badger Crescendo 175 that I replaced my trusty 150 with after it came back from a loan as a single block of paint(!), and a cheap no-name single-action that I use for large areas and for experimenting with new paints: would much rather the $30 one dies in an experiment than the $300+ one...

Cleaning the single-action was pretty easy as there are only a couple of moving parts - the 175 is bit more complex and was actually well overdue for a service. It was only after reassembling it that I notice that the needle was extending way too far out of the tip, leading me to one of two conclusions: either the tip of the tip had been reamed beyond all repair, or somehow I had ended up with the wrong tip/needle combination. Uh-oh, I thought, this could hurt in these fiscally-constrained times...

I went onto the Badger site to see what the part numbers were and it was only when it said that the 175T came with three tips and needles (fine, medium and large), that a little bit of grey matter was knocked loose and I recalled that, when I bought it around 1998, that had been one of the selling points...over the 150 for which I had had to buy the extras separately...OK, that's nice nice, after 13 years and Lord knows how many house moves, hobby room re-orgs, etc, etc, where would I even start looking?

Logically I immediately steered away from looking in tools, or even paints and started searching in fillers and sandpaper - right on the money!!! I still have to find the medium tip but located in minutes the other needles and the fine tip - which probably should have been using all along since I have the single-action for large areas...

Painting has always been the one area where my modelling has bottle-necked and the stash is full or models just screaming for just a touch of colour in order to progress down the production line...it is way too damp today and probably for the rest of the weekend to do any airbrushing - everything here at the moment is just sodden - WHERE'S THE SNOW???!!! - but I don't think I have any excuses left now...
Please critique my posts honestly i.e. say what you think so I can learn and improve...
The World According To Me
User avatar
SJPONeill
Modelling Gent and Scholar
Posts: 3524
Joined: May 1st, 2011, 12:01 am
Location: Near the Spiral, NZ.
Contact:

Re: Simon's Space

Post by SJPONeill »

I didn't really mean to start another model...it just kinda happened...honest!! I saw a plain box in the stash that I didn't recognise so grabbed it to have a look - it is the Hobbycraft 1/48 Avro CF-105 Arrow...the first tool...it is very 60s will shallow-as gear bays and nothing in the cockpit but a couple of armchairs...before I knew it the wings fuselage had been assembled (a whole 8 parts!)...

Image

I then did some research on ity and the sole unanimous warning seemed to be watch the fuselage seam because it is long and weak...yep...should have checked and added some interior tabs along the join. filled the gaps and sanded it all back last night and got a layer of primer on tonight to see how it looks...

Here she is this morning - the wing are not fixed yet, just sitting there...the seam along the top is covered by the separate spine piece which is quite clever...she is a decent size...

Image

Apart from adding a decent resin seat to the front cockpit as the visibility through the canopy is not too bad and making up some intake and jet pipes covers to conceal the absolute lack of detail in these areas, this will be pretty much OOB, right down to the eight imaginative but totally wrong missiles and the very 40s external tank...

This is a model, like many of the Lindberg jets, that one could have a lot of fun with in Whifferville so I may keep an eye out for some more of these and maybe some of the other bigger Hobbycraft jets...

Other modelling tasks completed today were sanding down the latest filling job on the Hendon and laying a layer of primer over it to see if there are any more dents; also hit the PAK 44 and Vulcan with some primer to check sanding operations there...

If it's a decent day tomorrow I'll be doing a bunch of painting I hope...
Please critique my posts honestly i.e. say what you think so I can learn and improve...
The World According To Me
User avatar
SJPONeill
Modelling Gent and Scholar
Posts: 3524
Joined: May 1st, 2011, 12:01 am
Location: Near the Spiral, NZ.
Contact:

Re: Simon's Space

Post by SJPONeill »

As I am home alone til tomorrow, I am working through our movie collection for the ones I haven't seen yet and had a bit of a movie night...both pretty light, the remake of The Stepford Wives which I enjoyed and In Bruges which I endured - a comedy? Yeah right...Anyway due to the lack of intense drama I felt the need for something to do with my hands while I watched and stumbled across the AirModel vac Seamaster which I cut out years ago, 2003 I think it was, and started to sand it back...put a fairly large dent in it too...so a very satisfying modelling night tonight...
Please critique my posts honestly i.e. say what you think so I can learn and improve...
The World According To Me
User avatar
Jagewa
Modelling Gent and Scholar
Posts: 2752
Joined: April 6th, 2011, 2:18 am
Location: Christchurch, New Zealand
Contact:

Re: Simon's Space

Post by Jagewa »

Way hay, you've cracked the cement bottle open, good stuff Simon. Arrow certainly looks the right name for it. A couple of zoomy looking bird with the Seamaster on the go as well, cool.

Cheers
Jim
User avatar
SJPONeill
Modelling Gent and Scholar
Posts: 3524
Joined: May 1st, 2011, 12:01 am
Location: Near the Spiral, NZ.
Contact:

Re: Simon's Space

Post by SJPONeill »

Yeah, Jim, feels good although I suspect the SeaMaster might be tainted with a dose of AMS - the May 10 SAM has some great three views of the various versions and shows that in addition to the rotary bomb bay doors, there is also provision for weapons to be loaded into a hatch on top of the fuselage and run on rails into the bomb bay - this for re-arming at sea off a tender. It also describes the bomb bay doors as being able to be removed onshore and reloaded...I have visions of a TB2-like range of mission-configured pods on a conveyor running under an elevated SeaMaster...

I do have to say that vacs like the Airmodel SeaMaster and BV-238, while needing a lot of extra work in making detail bits, and structural items like spars and formers, are a lot more satisfying (and cost-effective) than big (and expensive) shake'n'bakes like those from Anigrand, which may have issues of their own...

Didn't get any painting done today - wasted my sunny Sunday doing other jobs - as it was too damn cold in the garage...although I did get long term domestic AIP to establish a modelling room in the loft - a northern hemisphere habit that hasn't caught on here as much as it could...

I did however organise some paints in preparation for painting and found I appeared to be out of US Interior Green and thought I'd have to mail order some in but then stumbled across this site (http://www.color-swatches.com/vallejo/i ... watch.html;) which informs me that Tamiya XF-58 Olive Green might be close enough for government work...touch wood...
Please critique my posts honestly i.e. say what you think so I can learn and improve...
The World According To Me
User avatar
SJPONeill
Modelling Gent and Scholar
Posts: 3524
Joined: May 1st, 2011, 12:01 am
Location: Near the Spiral, NZ.
Contact:

Re: Simon's Space

Post by SJPONeill »

Played around with the SeaMaster some more last night...still too cold for any painting...is verboten in any way inside the house and it is damn cold outside - wasted my one sunny day of the weekend working outside....

Gearing up to start on the interior structure - I really should have done this BEFORE I trimmed the main parts from the backing sheet but that was way back in 2003 when i didn't know what I know now...the unsupported sides are quite flimsy so some care is necessary to ensure that measuring the shape doesn't actually distort it at all...but with a bit of care, it can be done...

Image

Image

Image

Having measured the shape, it is a simple matter of transferring it to a sheet of plastic and mirroring it for a complete former. These formers do three things:

Strengthen the whole fuselage structure and provide and firm base for the wings.

Provide an outline shape for the cockpit for detailing.

Enable the bomb bay and loading hatch to be modelled if I so desire - I still really like the TB2 style display idea...
Please critique my posts honestly i.e. say what you think so I can learn and improve...
The World According To Me
User avatar
Jagewa
Modelling Gent and Scholar
Posts: 2752
Joined: April 6th, 2011, 2:18 am
Location: Christchurch, New Zealand
Contact:

Re: Simon's Space

Post by Jagewa »

Ah that's a great tip, do the profiling before you remove from the backing, clever.

Cheers
Jim
Post Reply

Return to “Workbench Window”