Just as well - you can't sell something you havn't tastedAndrewR wrote:Wife and eldest son doing the baking for a school bake sale fund raiser tomorrow Fortunately we only have to send half a dozenClashcityrocker wrote:Some precision baking on display there.
Nigel
AndrewR's Basement Lab
-
Stuart

- Raider of the Lost Ark Royal
- Posts: 19447
- Joined: February 25th, 2013, 4:55 pm
- Location: North Wales
- Contact:
Re: AndrewR's Basement Lab
Stuart Templeton I may not be good but I'm slow...
My Blog: https://stuartsscalemodels.blogspot.com/
My Blog: https://stuartsscalemodels.blogspot.com/
-
AndrewR

- In the basement lab
- Posts: 24095
- Joined: April 5th, 2011, 4:13 pm
- Location: Ottawa, Ontario, The Great White North
- Contact:
Re: AndrewR's Basement Lab
The final cabane is on the R-5. Break out the champagne. 
Now all I have to do is fix the paint work up and rig the thing
The hands were less shaky tonight, so I am more hopeful about doing the rigging soon.
cheers
Andrew
Now all I have to do is fix the paint work up and rig the thing
The hands were less shaky tonight, so I am more hopeful about doing the rigging soon.
cheers
Andrew
Up in the Great White North
-
PaulBradley

- Staring out the window
- Posts: 21209
- Joined: April 6th, 2011, 3:08 pm
- Location: Flagstaff, AZ
Re: AndrewR's Basement Lab
Mmm, cake and champagne. Classy thread.
Paul
За демократію і незалежний Україну
"For Democracy and a Free Ukraine"
За демократію і незалежний Україну
"For Democracy and a Free Ukraine"
-
AndrewR
- In the basement lab
- Posts: 24095
- Joined: April 5th, 2011, 4:13 pm
- Location: Ottawa, Ontario, The Great White North
- Contact:
Re: AndrewR's Basement Lab
Nice cake, shame about the modellingPaulBradley wrote:Mmm, cake and champagne. Classy thread.
Up in the Great White North
-
ShaunW
- NOT the sheep
- Posts: 26188
- Joined: November 26th, 2011, 6:11 pm
- Location: Pontefract West Yorkshire
Re: AndrewR's Basement Lab
Man, those muffins look good. IIRC, lemon cake has also featured in this thread, which is one of my faves. Bake on dude 
The R-5 is looking good, although it has to be said the muffins have rather taken centre stage here!
The R-5 is looking good, although it has to be said the muffins have rather taken centre stage here!
Doing - Tamiya 1/35th Universal Carrier.
Work is the curse of the modelling classes!
IPMS#12300
Work is the curse of the modelling classes!
IPMS#12300
-
AndrewR
- In the basement lab
- Posts: 24095
- Joined: April 5th, 2011, 4:13 pm
- Location: Ottawa, Ontario, The Great White North
- Contact:
Re: AndrewR's Basement Lab
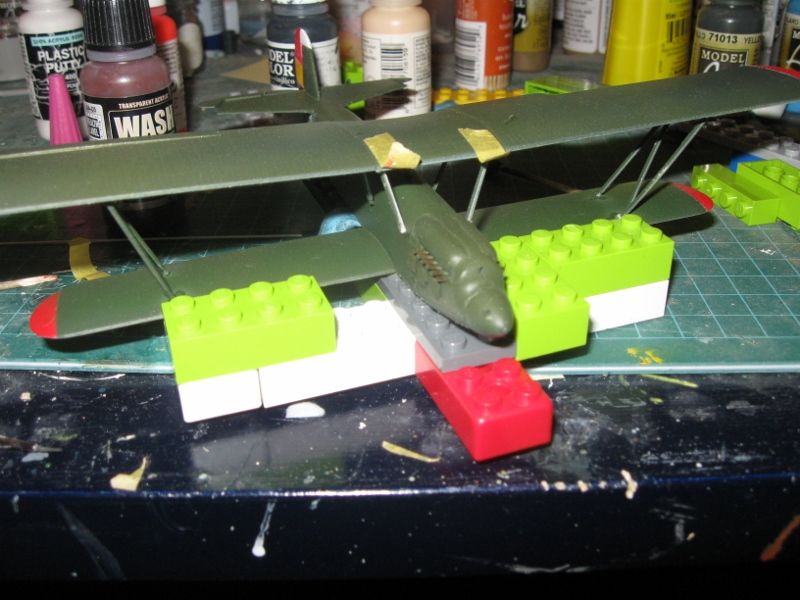
It took 3 days to mount the cabanes, rather less time to eat the muffins!
Up in the Great White North
-
AndrewR
- In the basement lab
- Posts: 24095
- Joined: April 5th, 2011, 4:13 pm
- Location: Ottawa, Ontario, The Great White North
- Contact:
Re: AndrewR's Basement Lab
The R-5 gets a touch of green primer to dress up the worn bits on the struts and wing.
One or two of the joints are still loose on the struts, so I will have to get the CA out again!
cheers
Andrew
PS - The Hornet is progressing in the Shared Build area!

One or two of the joints are still loose on the struts, so I will have to get the CA out again!
cheers
Andrew
PS - The Hornet is progressing in the Shared Build area!

Up in the Great White North
-
AndrewR
- In the basement lab
- Posts: 24095
- Joined: April 5th, 2011, 4:13 pm
- Location: Ottawa, Ontario, The Great White North
- Contact:
Re: AndrewR's Basement Lab
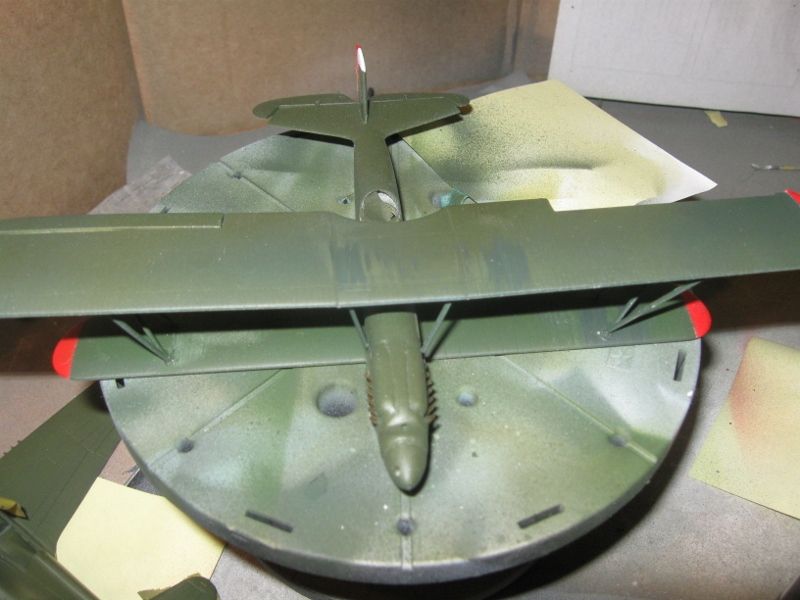
The Hawk-81 finally gets its last coat of matt varnish.

I think the pitot tube needs to go on, and then this one is finished.


Unless I spot a glossy bit in these photos!
I managed to fix the loose cabanes last night, add the missing aileron and touch up the green top coat. The R-5 is ready for the rigging. As I have very shaky hands this morning, I have postponed this task
The Hornet build progresses steadily in the SB thread.

cheers
Andrew
Up in the Great White North
-
AndrewR
- In the basement lab
- Posts: 24095
- Joined: April 5th, 2011, 4:13 pm
- Location: Ottawa, Ontario, The Great White North
- Contact:
Re: AndrewR's Basement Lab
With the Hawk practically finished and the Hornet in the paint shop, I was needing something to do which can be built quickly, but would provide an interesting challenge for painting.
It happens that I've got an Eduard Dual Combo set of the Fokker Dr.1. This comes with lots of nice photoetch, which I don't think I could manage right now. It has decals for four machines, including both Manfred and Lothar von Richthofen, which is what I intend to do with the two kits. The box art has one of the other options: Fritz Kempf's Dr.1 with "Kennscht mi noch" ("Remember me" in Swabian dialect). This is mostly done in the Fokker streaky camouflage, which presents a challenge to paint So I'm going to have a go at it, using the Revell Dr.1, which is also a nice kit, if not quite as refined as the Eduard version

The Fokker Dr.1 has very little rigging, which can easily be added later. I;ve already built one of these kits with number one son, so I know it goes together pretty well. Sissel has just built this particular subject too, so you can see what it looks like here:
http://uamf.org.uk/viewtopic.php?f=14&t=4375&p=107449;
First thing is to get rid of that wretched red plastic. I've used Vallejo sand primer on the interior and exterior of the fabric covered parts, and panzergrau primer on the metal parts and wheels.

The sand primer covers the red pretty well, although it will get a second coat when I remove bits from the sprues and stick things together. It is also is a good base for CDL too, and in fact, I may well leave the primer bare on the CDL parts of the interior.
If I get really ambitious, I will try to add a couple of photoetch gunsights and maybe a spinner boss from photoetch - a couple of little details like that really enhance a WW1 model.
cheers
Andrew
It happens that I've got an Eduard Dual Combo set of the Fokker Dr.1. This comes with lots of nice photoetch, which I don't think I could manage right now. It has decals for four machines, including both Manfred and Lothar von Richthofen, which is what I intend to do with the two kits. The box art has one of the other options: Fritz Kempf's Dr.1 with "Kennscht mi noch" ("Remember me" in Swabian dialect). This is mostly done in the Fokker streaky camouflage, which presents a challenge to paint

The Fokker Dr.1 has very little rigging, which can easily be added later. I;ve already built one of these kits with number one son, so I know it goes together pretty well. Sissel has just built this particular subject too, so you can see what it looks like here:
http://uamf.org.uk/viewtopic.php?f=14&t=4375&p=107449;
First thing is to get rid of that wretched red plastic. I've used Vallejo sand primer on the interior and exterior of the fabric covered parts, and panzergrau primer on the metal parts and wheels.

The sand primer covers the red pretty well, although it will get a second coat when I remove bits from the sprues and stick things together. It is also is a good base for CDL too, and in fact, I may well leave the primer bare on the CDL parts of the interior.
If I get really ambitious, I will try to add a couple of photoetch gunsights and maybe a spinner boss from photoetch - a couple of little details like that really enhance a WW1 model.
cheers
Andrew
Up in the Great White North
-
Sissel

- Modelling Lady and Scholar
- Posts: 4097
- Joined: October 31st, 2011, 12:39 pm
- Location: Island in Norway
Re: AndrewR's Basement Lab
Cheers, Andrew. I'm liking your next projects. I'm interested in getting those Eduard Fokkers myself, and also another Revell kit and make The Red Baron.
I'm sure you'll master the streaky pattern without trouble. Good luck with it.
I'm sure you'll master the streaky pattern without trouble. Good luck with it.
Confused as always, and somewhere in hiding on the Scandinavian peninsula...
-
AndrewR
- In the basement lab
- Posts: 24095
- Joined: April 5th, 2011, 4:13 pm
- Location: Ottawa, Ontario, The Great White North
- Contact:
Re: AndrewR's Basement Lab
More painting of the Fokker...
The interior "V" is Vallejo Air Wood, followed by a light overspray of transparent orange. I will paint the canvas parts of the interior with a very light olive-green to represent the exterior colour soaking through. The metal framework will be painted RLM 02, which is an historical "Institutional German Grey-Green" colour and was used all over the place in Germany.
I've also sprayed the struts and other ironwork with RLM 02 already. The engine has had a coat of black/steel mix over the top of the dark grey primer.

The exterior has my first attempt at a Fokker streaky camouflage. I decided to start from basics. The green brown colour probably came from a green paint mix, in combination with a varnish, which gave it a brown tint. The way to get a green colour, was to mix a yellow pigment (say yellow ochre) with black (carbon black, also known as lamp black - fine soot particles!). So that's what I did. The darkest colour is approximately 2:1 yellow to black. There is also a lighter colour which is 4:1 yellow to black. I mixed these from Vallejo Air Yellow and Black, which are quite runny, being optimized for airbrush application. Then I found an old and entirely disreputable wide brush, with spiky bristles and put stripes on with the dark mix first, then with the lighter mix. It did not take long

I will probably try to darken it slightly using an umber wash.

I have not decorated the top deck yet, as that needs doing after the fuselage is together and any work on the seam complete.
I should be able to spray the lower wings with RLM 65 next. I also hope to be able to put the cockpit together tomorrow, and put some streaking on the propeller for the wood grain effect.
cheers
Andrew
Up in the Great White North
-
philp

- Modelling Gent and Scholar
- Posts: 1279
- Joined: May 1st, 2011, 12:14 am
- Location: Kearns, Utah
- Contact:
Re: AndrewR's Basement Lab
Looking good. I built the Revell kit in the last Blitzbau.
-
ShaunW
- NOT the sheep
- Posts: 26188
- Joined: November 26th, 2011, 6:11 pm
- Location: Pontefract West Yorkshire
Re: AndrewR's Basement Lab
Great stuff, that Fokker streaky finish looks very convincing to me Andrew.
Doing - Tamiya 1/35th Universal Carrier.
Work is the curse of the modelling classes!
IPMS#12300
Work is the curse of the modelling classes!
IPMS#12300
-
PaulBradley
- Staring out the window
- Posts: 21209
- Joined: April 6th, 2011, 3:08 pm
- Location: Flagstaff, AZ
Re: AndrewR's Basement Lab
I agree, Shawn - very nice.
Paul
За демократію і незалежний Україну
"For Democracy and a Free Ukraine"
За демократію і незалежний Україну
"For Democracy and a Free Ukraine"
-
AndrewR
- In the basement lab
- Posts: 24095
- Joined: April 5th, 2011, 4:13 pm
- Location: Ottawa, Ontario, The Great White North
- Contact:
Re: AndrewR's Basement Lab
Thanks Shawn and Paul
The background colour (sand primer ) is just a wee bit too yellow to my eye - German CDL was darker than the British equivalent, but I think a slight darkening effect will make it pretty good. It's a lot easier than using decal sheets with streaks would be anyhow!
One option would be to start with a different colour Vallejo primer - Israeli Armour Sand perhaps, which is more greyish than yellow. The desert sand was all I had in the yellowish shade.
cheers
Andrew
Up in the Great White North