Skypirate's Hideaway
-
Dazzled

- Modelling Gent and Scholar
- Posts: 9592
- Joined: October 1st, 2011, 11:08 pm
- Location: Mid Glamorgan, South Wales
- Contact:
Re: Skypirate's Hideaway
Love that superbly metalized Hustler 
COLD WAR S.I.G. LEADER
Wherever there's danger, wherever there's trouble, wherever there's important work to be done....I'll be somewhere else building a model!
Wherever there's danger, wherever there's trouble, wherever there's important work to be done....I'll be somewhere else building a model!
-
skypirate

- Modelling Gent and Scholar
- Posts: 7302
- Joined: May 1st, 2011, 6:13 am
- Location: Port Macquarie, Australia
Re: Skypirate's Hideaway
Thanks, Daryl. It does look ok in a small photo from a distance! Not so flash in the flesh.
As I approach the last stages with the Hustler, I see opportunities for AMS!
I am fed up of u/c bay doors with no positive location always at the risk of getting knocked off. So here I have used my new drill set to make fuse wire dowels to give the joins some strength.
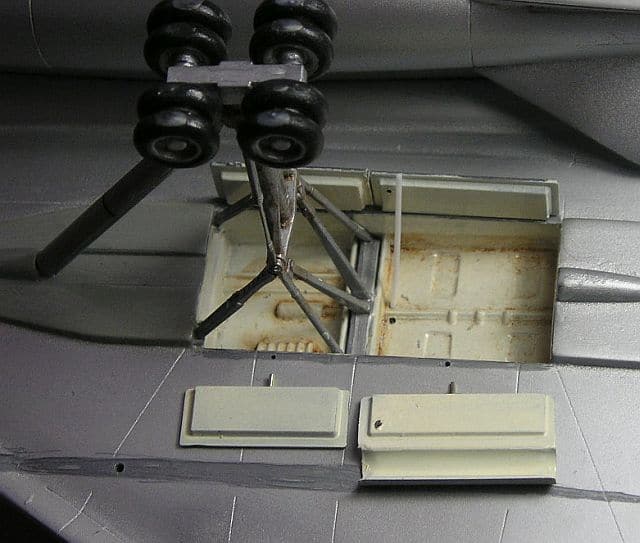
I have also drilled holes to take some support struts for the doors. There is one being measured in the photo. This is especially necessary on the nose wheel doors.
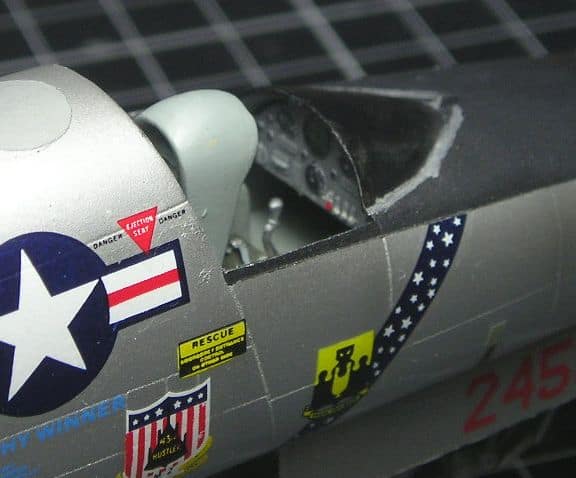
And since all the crew hatches will be open (kit manufacturers supply poseable hatches and canopies but rarely the means to hold them open! Grrrr!) I have had to add the throttle detail in the pilot's cockpit.

You can barely see the stretched sprue throttles, not yet painted. Thin black decal strip simulates the slots for throttle movement.
The seat belts are PE, installed over 10 years ago, so I don't remember the source!
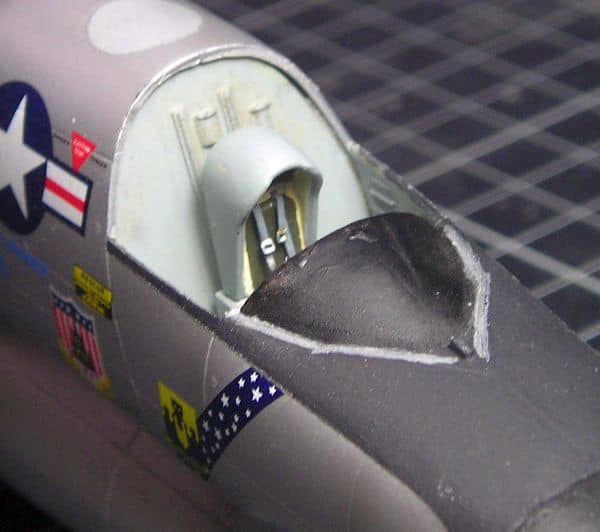
Some sort of canopy actuator will have to go in behind the escape capsule to hod the hatch open.
Instrument panels are kit parts and reasonably adequate in this scale.
Post-shading using Tamiya Smoke has been completed, and the flap repair is well under way. I will try to use fuse wire dowels on that part as well.
Looking forward to the engines going on!
Cheers,
David
As I approach the last stages with the Hustler, I see opportunities for AMS!
I am fed up of u/c bay doors with no positive location always at the risk of getting knocked off. So here I have used my new drill set to make fuse wire dowels to give the joins some strength.
I have also drilled holes to take some support struts for the doors. There is one being measured in the photo. This is especially necessary on the nose wheel doors.
And since all the crew hatches will be open (kit manufacturers supply poseable hatches and canopies but rarely the means to hold them open! Grrrr!) I have had to add the throttle detail in the pilot's cockpit.
You can barely see the stretched sprue throttles, not yet painted. Thin black decal strip simulates the slots for throttle movement.
The seat belts are PE, installed over 10 years ago, so I don't remember the source!
Some sort of canopy actuator will have to go in behind the escape capsule to hod the hatch open.
Instrument panels are kit parts and reasonably adequate in this scale.
Post-shading using Tamiya Smoke has been completed, and the flap repair is well under way. I will try to use fuse wire dowels on that part as well.
Looking forward to the engines going on!
Cheers,
David
-
gnomemeansgnome

- Modelling Gent and Scholar
- Posts: 5269
- Joined: July 16th, 2013, 4:03 pm
- Location: No Fun City
Re: Skypirate's Hideaway
Nice! Always a big fan of the B-58.
Ego no habeo consilium.
ICBM = Insatiable Collector and Builder of Models
ICBM = Insatiable Collector and Builder of Models
-
Stuart

- Raider of the Lost Ark Royal
- Posts: 19451
- Joined: February 25th, 2013, 4:55 pm
- Location: North Wales
- Contact:
Re: Skypirate's Hideaway
Superb work that! It's actually a much smaller aircraft than I thought - I always assumed the cockpit had seating for two side by side like the B-1.
Stuart Templeton I may not be good but I'm slow...
My Blog: https://stuartsscalemodels.blogspot.com/
My Blog: https://stuartsscalemodels.blogspot.com/
-
ShaunW
- NOT the sheep
- Posts: 26188
- Joined: November 26th, 2011, 6:11 pm
- Location: Pontefract West Yorkshire
Re: Skypirate's Hideaway
Oh yes, there are plenty of opportunities for AMS here David, for instance I love those bonkers small throttles and the way you have simulated their tracks with decal - that alone should receive some sort of award!!
Doing - Tamiya 1/35th Universal Carrier.
Work is the curse of the modelling classes!
IPMS#12300
Work is the curse of the modelling classes!
IPMS#12300
-
Migrant

- Happily Landed after Many Circuits and Bumps
- Posts: 2428
- Joined: April 5th, 2011, 8:33 pm
- Location: Calgary, Canada
Re: Skypirate's Hideaway
I agree with Shaun, nice detail work on the throttles and cockpit in general. I'm impressed with the scale thickness of the instrument panel coaming; did you thin down the kit part?
-
skypirate
- Modelling Gent and Scholar
- Posts: 7302
- Joined: May 1st, 2011, 6:13 am
- Location: Port Macquarie, Australia
Re: Skypirate's Hideaway
The throttles are painted and look ok. The IP coaming is as moulded.Migrant wrote:I'm impressed with the scale thickness of the instrument panel coaming; did you thin down the kit part?
I have repaired and fitted the flap. Today I find that the windscreen does not fit at all. Lots of fettling required around the angle of the front windows and the side windows, and there will still be a gap to be filled with white glue.
I need a break from this for a couple of days!
cheers,
David
-
Stamford

- Modelling Gent and Scholar
- Posts: 2240
- Joined: May 1st, 2011, 7:42 am
- Location: Klågerup Sweden
Re: Skypirate's Hideaway
It may be a hassel the hustle but if does look the part! One of those I´ve always wanted but never had.
running at the edge of their world

Re: Skypirate's Hideaway
Nice detail work in the office!
Paul
This is it. The moment we should have trained for.
This is it. The moment we should have trained for.
-
skypirate
- Modelling Gent and Scholar
- Posts: 7302
- Joined: May 1st, 2011, 6:13 am
- Location: Port Macquarie, Australia
Re: Skypirate's Hideaway
I have invented plenty of additional AMS work on the Hustler!
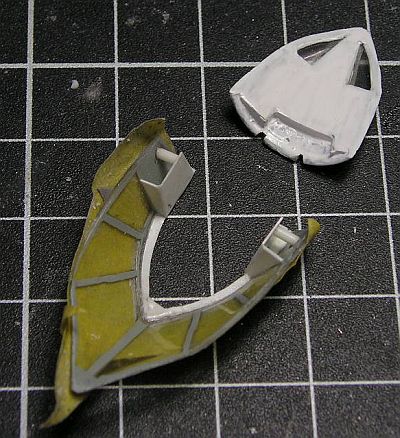
How to pose the crew hatches open? They will need hinges and struts. I have started converting the pilot's hatch from the original '2D' kit part to a more beefy 3D hatch that will help to accommodate the struts and hinges.
The 10-thou styrene card on the right has been cut and shaped, including an overall east-west curve, to fit the inside the kit part on the left. The kit part was painted that way more than 10 years ago. I have better references now, and more confidence to do a better job!

Here the structure has been built up with more card closing off the gaps at the edges (so it is now more of a hollow piece).
Perimeter joins have since been faired into the original part with putty and I have cut notches for the hinges.
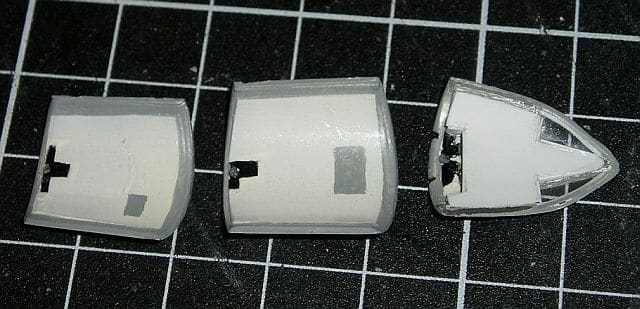
The other hatches will require similar, though simpler shapes grafted on.
All this effort prevents work on the IL-2 and the Phantom, but I really want to finally finish this model once and for all! The engines are now mounted, post-shading done, and the beast is looking quite reasonable. Still some touch-ups required here and there on the engine pylons.
Thanks for looking,
David
How to pose the crew hatches open? They will need hinges and struts. I have started converting the pilot's hatch from the original '2D' kit part to a more beefy 3D hatch that will help to accommodate the struts and hinges.
The 10-thou styrene card on the right has been cut and shaped, including an overall east-west curve, to fit the inside the kit part on the left. The kit part was painted that way more than 10 years ago. I have better references now, and more confidence to do a better job!
Here the structure has been built up with more card closing off the gaps at the edges (so it is now more of a hollow piece).
Perimeter joins have since been faired into the original part with putty and I have cut notches for the hinges.
The other hatches will require similar, though simpler shapes grafted on.
All this effort prevents work on the IL-2 and the Phantom, but I really want to finally finish this model once and for all! The engines are now mounted, post-shading done, and the beast is looking quite reasonable. Still some touch-ups required here and there on the engine pylons.
Thanks for looking,
David
-
skypirate
- Modelling Gent and Scholar
- Posts: 7302
- Joined: May 1st, 2011, 6:13 am
- Location: Port Macquarie, Australia
Re: Skypirate's Hideaway
Whew!
Got that done today.
First the missing structure at the end of the pilot's side windows, and another view of the pilot's hatch being painted:
Then all the hatches beefed-up and painted gloss white. Windscreen interior painted light grey. In this case the new sill around the top of the windscreen is the cockpit sill that the pilot's hatch closes on.
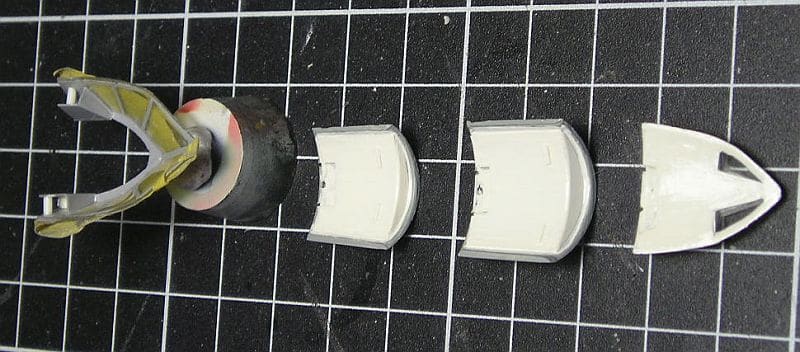
This means I now have to face the task of constructing the hatch struts and hinges. Not so sure about a strong solution yet.
Cheers,
David
Listening today: Canned Heat, Janis Joplin with Big Brother and the Holding Co.
Got that done today.
First the missing structure at the end of the pilot's side windows, and another view of the pilot's hatch being painted:
Then all the hatches beefed-up and painted gloss white. Windscreen interior painted light grey. In this case the new sill around the top of the windscreen is the cockpit sill that the pilot's hatch closes on.
This means I now have to face the task of constructing the hatch struts and hinges. Not so sure about a strong solution yet.
Cheers,
David
Listening today: Canned Heat, Janis Joplin with Big Brother and the Holding Co.
-
gnomemeansgnome
- Modelling Gent and Scholar
- Posts: 5269
- Joined: July 16th, 2013, 4:03 pm
- Location: No Fun City
Re: Skypirate's Hideaway
Wow! Nice work.
Ego no habeo consilium.
ICBM = Insatiable Collector and Builder of Models
ICBM = Insatiable Collector and Builder of Models
-
JamesPerrin

- Looks like his avatar
- Posts: 13694
- Joined: April 5th, 2011, 8:09 pm
- Location: W. Yorkshire
- Contact:
Re: Skypirate's Hideaway
Deep breath, the Hustler is to good not to finish
Classic British Kits SIG Leader Better to fettle than to fill
(2024 A:B 5:2) (2023 13:8:7) (2022 21:11) (2021 15:8) (2020 8:4:4)
(2024 A:B 5:2) (2023 13:8:7) (2022 21:11) (2021 15:8) (2020 8:4:4)
-
ShaunW
- NOT the sheep
- Posts: 26188
- Joined: November 26th, 2011, 6:11 pm
- Location: Pontefract West Yorkshire
Re: Skypirate's Hideaway
Excellent, I'm loving the additional work you are doing on this build David.
Doing - Tamiya 1/35th Universal Carrier.
Work is the curse of the modelling classes!
IPMS#12300
Work is the curse of the modelling classes!
IPMS#12300
-
skypirate
- Modelling Gent and Scholar
- Posts: 7302
- Joined: May 1st, 2011, 6:13 am
- Location: Port Macquarie, Australia
Re: Skypirate's Hideaway
Thanks, guys.
A little progress on the Hustler. I think I have bitten off more than I can chew! These crew hatches are very awkward to mount the way I have chosen. I am sure the new Airfix would have engineered an elegant solution.
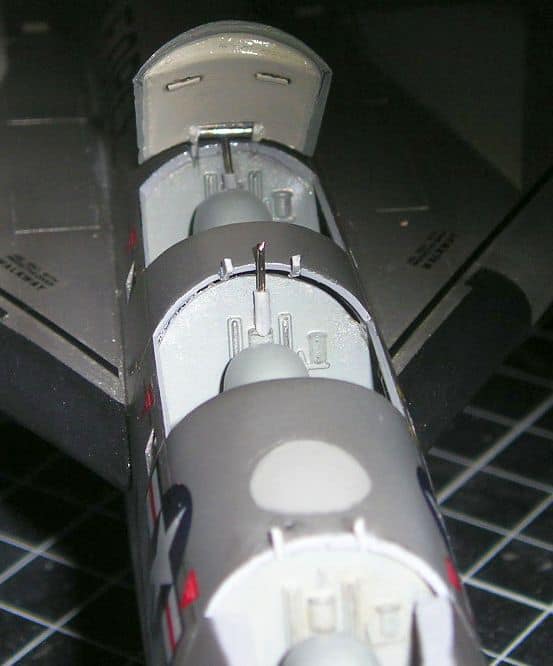
The rear hatch is mounted. The middle strut is being tested for fit. The hinges are pieces of styrene card. I was contemplating using leftover bits of PE, but chickened out.
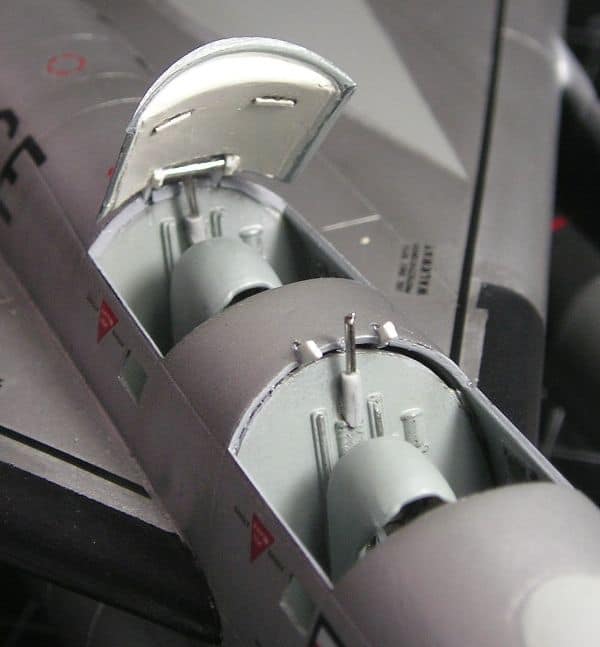
A spot of epoxy glues the strut (part of a pin inserted into drilled-out styrene rod) to a shallow hole in the hatch. Another spot of epoxy holds the styrene rod to the rear bulkhead in each crew compartment. Not precisely correct, but passable as the real thing, I hope!
As you can imagine, the model is suffering much handling with all this fiddly work. Not recommended for such a fiddly model! There is a lot of ominous creaking! Not to mention risk to the NMF. But the Pledge coat should help, I hope!
Two hatches are mounted. One more to go, then touch-ups, nav lights and pitot, and I will be glad to declare it done!
Thanks for looking,
David
Listening today: Savoy Brown, Don Henley
A little progress on the Hustler. I think I have bitten off more than I can chew! These crew hatches are very awkward to mount the way I have chosen. I am sure the new Airfix would have engineered an elegant solution.
The rear hatch is mounted. The middle strut is being tested for fit. The hinges are pieces of styrene card. I was contemplating using leftover bits of PE, but chickened out.
A spot of epoxy glues the strut (part of a pin inserted into drilled-out styrene rod) to a shallow hole in the hatch. Another spot of epoxy holds the styrene rod to the rear bulkhead in each crew compartment. Not precisely correct, but passable as the real thing, I hope!
As you can imagine, the model is suffering much handling with all this fiddly work. Not recommended for such a fiddly model! There is a lot of ominous creaking! Not to mention risk to the NMF. But the Pledge coat should help, I hope!
Two hatches are mounted. One more to go, then touch-ups, nav lights and pitot, and I will be glad to declare it done!
Thanks for looking,
David
Listening today: Savoy Brown, Don Henley