Aha!
I have one of these in the stash.
The most beautiful, ugly, carrier-borne aircraft ever to enter service!
Shallow engraving, eh?
Watching with interest!
David
Stamfords Shed End Thread
-
Stamford

- Modelling Gent and Scholar
- Posts: 2240
- Joined: May 1st, 2011, 7:42 am
- Location: Klågerup Sweden
Re: Stamfords Shed End Thread
Strange plane indeed the Barracuda. Unloved by those whos used her - record holder ordered in numbers ordered by the F.A.A. - about 2500 of the damn things! never would have guessed that.
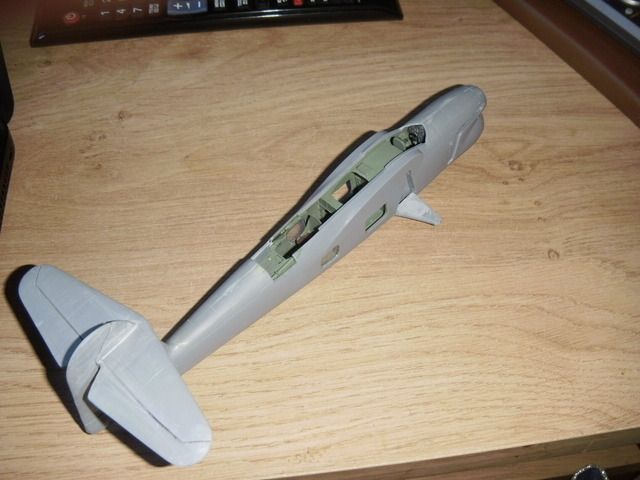
Little bit of progress made. This version of the Special Hobby release has resin and pe bits included. Unfortunately there seems to be a few communication issues between them. I´d blame the resin people but we´ll probably get on to that.
This the cockpit assembly nearly done oob.
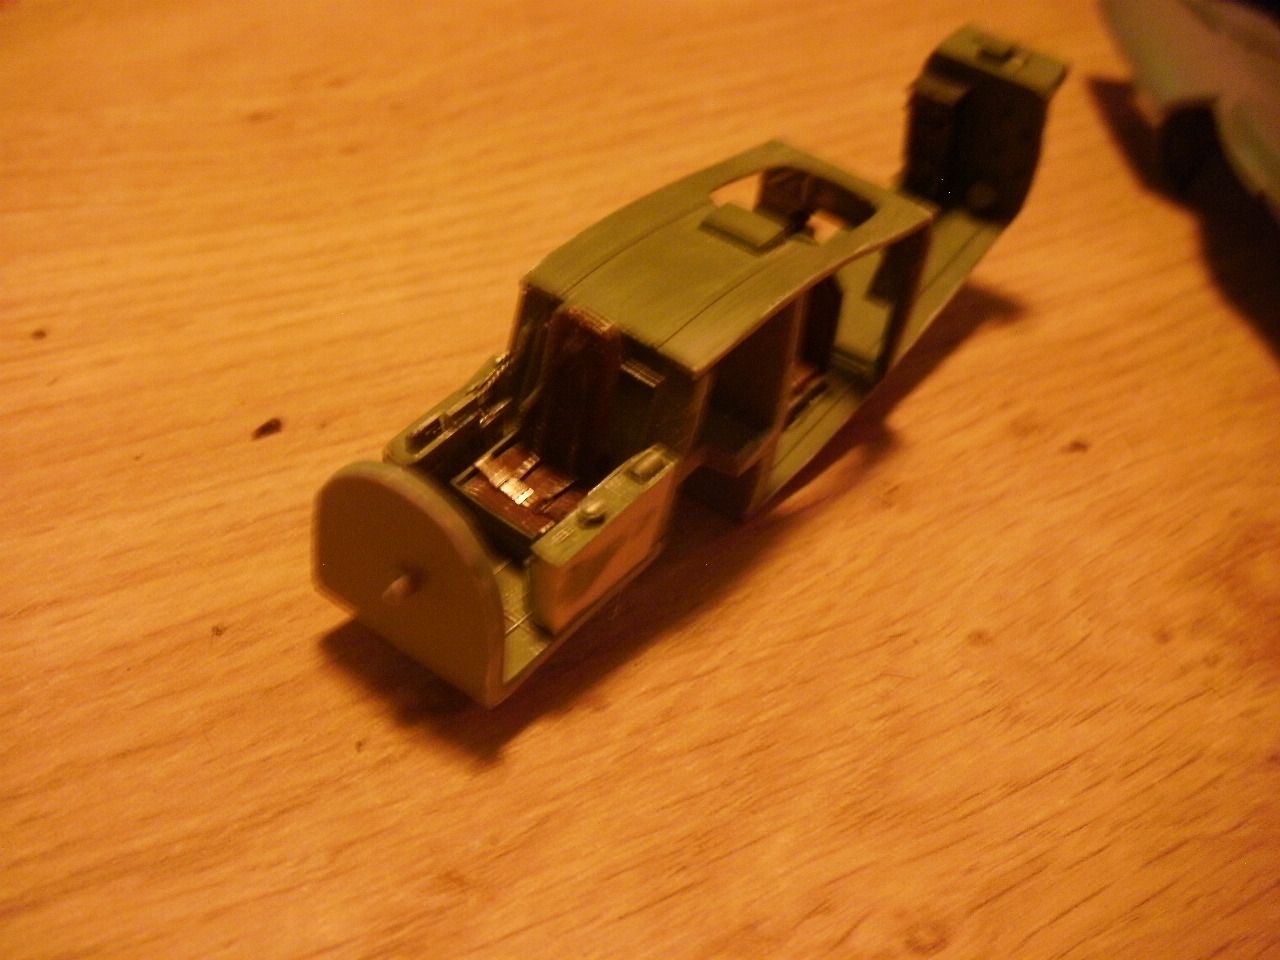
Pretty straight forward - strange mix of resin and poly. Most of the parts poly with a few bits of knobs and boxes in resin. The last bulkhead wall is resin as well -for some reason - and this makes the joining the fuselage a bit iffy as its a bit wide. Fair bit of shaving required here.
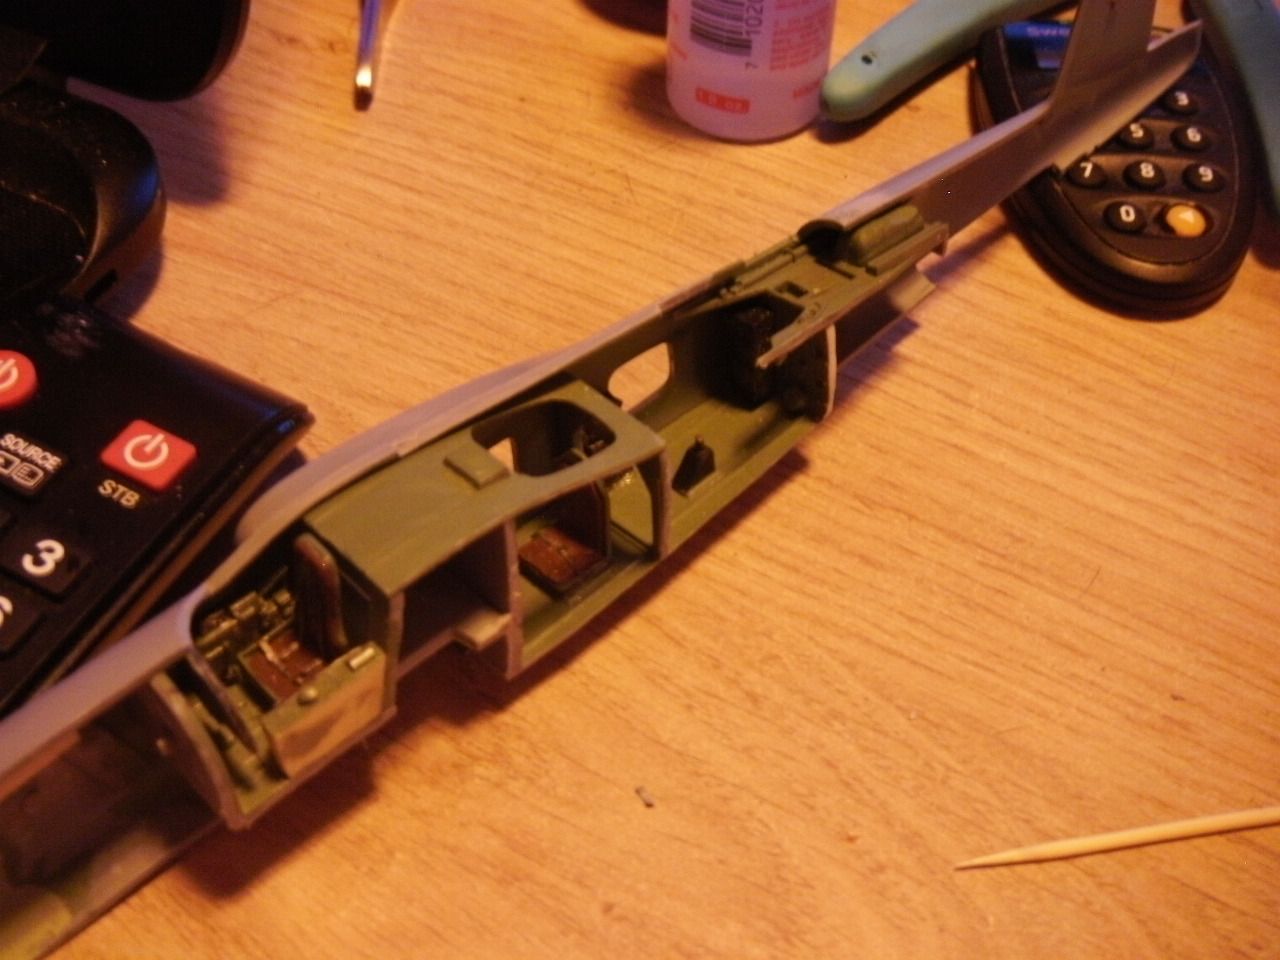
Cut out the last small section of the fuselage so I could display the guns - a sliding hatch evidently - a missing hatch on this build!
After the cut and a bit of research were back with the resin dude. According to all other sources the Barracuda sported twin vickers drum fed 303 machine guns. The Special Hobby resin dude decided that all ww2 machine guns were 0.5 brownings however and went with that.
The fuselage is now cut open to display these big boys. This is one of the last things I´m going to attach so I´m going to ignore it for a while.
Little bit of progress made. This version of the Special Hobby release has resin and pe bits included. Unfortunately there seems to be a few communication issues between them. I´d blame the resin people but we´ll probably get on to that.
This the cockpit assembly nearly done oob.

Pretty straight forward - strange mix of resin and poly. Most of the parts poly with a few bits of knobs and boxes in resin. The last bulkhead wall is resin as well -for some reason - and this makes the joining the fuselage a bit iffy as its a bit wide. Fair bit of shaving required here.
Cut out the last small section of the fuselage so I could display the guns - a sliding hatch evidently - a missing hatch on this build!

After the cut and a bit of research were back with the resin dude. According to all other sources the Barracuda sported twin vickers drum fed 303 machine guns. The Special Hobby resin dude decided that all ww2 machine guns were 0.5 brownings however and went with that.

The fuselage is now cut open to display these big boys. This is one of the last things I´m going to attach so I´m going to ignore it for a while.
running at the edge of their world
-
ShaunW
- NOT the sheep
- Posts: 26180
- Joined: November 26th, 2011, 6:11 pm
- Location: Pontefract West Yorkshire
Re: Stamfords Shed End Thread
The 'cuda might not be a looker, but it certainly has character and presence. I had to laugh at the comment re the resin guy's take on WW II machine guns, funny that 
Doing - Tamiya 1/35th Universal Carrier.
Work is the curse of the modelling classes!
IPMS#12300
Work is the curse of the modelling classes!
IPMS#12300
-
Stamford
- Modelling Gent and Scholar
- Posts: 2240
- Joined: May 1st, 2011, 7:42 am
- Location: Klågerup Sweden
Re: Stamfords Shed End Thread
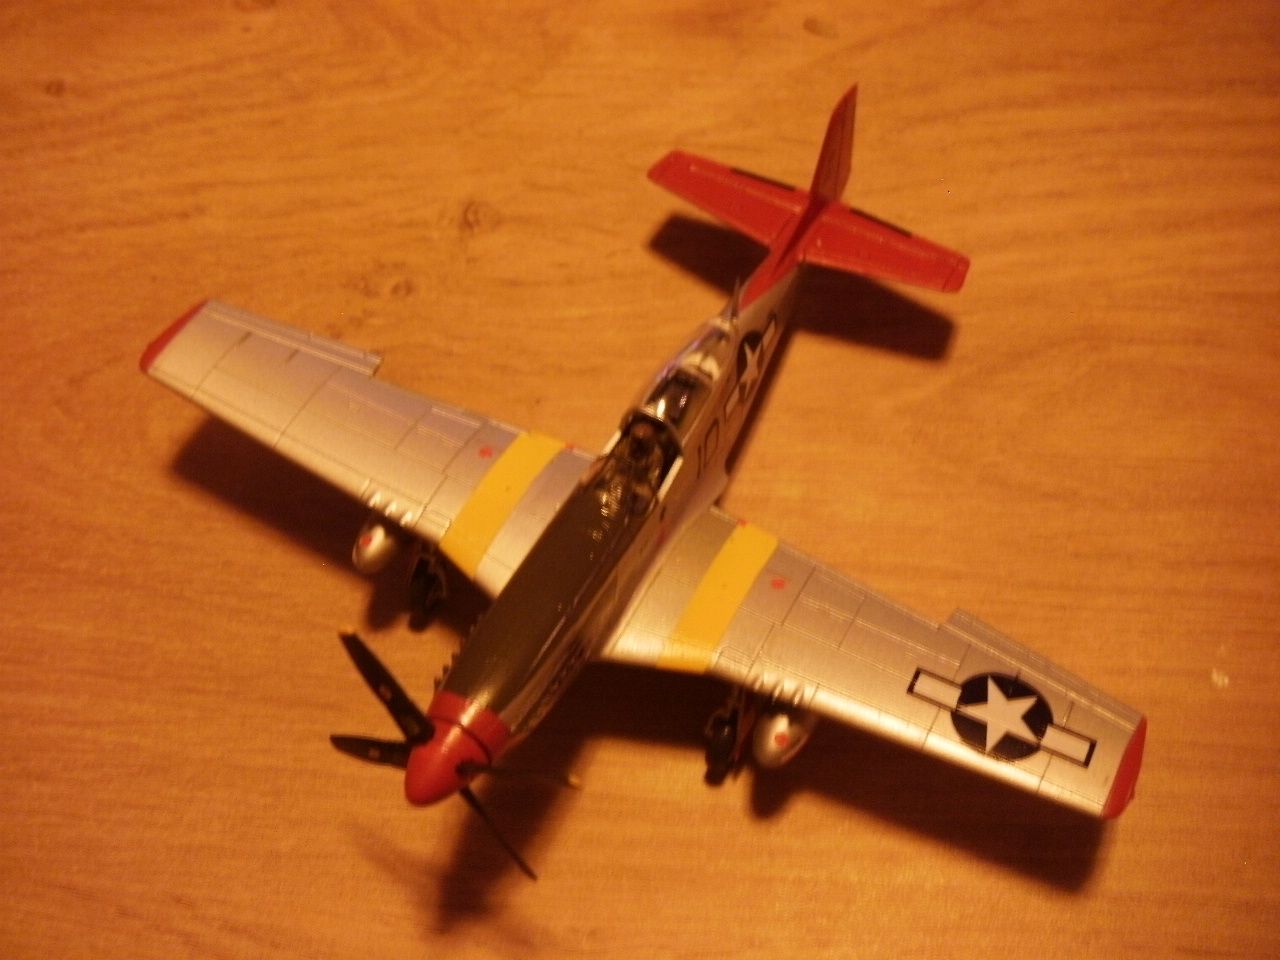
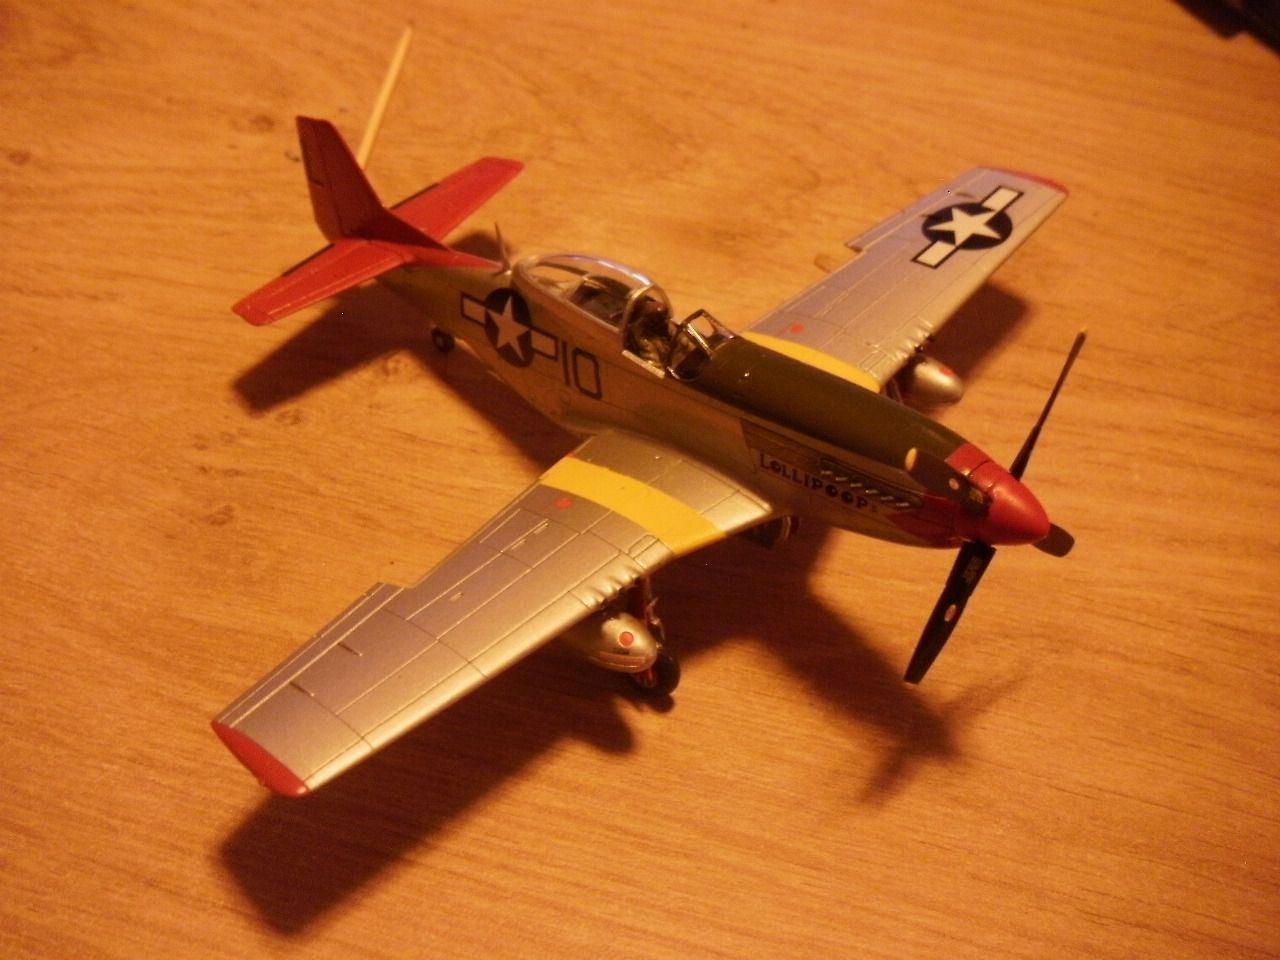
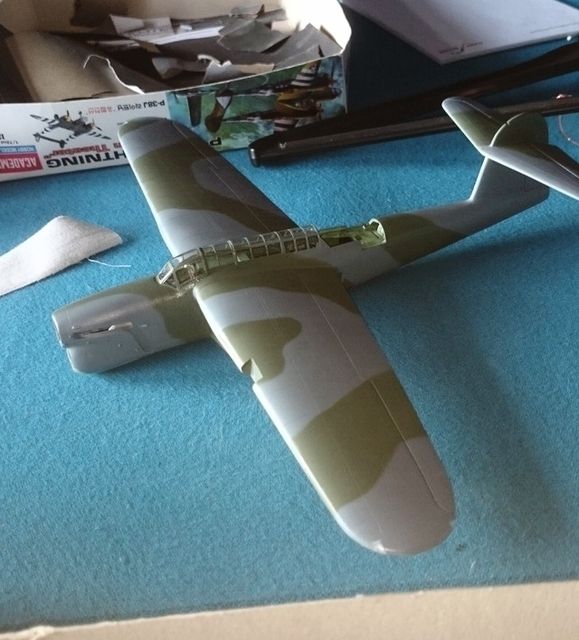
Always liked these weired ones! Quick pick of the Mustang to tidy things up - lovely little kit and just the job to get back on the plastic. Ended up looking like this.


running at the edge of their world
-
Stamford
- Modelling Gent and Scholar
- Posts: 2240
- Joined: May 1st, 2011, 7:42 am
- Location: Klågerup Sweden
Re: Stamfords Shed End Thread
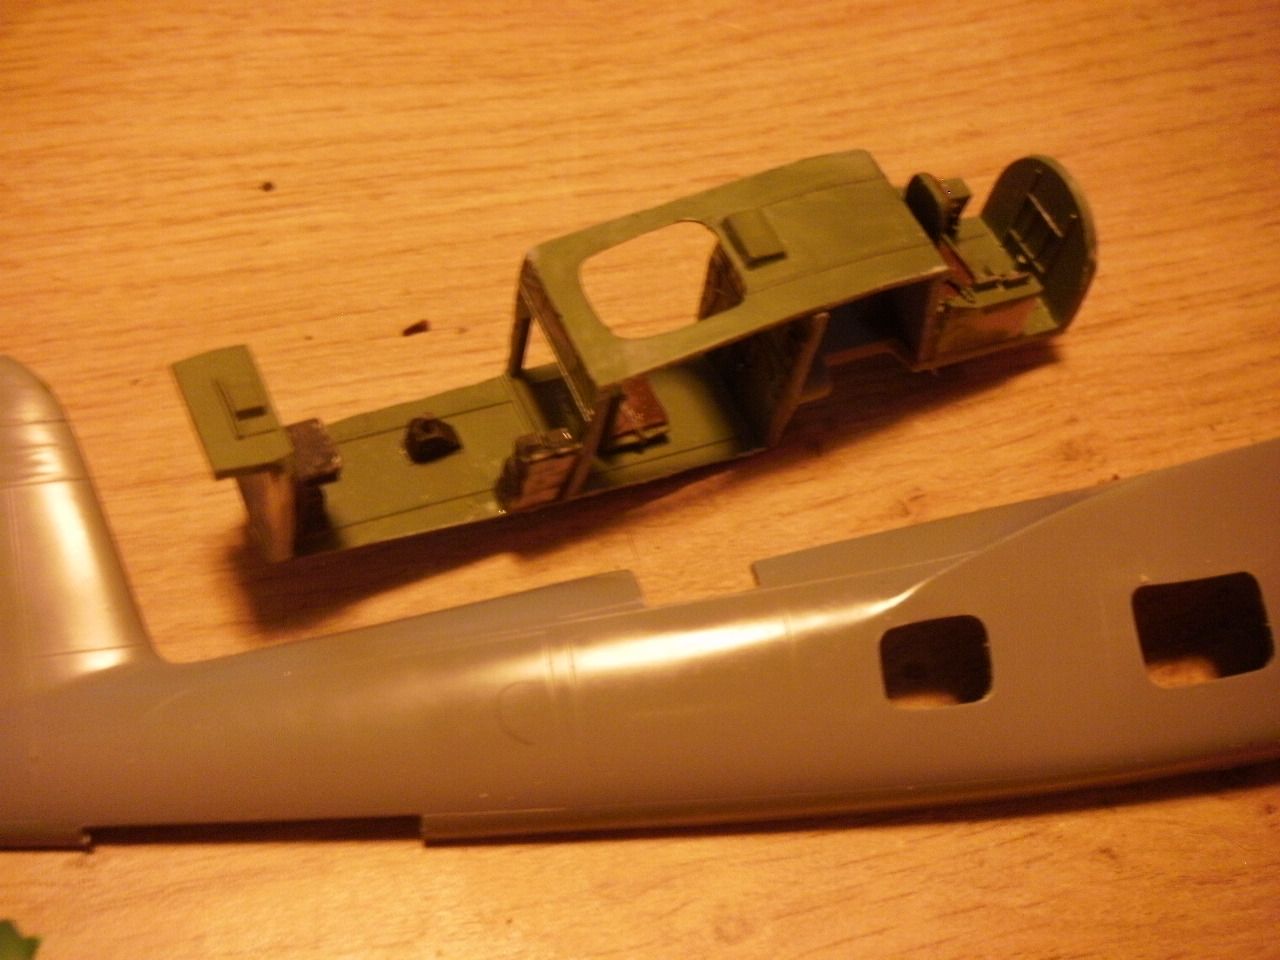
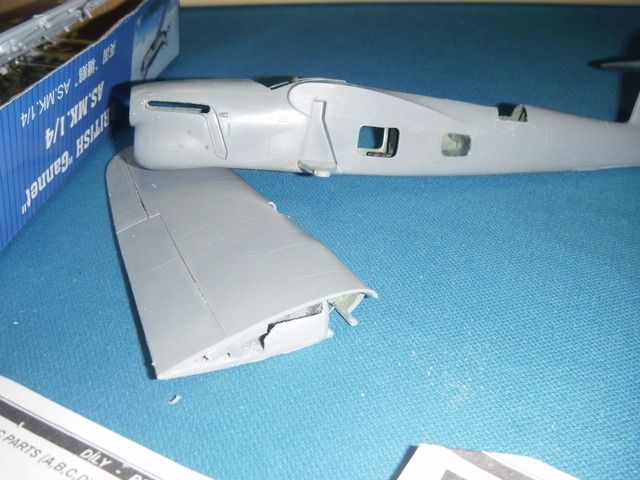
Bit more done on the Barra - replaced the kits resin with some plastic as I have cut back the fuselage hatch to show the guns. Also thinned the fuselage where the canopy won´t cover it as its preeettty thick otherwise!

running at the edge of their world
-
ShaunW
- NOT the sheep
- Posts: 26180
- Joined: November 26th, 2011, 6:11 pm
- Location: Pontefract West Yorkshire
Re: Stamfords Shed End Thread
Nice one Stamford, the P-51 turned out very nicely and the Barracuda interior looks great from here.
Doing - Tamiya 1/35th Universal Carrier.
Work is the curse of the modelling classes!
IPMS#12300
Work is the curse of the modelling classes!
IPMS#12300
-
mjatx

- Modelling Gent and Scholar
- Posts: 1396
- Joined: April 10th, 2014, 10:13 pm
- Location: Austin, Texas, USA
Re: Stamfords Shed End Thread
Great work on that camo scheme and especially all those clear parts!
-
Stamford
- Modelling Gent and Scholar
- Posts: 2240
- Joined: May 1st, 2011, 7:42 am
- Location: Klågerup Sweden
Re: Stamfords Shed End Thread
Got the fuselage closed on the barra but pics are on hold.
Been playing with a Frog. Maybe the first real Frog in a long time - done a few Novo´s and other re-pops but this one came with real frog instructions but no decals from a mate who picked it up for 50p. Never made it before its a 162 Salamander. Tarted it up a bit with a carved wheel from the spares for the turbine, a new seat filed to shape and some scrap pe for the sidewalls and IP. Couple of shot in the nose and the rest will be more or less as frog intended.
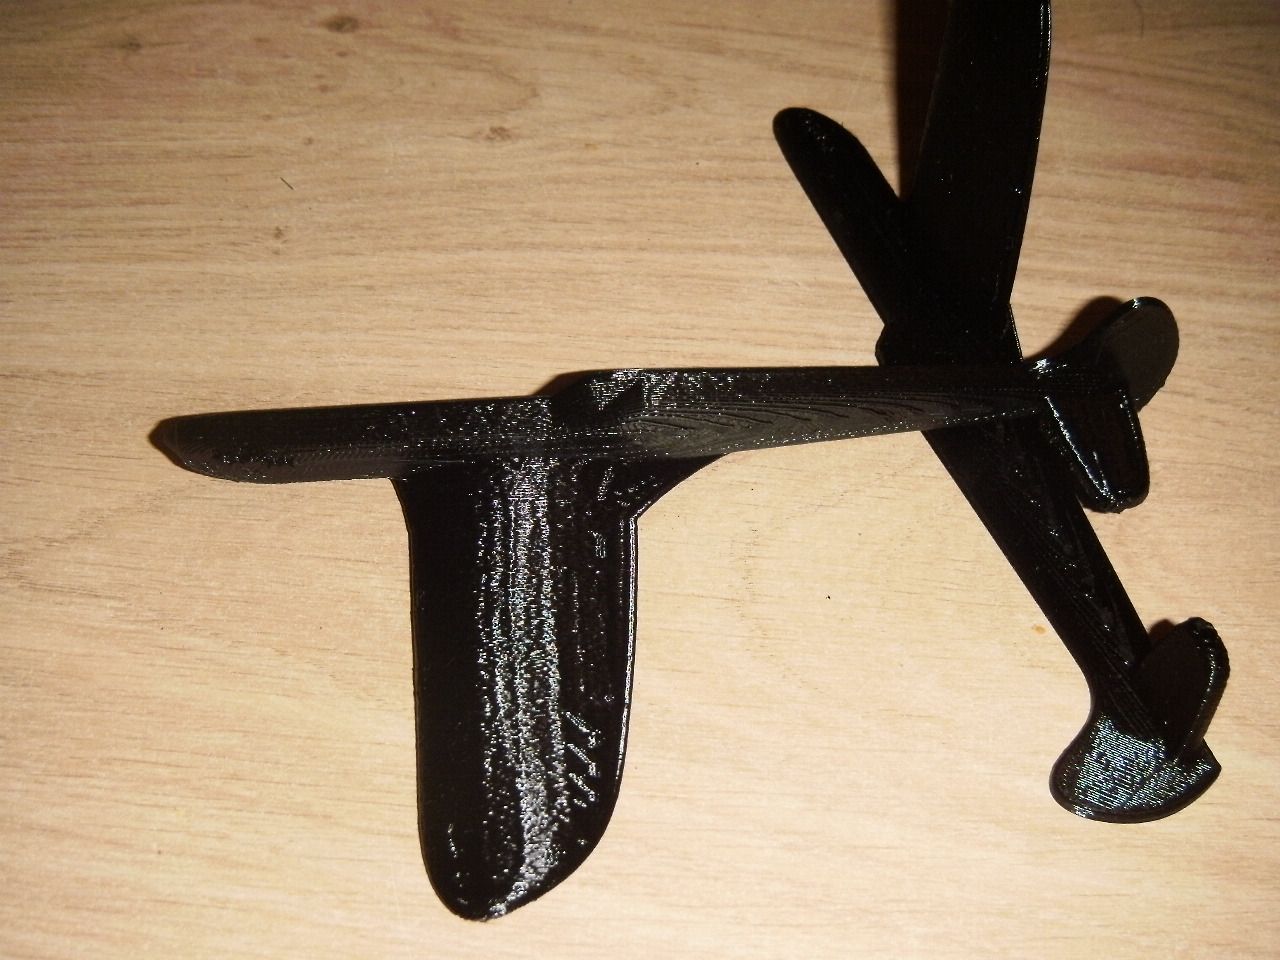
And now for something completely different.
Went for dinner last Saturday with someone who had built himself a 3d printer. He showed a couple of bits he had printed from CAD sources, I said print me a Spitfire! We had a quick search and found something on t´interweb which was very small. He blew it up and we tried to print it out. Took a few goes but here it is - Print it yourself modelling mark 1 - not to detailed and not that many parts. Instructions deemed un-neccessary!
Been playing with a Frog. Maybe the first real Frog in a long time - done a few Novo´s and other re-pops but this one came with real frog instructions but no decals from a mate who picked it up for 50p. Never made it before its a 162 Salamander. Tarted it up a bit with a carved wheel from the spares for the turbine, a new seat filed to shape and some scrap pe for the sidewalls and IP. Couple of shot in the nose and the rest will be more or less as frog intended.


And now for something completely different.
Went for dinner last Saturday with someone who had built himself a 3d printer. He showed a couple of bits he had printed from CAD sources, I said print me a Spitfire! We had a quick search and found something on t´interweb which was very small. He blew it up and we tried to print it out. Took a few goes but here it is - Print it yourself modelling mark 1 - not to detailed and not that many parts. Instructions deemed un-neccessary!

running at the edge of their world
-
ShaunW
- NOT the sheep
- Posts: 26180
- Joined: November 26th, 2011, 6:11 pm
- Location: Pontefract West Yorkshire
Re: Stamfords Shed End Thread
Nice, I like your additions to the Frog Salamander. 3D printing is quite something and will probably revolutionise our hobby, if it is not doing so already!
Doing - Tamiya 1/35th Universal Carrier.
Work is the curse of the modelling classes!
IPMS#12300
Work is the curse of the modelling classes!
IPMS#12300
-
Stuart

- Raider of the Lost Ark Royal
- Posts: 19415
- Joined: February 25th, 2013, 4:55 pm
- Location: North Wales
- Contact:
Re: Stamfords Shed End Thread
I certainly think it'll have it's place in the hobby - I've already seen OO-Gauge London Underground Trains made from one - well the body anyway.
Stuart Templeton I may not be good but I'm slow...
My Blog: https://stuartsscalemodels.blogspot.com/
My Blog: https://stuartsscalemodels.blogspot.com/
-
skypirate

- Modelling Gent and Scholar
- Posts: 7292
- Joined: May 1st, 2011, 6:13 am
- Location: Port Macquarie, Australia
Re: Stamfords Shed End Thread
Good to see the FROG attention!
So far only VERY expensive industrial 3D printers can achieve the surface finish our hobby requires.
cheers,
David
So far only VERY expensive industrial 3D printers can achieve the surface finish our hobby requires.
cheers,
David
-
Stamford
- Modelling Gent and Scholar
- Posts: 2240
- Joined: May 1st, 2011, 7:42 am
- Location: Klågerup Sweden
Re: Stamfords Shed End Thread
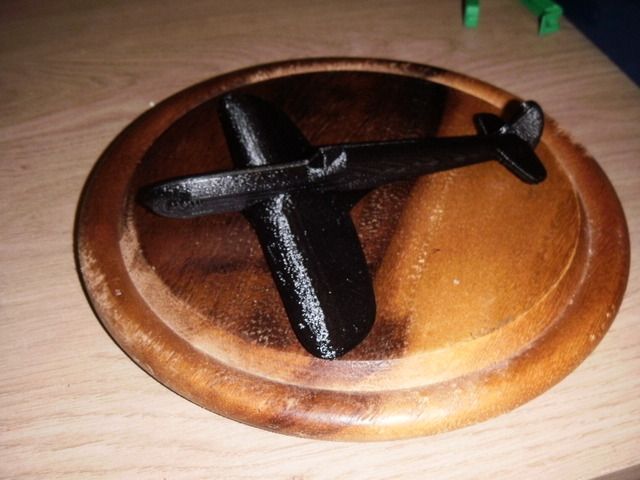
Thanks for the comments guys. Update time, finished the 3d Spit! Toyed with the idea of blasting it silver and applying some roundels but decided to go au natural !
Also closed up the fuselage on the salamander and sprayed it with its undercoat/underside coat!
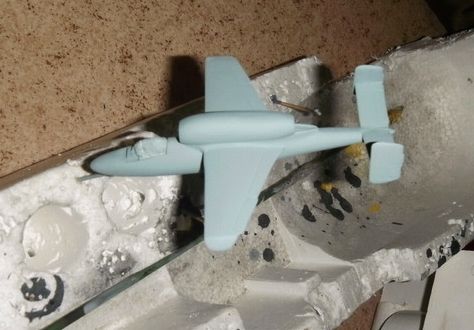
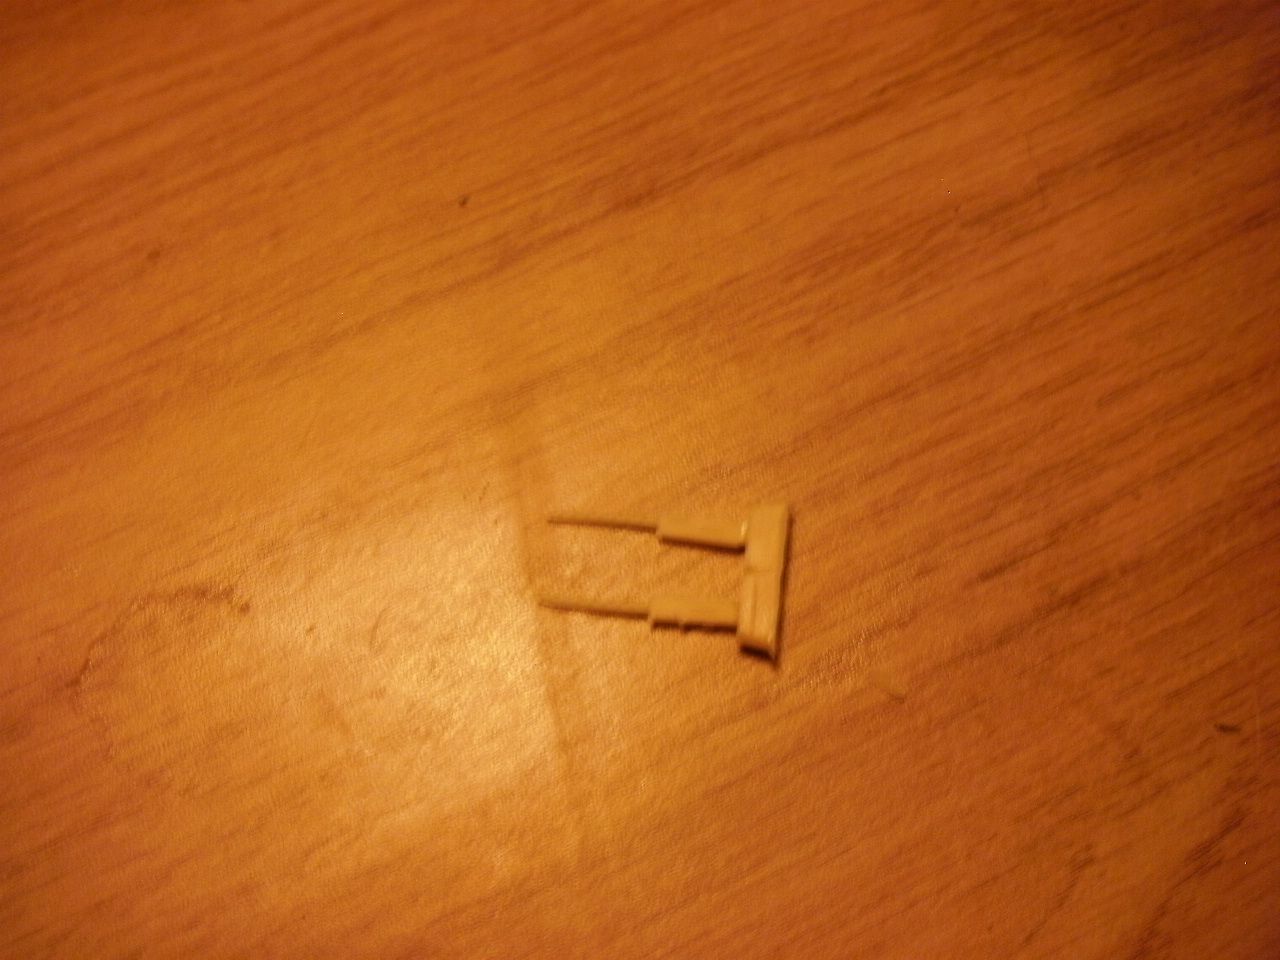
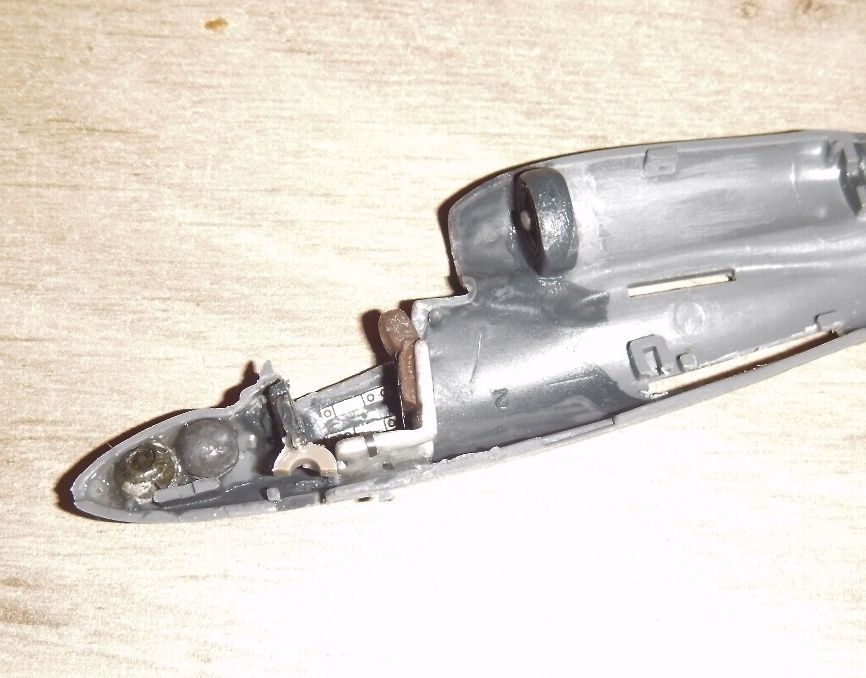
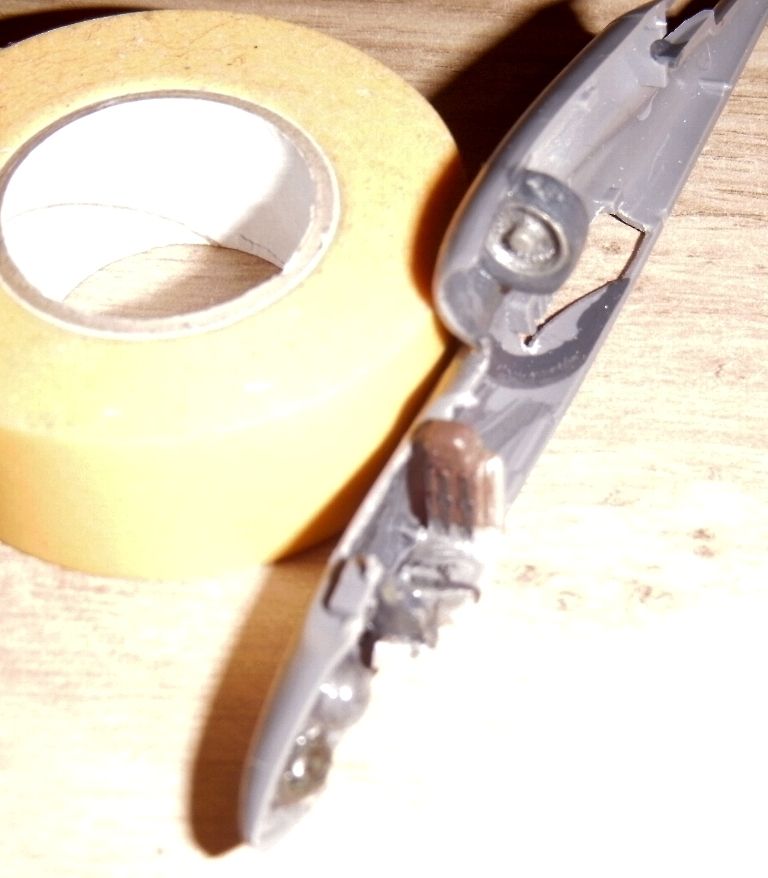
Have also been wrestling with the big Barra. Srange mixture of detailed areas and we really can´t be bothered this kit. The wheel wells, however, have some nice detail and build up well. The wheels and undercarriage legs not so much but this will be worried about later in the build. I cut out the wingtip lights and glued clear sprue to the angles, will file these up. Difficult to get clear but better than nothing I reckon. I also added some scrap to the inside of the wings at the attachment point to the fuselage to give a greater area for the cement to work on - it´s only a butt joint otherwise and a pretty heavy wing.
The major headache at the moment is that I have managed to push the exhausts into the fuselage! The bond between the resin and poly in this kit has been a problem all along - probably should have cleaned them up better! Anyways I have opened up the hole behind the prop and shaken them out - Will have to try and reset them with tweazers at a later date - saves me masking them I suppose!

Also closed up the fuselage on the salamander and sprayed it with its undercoat/underside coat!

Have also been wrestling with the big Barra. Srange mixture of detailed areas and we really can´t be bothered this kit. The wheel wells, however, have some nice detail and build up well. The wheels and undercarriage legs not so much but this will be worried about later in the build. I cut out the wingtip lights and glued clear sprue to the angles, will file these up. Difficult to get clear but better than nothing I reckon. I also added some scrap to the inside of the wings at the attachment point to the fuselage to give a greater area for the cement to work on - it´s only a butt joint otherwise and a pretty heavy wing.
The major headache at the moment is that I have managed to push the exhausts into the fuselage! The bond between the resin and poly in this kit has been a problem all along - probably should have cleaned them up better!


running at the edge of their world
-
Stamford
- Modelling Gent and Scholar
- Posts: 2240
- Joined: May 1st, 2011, 7:42 am
- Location: Klågerup Sweden
Re: Stamfords Shed End Thread
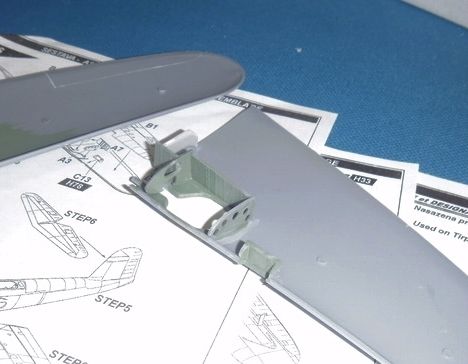
Time for an update on the barra. Main assembly completed and painted - had a few issues with the canopy which seemed fine whilst dry fitting but both pieces didn´t seem to like each once glue was added.  This left a few gaps which needed filling but turned out ok. Definately 2 steps forward 4 leaps back with this fellow. I then undercoated it which revealed nasty seams on the underside - did some work there then applied montex gimp masks to the canopy - remembered to give them a coat of klear to help stop bleeding yay! - and masked her up with tamy´s tape and sausages.
And low and behold the unpealing revealed nice neat demarcation! First time this build something went right first time! There was some residue from the gimp masks but on asking you lovely people for advice - thanks fredk - this was removed using wd40, (is there anything this stuff won´t do?), still a lot to do here mind - the undercarriage as supplied is too fragile to hold up a 1/72 tiger moth and this lady is a singer at the end of things.
Be interesting to see how the photo looks as I have dragged myself kicking and screaming into the current decade and used my phone and directly uploaded the pic to photobucket instead of faffing about with my camera and leads and transfering things to 46 different places.
running at the edge of their world
-
ShaunW
- NOT the sheep
- Posts: 26180
- Joined: November 26th, 2011, 6:11 pm
- Location: Pontefract West Yorkshire
Re: Stamfords Shed End Thread
Nice one, the demarcation for the camo looks good to me, not too hard nor too soft, freehand style, which would be wrong for a British machine. The masks look to have worked nicely on that multi-panelled canopy too.
Doing - Tamiya 1/35th Universal Carrier.
Work is the curse of the modelling classes!
IPMS#12300
Work is the curse of the modelling classes!
IPMS#12300
-
Dazzled

- Modelling Gent and Scholar
- Posts: 9592
- Joined: October 1st, 2011, 11:08 pm
- Location: Mid Glamorgan, South Wales
- Contact:
Re: Stamfords Shed End Thread
That looks pretty nice Stamford. Well worth the effort 
COLD WAR S.I.G. LEADER
Wherever there's danger, wherever there's trouble, wherever there's important work to be done....I'll be somewhere else building a model!
Wherever there's danger, wherever there's trouble, wherever there's important work to be done....I'll be somewhere else building a model!