This kit looks to be a real treat, Steve. Nice work on the cockpit and I can confirm that Mike's IP decals are brill.
Flakmonkey's ground attacker with Griffon grunt
-
PaulBradley

- Staring out the window
- Posts: 21219
- Joined: April 6th, 2011, 3:08 pm
- Location: Flagstaff, AZ
Re: Flakmonkey's ground attacker with Griffon grunt
Lovely wallpaper. 
This kit looks to be a real treat, Steve. Nice work on the cockpit and I can confirm that Mike's IP decals are brill.
This kit looks to be a real treat, Steve. Nice work on the cockpit and I can confirm that Mike's IP decals are brill.
Paul
За демократію і незалежний Україну
"For Democracy and a Free Ukraine"
За демократію і незалежний Україну
"For Democracy and a Free Ukraine"
-
AndrewR

- In the basement lab
- Posts: 24110
- Joined: April 5th, 2011, 4:13 pm
- Location: Ottawa, Ontario, The Great White North
- Contact:
Re: Flakmonkey's ground attacker with Griffon grunt
You are(almost) tempting me to move up to 1/48 scale. I have the Xtrakits 1/72 kit for the Mk XII, but it won't go together as easily as this one.
Up in the Great White North
-
flakmonkey

- Modelling Gent and Scholar
- Posts: 3489
- Joined: April 6th, 2011, 9:58 am
- Location: Down in the tube station at midnight
- Contact:
Re: Flakmonkey's ground attacker with Griffon grunt
We would like to point out that we were not responsible for the wallpaper in the room at the top of the house. Moves are afoot to cover the walls with more paint racks to hide it.
This is a nice kit, not perfect by any means but an enjoyable build. Modellers who have advanced past the beginner stage and are looking for something to try out some newly learnt modelling skills on would be particularly well served by it.
This is a nice kit, not perfect by any means but an enjoyable build. Modellers who have advanced past the beginner stage and are looking for something to try out some newly learnt modelling skills on would be particularly well served by it.
Would ya like to learn to fly? Would ya? Would you like to see me try?
-
flakmonkey
- Modelling Gent and Scholar
- Posts: 3489
- Joined: April 6th, 2011, 9:58 am
- Location: Down in the tube station at midnight
- Contact:
Re: Flakmonkey's ground attacker with Griffon grunt
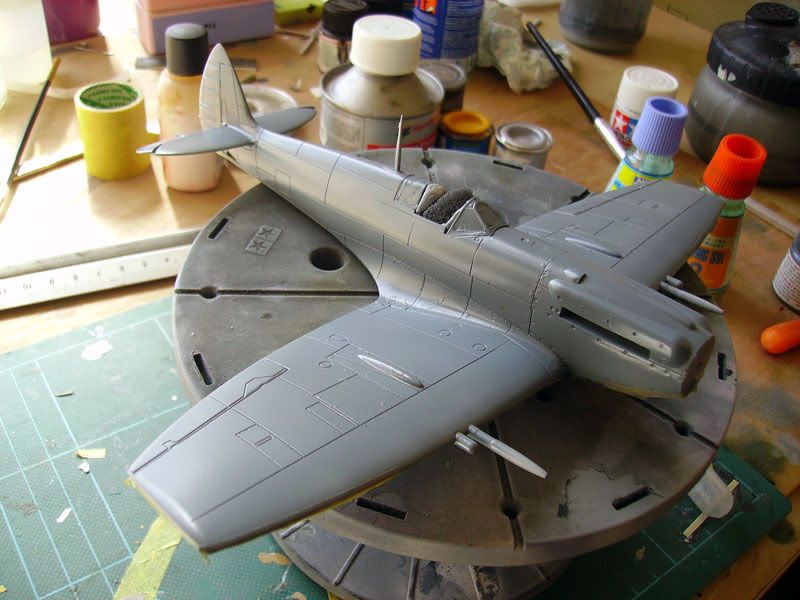
Small update as I have been doing a couple of odd jobs on the Mk.XII when I should have been working. Shhhhh.
Having decided that leaving the radiator off until the underside colour had been sprayed was far too lily livered, I set about attaching it. Doing this now also neatly side steps my finely honed ability to make a mess of apparently simple operations which would no doubt result in getting cement all over the freshly painted undersides of the model. As previously mentioned, the radiator housing fits neatly into its recess on the lower wing. At least it does until you fit the radiator faces to it. These are fractionally too wide to fit into their locating grooves without spreading the sides of the housing, so their outer edges need sanding slightly. You can actually feel the housing being stretched as you push them into place, so sand a little plastic from each side until this stops happening. Once they are in place, take a scalpel to the shoulder on the upper corner of each part and trim that down so that it is flush with the upper face of the housing. The instruction sheet shows the parts much more clearly than a photograph, so I have scanned this and circled the shoulder that needs trimming down.
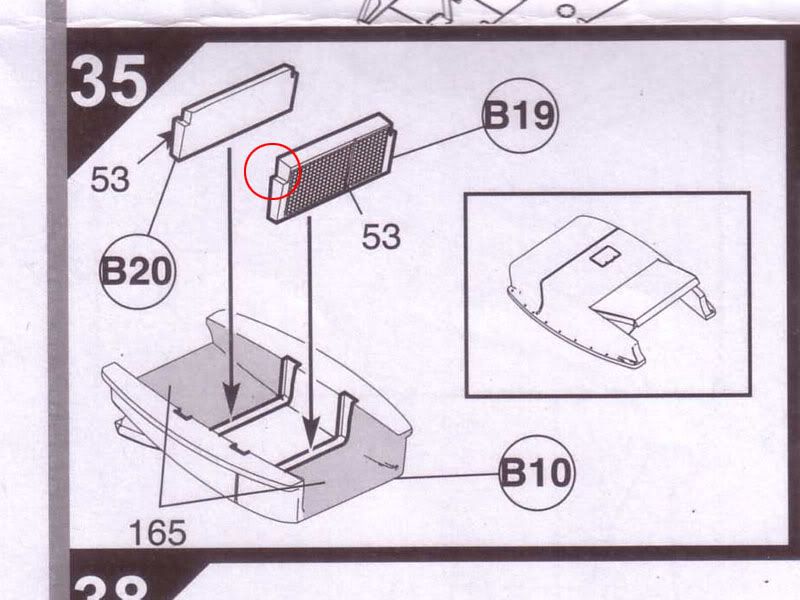
Once that's done, everything is good once more. It's a good idea to thin down the mouth of the housing too, these weren't blade thin in real life so about half the moulded thickness is reasonable. Today's good news is that, with some careful filing, you can make the sliding section of the three piece canopy fit in the open position. Just thin down the rear edge carefully, the frame is quite wide here so by angling the file and going steadily you can avoid having to do any polishing work later. When test fitting the sliding section, I realised that Airfix have done what everybody else does and not moulded the canopy rails correctly. To be fair, the Airfix kit is meant to be built buttoned up first and foremost and so this wouldn't be an issue and in any case it's always a compromise on the part of the manufacturer when approaching this sort of thing. Had I thought about this earlier it would have been easier but it's still not difficult to sort it out. A small rectangle of plastic card needs cementing in place and once set, sanding to blend in to the contours of the fuselage.
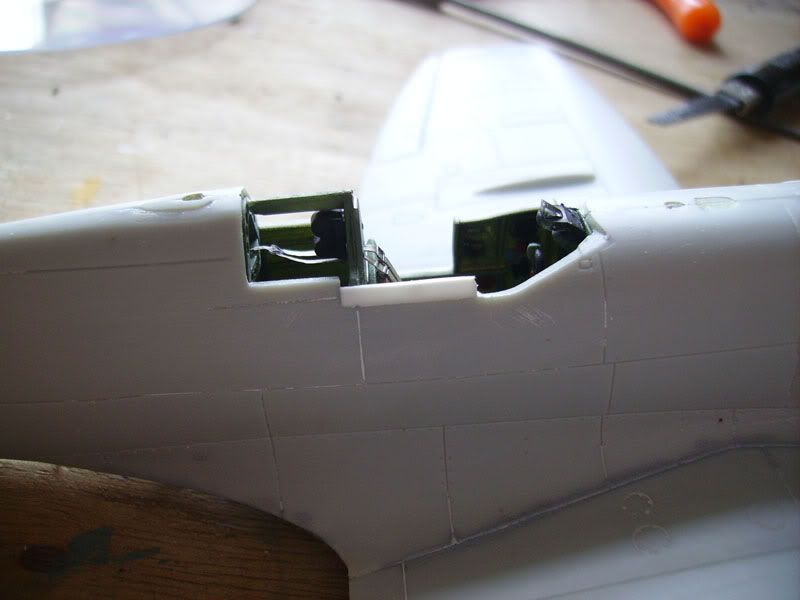
The groove that the canopy runs in needs to be scribed as a continuation of the existing line. The front edges of the rails should be square so that there is a triangular gap between the rail and the trailing edge of the windscreen. The starboard rail can also be done, although only a tiny section of it lives on the fuselage, the rest being part of the access door.
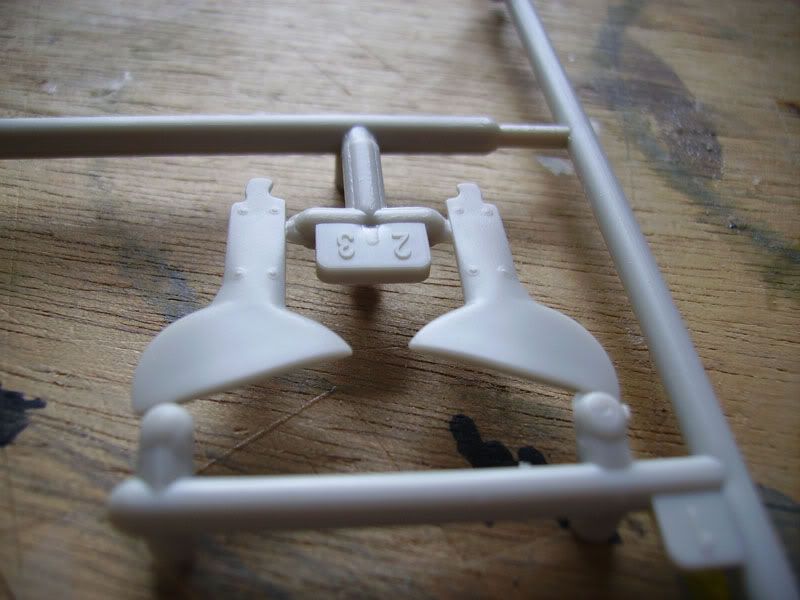
There is a gotcha on the undercarriage of the Mk.XII kit. Early Mk.XIIs were based on Mk.V airframes, and had Mk.V undercarriage; fixed tailwheel, narrow five spoke mainwheels and flat undercarriage covers. Later Mk.XIIs were based on Mk.VIII airframes, and had the later undercarriage; retractable tailwheel, wide mainwheels and the bulged undercarriage covers that were necessary to accomodate the wider tyres. Airfix provide both styles of tailwheel, but only provide Mk.VIII style mainwheels and undercarriage covers. This means that if you want to build the 91 Sqn. machine that the kit provides markings for, you need to rob a passing Mk.V of its mainwheels and undercarriage covers. Having said that, the bulged covers are nicely done and as I had intended to do a 41 Sqn. machine from the outset I can't say that this disturbs me too greatly.
Whilst you're going about fixing and improving things, don't be tempted to fix the missing wingtip navigation lights. The Mk.XII didn't have any and so Airfix have that right. Why it didn't have any I do not know. Probably somebody forgot. This may be starting to sound like the new Mk.XII kit is a box full of errors and shortcomings, but that is some distance from the truth. In many ways it is better than the highly regarded F.22/ 24 kits, and the majority, if not all, of its tiny faults can be found on just about every other Spitfire kit you can buy. Very little needs to be done (as opposed to "it's a nice idea to do...") to build a very good Mk.XII straight from the box.
Having decided that leaving the radiator off until the underside colour had been sprayed was far too lily livered, I set about attaching it. Doing this now also neatly side steps my finely honed ability to make a mess of apparently simple operations which would no doubt result in getting cement all over the freshly painted undersides of the model. As previously mentioned, the radiator housing fits neatly into its recess on the lower wing. At least it does until you fit the radiator faces to it. These are fractionally too wide to fit into their locating grooves without spreading the sides of the housing, so their outer edges need sanding slightly. You can actually feel the housing being stretched as you push them into place, so sand a little plastic from each side until this stops happening. Once they are in place, take a scalpel to the shoulder on the upper corner of each part and trim that down so that it is flush with the upper face of the housing. The instruction sheet shows the parts much more clearly than a photograph, so I have scanned this and circled the shoulder that needs trimming down.
Once that's done, everything is good once more. It's a good idea to thin down the mouth of the housing too, these weren't blade thin in real life so about half the moulded thickness is reasonable. Today's good news is that, with some careful filing, you can make the sliding section of the three piece canopy fit in the open position. Just thin down the rear edge carefully, the frame is quite wide here so by angling the file and going steadily you can avoid having to do any polishing work later. When test fitting the sliding section, I realised that Airfix have done what everybody else does and not moulded the canopy rails correctly. To be fair, the Airfix kit is meant to be built buttoned up first and foremost and so this wouldn't be an issue and in any case it's always a compromise on the part of the manufacturer when approaching this sort of thing. Had I thought about this earlier it would have been easier but it's still not difficult to sort it out. A small rectangle of plastic card needs cementing in place and once set, sanding to blend in to the contours of the fuselage.
The groove that the canopy runs in needs to be scribed as a continuation of the existing line. The front edges of the rails should be square so that there is a triangular gap between the rail and the trailing edge of the windscreen. The starboard rail can also be done, although only a tiny section of it lives on the fuselage, the rest being part of the access door.
There is a gotcha on the undercarriage of the Mk.XII kit. Early Mk.XIIs were based on Mk.V airframes, and had Mk.V undercarriage; fixed tailwheel, narrow five spoke mainwheels and flat undercarriage covers. Later Mk.XIIs were based on Mk.VIII airframes, and had the later undercarriage; retractable tailwheel, wide mainwheels and the bulged undercarriage covers that were necessary to accomodate the wider tyres. Airfix provide both styles of tailwheel, but only provide Mk.VIII style mainwheels and undercarriage covers. This means that if you want to build the 91 Sqn. machine that the kit provides markings for, you need to rob a passing Mk.V of its mainwheels and undercarriage covers. Having said that, the bulged covers are nicely done and as I had intended to do a 41 Sqn. machine from the outset I can't say that this disturbs me too greatly.
Whilst you're going about fixing and improving things, don't be tempted to fix the missing wingtip navigation lights. The Mk.XII didn't have any and so Airfix have that right. Why it didn't have any I do not know. Probably somebody forgot. This may be starting to sound like the new Mk.XII kit is a box full of errors and shortcomings, but that is some distance from the truth. In many ways it is better than the highly regarded F.22/ 24 kits, and the majority, if not all, of its tiny faults can be found on just about every other Spitfire kit you can buy. Very little needs to be done (as opposed to "it's a nice idea to do...") to build a very good Mk.XII straight from the box.
Would ya like to learn to fly? Would ya? Would you like to see me try?

Re: Flakmonkey's ground attacker with Griffon grunt
Everything looks great Flak. This build will be bookmarked for future reference. My LMS is having a real hard time getting me this kit.
Besting 60 years of mediocre building of average kits in the stand off scale
-
flakmonkey
- Modelling Gent and Scholar
- Posts: 3489
- Joined: April 6th, 2011, 9:58 am
- Location: Down in the tube station at midnight
- Contact:
Re: Flakmonkey's ground attacker with Griffon grunt
As luck would have it Jeff I just came across this one as I was looking for something else, having failed to turn one up when I was specifically looking for one. There's an interesting article here explaining the supply shortages that many retailers are experiencing at the moment.
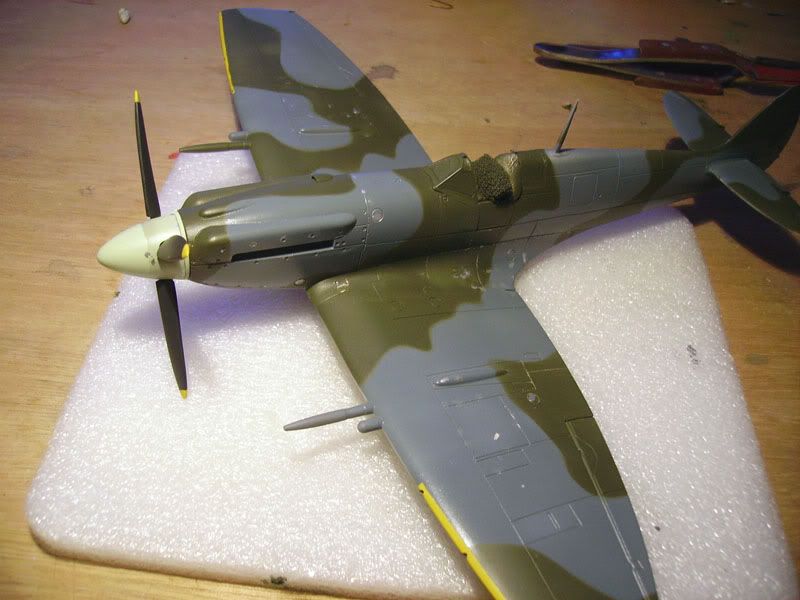
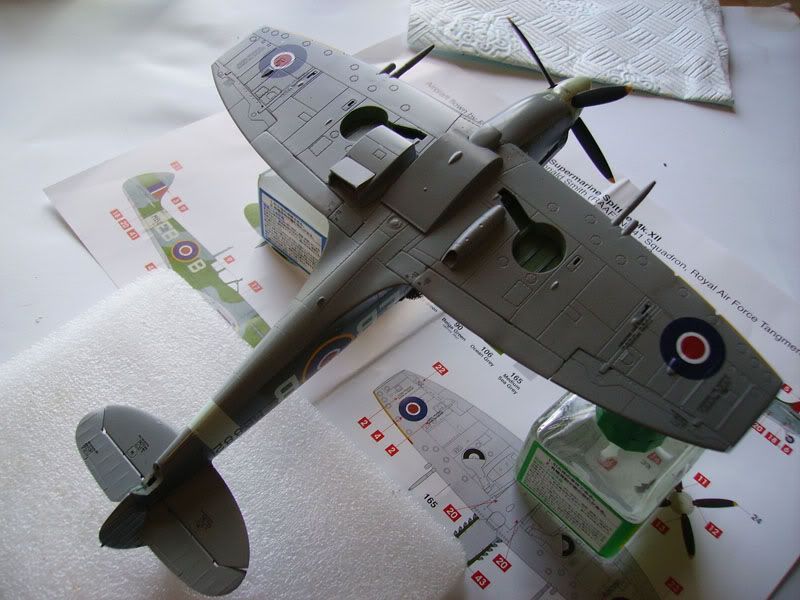
Just to prove that I make a mess when I'm enjoying myself, here is the current state of the Ikea workbench.
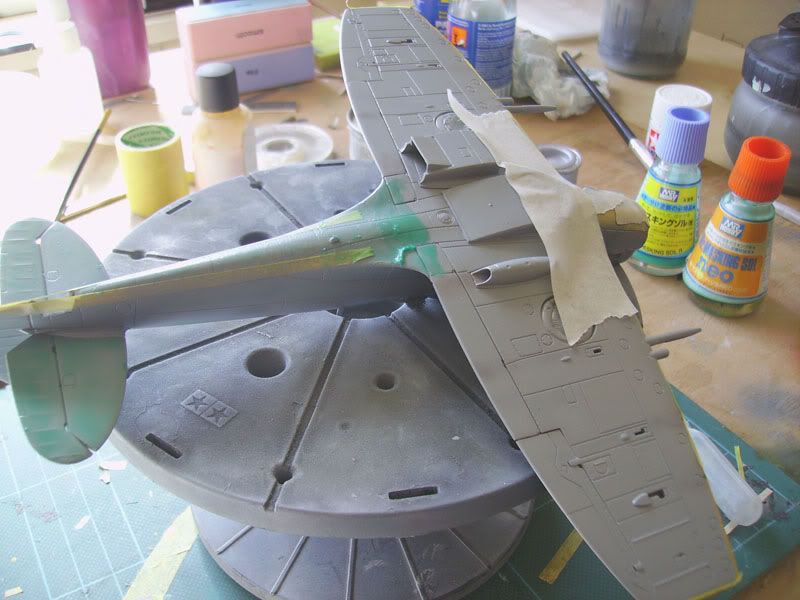
The whole thing was primed with a couple of airbrushed coats of Mr. Surfacer before spraying the undersides with Tamiya XF-83. Some streaky bits were added before sealing it with a coat of Klear and masking off for the top colours. Some of the masking was done with Gunze's acrylic friendly Mr. Masking Sol Neo. The 20mm and .50 barrel fairings haven't been masked and will have their demarcation lines brush painted with a steady hand. The uppers have had a coat of Tamiya XF-82 and again have been Kleared to protect them from picking up greasy marks when the blu-tak masking for the green goes on. The green will be Tamiya XF-81. All these colours are the ones they introduced for their 1/32 Spitfires and are a good addition to the paint rack. despite their XF (flat) designation, they dry to a satin sheen. Like all Tamiya acrylics, they are very easy to work with.
The panel lines look very deep and wide in the pictures. Although in real life they are a little more exaggerated than I would like (in fact I should have brushed Mr. Surfacer into them before priming but was too bone idle), they are nowhere near as diecast looking as the photographs would have you believe. Green next then.
Just to prove that I make a mess when I'm enjoying myself, here is the current state of the Ikea workbench.
The whole thing was primed with a couple of airbrushed coats of Mr. Surfacer before spraying the undersides with Tamiya XF-83. Some streaky bits were added before sealing it with a coat of Klear and masking off for the top colours. Some of the masking was done with Gunze's acrylic friendly Mr. Masking Sol Neo. The 20mm and .50 barrel fairings haven't been masked and will have their demarcation lines brush painted with a steady hand. The uppers have had a coat of Tamiya XF-82 and again have been Kleared to protect them from picking up greasy marks when the blu-tak masking for the green goes on. The green will be Tamiya XF-81. All these colours are the ones they introduced for their 1/32 Spitfires and are a good addition to the paint rack. despite their XF (flat) designation, they dry to a satin sheen. Like all Tamiya acrylics, they are very easy to work with.
The panel lines look very deep and wide in the pictures. Although in real life they are a little more exaggerated than I would like (in fact I should have brushed Mr. Surfacer into them before priming but was too bone idle), they are nowhere near as diecast looking as the photographs would have you believe. Green next then.
Would ya like to learn to fly? Would ya? Would you like to see me try?
-
AndrewR
- In the basement lab
- Posts: 24110
- Joined: April 5th, 2011, 4:13 pm
- Location: Ottawa, Ontario, The Great White North
- Contact:
Re: Flakmonkey's ground attacker with Griffon grunt
Is that Mr Steady Hand? Send him to Canada, when he'a finished at your place!flakmonkey wrote:... brush painted with a steady hand....
Up in the Great White North
-
flakmonkey
- Modelling Gent and Scholar
- Posts: 3489
- Joined: April 6th, 2011, 9:58 am
- Location: Down in the tube station at midnight
- Contact:
Re: Flakmonkey's ground attacker with Griffon grunt
Packaging might be a problem Andrew but I'll see what I can come up with.
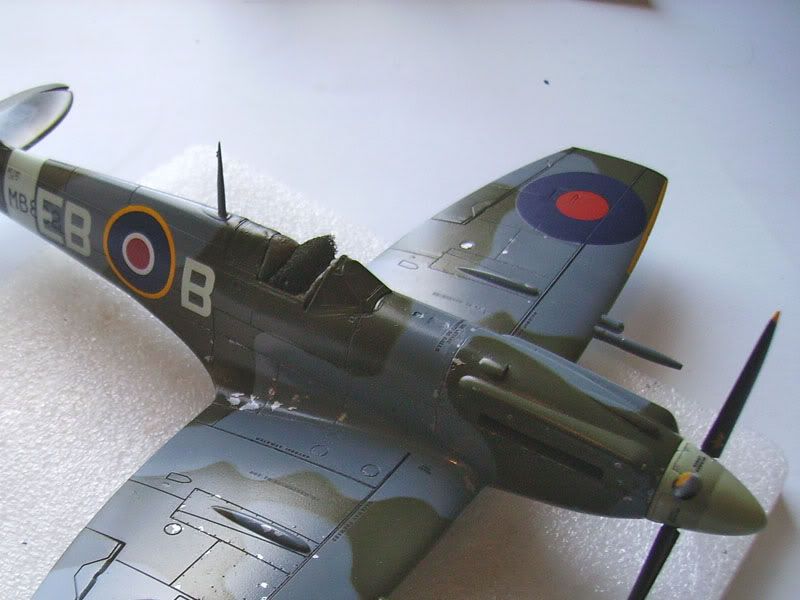
Main painting complete, as usual the Tamiya acrylics were well behaved and went down very nicely. The Spitfire XII Wing, comprising 41 and 91 Sqns., was very kept very busy if 41 Sqn.'s action reports are anything to go by. When they weren't attacking trains and sinking tugboats on the Seine (the wing seems to have accounted for an inordinate amount of shipping in the shape of tugs and the occasional E-Boat) they were escorting the USAAF's Marauders on Ramrod raids against airfields in daylight, and also enjoyed a large amount of success intercepting tip and run Jabo raiders in Fw-190s. Their Mk.XIIs quickly took on a distinctly used appearance, which I have tried to represent with this model. Between the primer and the top coat sits a coat of Alclad duralumin, which had masking fluid dabbed onto it before the top coat was sprayed. The fluid was applied around fastenings, the wing roots, maintenance panels and the edges of the engine cowlings. Once the top coat was dry, the dried masking fluid was removed with a clean piece of blu-tak to reveal the duralumin paint beneath. I had purposely gone way over the top with the masking fluid, the plan being to then touch up some of the chips with a brush and slightly lighter versions of the camouflage colours to simulate touch ups by the ground crews with fresh paint.
Underneath, there is some light staining which will be worked on a little later on. These machines would collect have quite heavy powder staining aft of the gun muzzles and they also would have some staining from oil and exhaust fumes around the nose.
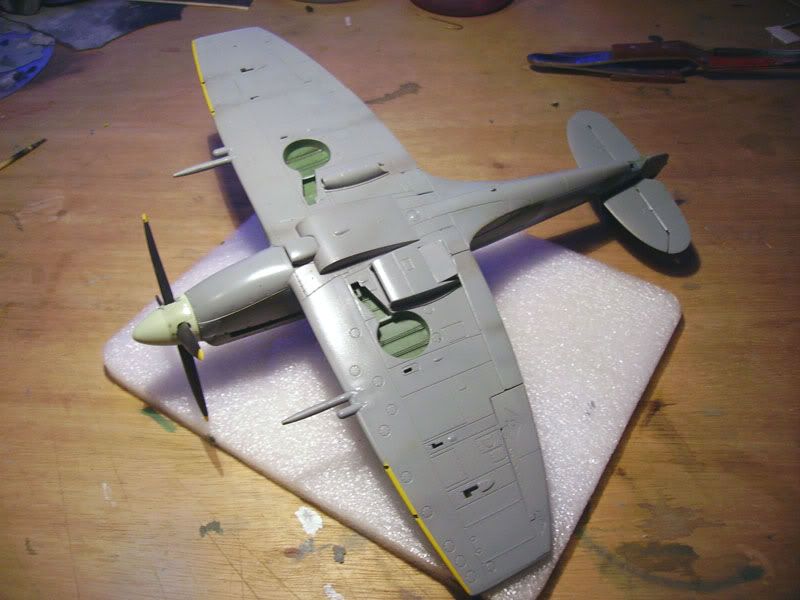
The undercarriage is being put together as well so it can soon stand on its feet. The tie down rings on the mainwheel legs were replaced by tiny slices of brass tubing. The kit's scissors links are very well done and have the lightening holes moulded into them. Everything is being sprayed with H56 and will get a coat of almost flat varnish before washing and painting the oleos with metalcote polished aluminium.

The model will be getting a coat of klear shortly ready for decals some tome tomorrow.
Main painting complete, as usual the Tamiya acrylics were well behaved and went down very nicely. The Spitfire XII Wing, comprising 41 and 91 Sqns., was very kept very busy if 41 Sqn.'s action reports are anything to go by. When they weren't attacking trains and sinking tugboats on the Seine (the wing seems to have accounted for an inordinate amount of shipping in the shape of tugs and the occasional E-Boat) they were escorting the USAAF's Marauders on Ramrod raids against airfields in daylight, and also enjoyed a large amount of success intercepting tip and run Jabo raiders in Fw-190s. Their Mk.XIIs quickly took on a distinctly used appearance, which I have tried to represent with this model. Between the primer and the top coat sits a coat of Alclad duralumin, which had masking fluid dabbed onto it before the top coat was sprayed. The fluid was applied around fastenings, the wing roots, maintenance panels and the edges of the engine cowlings. Once the top coat was dry, the dried masking fluid was removed with a clean piece of blu-tak to reveal the duralumin paint beneath. I had purposely gone way over the top with the masking fluid, the plan being to then touch up some of the chips with a brush and slightly lighter versions of the camouflage colours to simulate touch ups by the ground crews with fresh paint.
Underneath, there is some light staining which will be worked on a little later on. These machines would collect have quite heavy powder staining aft of the gun muzzles and they also would have some staining from oil and exhaust fumes around the nose.
The undercarriage is being put together as well so it can soon stand on its feet. The tie down rings on the mainwheel legs were replaced by tiny slices of brass tubing. The kit's scissors links are very well done and have the lightening holes moulded into them. Everything is being sprayed with H56 and will get a coat of almost flat varnish before washing and painting the oleos with metalcote polished aluminium.
The model will be getting a coat of klear shortly ready for decals some tome tomorrow.
Would ya like to learn to fly? Would ya? Would you like to see me try?
-
Mikeew
- Active Participant
- Posts: 637
- Joined: May 1st, 2011, 9:36 am
- Location: Bexhill on-sea,East Sussex. UK
Re: Flakmonkey's ground attacker with Griffon grunt
This is looking FANTASTIC!
I have one of these kits in the stash, this is pure inspiration Steve.
I have one of these kits in the stash, this is pure inspiration Steve.
-
Dirkpitt289

- NUMA's Auto Mechanic
- Posts: 8724
- Joined: May 2nd, 2011, 1:55 am
- Location: New jersey USA
- Contact:
Re: Flakmonkey's ground attacker with Griffon grunt
Looking great, keep up the good work
.... Dirk
Beware of the DOG's of WAR
My Youtube Channel
https://www.youtube.com/user/ModelingGu ... rid&view=0
Beware of the DOG's of WAR
My Youtube Channel
https://www.youtube.com/user/ModelingGu ... rid&view=0
-
flakmonkey
- Modelling Gent and Scholar
- Posts: 3489
- Joined: April 6th, 2011, 9:58 am
- Location: Down in the tube station at midnight
- Contact:
Re: Flakmonkey's ground attacker with Griffon grunt
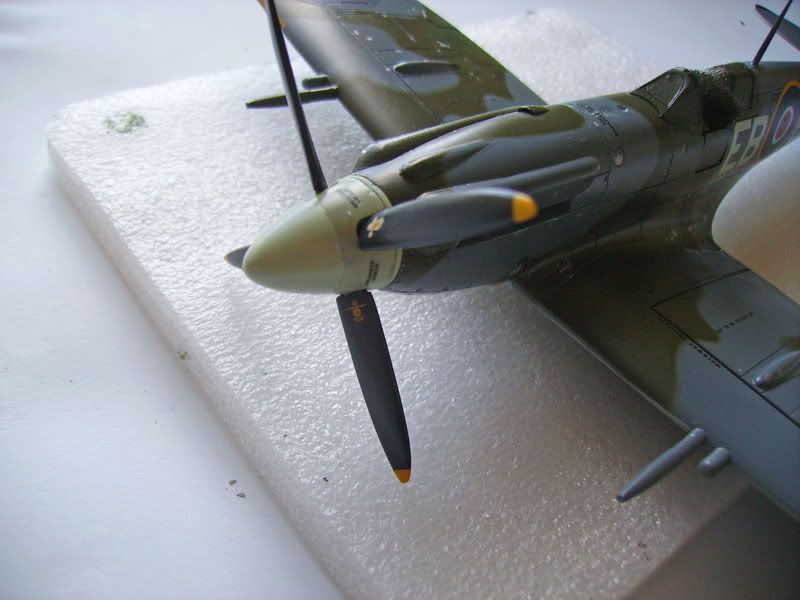
Thanks for looking and commenting guys. Continuing building at what is, for me, lightning speed, I have come to the decals. Quite an enjoyable stickers session in what has been an enjoyable build so far. When Airfix get a Spitfire right, there is a feel good factor involved in building it, and this has it in spades. Not a perfect kit but it has that certain something.
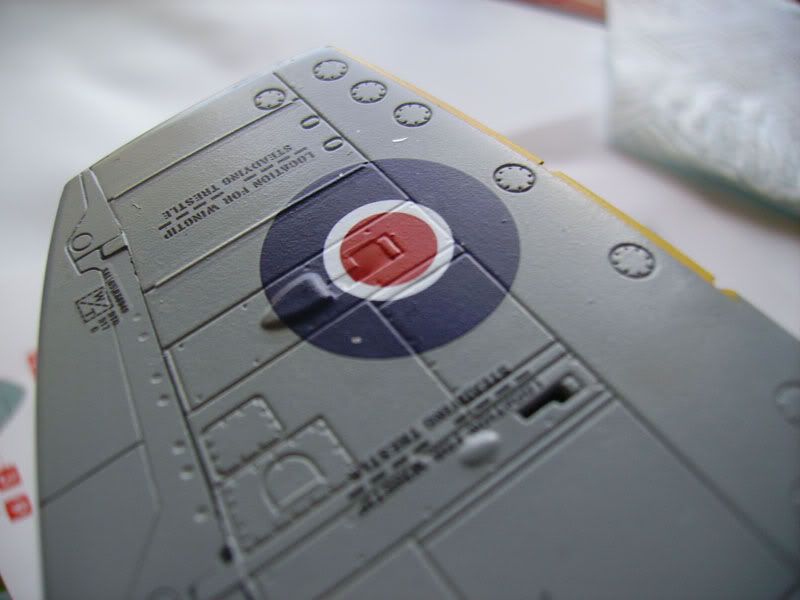
The decals are excellent, as good as any aftermarket decals I have used. I was going to paint the fuselage band but realised that the sky was going to be tricky to match with the code letters, and so used the kit's decal. What could have been a problem area went very well and I don't think I could have painted it to look any better. Another cause for concern was the odd chopped off serial number for the starboard side. This has had parts of it removed so that when it is applied over the code letters, it appears to have been overpainted. In the event, it fitted around the code letters perfectly.
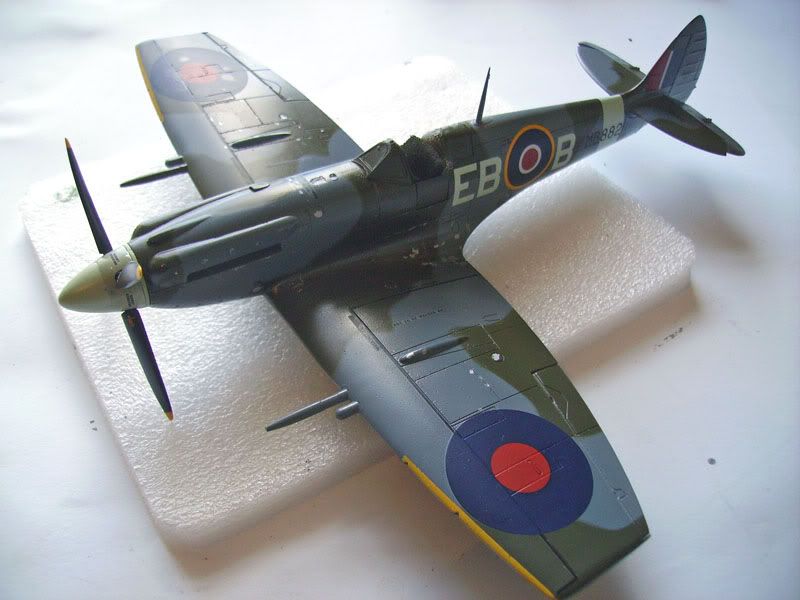
There is a full set of stencil data, and prop decals are a welcome inclusion. This sort of thing used to cost a lot of money.
The underwing roundels will need to be trimmed out around the cartridge ejection ports once they have hardened enough.
The decals can have another few hours to set then the model will have another light coat of klear ready for the final weathering. Once the powder staining around the .303 muzzles has been done, the decals for the fabric covering patches can be applied to those.
The decals are excellent, as good as any aftermarket decals I have used. I was going to paint the fuselage band but realised that the sky was going to be tricky to match with the code letters, and so used the kit's decal. What could have been a problem area went very well and I don't think I could have painted it to look any better. Another cause for concern was the odd chopped off serial number for the starboard side. This has had parts of it removed so that when it is applied over the code letters, it appears to have been overpainted. In the event, it fitted around the code letters perfectly.
There is a full set of stencil data, and prop decals are a welcome inclusion. This sort of thing used to cost a lot of money.
The underwing roundels will need to be trimmed out around the cartridge ejection ports once they have hardened enough.
The decals can have another few hours to set then the model will have another light coat of klear ready for the final weathering. Once the powder staining around the .303 muzzles has been done, the decals for the fabric covering patches can be applied to those.
Would ya like to learn to fly? Would ya? Would you like to see me try?
-
Chris
Re: Flakmonkey's ground attacker with Griffon grunt
Man, that looks good.
Really well done FM!
Really well done FM!
Re: Flakmonkey's ground attacker with Griffon grunt
Beautiful work, Flak.
Besting 60 years of mediocre building of average kits in the stand off scale
-
Desert_fox

- The Bug Has Well And Truly Bitten
- Posts: 213
- Joined: June 6th, 2011, 9:37 pm
- Location: Scotland
Re: Flakmonkey's ground attacker with Griffon grunt
That's inspirational, truly. I always love a Spit, and when one is modelled this beautifully, I love them even more
Will write history dissertations for modelling supplies...
-
AndrewR
- In the basement lab
- Posts: 24110
- Joined: April 5th, 2011, 4:13 pm
- Location: Ottawa, Ontario, The Great White North
- Contact:
Re: Flakmonkey's ground attacker with Griffon grunt
Yes, this one is looking mighty fine! 
Cheers
Andrew
Cheers
Andrew
Up in the Great White North