Flakmonkey's ground attacker with Griffon grunt
-
JohnRatzenberger

- Why is he so confused ?
- Posts: 15734
- Joined: April 5th, 2011, 3:42 pm
- Location: Living on a sandbar - Nags Head, NC.
Re: Flakmonkey's ground attacker with Griffon grunt
Excellent work -- seems like a nice kit also ...
John Ratzenberger 
It's my model and I'll do what I want with it.
It's my model and I'll do what I want with it.
-
Dirkpitt289

- NUMA's Auto Mechanic
- Posts: 8724
- Joined: May 2nd, 2011, 1:55 am
- Location: New jersey USA
- Contact:
Re: Flakmonkey's ground attacker with Griffon grunt
This is really coming along. I look forward to seeing it get some paint
.... Dirk
Beware of the DOG's of WAR
My Youtube Channel
https://www.youtube.com/user/ModelingGu ... rid&view=0
Beware of the DOG's of WAR
My Youtube Channel
https://www.youtube.com/user/ModelingGu ... rid&view=0
-
flakmonkey

- Modelling Gent and Scholar
- Posts: 3489
- Joined: April 6th, 2011, 9:58 am
- Location: Down in the tube station at midnight
- Contact:
Re: Flakmonkey's ground attacker with Griffon grunt
Thanks for looking and following along.
Today's secret weapons:
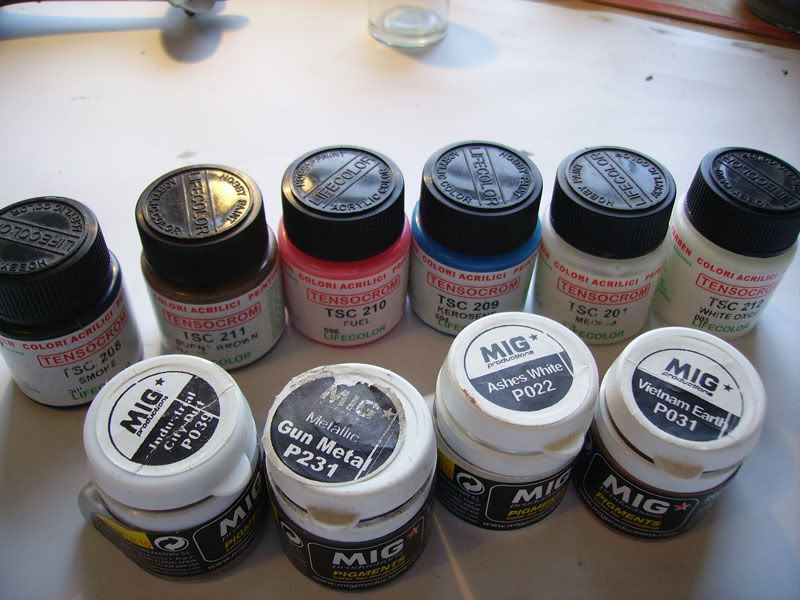
The Lifecolor Tensacrom at the back takes some getting to grips with and at first you think it's rubbish. Once you get the hang of it, it's brilliant stuff. When used for area and pin washes, it looks very natural and has a magical ability to collect only where you wanted it to. Through an airbrush, you can use it to create very natural looking smoke staining. The trick is to thin it to the point of overthinning so that the acrylic medium it is based on is only just holding it together, then as it dries the fine pigments settle out to give very soft feathered edges. The Tensacrom was used to create a base for further work with the MIG pigments once a satin coat of klear and Tamiya flat base had been sprayed. Then everything was sealed in with a flatter coat of the klear/ X21 mixture.

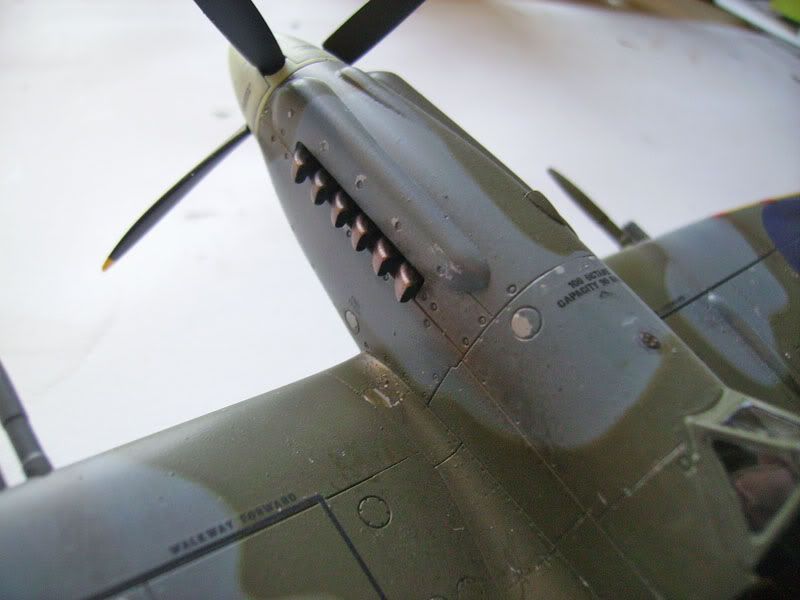
The exhaust stubs were sprayed with Alclad steel and then dusted over with Alclad copper. Once dry, MIG gunmetal powder was brushed over them lightly. The stubs weren't hollowed out, it would have been a nice thing to do but I don't have spare ones and I have two left hands so decided that I would rather have solid exhausts than none at all.
Underneath everything was done in much the same way, I haven't weathered it as heavily as it would have been in real life as I feel that this looks ugly. I would much rather under-do it.

Last few bits and pieces tomorrow then beer.
There is paint on it. Honestly. Really really. Actually it's nearly done. I still have to mask up and paint the sliding section of the canopy and then fit that, and there are a couple of bits and pieces still to go on; the cannon muzzles, pitot tube and IFF antenna underneath the fuselage. In the latter months of their service, Mk.XIIs were fitted with a new IFF system that had the antenna below the starboard wing. There is a part provided for this in the kit, but strictly speaking if you fit this you should remove the small fairing beneath the wing fillet that housed the old antenna.As all Mk.XIIs had both systems at one point or another, both are correct.Dirkpitt289 wrote:I look forward to seeing it get some paint
Today's secret weapons:
The Lifecolor Tensacrom at the back takes some getting to grips with and at first you think it's rubbish. Once you get the hang of it, it's brilliant stuff. When used for area and pin washes, it looks very natural and has a magical ability to collect only where you wanted it to. Through an airbrush, you can use it to create very natural looking smoke staining. The trick is to thin it to the point of overthinning so that the acrylic medium it is based on is only just holding it together, then as it dries the fine pigments settle out to give very soft feathered edges. The Tensacrom was used to create a base for further work with the MIG pigments once a satin coat of klear and Tamiya flat base had been sprayed. Then everything was sealed in with a flatter coat of the klear/ X21 mixture.
The exhaust stubs were sprayed with Alclad steel and then dusted over with Alclad copper. Once dry, MIG gunmetal powder was brushed over them lightly. The stubs weren't hollowed out, it would have been a nice thing to do but I don't have spare ones and I have two left hands so decided that I would rather have solid exhausts than none at all.
Underneath everything was done in much the same way, I haven't weathered it as heavily as it would have been in real life as I feel that this looks ugly. I would much rather under-do it.
Last few bits and pieces tomorrow then beer.
Would ya like to learn to fly? Would ya? Would you like to see me try?

Re: Flakmonkey's ground attacker with Griffon grunt
That beer is well deserved. Beautiful work Steve. I want mine real bad now.
Besting 60 years of mediocre building of average kits in the stand off scale
-
splash

- Senior Service Rotorhead
- Posts: 13828
- Joined: May 1st, 2011, 11:02 am
- Location: Somerset England
Re: Flakmonkey's ground attacker with Griffon grunt
Congratulations on another excellent build.
Regards
Splash
Regards
Splash
My work bench is starting to look like Portsmouth Naval Dockyard.
-
flakmonkey
- Modelling Gent and Scholar
- Posts: 3489
- Joined: April 6th, 2011, 9:58 am
- Location: Down in the tube station at midnight
- Contact:
Re: Flakmonkey's ground attacker with Griffon grunt
Beer on the way. Blitzbaus excepted, this is the fastest I can remember building a kit. Before visiting the fridge to see what the Hoegarden fairy has left for me, we should do an update here I suppose.
When I wrote yesterday's waffle, I forgot to show you any of the oil streaks.
Very easy to do, these are just tiny drops of Tensacrom Oil thinned 1:1 with water spotted onto the model and then blown around with the airbrush.
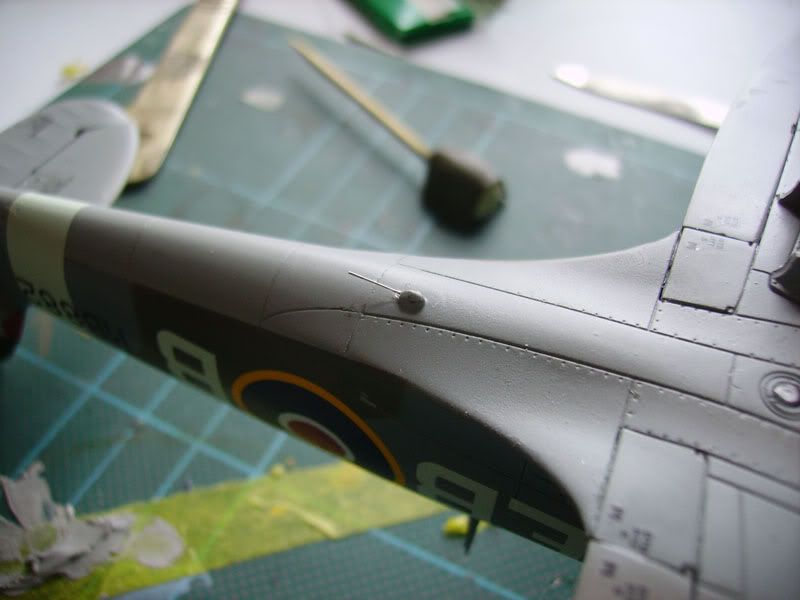
The IFF antenna has been added from a tiny length of Rotosound's finest guitar string (an .008 to be exact). A hole of the appropriate diameter was drilled into the fairing and the antenna was slipped into that and secured with a drop of Klear.
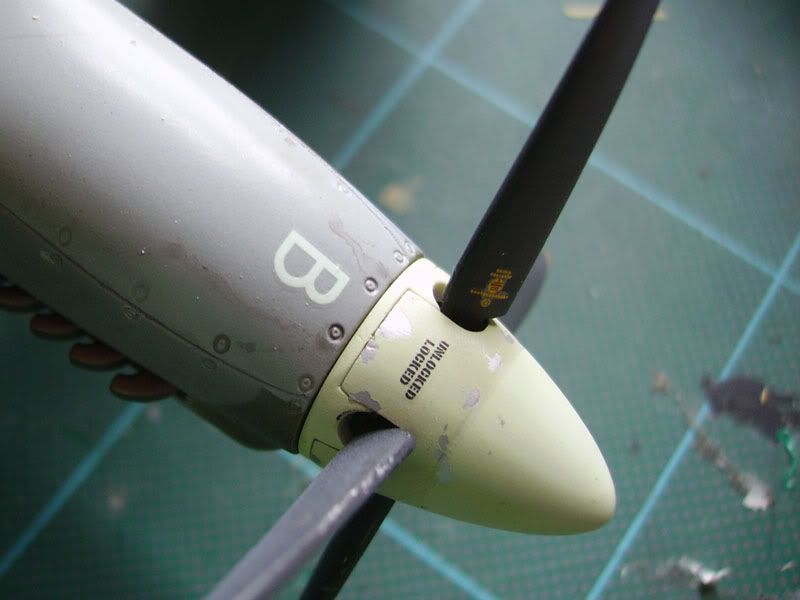
The canopy was strapped down with some stretchy electrical tape. I put a doubled up piece underneath it to stop it sticking to the model. Once it was held down, Formula 560 was run along the lower edges with a brush. That was left for an hour or two and the 560 was touched in with the Klear/ Tamiya X-21 mixture for an invisible fix. Later Spitfire canopies had a semi circular notch on the rear edge to clear the base of the aerial mast. Whether the Mk.XII had this notch or not I was unable to tell and so left it as it came from the box. The Mk.IX certainly had the notch but remember that the Mk.XII is actually a Mk.V or Mk.VIII on steroids so it may be the case it didn't have it.
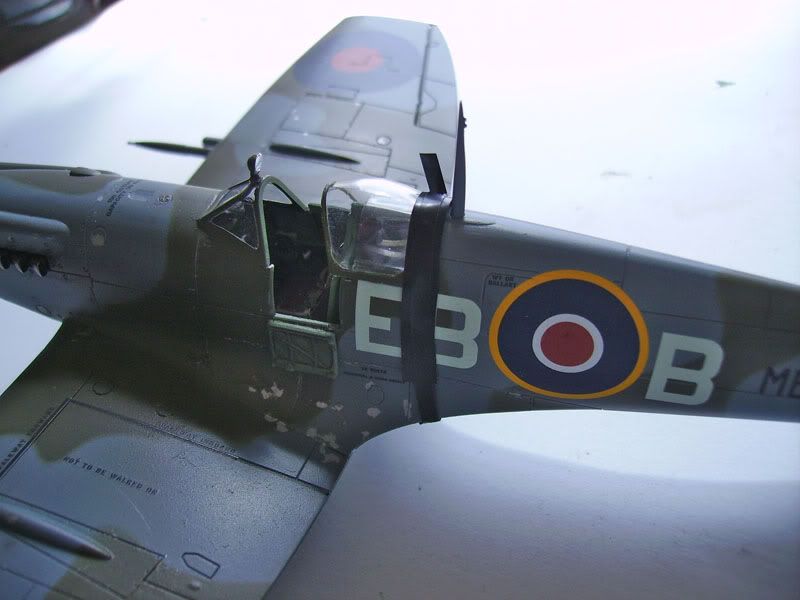
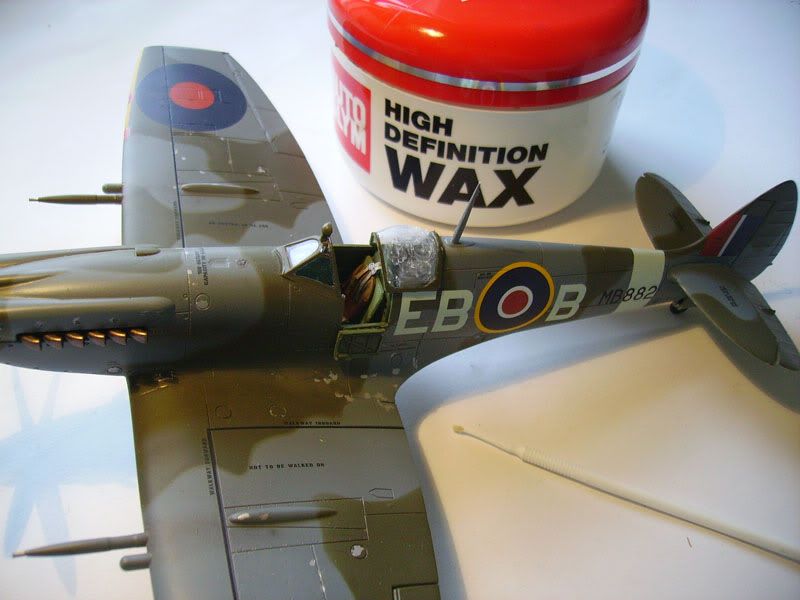
The transparencies, slightly daft open canopy affair notwithstanding, are very good. Crystal clear and thin, they didn't even need a dip in Klear. All they needed was a shine up with Autoglym HD wax car polish. This was applied with a microbrush, left for half an hour then polished off with a cotton bud. The HD wax is expensive stuff but as a bonus you can use it on your car as well. This provides brownie point opportunities; simply hand the pot to the wife when she cleans your car and watch as she grins uncontrollably at the gleaming finish as you relax with a cold beer.
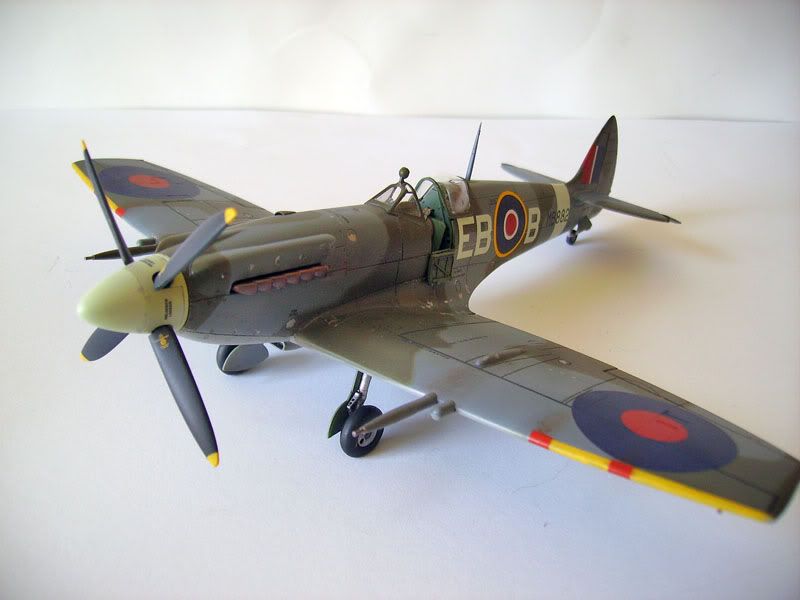
And that's that. This is a very nice kit from Airfix and it's one that I am very pleased to see in the shops as I have always had a soft spot for the Mk.XII. Not only was it the lightest and most agile of the Griffon Spitfires, it was Jeffrey Quill's favourite, which is good enough for me. Hopefully somebody at Airfix is beavering away at the XIV and F.21.
When I wrote yesterday's waffle, I forgot to show you any of the oil streaks.
Very easy to do, these are just tiny drops of Tensacrom Oil thinned 1:1 with water spotted onto the model and then blown around with the airbrush.
The IFF antenna has been added from a tiny length of Rotosound's finest guitar string (an .008 to be exact). A hole of the appropriate diameter was drilled into the fairing and the antenna was slipped into that and secured with a drop of Klear.
The canopy was strapped down with some stretchy electrical tape. I put a doubled up piece underneath it to stop it sticking to the model. Once it was held down, Formula 560 was run along the lower edges with a brush. That was left for an hour or two and the 560 was touched in with the Klear/ Tamiya X-21 mixture for an invisible fix. Later Spitfire canopies had a semi circular notch on the rear edge to clear the base of the aerial mast. Whether the Mk.XII had this notch or not I was unable to tell and so left it as it came from the box. The Mk.IX certainly had the notch but remember that the Mk.XII is actually a Mk.V or Mk.VIII on steroids so it may be the case it didn't have it.
The transparencies, slightly daft open canopy affair notwithstanding, are very good. Crystal clear and thin, they didn't even need a dip in Klear. All they needed was a shine up with Autoglym HD wax car polish. This was applied with a microbrush, left for half an hour then polished off with a cotton bud. The HD wax is expensive stuff but as a bonus you can use it on your car as well. This provides brownie point opportunities; simply hand the pot to the wife when she cleans your car and watch as she grins uncontrollably at the gleaming finish as you relax with a cold beer.
And that's that. This is a very nice kit from Airfix and it's one that I am very pleased to see in the shops as I have always had a soft spot for the Mk.XII. Not only was it the lightest and most agile of the Griffon Spitfires, it was Jeffrey Quill's favourite, which is good enough for me. Hopefully somebody at Airfix is beavering away at the XIV and F.21.
Would ya like to learn to fly? Would ya? Would you like to see me try?
-
Dirkpitt289
- NUMA's Auto Mechanic
- Posts: 8724
- Joined: May 2nd, 2011, 1:55 am
- Location: New jersey USA
- Contact:
Re: Flakmonkey's ground attacker with Griffon grunt
Let me be the first to say congratulations on being the first to complete his build and what a fine build it is. Well done.
.... Dirk
Beware of the DOG's of WAR
My Youtube Channel
https://www.youtube.com/user/ModelingGu ... rid&view=0
Beware of the DOG's of WAR
My Youtube Channel
https://www.youtube.com/user/ModelingGu ... rid&view=0
-
Chris
Re: Flakmonkey's ground attacker with Griffon grunt
Beautiful work FM, congrats on being the first to complete a Rhubarb!
-
Stamford

- Modelling Gent and Scholar
- Posts: 2240
- Joined: May 1st, 2011, 7:42 am
- Location: Klågerup Sweden
Re: Flakmonkey's ground attacker with Griffon grunt
Probably end up more or less trying to copy this when I build mine. Re the lack of wingtip nav lights - could it not be the fact that they chopped the wingtips off 
running at the edge of their world
-
MackemPete

- Onto the Clever Stuff, Now.
- Posts: 123
- Joined: May 1st, 2011, 1:35 pm
- Location: Sunderland
Re: Flakmonkey's ground attacker with Griffon grunt
Fantastic build mate
Pete
Pete
-
AndrewR

- In the basement lab
- Posts: 24100
- Joined: April 5th, 2011, 4:13 pm
- Location: Ottawa, Ontario, The Great White North
- Contact:
Re: Flakmonkey's ground attacker with Griffon grunt
Good stuff. I hope supplies of this kit gets across the pond soon.
Up in the Great White North
-
flakmonkey
- Modelling Gent and Scholar
- Posts: 3489
- Joined: April 6th, 2011, 9:58 am
- Location: Down in the tube station at midnight
- Contact:
Re: Flakmonkey's ground attacker with Griffon grunt
Thanks guys, this was a fun build. The kit is a good one and goes together very nicely.
You'd think so wouldn't you. But the Mk.IX clippies that came later on had lights, the lack of them on the XII is possibly down to the type being conceived and put into production at great speed. All of my books are oddly silent on the matter. It's a conspiracy I tell you.Stamford wrote:Re the lack of wingtip nav lights - could it not be the fact that they chopped the wingtips off
Would ya like to learn to fly? Would ya? Would you like to see me try?
-
Karaya

- The Bug Has Well And Truly Bitten
- Posts: 416
- Joined: May 24th, 2011, 1:58 am
- Location: Western Australia
Re: Flakmonkey's ground attacker with Griffon grunt
Stunning and some really good pointers. Thanks flak.
.....Sven W.
-
Softscience

- Staring out the window
- Posts: 7484
- Joined: April 5th, 2011, 4:34 pm
- Location: Maryland, near Washington DC
Re: Flakmonkey's ground attacker with Griffon grunt
Like I said elsewhere, I love what you fdid with this model.
So what is your final verdict on the integrally moulded rear canopy/hood? It looks quite nice on your build, but how much hassle was it to get it that way?
So what is your final verdict on the integrally moulded rear canopy/hood? It looks quite nice on your build, but how much hassle was it to get it that way?
-
flakmonkey
- Modelling Gent and Scholar
- Posts: 3489
- Joined: April 6th, 2011, 9:58 am
- Location: Down in the tube station at midnight
- Contact:
Re: Flakmonkey's ground attacker with Griffon grunt
I didn't use it, I just thinned the back and lower edges of the proper canopy part down until it fitted. When you have the one piece canopy in your hand you can see it's never going to look convincing. Light refracts through it in such a way that it just looks like a lens from Mr. Magoo's glasses. Silly idea.
Would ya like to learn to fly? Would ya? Would you like to see me try?