WheresMyMojo 1/72 Revell BK117
-
WheresMyMojo
- Getting well comfy!
- Posts: 67
- Joined: September 2nd, 2011, 11:33 pm
- Location: Ipswich UK
Re: WheresMyMojo 1/72 Revell BK117
Thanks, those extra couple of days will come in handy!
Graham
The...errr...modeler...formerly known as 'chuffchuff'
The...errr...modeler...formerly known as 'chuffchuff'
-
WheresMyMojo
- Getting well comfy!
- Posts: 67
- Joined: September 2nd, 2011, 11:33 pm
- Location: Ipswich UK
Re: WheresMyMojo 1/72 Revell BK117
Reporting in, just in case anyone thinks I've disappeared again 
I've spent all tonight reworking the cockpit (including a rather useless spell of painting, a bit over eager I did some painting which I've then to do some work over...durrr). It's taken rather longer than I'd hoped, but I'm over the hump and it's just about ready for final painting and assembly. With such a short amount of time left I might not have bothered but I'm hoping the layout will still be visible even with a couple of windows blocked up by inner walling. I'll take a photo when it's all together.
I'm working tomorrow (and Sunday) and it's my sisters Birthday, so I may not have anything to show for the next couple of days. That means a lot of work Sunday evening and trying to get it all together Monday. Tick tock!
There are a lot of spindly parts with small seams showing. With the plastic feeling a bit hard it would take a bit of patience to smooth them all out to my satisfaction without breaking them, so I've primed these and am just hoping that under the paint they're not going to show up much.
Graham
The...errr...modeler...formerly known as 'chuffchuff'
The...errr...modeler...formerly known as 'chuffchuff'
-
WheresMyMojo
- Getting well comfy!
- Posts: 67
- Joined: September 2nd, 2011, 11:33 pm
- Location: Ipswich UK
Re: WheresMyMojo 1/72 Revell BK117
More work tonight. There are no tabs of any kind to help line up the two cabin halves so I added my own:
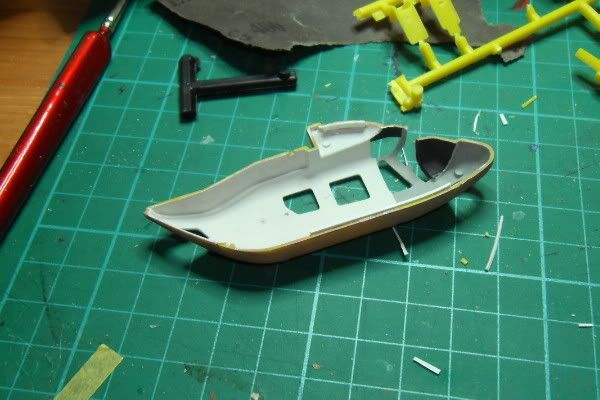
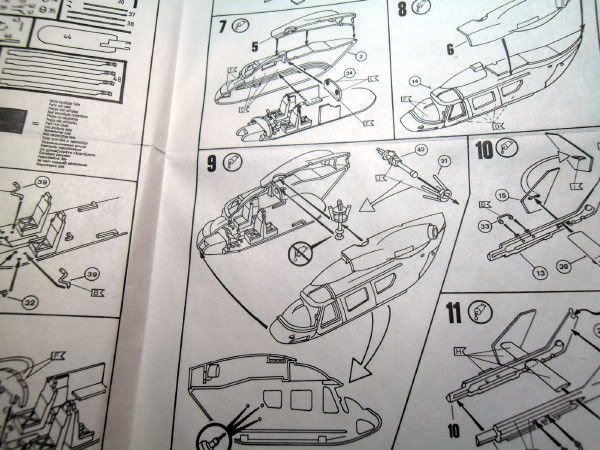
The instructions suggest placing the engine coverings in place before closing up the cabin, but I can imagine that resulting in them being badly lined up:
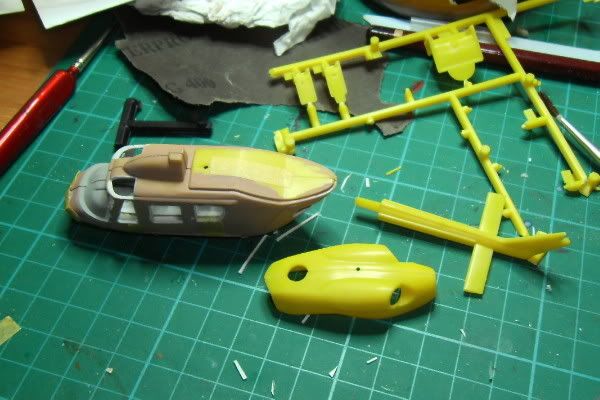
So I decided to join the panels directly together, using masking tape to hold the cabin together to aid alignment, and priming the rear end tonight will give some drying time. I'll add the innards and prop bits later so this will also make painting a lot easier. As the panels are well defined on the actual helicopter, this will also let me build up the upper part seperatly and fit the assembly at the end. Much safer for butterfingers!
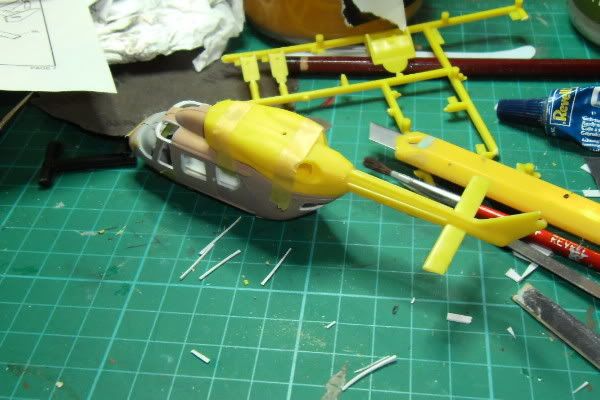
The insert that joins the tail to the engine panels is too big for the hole, so I initially just glued the upper part of the casing together, leaving the area to receive the tail unglued so it could be sprung open. When the glue had dried (and rubbing off of fake panel details done) I added the tail, adding plenty of glue to aid melting action and a tight final fit:
The instructions suggest placing the engine coverings in place before closing up the cabin, but I can imagine that resulting in them being badly lined up:
So I decided to join the panels directly together, using masking tape to hold the cabin together to aid alignment, and priming the rear end tonight will give some drying time. I'll add the innards and prop bits later so this will also make painting a lot easier. As the panels are well defined on the actual helicopter, this will also let me build up the upper part seperatly and fit the assembly at the end. Much safer for butterfingers!
The insert that joins the tail to the engine panels is too big for the hole, so I initially just glued the upper part of the casing together, leaving the area to receive the tail unglued so it could be sprung open. When the glue had dried (and rubbing off of fake panel details done) I added the tail, adding plenty of glue to aid melting action and a tight final fit:
Graham
The...errr...modeler...formerly known as 'chuffchuff'
The...errr...modeler...formerly known as 'chuffchuff'
-
TimJ

- Modelling Gent and Scholar
- Posts: 4292
- Joined: May 1st, 2011, 12:54 am
- Location: Oldbury, West Midlands
Re: WheresMyMojo 1/72 Revell BK117
Nice work.
2020 A:35 B:18. 2021 A: 51 B:25 C:21 2022 A:63 B:23 C:11 2024 A:9 B:4 C:15

Re: WheresMyMojo 1/72 Revell BK117
There you go Graham. Keep on truckin'
Besting 60 years of mediocre building of average kits in the stand off scale
-
WheresMyMojo
- Getting well comfy!
- Posts: 67
- Joined: September 2nd, 2011, 11:33 pm
- Location: Ipswich UK
Re: WheresMyMojo 1/72 Revell BK117
Last night I made a rear window from plastic packaging, and tried to glue it in, unsuccessfully. Using the slow-dry properties of Clearfix I thought I could ease it into place, taking my time to bend it into the correct curves. All that happened was that my constant fiddling just loosened up and removed the acrylic paint I'd used to edge the windowframe with, withouth the glue being strong enough to hold my window in place. So onto plan number two! I've repainted the rear sills with enamel and hopefully overnight was long enough drying time; I'm going to use superglue to hold the upper edge in place, trim as necessary, and glue each edge of the window into place one at at time to try to avoid getting superglue all over the place! If that doesn't work, then I'm bu**ered!
Graham
The...errr...modeler...formerly known as 'chuffchuff'
The...errr...modeler...formerly known as 'chuffchuff'
-
WheresMyMojo
- Getting well comfy!
- Posts: 67
- Joined: September 2nd, 2011, 11:33 pm
- Location: Ipswich UK
Re: WheresMyMojo 1/72 Revell BK117
I finally got both rear windows in. Afterwards the kit windows were masked and placed. This process did take longer than expected and I'm a fair bit behind. I'll be making a start painting the final colour on the rear main assembly and putting the cockpit together, when I'll also decide whether to take time out to make seatbelts and oxygen cylinders also featuring in the real thing.
Graham
The...errr...modeler...formerly known as 'chuffchuff'
The...errr...modeler...formerly known as 'chuffchuff'
-
WheresMyMojo
- Getting well comfy!
- Posts: 67
- Joined: September 2nd, 2011, 11:33 pm
- Location: Ipswich UK
Re: WheresMyMojo 1/72 Revell BK117
PS: any tips on removing excess Humbrol Clearfix without messing up paintwork or masking tape? I intend to use some fine wet'n'dry, but if theres something I can just wipe it away with I'm all ears
Graham
The...errr...modeler...formerly known as 'chuffchuff'
The...errr...modeler...formerly known as 'chuffchuff'
-
WheresMyMojo
- Getting well comfy!
- Posts: 67
- Joined: September 2nd, 2011, 11:33 pm
- Location: Ipswich UK
Re: WheresMyMojo 1/72 Revell BK117
Cockpit and cabin all done:
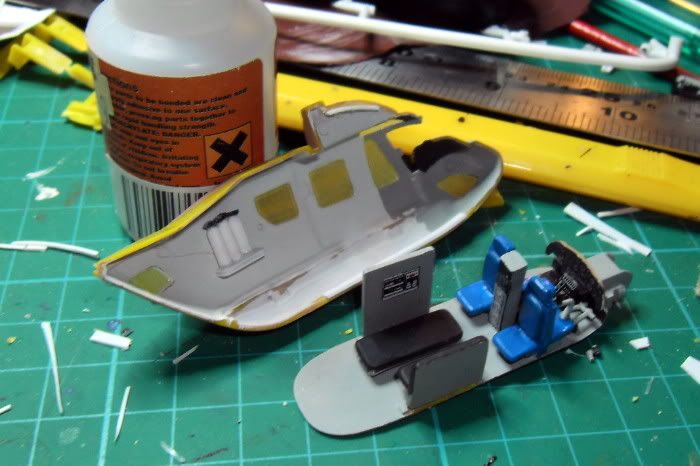
I'd forgetten that last night I hadn't finshed painting the two sets of front seats! The main cabin colours of cream, light grey and pale blue didn't really show up in the closed up cabin, so I made the blue and grey darker to show up more; but, being short on time I just shlapped the pale blue onto the seats instead of highlighting the grey seat backings, and I left off the seatbelts. The rear facing seats are scratch-built; I beefed up the bench seat and cut away the rest of the wall that was in the kit to make it more like the EAAA chopper; the other wall was upturned; and I added a cabinet to the back betwteen the seats, using the control panel decal to show the control panel on the top; finally adding what I assume to be oxygen cylinders to the chopper wall itself.
I'd forgetten that last night I hadn't finshed painting the two sets of front seats! The main cabin colours of cream, light grey and pale blue didn't really show up in the closed up cabin, so I made the blue and grey darker to show up more; but, being short on time I just shlapped the pale blue onto the seats instead of highlighting the grey seat backings, and I left off the seatbelts. The rear facing seats are scratch-built; I beefed up the bench seat and cut away the rest of the wall that was in the kit to make it more like the EAAA chopper; the other wall was upturned; and I added a cabinet to the back betwteen the seats, using the control panel decal to show the control panel on the top; finally adding what I assume to be oxygen cylinders to the chopper wall itself.
Graham
The...errr...modeler...formerly known as 'chuffchuff'
The...errr...modeler...formerly known as 'chuffchuff'
-
WheresMyMojo
- Getting well comfy!
- Posts: 67
- Joined: September 2nd, 2011, 11:33 pm
- Location: Ipswich UK
Re: WheresMyMojo 1/72 Revell BK117
Well, after stopping for dinner I've not managed to get much further on this! I was hoping to get it all buttoned up but it's just not going to happen, so that's going to be it for today. It's my weekend off coming up so I'll try to finish it all up then. Trying to play catch up I've spent most of my evenings last week at the modeling bench, but didn't make a big enough dent to carry it off, even though I cut back a little on some of the detail I was hoping to get in.
Graham
The...errr...modeler...formerly known as 'chuffchuff'
The...errr...modeler...formerly known as 'chuffchuff'
Re: WheresMyMojo 1/72 Revell BK117
I really like what you have here, Graham. Group builds, as you know, are about fun. You should never compromise your goals for the sake of finishing to a deadline. Give it hell but satisfy yourself.
Besting 60 years of mediocre building of average kits in the stand off scale