Bristol Beaufighter; Airfix 1/72

Military or civil, triplanes, biplanes or monoplanes, props, jets or helicopters...models in here.
vacant
Modelling Gent and Scholar
Posts: 3840
Joined: August 5th, 2012, 9:58 pm

Bristol Beaufighter; Airfix 1/72

Post by vacant »

This is a restoration of – I think it’s the old Airfix kit. I picked what was left of it out of a boneyard bag that a fellow modeller was giving away. The fuselage, main and rear wings together with the starboard engine were there, but apart from a few other odds and ends, that was it. It had been built previously and painted, or rather caked, in camouflage colours and decals applied. There were thick glue smears in abundance and it was missing all transparent parts, undercarriage and wheels. Some of the wings were broken off. So game on!

Apologies for not having taken a photo at the start. Just think ‘junk’ and you won’t be too far off. All photos below are of the restored model.

Image

I began by soaking it in oven cleaner for two days, wrapped in a plastic bag (the model, not me). That got rid of most of the old paint, though some further work was needed to remove it all.

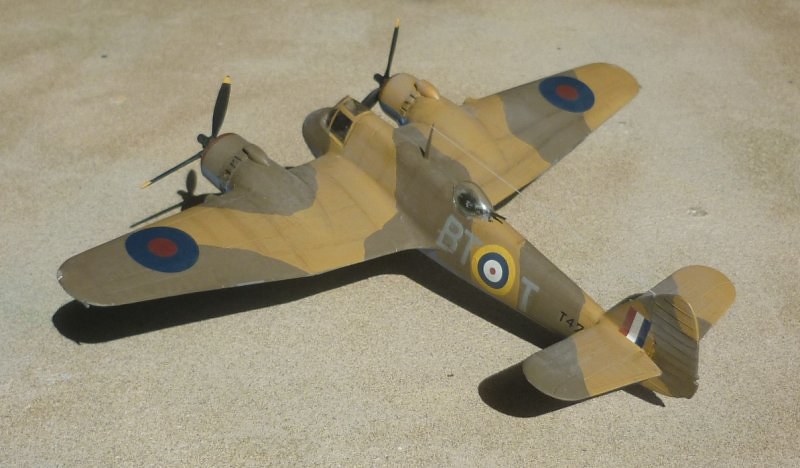
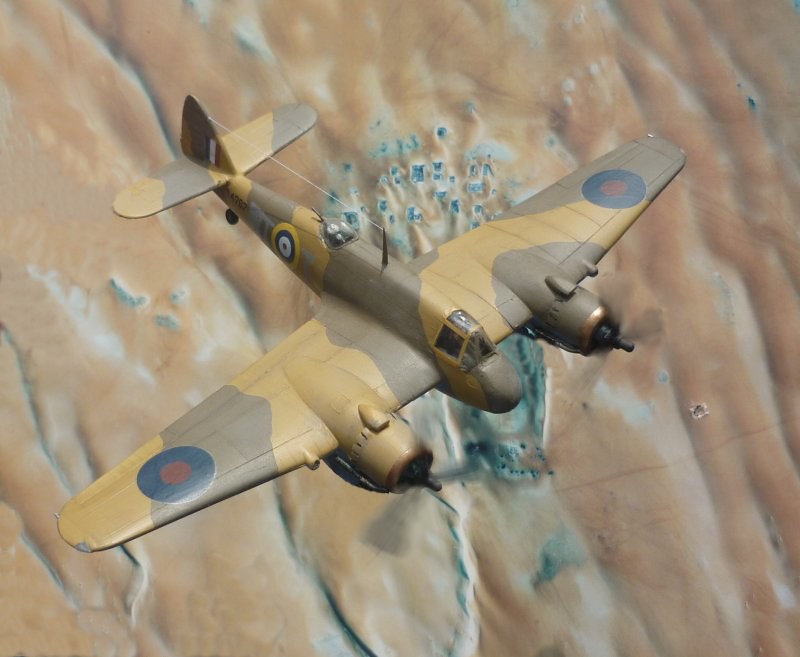
I sanded down the slightly raised panel lines and used a sharp point to scribe new ones. Although I followed the raised lines on the wings, the lines I scribed on the fuselage were more random. I don’t worry that all panel lines should be visible in 1/72 scale.

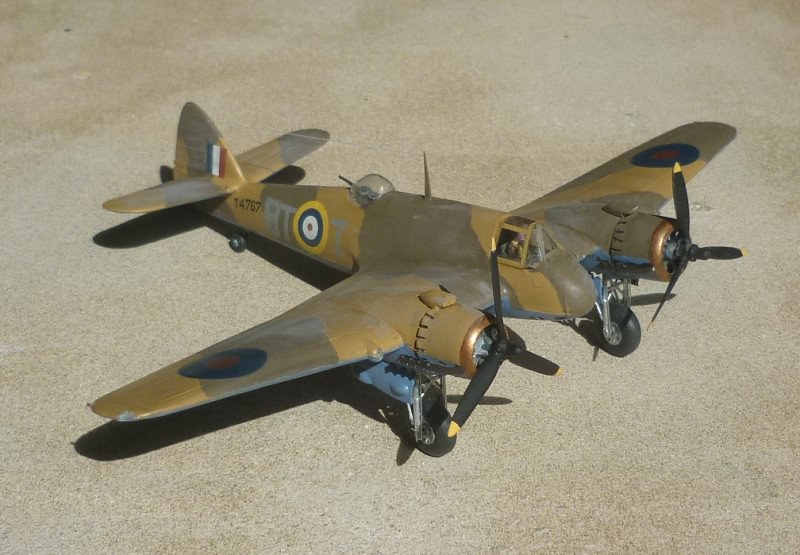
I made a new flight deck interior with an instrument panel, seat and some side panels. I painted and added a pilot figure to help fill the space.

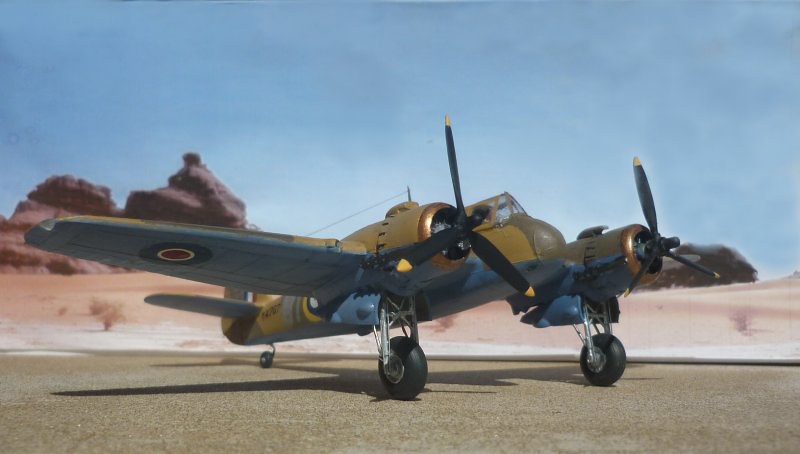
I used the starboard engine nacelle as a template to make a new port one. That was made from 20 thou. plastic card that I dunked in boiling water to get the right shape. The front piece was cut from a nacelle in the spares box and trimmed to fit. The result is a port engine that is slightly bigger than the starboard one, but hopefully not too noticeable. I suppose I could have enlarged the starboard one by wrapping plastic card around it, but if I did not tell you, would you have noticed?

I drilled out the engine moulding from the starboard engine and replaced it with one that had better definition from the spares box. I also raided the spares box for an engine for the new port nacelle.

I scratch built the undercarriage legs from scrap sprue and wire. The wheels came from the spares box. They may not be entirely accurate, but they seem to look about right. I suspect that the sit of the model is slightly too high, but it’s not too bad.

I made a flight deck and observer’s transparency by carving some balsa and using it to plunge mould the replacements. I did that using 20 thou clear plastic card. The observer/gunner’s machine gun came from kit parts.

I cut notches in the wing tips and inserted pieces of clear sprue to represent navigation lights. These were sanded down to lie flush. I also added some stretched sprue to represent the rear facing wing tip lights. And yes, I know there are no landing lights in the photos – I forgot to include them during the build, but I added them after the photos were taken.

The engine exhausts were cobbled together using various spare pieces, marrying the saw tooth ends to the front pieces.

The rear wheel was made from wire and a spare small wheel from spares. An aerial was made from scrap plastic. I drilled out the four gun ports under the fuselage.

The model was painted using Humbrol acrylic paints. The decals were cobbled together from odds and ends. I got some ‘dust’ by rubbing some pastels on sandpaper and dabbed the dust onto some of the panel lines. I added decals from spares then gave it a coat of Revell Aquacolor matt clear varnish. To finish it off, I rubbed some light grey pastel chalk onto some sandpaper and applied the dust to the model. This was intended to give it a dusty desert-like appearance. It may just make it look messy!

And that was it. Memo to diary - I really must buy the new Airfix Beaufighter one day.

Image

Image

Image
User avatar
iggie
Modelling Gent and Scholar
Posts: 23424
Joined: July 31st, 2013, 11:04 am
Location: North Somercotes, Lincolnshire
Contact:

Re: Bridtol Beaufighter; Airfix 1/72

Post by iggie »

I wouldn't bother with the new tool; yours looks pretty much as good!
Best wishes

Jim
If you can walk away from a landing, it's a good landing. If you use the airplane the next day, it's an outstanding landing
"Never put off till tomorrow, what you can do the day after tomorrow"
User avatar
Tarkas
Active Participant
Posts: 623
Joined: August 9th, 2012, 6:24 pm
Location: Geosynchronous orbit, but at a very low altitude

Re: Bristol Beaufighter; Airfix 1/72

Post by Tarkas »

You may be right about it sitting a bit high, but it's still a very nice representation of "two bloody great engines hotly pursued by an airframe" -- or in other words, a Beaufighter. :pilot: I am in envy of your scratchbuilding skills, and also of your spares box -- mine only ever seems to have a few weapons and a ton of undercarriage parts in it (I make my aircraft models in flight, and hence with their gear up). :mrgreen:

Good work.
Ping! Ping!! Ping!!! -- Mother Box
She's such a chatterbox, sometimes...
Lone Modeller
Modelling Gent and Scholar
Posts: 5323
Joined: April 1st, 2013, 6:45 pm

Re: Bristol Beaufighter; Airfix 1/72

Post by Lone Modeller »

I agree with Iggie - that is a very good representation of a Beau. Once again you demonstrate to the rest of us how to model on a shoe-string - of which I entirely approve BTW, which is why I scratch build.

I too admire your restoration skills - having a full spares box does help but you seem to be able to make excellent parts if any are missing/unavailable.
User avatar
Marek
Modelling Gent and Scholar
Posts: 2455
Joined: May 1st, 2011, 8:03 am
Location: Madison, WI
Contact:

Re: Bristol Beaufighter; Airfix 1/72

Post by Marek »

really cool restoration again, I wish I could say 'it sits bit too high' about my 30 years old efforts :)
Barry
Modelling Gent and Scholar
Posts: 2612
Joined: May 1st, 2011, 1:23 am
Location: Eastvale, California, USA

Re: Bristol Beaufighter; Airfix 1/72

Post by Barry »

Very nice restoraton
2012 A:12 B:13 C:0
User avatar
Martin R
Modelling Gent and Scholar
Posts: 4695
Joined: May 1st, 2011, 7:53 am

Re: Bristol Beaufighter; Airfix 1/72

Post by Martin R »

Cracking job! Very impressive modelling skills on display there.

From the look of it, I think it's the old FROG kit and it has the longer dihedral tailplane of the MkX.

Regards

Martin
vacant
Modelling Gent and Scholar
Posts: 3840
Joined: August 5th, 2012, 9:58 pm

Re: Bristol Beaufighter; Airfix 1/72

Post by vacant »

I was unsure if it was the old Airfix or FROG kit. It had lugs instead of seats that were typical of old Airfix kits. The remaining engine cowling (starboard side) looked very much like an old Airfix one. What raised some uncertainty were the fine raised panel lines that were typical of old FROG kits. I did not split the fuselage so I did not get to see if there were any identifying marks inside. Any raising of the tailplanes was down to how I attached them. You can't judge by the undercarriage as it is entirely scratch built. I would like to think it is an old FROG kit, but I just don't know.
User avatar
Eric Mc
Modelling Gent and Scholar
Posts: 4807
Joined: May 3rd, 2011, 8:27 am
Location: Farnborough, Hants

Re: Bristol Beaufighter; Airfix 1/72

Post by Eric Mc »

It looks a bit Froggy to me.
vacant
Modelling Gent and Scholar
Posts: 3840
Joined: August 5th, 2012, 9:58 pm

Re: Bristol Beaufighter; Airfix 1/72

Post by vacant »

But what makes it look 'Froggy'? I did rather a lot to it so it may not be easy to determine what looks 'Froggy', 'Airfixy' or even 'Vacanty'.
User avatar
Dazzled
Modelling Gent and Scholar
Posts: 9592
Joined: October 1st, 2011, 11:08 pm
Location: Mid Glamorgan, South Wales
Contact:

Re: Bristol Beaufighter; Airfix 1/72

Post by Dazzled »

I think it looks brillianty :grin:
COLD WAR S.I.G. LEADER

Wherever there's danger, wherever there's trouble, wherever there's important work to be done....I'll be somewhere else building a model!
User avatar
Martin R
Modelling Gent and Scholar
Posts: 4695
Joined: May 1st, 2011, 7:53 am

Re: Bristol Beaufighter; Airfix 1/72

Post by Martin R »

vacant wrote:But what makes it look 'Froggy'? I did rather a lot to it so it may not be easy to determine what looks 'Froggy', 'Airfixy' or even 'Vacanty'.
Well, that's the issue isn't it. To me, the nose planform is blunter than Airfix, and the cowling flaps look individual, again like the FROGgy. However, as you say, you've done a lot of work to it, so I may be completely wrong.

Regards

Martin
User avatar
PaulBradley
Staring out the window
Posts: 21203
Joined: April 6th, 2011, 3:08 pm
Location: Flagstaff, AZ

Re: Bristol Beaufighter; Airfix 1/72

Post by PaulBradley »

Or it may be the original owner mixed and matched parts...? In any event, it looks good!
Paul

За демократію і незалежний Україну

"For Democracy and a Free Ukraine"
vacant
Modelling Gent and Scholar
Posts: 3840
Joined: August 5th, 2012, 9:58 pm

Re: Bristol Beaufighter; Airfix 1/72

Post by vacant »

The original owner had done something to the nose as there was a lot of green filler in that area. He may have been trying to reshape it. I had to reshape his reshaping so it may not be exactly as in the original Airfix kit. The cowling flaps on the starboard engine look individual because I have etched the gaps and filled them with a dark wash (exaggerating the effect a bit). The cowling flaps on the port wing look individual because they are. The whole engine area is scratch built and that included making and attaching individual pieces from thin card to make the flaps.
User avatar
Eric Mc
Modelling Gent and Scholar
Posts: 4807
Joined: May 3rd, 2011, 8:27 am
Location: Farnborough, Hants

Re: Bristol Beaufighter; Airfix 1/72

Post by Eric Mc »

That does make a difference - to some extent. Did you do any work on the fuselage shape. Te old Airfix kit had an odd hunchback shape to it (as well as all its other issues).
Post Reply

Return to “Aviation Modelling”