Airfix 1/72 Avro Vulcan (Finished)

Military or civil, triplanes, biplanes or monoplanes, props, jets or helicopters...models in here.
User avatar
Zee28
Modelling Gent and Scholar
Posts: 2834
Joined: March 8th, 2013, 10:21 pm
Location: South London

Airfix 1/72 Avro Vulcan (Finished)

Post by Zee28 »

After getting myself back into the game with a couple of simple builds I decided to take some time away from my work, have some 'Me time' and tackle something BIG.

Hmmmm, what's the biggest things in my stash (rummage, rummage).......

I came up with the Vulcan and the B-29. A toss of a coin and it was Vulcan time!

Man, this thing is huge! You get 4 huge sprues in a huge box, but the parts breakdown is much like any other Airfix jet, it's just that each part is ten times bigger! If you've built, say, the Airfix Buccaneer, well this is much the same, ie. Horizontally split fuselage halves, top and bottom wing halves, tail cone etc. etc. It's just the each part is enormous and has the uncanny ability to knock everything off your modelling bench when you turn it around! (including a nice glass of 8 year aged scotch, Grrrrr.)

A quick look on the internet and there have been some really impressive builds of this kit, but it does come in for it's fair share of criticism. It's been labelled as a bit of a filler queen, the intakes have taken a bashing, plus other things more related to it's age, such as raised panel lines etc. But this one will be done straight out of the box, no mods, as quickly as possible. I've never done anything as big as this so we'll see how it goes.

I was a bit disappointed that there is no internal bomb bay detail at all. On a lot of Airfix big bombers you get a bomb bay and a chance to display it with bomb doors open, but not on this one. As pointed out to me by forum buddy Bluesteel, there is an after-market bomb bay available, but it's photo-etch and consists of about a million parts, so totally beyond my ability, a big resin cast one would have been do-able, but no such thing exists as far as I know. Just to add insult to injury Airfix have given us the bomb bay doors as a separate part, so you can pose them open, but with nothing to see inside except a huge void of empty fuselage. Somebody on the internet scratch built a bomb bay, very impressive but way beyond my skills, so my bomb doors will remain closed.

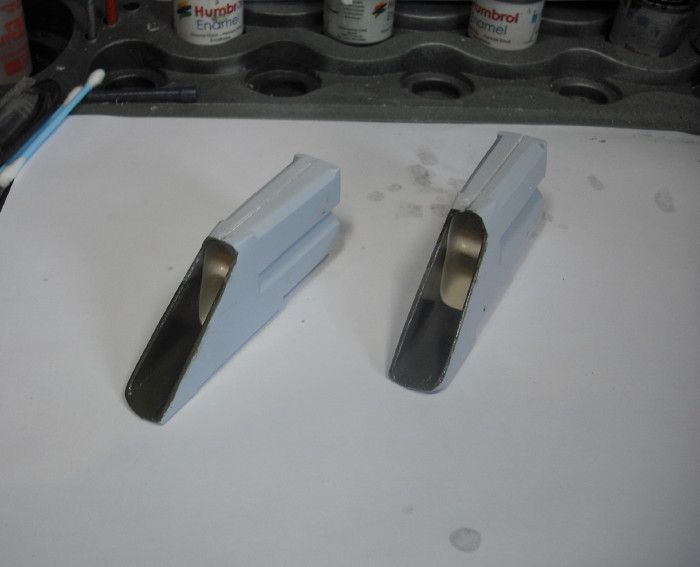
First up I decided to tackle those dreaded intakes. The first dilemma was colours. The Airfix instructions suggest that the intakes are coloured white right up to the intake lip on the leading edge of the wing root, but looking at photos of Vulcans it seems that the camouflage wraps quite a long way into the inside of the intakes before they change to white, so I decided to create a break from camouflage to white inside the intakes in what seemed to be about the right place. It's probably pure fiction and not accurate but it's a compromise based on a mix of photos and Airfix's painting suggestions. So, I sprayed inside each intake half with white, then masked up and sprayed the camouflage colours part way into the front of the intakes, like this:

Image


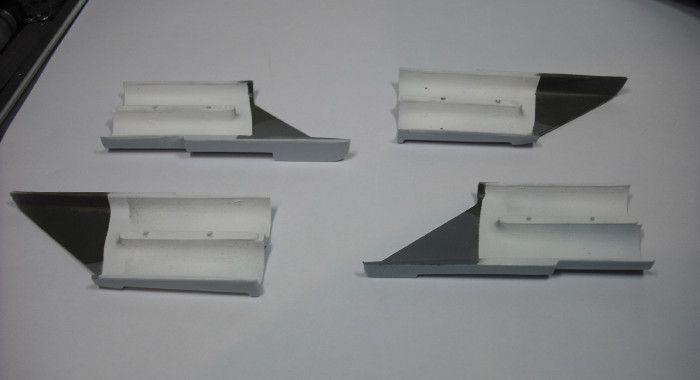
Then I joined the halves together, but the joint was pretty bad, screamingly obvious when looking down the intakes. The parts I could get to, ie. the camouflaged area at the front, was dealt with in the conventional way, apply filler, rub down with a sanding stick and re-spray. But the white area, deep inside, I could not get to at all with convention methods and tools, and the join line was looking horrible. I scratched my head for a few minutes and then decided to thin down some PVA glue with water, brush it along the seams inside the intake pipes with a small long brush, and hold the assembly at a suitable angle so the PVA would (hopefully!) sort of 'Flow' into the join and fill the gap before it sets. I did this a couple of times before the joins started to disappear, but to be honest it was only partially successful. Yes, the join lines are now filled, but it's a little bit lumpy and bumpy in there if you look closely. Anyway, I decided I could live with that and re-sprayed the white and called the intakes done. They came out like this.

Image


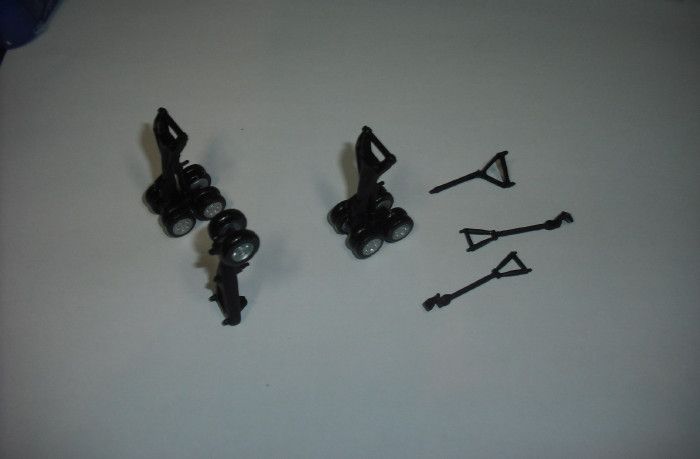
Cleaning the flash off, then painting and then assembling 18 wheels could test the patience of the mostly saintly of model-makers. I needed a stiff drink and a lie down after doing this lot!

Image


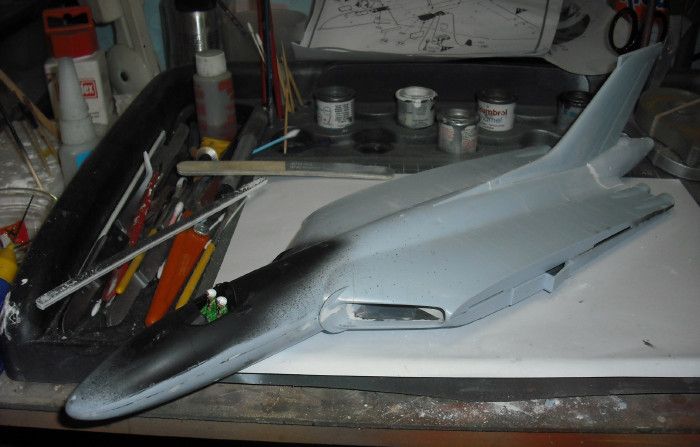
First of all, please excuse the blurry photo and the chaotic workbench. The inside of the cockpit area and the inside of the tailpipes were sprayed matt black on both top and bottom fuselage halves and the intakes were glued into position in the lower fuselage half and clamped whilst drying. Additionally, the instructions called for 30 grams of weight in the nose, I erred on the side of caution and went for 50 grams of lead epoxied in the lower nose (there's loads of room!), painted black to hide it. I'm sure that chunky front undercarriage leg can take the strain!
Incidentally, if ever you are doing one of these, do not follow the Airfix instructions if you are closing up the bomb bay doors. They tell you to put them in right at the end, but don't, do it now whilst the fuselage is in two halves, because the fit is very poor and (more significantly) the only glue points are the four extreme corners, consequently, along the sides, it flaps about horribly and doesn't align with the fuselage. It definitely needs some internal bracing or similar, which would be impossible to do when the fuselage is closed up.
What I did was was put the doors in at this early stage whilst I had access to the inside, glued it at the four corners as per the instructions, then, once set, I bent it into the right position so the side edges lined up with the fuselage belly better, then added a couple of strategically places blobs of thick CA on the inside to hold it with correct curvature, followed by a bead of conventional styrene glue all the way around the inside to reinforce it. It seems to be OK so far and certainly lines up with the underneath better, requiring far less sanding on the outside.

Image


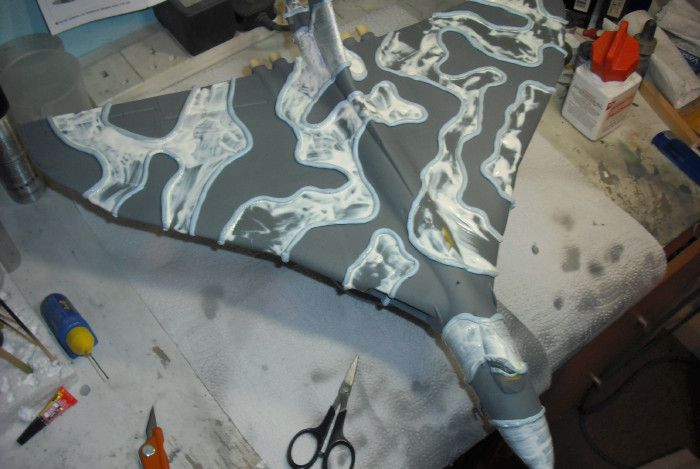
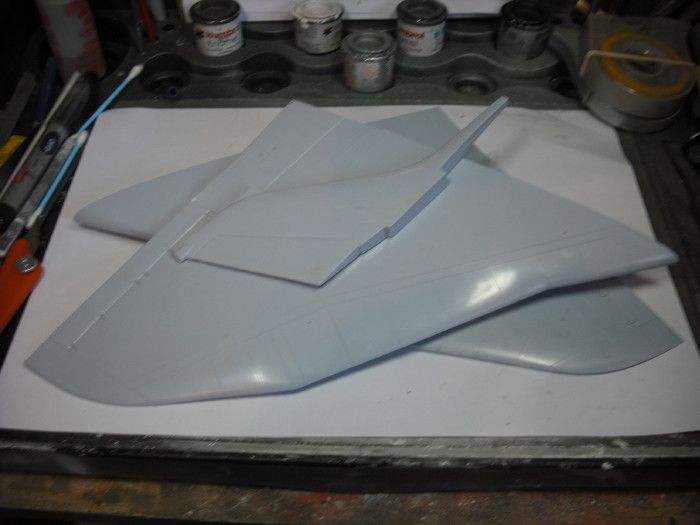
The main flying surfaces went together quickly and easily, they are just two halves like any other typical Arifix kit, but you do need an awful lot of clamps all round the perimeter whilst the glue dries, or else they try to spring apart all over the place, probably slight warping of the parts causes this.

Image


Whilst things were drying I decided to paint and assemble the undercarriage parts. Other than having to run a drill into the main wheels to get them to fit nice on the axles, it all went together painlessly, Airfix have engineered these bits very well.

Image


Finally I was able to close up the two fuselage halves. First I assembled and added the cockpit interior which consists of a cockpit floor, two seats, two pilot figures, an instrument panel and two control columns. Frankly that's plenty because nothing will be seen through those tiny windows. I painted the flying suits of the pilots in an intentionally lighter shade of green than would be accurate in the hope that they might show up a bit inside that dingy cockpit when looking through those tiny windows. Erm, after a test fit of the canopy I can confidently report, no chance, you can't see a darned thing!
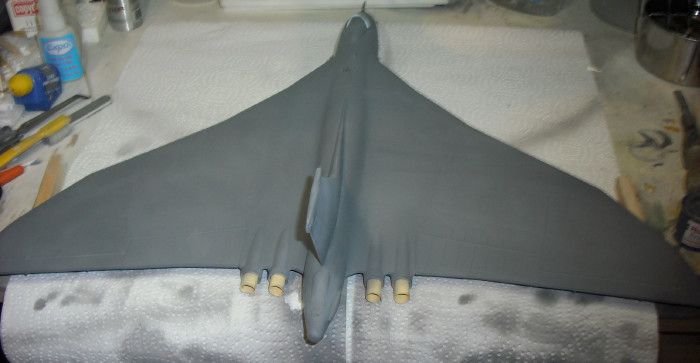
I then added the tail cone. I decided to do all the necessary filling and sanding on the fuselage before adding the wings, purely for ease of handling on the bench, because once the wings are on it becomes a bit of a monster!
The fuselage halves fitted together nicely, but extensive 'fill-sand-repeat' was required around the join with the tail cone to get it to blend in, also around the tail pipes to make them round and, worst off all, inside the intakes where the intake assembly meets the wing root lip, that area was a bit a nightmare, very difficult to get to, very difficult to see, it needed a lot of work with the filler and sanding stick to make it even passable, and the intakes now need painting, AGAIN! :evil: That'll be the third time.......
Incidentally, the tail pipes are a bit wrong, they are straight but should be tapered and slightly conical, but I'll live with that.

Image


And that's as far as I've got at the moment, more updates soon, as I've got some bench time this evening. Thanks for looking!

Regards,

Zee28
User avatar
jamesaw
Modelling Gent and Scholar
Posts: 1117
Joined: October 16th, 2011, 1:30 pm
Location: Ontario, Canada

Re: Airfix 1/72 Avro Vulcan (Work in Progress)

Post by jamesaw »

Looking good so far. Shame about the scotch though!
User avatar
Zee28
Modelling Gent and Scholar
Posts: 2834
Joined: March 8th, 2013, 10:21 pm
Location: South London

Re: Airfix 1/72 Avro Vulcan (Work in Progress)

Post by Zee28 »

Cheers James. Yes, it's a biggie, I think it might be time to clear the bench and temporarily dispense with the Humbrol work station before I put the wings on! It is seriously unmanageable and one has a tendency to work on it away from the bench on your lap, due to it's ungainly size.

Other than the 'fill-sand-repeat' around the intakes, I'm actually quite enjoying this one. It's big but actually quite simple.

Zee
User avatar
Eric Mc
Modelling Gent and Scholar
Posts: 4808
Joined: May 3rd, 2011, 8:27 am
Location: Farnborough, Hants

Re: Airfix 1/72 Avro Vulcan (Work in Progress)

Post by Eric Mc »

Built it in 1985. Long since gone the way of most of the full size ones.
User avatar
Zee28
Modelling Gent and Scholar
Posts: 2834
Joined: March 8th, 2013, 10:21 pm
Location: South London

Re: Airfix 1/72 Avro Vulcan (Work in Progress)

Post by Zee28 »

Hi Eric. I have contributed regularly for the last few years to the XH558 'Vulcan to the Sky' fund to keep her airborne, and seeing her at Duxford last year brought a lump to my throat, simply stunning, breath-taking, awesome, words fail me. From an age when the great British aviation industry was at it's most forward thinking and innovative before it was killed by politics and financial issues, this is a plane that needs to be celebrated!

Right, that's decided, XH558 decals for this one!
User avatar
Stuart
Raider of the Lost Ark Royal
Posts: 19446
Joined: February 25th, 2013, 4:55 pm
Location: North Wales
Contact:

Re: Airfix 1/72 Avro Vulcan (Work in Progress)

Post by Stuart »

Looks like you're having fun with this one Mr Zee. Looking forward to seeing it come together.

Its certainly a big beast!

Cheers

Stuart
Stuart Templeton I may not be good but I'm slow...

My Blog: https://stuartsscalemodels.blogspot.com/
User avatar
splash
Senior Service Rotorhead
Posts: 13828
Joined: May 1st, 2011, 11:02 am
Location: Somerset England

Re: Airfix 1/72 Avro Vulcan (Work in Progress)

Post by splash »

Nice work Zee.

One trick I use for those times when intake seams will not disappear is fit intake blanks :-D
My work bench is starting to look like Portsmouth Naval Dockyard.
User avatar
Clashcityrocker
Modelling Gent and Scholar
Posts: 10816
Joined: May 1st, 2011, 12:31 am
Location: Adelaide. South Australia

Re: Airfix 1/72 Avro Vulcan (Work in Progress)

Post by Clashcityrocker »

Nice progress Zee. This will leave a big hole in your stash :)

Nigel
User avatar
Zee28
Modelling Gent and Scholar
Posts: 2834
Joined: March 8th, 2013, 10:21 pm
Location: South London

Re: Airfix 1/72 Avro Vulcan (Work in Progress)

Post by Zee28 »

Back again with the big triangle!

Sorry for lack of updates (it slipped onto page 2, unforgivable!) but I didn't get the modelling time I had hoped for due to other things.

Anyway, progress since last update. I glued the wings on (hopefully straight), and like the rest of the kit a lot of 'Fill-sand-repeat' was needed along the wing to fuselage joint. I then went over the whole thing again with the sanding stick and finally the big bird was ready for some paint.

I shot the whole thing with a generous coat of Humbrol 164 Dark Sea Grey (satin) and thanks to all that sanding it didn't throw up any obvious blemishes. There's a couple of very minor ones on the underside but I can live with them. So here we are, all grey.

Image


This took a while to dry, so my attention was temporarily diverted to the on-going Airfix Hampden. Once the grey was all dry I then masked up for the green using the familiar Blu-tak in-filled with Copydex method. I like this method of masking because it's quick, cheap and peels off so easily and tidily without leaving any marks on the paint underneath. But I've only used it with good old fashioned enamels so I can't say how it would work on acrylics. So here it is all masked up ready for the green.

Image


Thanks for looking, more updates very soon!

Zee28
User avatar
Eric Mc
Modelling Gent and Scholar
Posts: 4808
Joined: May 3rd, 2011, 8:27 am
Location: Farnborough, Hants

Re: Airfix 1/72 Avro Vulcan (Work in Progress - now painting

Post by Eric Mc »

Based on what you said on the Fouga Magister thread, you will probably need to completely restock with green and grey paint as well as Copydex when you've finished this one.
User avatar
Zee28
Modelling Gent and Scholar
Posts: 2834
Joined: March 8th, 2013, 10:21 pm
Location: South London

Re: Airfix 1/72 Avro Vulcan (Work in Progress - now painting

Post by Zee28 »

Eric, you're so right! That's a whole tin of Humbrol 164 on there! Fortunately my good lady foresaw this problem and came home from her shopping with another two tins, one grey, one green, so I am good to go!

Green is now on an I am brush painting some of the little bits and bobs right now, then some Klear later, photos to follow soon.

Zee28
shangos70
Modelling Gent and Scholar
Posts: 4422
Joined: May 1st, 2011, 11:14 am
Location: Doncaster, Socialist Republic of South Yorkshire.

Re: Airfix 1/72 Avro Vulcan (Work in Progress - now painting

Post by shangos70 »

Nice work Zee, I bought some gloss white resin one piece intakes for mine but I forgot about the camo demarcation on them. Must invest in new jet pipe after seeing yours.
User avatar
Stuart
Raider of the Lost Ark Royal
Posts: 19446
Joined: February 25th, 2013, 4:55 pm
Location: North Wales
Contact:

Re: Airfix 1/72 Avro Vulcan (Work in Progress - now painting

Post by Stuart »

Lovely build Mr Zee!
Stuart Templeton I may not be good but I'm slow...

My Blog: https://stuartsscalemodels.blogspot.com/
User avatar
Clashcityrocker
Modelling Gent and Scholar
Posts: 10816
Joined: May 1st, 2011, 12:31 am
Location: Adelaide. South Australia

Re: Airfix 1/72 Avro Vulcan (Work in Progress - now painting

Post by Clashcityrocker »

Any chance of showing us what the copydex looks like. I've got Maskol, but that can get a bit messy.

Nigel
User avatar
Zee28
Modelling Gent and Scholar
Posts: 2834
Joined: March 8th, 2013, 10:21 pm
Location: South London

Re: Airfix 1/72 Avro Vulcan (Work in Progress - now painting

Post by Zee28 »

Clashcityrocker wrote:Any chance of showing us what the copydex looks like. I've got Maskol, but that can get a bit messy.
How do you mean Nigel? You can see it slapped on above. Do you mean see the result after it's all ripped off? that'll be coming soon mate, hopefully later tonight (I'm doing an insomnia session tonight).

Basically all I do is mark out the camo with long Blu-tak sausages then in-fill the area not to be painted with a very thick, generous coat of Copydex, straight out of the bottle, just slap it on and ensure it touches the Blu-tak all the way round.

Then I wait for it to dry off (touch dry, it doesn't take long) then hit it with the paint. Once the paint is thoroughly dry I just grab one corner of the Blu-tak and it will come off talking the Copydex with it in one great big sheet. As long as the drying time is adhered to it then it shouldn't leave any residue at all.

I didn't get on with Maskol at all, it was too thin for this sort of work, and Vallejo Liquid Mask was also not to my taste. Plus Copydex is cheap for the large amount you get (comparing it to proprietary modelling stuff).

I also mask small windows with Copydex, but you have to use a nice, small, decent brush for that.

I used the same method for my Jaguar, which might help demonstrate, like this (scroll to right near the bottom of page 1 to see it covered in Copydex!)

http://uamf.org.uk/viewtopic.php?f=19&t ... ar&start=0;

Hope this helps mate.

Vulcan pics to follow later.

Zee
Post Reply

Return to “Aviation Modelling”