Excellent fix to the exhaust and the details like the scoops. Thanks for the tip about using colour to show up things better when working on them sometimes.
David
Anigrand 1/72 HP 115 **FINISHED**
-
DavidWomby

- Modelling Gent and Scholar
- Posts: 11750
- Joined: May 1st, 2011, 8:09 pm
- Location: Florida, USA
-
JamesPerrin

- Looks like his avatar
- Posts: 13669
- Joined: April 5th, 2011, 8:09 pm
- Location: W. Yorkshire
- Contact:
Re: Anigrand 1/72 HP 115
Cheers David, the pen trick came in useful again when squaring up two laminations of plastic used to make the new wider lower fuselage. I quite like forming theses large pieces as they often come together quicker than small fiddle parts. 99% of the work done on course wet'n'dry stuck to a board.
The upper fuselage is moulded integral to the wing, but on close inspection there was a slight gap as if the two parts of the master hadn't been blended together. Photos show that the spine does flow into the wing albeit with a small radius of curvature so filler was applied and sanded back.
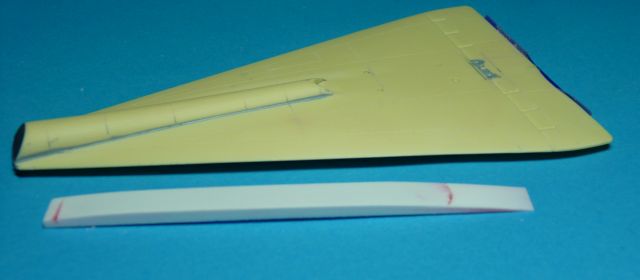
The upper fuselage is moulded integral to the wing, but on close inspection there was a slight gap as if the two parts of the master hadn't been blended together. Photos show that the spine does flow into the wing albeit with a small radius of curvature so filler was applied and sanded back.
Classic British Kits SIG Leader Better to fettle than to fill
(2024 A:B 5:2) (2023 13:8:7) (2022 21:11) (2021 15:8) (2020 8:4:4)
(2024 A:B 5:2) (2023 13:8:7) (2022 21:11) (2021 15:8) (2020 8:4:4)
-
JamesPerrin
- Looks like his avatar
- Posts: 13669
- Joined: April 5th, 2011, 8:09 pm
- Location: W. Yorkshire
- Contact:
Re: Anigrand 1/72 HP 115
Small update tonight. Firstly I basically glued to two pieces above together, but not until after a lot of measure and double checking my marks to make sure it was bang on centre. The rear of the cockpit module needed to be modified as in reality it overlapped the lower fuselage; my replacement was ~3mm longer than the kit part. Some sawing, sanding and a lot of trail fitting got it right. BTW tape is rubbish at keeping parts aligned when you are working in them so I tacked the rear of the cockpit parts together with CA glue.
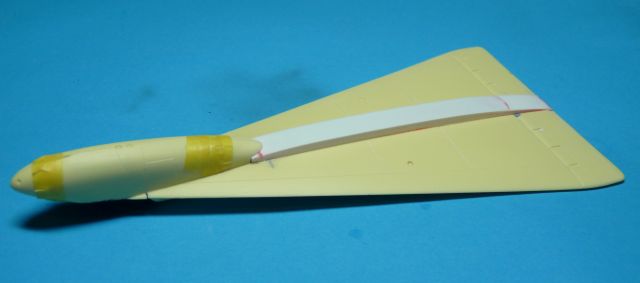
The cockpit is just dry fitted at the moment, though I was tempted to whack it, the engine and rudder on but thought better of it and take my time over it.
The cockpit is just dry fitted at the moment, though I was tempted to whack it, the engine and rudder on but thought better of it and take my time over it.
Classic British Kits SIG Leader Better to fettle than to fill
(2024 A:B 5:2) (2023 13:8:7) (2022 21:11) (2021 15:8) (2020 8:4:4)
(2024 A:B 5:2) (2023 13:8:7) (2022 21:11) (2021 15:8) (2020 8:4:4)
-
ShaunW
- NOT the sheep
- Posts: 26180
- Joined: November 26th, 2011, 6:11 pm
- Location: Pontefract West Yorkshire
Re: Anigrand 1/72 HP 115
Nice one. I agree, tape is rubbish for holding parts together if work is being carried out. A couple of dabs of CA will be fine.
Doing - Tamiya 1/35th Universal Carrier.
Work is the curse of the modelling classes!
IPMS#12300
Work is the curse of the modelling classes!
IPMS#12300
-
Dazzled

- Modelling Gent and Scholar
- Posts: 9592
- Joined: October 1st, 2011, 11:08 pm
- Location: Mid Glamorgan, South Wales
- Contact:
Re: Anigrand 1/72 HP 115
Nothing like a nice easy "box-shaker" is there James? 
It's coming along nicely too
It's coming along nicely too
COLD WAR S.I.G. LEADER
Wherever there's danger, wherever there's trouble, wherever there's important work to be done....I'll be somewhere else building a model!
Wherever there's danger, wherever there's trouble, wherever there's important work to be done....I'll be somewhere else building a model!
-
JamesPerrin
- Looks like his avatar
- Posts: 13669
- Joined: April 5th, 2011, 8:09 pm
- Location: W. Yorkshire
- Contact:
Re: Anigrand 1/72 HP 115
Don't think I'm not enjoying myself :DDazzled wrote:Nothing like a nice easy "box-shaker" is there James?
It's coming along nicely too
Classic British Kits SIG Leader Better to fettle than to fill
(2024 A:B 5:2) (2023 13:8:7) (2022 21:11) (2021 15:8) (2020 8:4:4)
(2024 A:B 5:2) (2023 13:8:7) (2022 21:11) (2021 15:8) (2020 8:4:4)
-
JamesPerrin
- Looks like his avatar
- Posts: 13669
- Joined: April 5th, 2011, 8:09 pm
- Location: W. Yorkshire
- Contact:
Re: Anigrand 1/72 HP 115
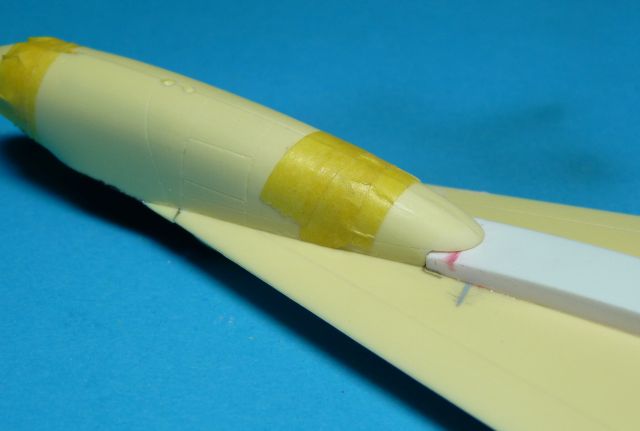
I stuck the cockpit on last night, it fits beautifully, and this morning realised I should have wedged the rear apart with a shim so as to match the width of the lower fuselageJamesPerrin wrote:The cockpit is just dry fitted at the moment, though I was tempted to whack it, the engine and rudder on but thought better of it and take my time over it.
Classic British Kits SIG Leader Better to fettle than to fill
(2024 A:B 5:2) (2023 13:8:7) (2022 21:11) (2021 15:8) (2020 8:4:4)
(2024 A:B 5:2) (2023 13:8:7) (2022 21:11) (2021 15:8) (2020 8:4:4)
-
Dazzled
- Modelling Gent and Scholar
- Posts: 9592
- Joined: October 1st, 2011, 11:08 pm
- Location: Mid Glamorgan, South Wales
- Contact:
Re: Anigrand 1/72 HP 115
I'm sure you'll find a way around it James. It's all part of the fun 
COLD WAR S.I.G. LEADER
Wherever there's danger, wherever there's trouble, wherever there's important work to be done....I'll be somewhere else building a model!
Wherever there's danger, wherever there's trouble, wherever there's important work to be done....I'll be somewhere else building a model!
-
JamesPerrin
- Looks like his avatar
- Posts: 13669
- Joined: April 5th, 2011, 8:09 pm
- Location: W. Yorkshire
- Contact:
Re: Anigrand 1/72 HP 115
Jamming a scalpel blade in the join and prising it off!Dazzled wrote:I'm sure you'll find a way around it James. It's all part of the fun
I was able to then only split the rear half of the cockpit pod and inserted a wedge shaped shim of card. Cleaned up the joins and re-glued. Card was also used to fill small gap at the wing root where it extended onto the cockpit halves.
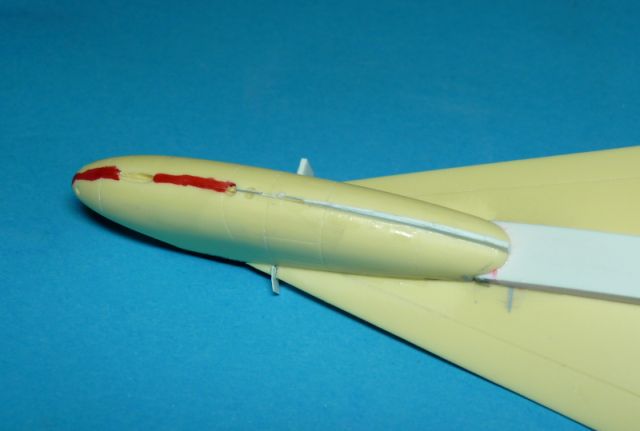
The red ink is just do I can check the seams around the nose.
Classic British Kits SIG Leader Better to fettle than to fill
(2024 A:B 5:2) (2023 13:8:7) (2022 21:11) (2021 15:8) (2020 8:4:4)
(2024 A:B 5:2) (2023 13:8:7) (2022 21:11) (2021 15:8) (2020 8:4:4)
-
JamesPerrin
- Looks like his avatar
- Posts: 13669
- Joined: April 5th, 2011, 8:09 pm
- Location: W. Yorkshire
- Contact:
Re: Anigrand 1/72 HP 115
Oh yeah we're back, for now at least.
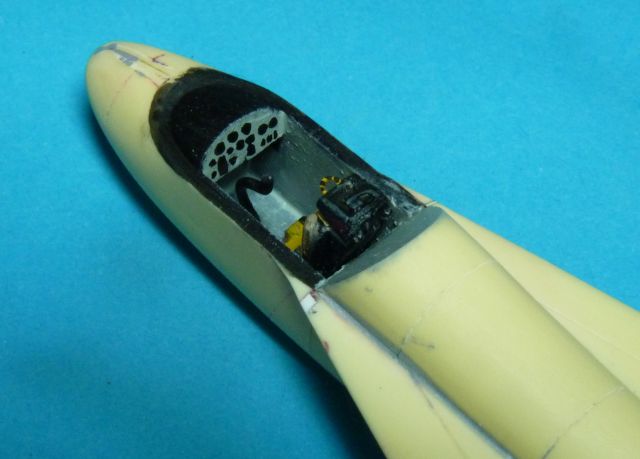
I'll focus on the cockpit area in this post but the tail has been added after some rescribing of incorrect/missing rudder and trim tab detail. Joints have been filled (small amounts) and sanded.
The ejector seat is a 2 feet away approximation of a Mk 4, as it fitted I decided to push ahead with it as I didn't want to focus effort in the cockpit. Painted up with some coloured masking tape straps, sorted.
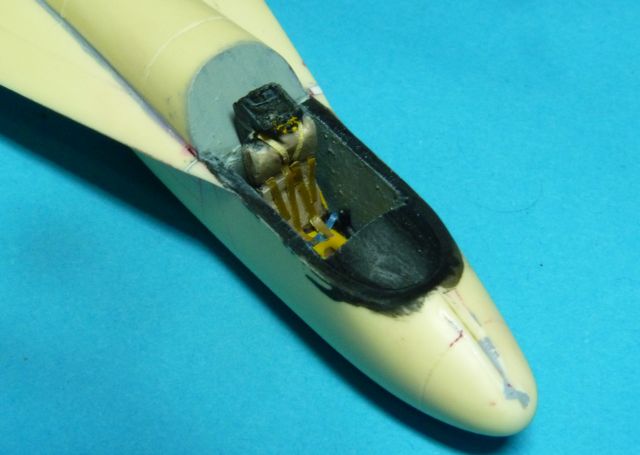
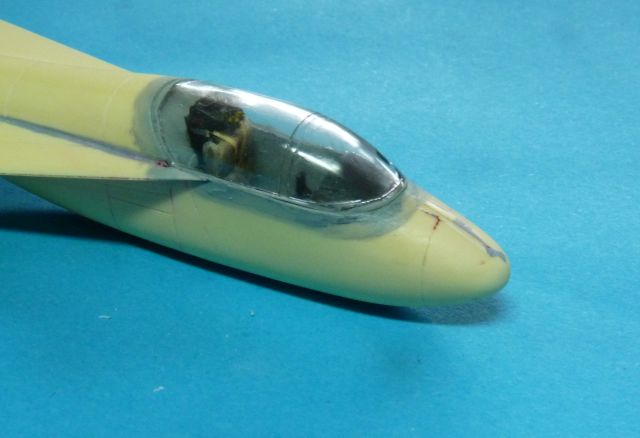
The canopy was not very clear and a poor fit being too high at the rear and leaving a large gap too. Sanding the lower rear edge got it to match the spine's curve and also closed the gap. It was sanded/polished inside and out and after the a dip in Klear came out as something usable.
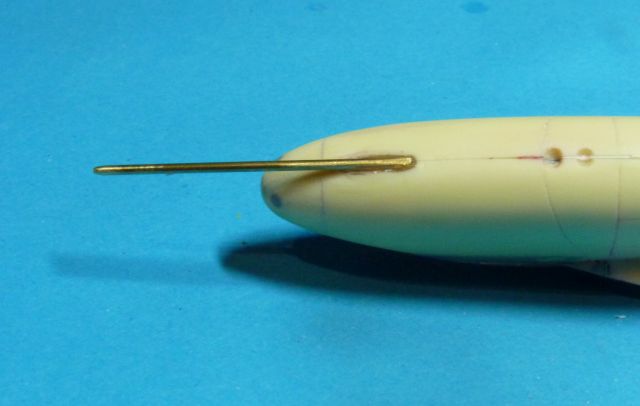
The pitot probe is hug, but the resin part is overly chunky, and I started work on replacing it in brass and wire. As the attachment point is at a tangent to the lower cockpit and I've glued in the base of the probe so that the join can be clean up now and not when the NMF has been applied.
I'll focus on the cockpit area in this post but the tail has been added after some rescribing of incorrect/missing rudder and trim tab detail. Joints have been filled (small amounts) and sanded.
The ejector seat is a 2 feet away approximation of a Mk 4, as it fitted I decided to push ahead with it as I didn't want to focus effort in the cockpit. Painted up with some coloured masking tape straps, sorted.
The canopy was not very clear and a poor fit being too high at the rear and leaving a large gap too. Sanding the lower rear edge got it to match the spine's curve and also closed the gap. It was sanded/polished inside and out and after the a dip in Klear came out as something usable.
The pitot probe is hug, but the resin part is overly chunky, and I started work on replacing it in brass and wire. As the attachment point is at a tangent to the lower cockpit and I've glued in the base of the probe so that the join can be clean up now and not when the NMF has been applied.
Classic British Kits SIG Leader Better to fettle than to fill
(2024 A:B 5:2) (2023 13:8:7) (2022 21:11) (2021 15:8) (2020 8:4:4)
(2024 A:B 5:2) (2023 13:8:7) (2022 21:11) (2021 15:8) (2020 8:4:4)
-
dollar19
- Modelling Gent and Scholar
- Posts: 1342
- Joined: May 1st, 2011, 1:11 am
- Location: Bristol, Va. USA
Re: Anigrand 1/72 HP 115
James, I just read through this entire thread. Even though I'm not familiar with this aircraft, I found myself intrigued by your build. Great progress so far and I'm looking forward to seeing more. Now I'm going to go research the HP115.
Greg
Greg
-
skypirate

- Modelling Gent and Scholar
- Posts: 7292
- Joined: May 1st, 2011, 6:13 am
- Location: Port Macquarie, Australia
Re: Anigrand 1/72 HP 115
Good to see you are persisting with this and rather successfully.
It will certainly stand out in the crowd.
cheers,
David
It will certainly stand out in the crowd.
cheers,
David
-
JamesPerrin
- Looks like his avatar
- Posts: 13669
- Joined: April 5th, 2011, 8:09 pm
- Location: W. Yorkshire
- Contact:
Re: Anigrand 1/72 HP 115
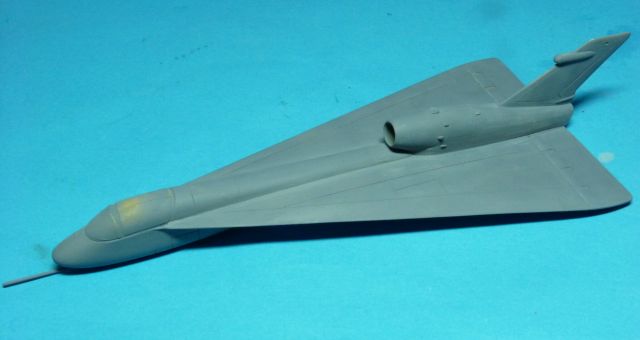
Alclad Grey primer, it goes on quite rough whatever you do but and quick swipe with 8000 grit micro mesh and it becomes silky smooth. Ready for the first coat of paint, which will more grey!
Classic British Kits SIG Leader Better to fettle than to fill
(2024 A:B 5:2) (2023 13:8:7) (2022 21:11) (2021 15:8) (2020 8:4:4)
(2024 A:B 5:2) (2023 13:8:7) (2022 21:11) (2021 15:8) (2020 8:4:4)