The fuselage shots give an good comparison between the softer detail of the older kits and the crisper detail of the newer tools. I built the Revell kit, a German Navy version, some years ago, enjoyed it very much and the kit would still feature on my shopping list for a 1/72nd Sea King despite the arrival of the Airfix new tool. In the past I have built the old Airfix kit on a couple of occasions and the Revell offering was, well, a revellation! Interestingly the left overs from the Revell build has provided me with instrument decals and interior bits and bobs for various non-helicopter projects. I have never built a Fujimi kit and the only one I have in the stash is a 1/48th Bf-110.
That is a great build of "Old 66" Paul, it shows what can be done with the old kit, although I dare say the new tool would make life a little easier!
SeaKing Stupidity or Utter Madness
-
ShaunW
- NOT the sheep
- Posts: 26188
- Joined: November 26th, 2011, 6:11 pm
- Location: Pontefract West Yorkshire
Re: SeaKing Stupidity or Utter Madness
Doing - Tamiya 1/35th Universal Carrier.
Work is the curse of the modelling classes!
IPMS#12300
Work is the curse of the modelling classes!
IPMS#12300
Re: SeaKing Stupidity or Utter Madness
The Revell kit Shaun, is proving the most complex in terms of kit engineering so far! I for one will not be meddling with any more of the old-tool Airfix kits. The new Airfix mould is superb. I built two HC4 variants last year, and this is my first with the HAR3 boxing.
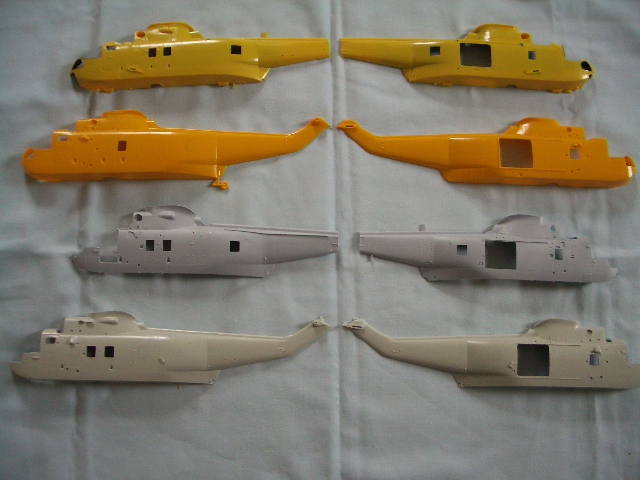
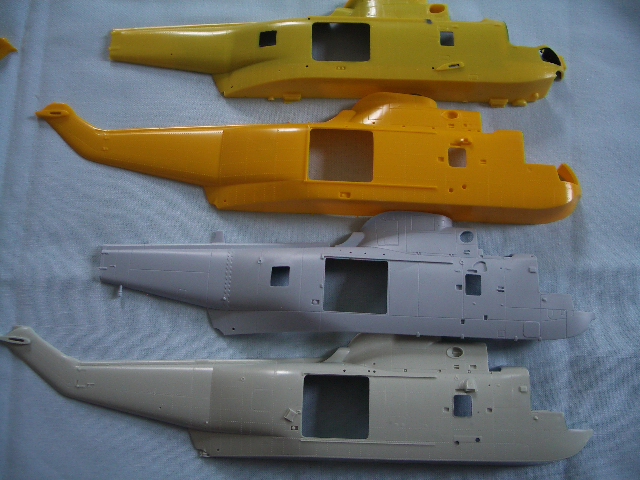
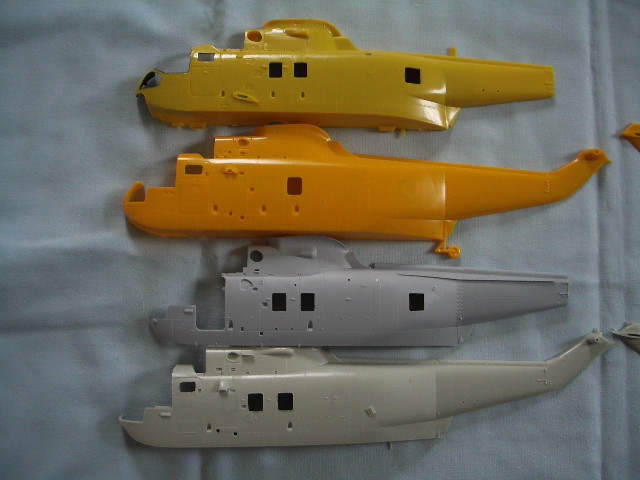
These 3 images give clearer images of the 4 fuselage halves. The new Airfix one has a separate "bottom" which I have not yet shown, this then removes any central seam line all along it
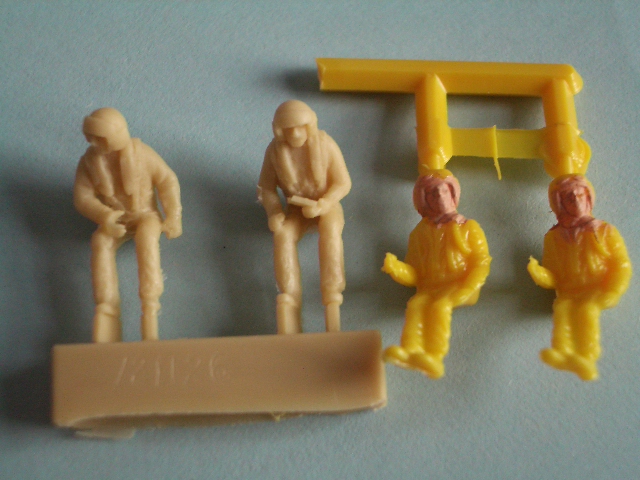
The old-tool Airfix, is the only one of the 4 that comes with any pilots. However there is a good set of aftermarket from PJ Productions.
Here are the 2 pilots from the set, along with the pair from the Airfix box.
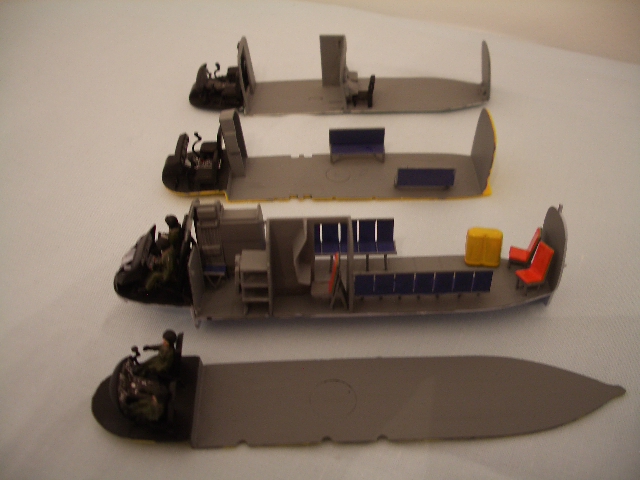
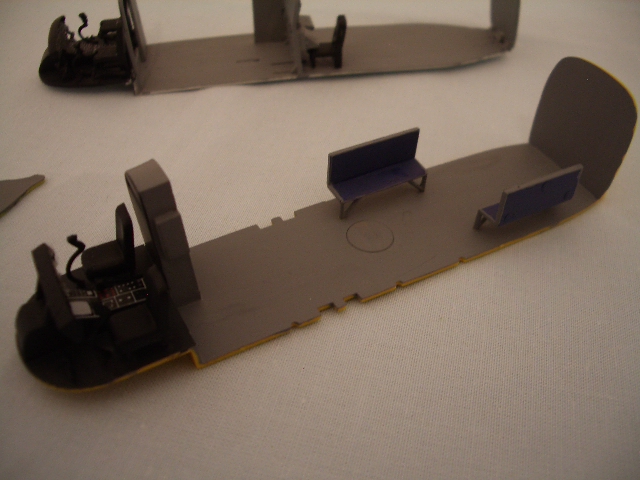
A little progress with the four interiors:
Revell is at the back, Fujimi next, and the two Airfix in the foreground:
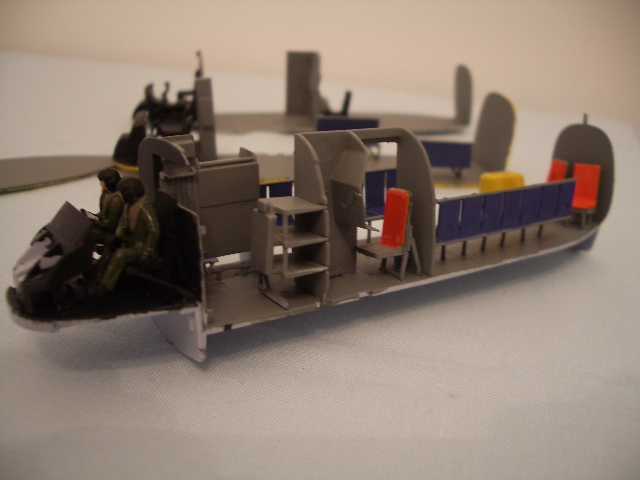
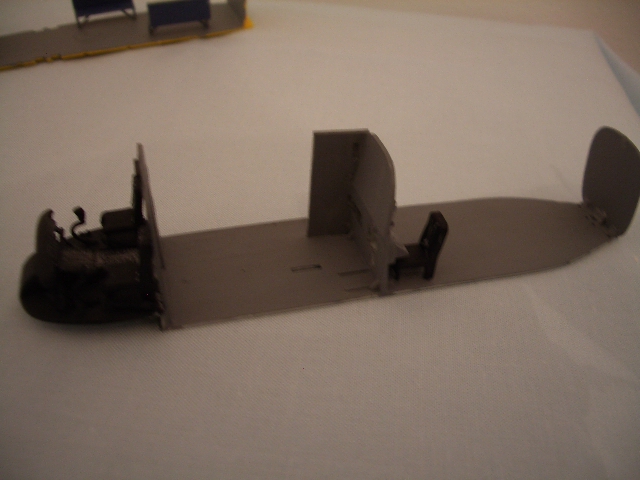
The Airfix interior is getting crowded, and there are still a couple items to add, but I need to wait until the internal ceiling is fitted, and this piece is fixed into the fuselage.
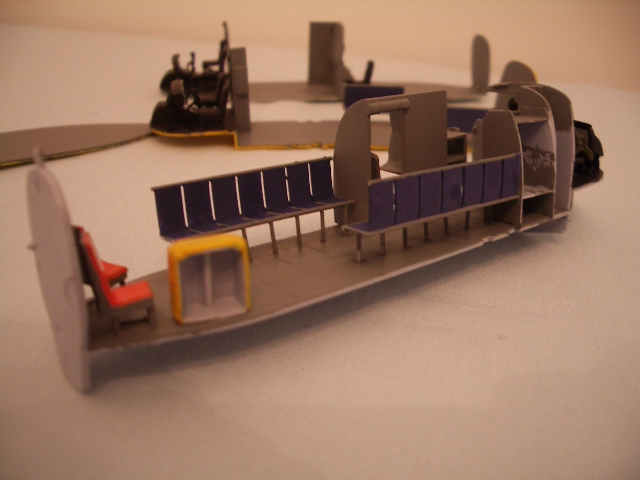
The Fujimi - this is with everything fitted in place.
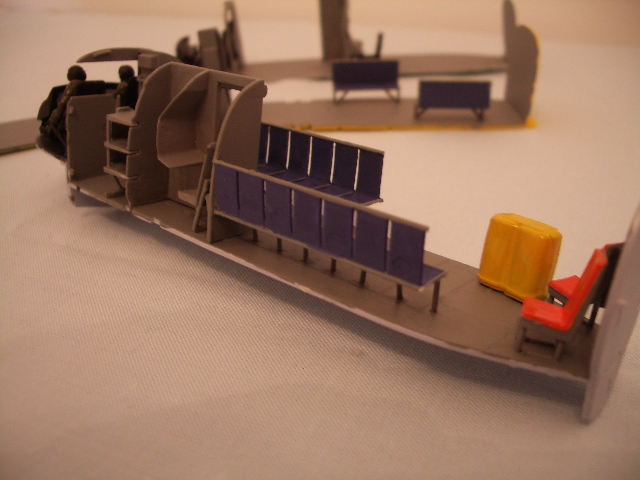
Revell - this one does have seating; some is moulded into the fuselage, some has yet to be fitted, and needs to be added once this piece is fixed into the fuselage.
The two Airfix kits head on.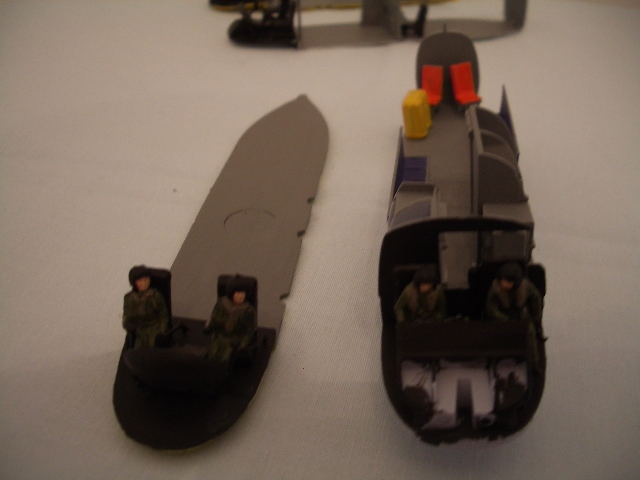
There are a few pieces - like seating - that are not used in this HAR3 variant due to adding the nav station, so once I have the interior of the old tool fitted, the spare seats and a bit of simple ingenuity will be incorporated before closing up. More on that next time.
These 3 images give clearer images of the 4 fuselage halves. The new Airfix one has a separate "bottom" which I have not yet shown, this then removes any central seam line all along it
The old-tool Airfix, is the only one of the 4 that comes with any pilots. However there is a good set of aftermarket from PJ Productions.
Here are the 2 pilots from the set, along with the pair from the Airfix box.
A little progress with the four interiors:
Revell is at the back, Fujimi next, and the two Airfix in the foreground:
The Airfix interior is getting crowded, and there are still a couple items to add, but I need to wait until the internal ceiling is fitted, and this piece is fixed into the fuselage.
The Fujimi - this is with everything fitted in place.
Revell - this one does have seating; some is moulded into the fuselage, some has yet to be fitted, and needs to be added once this piece is fixed into the fuselage.
The two Airfix kits head on.
There are a few pieces - like seating - that are not used in this HAR3 variant due to adding the nav station, so once I have the interior of the old tool fitted, the spare seats and a bit of simple ingenuity will be incorporated before closing up. More on that next time.
Trying to Build kits and not Buy kits
-
iggie

- Modelling Gent and Scholar
- Posts: 23434
- Joined: July 31st, 2013, 11:04 am
- Location: North Somercotes, Lincolnshire
- Contact:
Re: SeaKing Stupidity or Utter Madness
Lovely work on those interiors Chris!
Best wishes
Jim
If you can walk away from a landing, it's a good landing. If you use the airplane the next day, it's an outstanding landing
"Never put off till tomorrow, what you can do the day after tomorrow"
Jim
If you can walk away from a landing, it's a good landing. If you use the airplane the next day, it's an outstanding landing
"Never put off till tomorrow, what you can do the day after tomorrow"
-
splash

- Senior Service Rotorhead
- Posts: 13828
- Joined: May 1st, 2011, 11:02 am
- Location: Somerset England
Re: SeaKing Stupidity or Utter Madness
Great comparison build, this is becoming an excellent resource for anyone wanting a Seaking kit.
Regards Splash
Regards Splash
My work bench is starting to look like Portsmouth Naval Dockyard.
-
PaulBradley

- Staring out the window
- Posts: 21209
- Joined: April 6th, 2011, 3:08 pm
- Location: Flagstaff, AZ
Re: SeaKing Stupidity or Utter Madness
Great start, Chris!
Paul
За демократію і незалежний Україну
"For Democracy and a Free Ukraine"
За демократію і незалежний Україну
"For Democracy and a Free Ukraine"
-
Softscience

- Staring out the window
- Posts: 7473
- Joined: April 5th, 2011, 4:34 pm
- Location: Maryland, near Washington DC
Re: SeaKing Stupidity or Utter Madness
Great work on all of these, Chris. It is interesting to see how much more sophisticated contemporary kits have become.
-
Colin at Freightdog
- Series 3 and Beyond
- Posts: 23
- Joined: May 1st, 2011, 2:17 pm
Re: SeaKing Stupidity or Utter Madness
Great thread, I have way to many Sea King kits in the stash, including two old Airfix ones. The shortcomings in the nose glazing of the old kit are very obvious, but I'd still like to make them.
Colin
Colin
-
ShaunW
- NOT the sheep
- Posts: 26188
- Joined: November 26th, 2011, 6:11 pm
- Location: Pontefract West Yorkshire
Re: SeaKing Stupidity or Utter Madness
Great stuff Chris and it's really interesting to see this comparison build thread showing what are probably the most common kits of this iconic helo in 1/72nd. Looking at all this so far and at the risk of stating the obvious, it looks to me that the new tool Airfix or the Revell kit are top contenders for a relatively painless build with decent detail (that NT Airfix interior looks particularly nice). Although I'm nearly always up for the challenge of doing battle with an old timer such as the old tool Airfix kit, sometimes it is nice to build something that doesn't require the interior to be made largely from plastic card and rod!
Doing - Tamiya 1/35th Universal Carrier.
Work is the curse of the modelling classes!
IPMS#12300
Work is the curse of the modelling classes!
IPMS#12300

Re: SeaKing Stupidity or Utter Madness
This is excellent, Chris. I really like the look of the new tool Airfix, great detail.
On The Bench
Takom 1/35 M247 Sgt. York.
Takom 1/35 M247 Sgt. York.
-
Marek

- Modelling Gent and Scholar
- Posts: 2455
- Joined: May 1st, 2011, 8:03 am
- Location: Madison, WI
- Contact:
Re: SeaKing Stupidity or Utter Madness
Simply wonderful comparison build so far.
Re: SeaKing Stupidity or Utter Madness
Thanks to the followers for comments etc. For a painless build, Shaun it has got to be the new tool Airfix. It is a product of the new age, and everything about it is good. The parts counts is less and some stages of the build have been designed very cleverly. It goes together well, and I will show the instructions and decals in a later installment of this log, they are all good.
However, and I have to be fair to Revell, I guess when that kit was released (it is stamped copyright 1998 in fuselage), it was a revelation and it was the best kid on the street for a long time I guess. Dragon, have also got a seaking or two in their "Falklands commemoration" range of kits, and I will look to get one of them in time, but 4 kits is enough at once for now.
The Airfix old tool is stamped 1984 inside it, and the Fujimi (which has nothing stamped on it) is also a product of a very similar vintage according to Scalemates web site. So, these two are making for a good comparison in one respect.
Once the internals were done, I had to drill a variety of holes in very different places in each kit, so it is going to be quite interesting later seeing what we end up with from them all. ....
The two Airfix kits came with all the window apertures done and incorporated in to moulding, whereas they had to be cut out on the Fujimi and Revell kits. Not complicated, but it takes time to get a neat precise aperture of the right size and which fitted to the glazing pieces. Getting the glazing bits to actually lodge in the window cavity was a challenge on all but the NT Airfix. The only one where the windows went in well, was the Airfix new tool.
Armed with elastic bands and pegs, getting the insides fitted in, and the fuselages sealed, was a relatively painless task on all four. I am now at this stage with them:
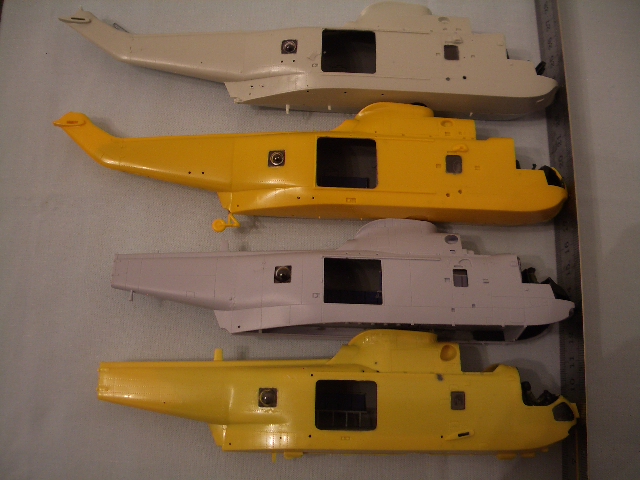
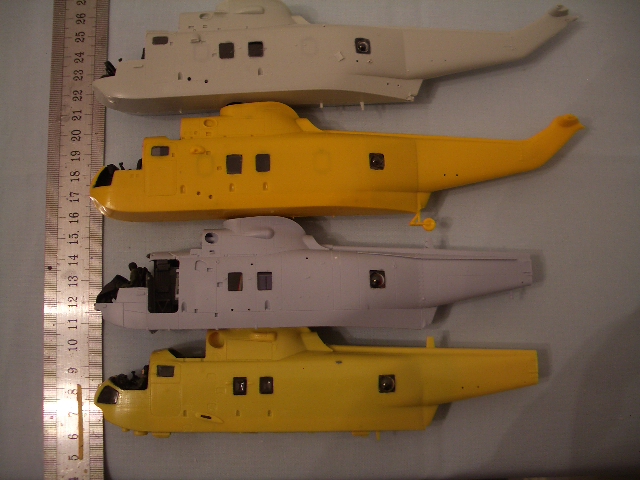
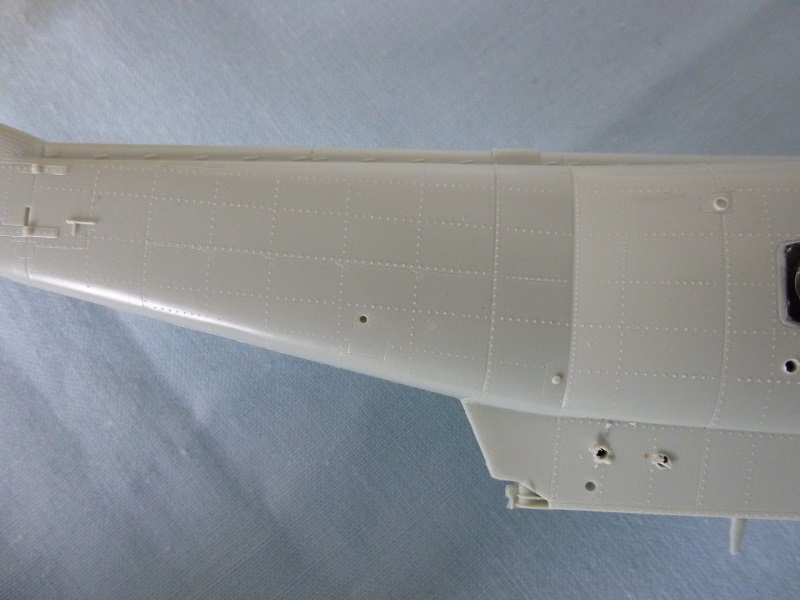
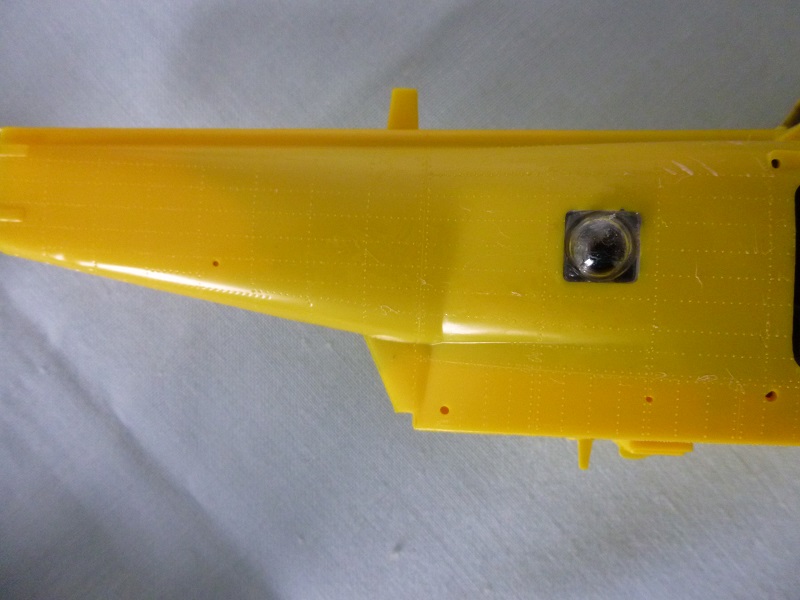
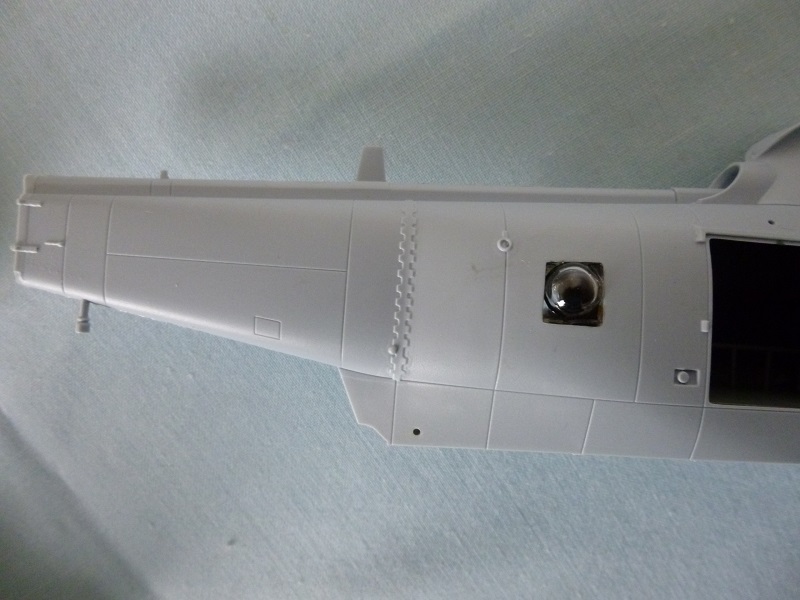
Over on another forum where I am sharing the build, we have got into the thorny matter of rivets/panel lines and raised bits ..... I am not getting drawn into a debate on this, but here are images of each fuselage:
Fujimi
Revell
OT Airfix
NT Airfix
That's all for now!
However, and I have to be fair to Revell, I guess when that kit was released (it is stamped copyright 1998 in fuselage), it was a revelation and it was the best kid on the street for a long time I guess. Dragon, have also got a seaking or two in their "Falklands commemoration" range of kits, and I will look to get one of them in time, but 4 kits is enough at once for now.
The Airfix old tool is stamped 1984 inside it, and the Fujimi (which has nothing stamped on it) is also a product of a very similar vintage according to Scalemates web site. So, these two are making for a good comparison in one respect.
Once the internals were done, I had to drill a variety of holes in very different places in each kit, so it is going to be quite interesting later seeing what we end up with from them all. ....
The two Airfix kits came with all the window apertures done and incorporated in to moulding, whereas they had to be cut out on the Fujimi and Revell kits. Not complicated, but it takes time to get a neat precise aperture of the right size and which fitted to the glazing pieces. Getting the glazing bits to actually lodge in the window cavity was a challenge on all but the NT Airfix. The only one where the windows went in well, was the Airfix new tool.
Armed with elastic bands and pegs, getting the insides fitted in, and the fuselages sealed, was a relatively painless task on all four. I am now at this stage with them:
Over on another forum where I am sharing the build, we have got into the thorny matter of rivets/panel lines and raised bits ..... I am not getting drawn into a debate on this, but here are images of each fuselage:
Fujimi
Revell
OT Airfix
NT Airfix
That's all for now!
Trying to Build kits and not Buy kits
-
Old_Tonto

- Modelling Gent and Scholar
- Posts: 8063
- Joined: May 1st, 2011, 7:41 pm
- Location: Middlesbrough, Peoples Republic of Teesside.
Re: SeaKing Stupidity or Utter Madness
Very interesting thread Chris. not a sea king expert myself but these images would indicate that rivets are quite visible in the real thing.
http://www.grubby-fingers-aircraft-illu ... round.html
Just my two penneth.
http://www.grubby-fingers-aircraft-illu ... round.html
Just my two penneth.
2023 - A:0 B:0 C:0
Current Projects:
East German Air Force (1956-90)
South African Air Force (1958-93)
Current Projects:
East German Air Force (1956-90)
South African Air Force (1958-93)
-
ShaunW
- NOT the sheep
- Posts: 26188
- Joined: November 26th, 2011, 6:11 pm
- Location: Pontefract West Yorkshire
Re: SeaKing Stupidity or Utter Madness
Good progress with this quartet Chris. I wouldn't get drawn too deep into the rivets/raised panel lines issue either! Suffice to say IMHO it's all down to personal preference. With builds of old kits I like to try and preserve the classic character of the exterior of the finished model and to that end, where possible, will keep the raised panel lines and I have been known to reinstate the same with stretched sprue. In the case of rivets I normally give them a light sanding as they usually protrude too far for my liking.
Doing - Tamiya 1/35th Universal Carrier.
Work is the curse of the modelling classes!
IPMS#12300
Work is the curse of the modelling classes!
IPMS#12300
Re: SeaKing Stupidity or Utter Madness
OT - I am not getting involved in the rivet debacle, but I like many others am amazed, that there are none, given that they LIDAR scanned to get the master for the new tool.
Pleased you like progress Shaun. All I can say... Things were going well... so well you know something has got to go wrong...
More on that in a moment.
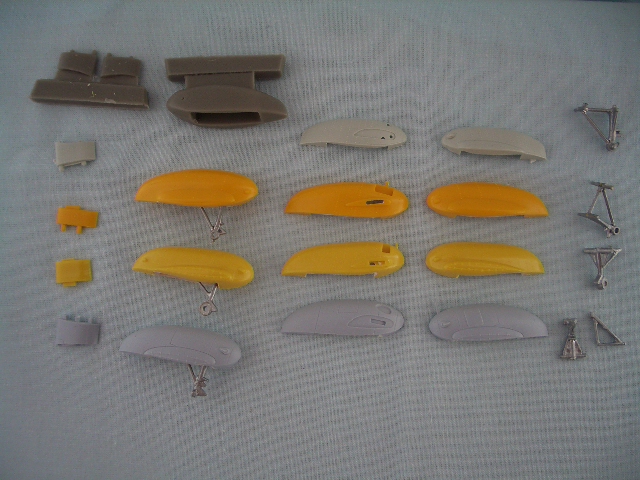
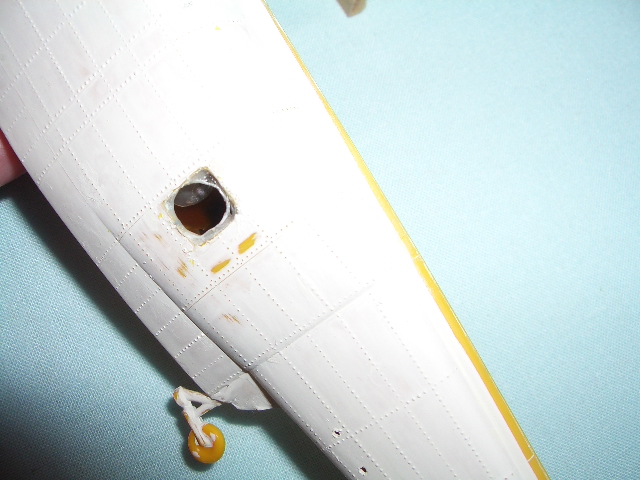
The last item I wanted to share and show for all 4 kits, for now were the sponsons.
For both Airfix kits and the Fujimi, I have built up one, and shown the parts for the other. The resin ones will replace those in the Revell kit. One thing to note, the new tool airfix has 2-parts to the wheel leg structure, whereas the others are moulded as a single piece.
From this point on, I was intending to work on just one kit at a time, and get it upto the point where it is largely all assembled and painted, ready for decalling..... I thought I would start with the Fujimi, as it had upto the point in my last report, been a reasonably pleasant built. So, a few more bits were added, along with a minimal smudge of filler here and there, and then I gave it a coat of white to sort out the seams, and in preparation for the yellow... in handling it, the bubble windows then fell out!
I could not get at them very easily because the back of the cabin before it becomes the tail, on that kit has a blanking plate glued in .... So I had to slide a blade in and try to open it up enough to get at the window ..... Oh did I swear!!! I
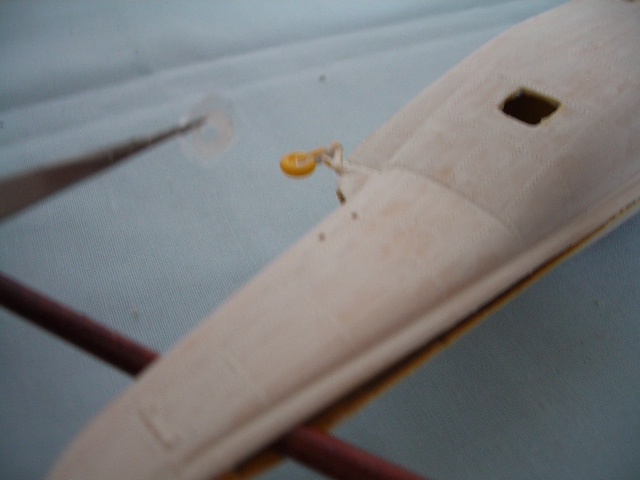
Then, the other bubble window also fell out... they were both glued back in with clearfix this time.
Once the seam was glued back up, and while it was being cleaned up .... yep.... one fell out again ....
The process of reopening the seam was done and I was getting worried it might not glue and clean up ....
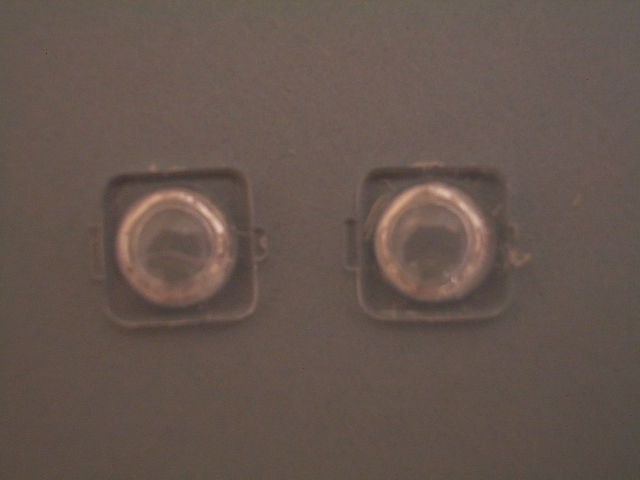
This time I resorted to some UHU All was going well.... I even got the seam all cleaned up, and painted this time. All was going well .... next morning one had fallen out again. The problem is, as you can see in the last photo, see due to the very small edge for them to fix and hold in with.

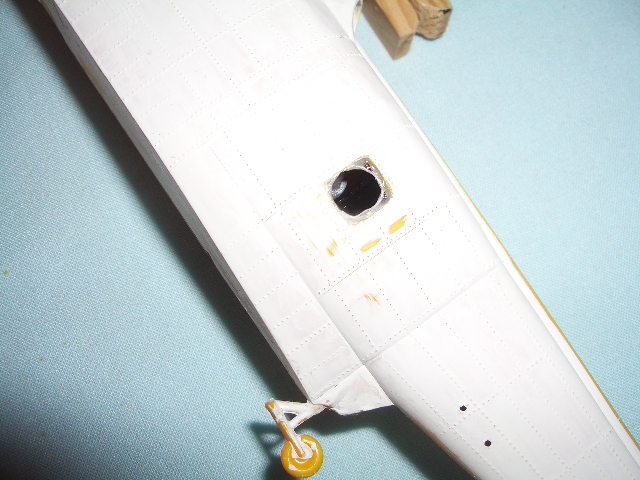
I am at the point of exasperation with this kit. I have now pushed out that back plate, and can get my fingers in, to replace the windows again, through the fuselage side door hole now. This last time, the pieces were very hard to find, and I ended up opening up the seam again, and now have a major issue to resolve, but the "key problem" however, is the fact that there is not enough overlap for the glazing to hold in against, and everytime I handle it, they fall inside.
I am awfully sorry Alan to be bearing such bad news. I am keen to hear from anyone with any bright ideas please.
I shall put this one aside for a while, and move back to the old Airfix one.
Pleased you like progress Shaun. All I can say... Things were going well... so well you know something has got to go wrong...
More on that in a moment.
The last item I wanted to share and show for all 4 kits, for now were the sponsons.
For both Airfix kits and the Fujimi, I have built up one, and shown the parts for the other. The resin ones will replace those in the Revell kit. One thing to note, the new tool airfix has 2-parts to the wheel leg structure, whereas the others are moulded as a single piece.
From this point on, I was intending to work on just one kit at a time, and get it upto the point where it is largely all assembled and painted, ready for decalling..... I thought I would start with the Fujimi, as it had upto the point in my last report, been a reasonably pleasant built. So, a few more bits were added, along with a minimal smudge of filler here and there, and then I gave it a coat of white to sort out the seams, and in preparation for the yellow... in handling it, the bubble windows then fell out!
I could not get at them very easily because the back of the cabin before it becomes the tail, on that kit has a blanking plate glued in .... So I had to slide a blade in and try to open it up enough to get at the window ..... Oh did I swear!!! I
Then, the other bubble window also fell out... they were both glued back in with clearfix this time.
Once the seam was glued back up, and while it was being cleaned up .... yep.... one fell out again ....
The process of reopening the seam was done and I was getting worried it might not glue and clean up ....
This time I resorted to some UHU All was going well.... I even got the seam all cleaned up, and painted this time. All was going well .... next morning one had fallen out again. The problem is, as you can see in the last photo, see due to the very small edge for them to fix and hold in with.
I am at the point of exasperation with this kit. I have now pushed out that back plate, and can get my fingers in, to replace the windows again, through the fuselage side door hole now. This last time, the pieces were very hard to find, and I ended up opening up the seam again, and now have a major issue to resolve, but the "key problem" however, is the fact that there is not enough overlap for the glazing to hold in against, and everytime I handle it, they fall inside.
I am awfully sorry Alan to be bearing such bad news. I am keen to hear from anyone with any bright ideas please.
I shall put this one aside for a while, and move back to the old Airfix one.
Trying to Build kits and not Buy kits