CONTINUATION OF MY 1:20 SCALE SCRATCH BUILT B17G (RADIO ROOM
-
iggie

- Modelling Gent and Scholar
- Posts: 23437
- Joined: July 31st, 2013, 11:04 am
- Location: North Somercotes, Lincolnshire
- Contact:
Re: CONTINUATION OF MY 1:20 SCALE SCRATCH BUILT B17G (RADIO
Nice job with the vac-forming! 
Best wishes
Jim
If you can walk away from a landing, it's a good landing. If you use the airplane the next day, it's an outstanding landing
"Never put off till tomorrow, what you can do the day after tomorrow"
Jim
If you can walk away from a landing, it's a good landing. If you use the airplane the next day, it's an outstanding landing
"Never put off till tomorrow, what you can do the day after tomorrow"
-
Clashcityrocker

- Modelling Gent and Scholar
- Posts: 10817
- Joined: May 1st, 2011, 12:31 am
- Location: Adelaide. South Australia
Re: CONTINUATION OF MY 1:20 SCALE SCRATCH BUILT B17G (RADIO
What about using clear plastic to vac-form the ball, then you won't have to cut out all the windows, just add the frames 
Nigel
Nigel
-
Narayan

- If anyone needs me, I'll be in my office
- Posts: 2602
- Joined: April 10th, 2011, 7:01 pm
- Location: The Middle of Nowhere in Ireland
Re: CONTINUATION OF MY 1:20 SCALE SCRATCH BUILT B17G (RADIO
Wow! That is simply amazing. Great work.
_________________
Narayan
Hello. My name is Inigo Montoya. You killed my father. Prepare to die.
A:B 2018 0:1 A:B 2017 28:03 2016 27:10 2015 53:07 2014 21:04 2013 39:12 2012 20:05 2011 11:10 2010 44:12 2009 19:16 2008 16:03 Overall 360:89
_________________
Narayan
Hello. My name is Inigo Montoya. You killed my father. Prepare to die.
A:B 2018 0:1 A:B 2017 28:03 2016 27:10 2015 53:07 2014 21:04 2013 39:12 2012 20:05 2011 11:10 2010 44:12 2009 19:16 2008 16:03 Overall 360:89
-
Fozzy

- The Bug Has Well And Truly Bitten
- Posts: 291
- Joined: July 23rd, 2011, 8:25 am
- Location: S.E.Bulgaria..near the Turkish border
- Contact:
Re: CONTINUATION OF MY 1:20 SCALE SCRATCH BUILT B17G (RADIO
Thanks for your input guys!

Hi Nigel.....I would have done but I simply didn't have a decent sheet of clear plastic...but I'm on top of this now and it should be ok.....famous last words!!Clashcityrocker wrote:What about using clear plastic to vac-form the ball, then you won't have to cut out all the windows, just add the frames
Nigel
FOZZY
Visit my Facebook page https://www.facebook.com/martinfosterss ... uiltmodels
Ready for inspection.....1:24 Scale Cutaway Spifire Mk1...1:24 Scale Cutaway Ju 87B-2......1:30 scale scratch built Westland Lysander...P51D seviced in a Hangar
Visit my Facebook page https://www.facebook.com/martinfosterss ... uiltmodels
Ready for inspection.....1:24 Scale Cutaway Spifire Mk1...1:24 Scale Cutaway Ju 87B-2......1:30 scale scratch built Westland Lysander...P51D seviced in a Hangar
-
Fozzy
- The Bug Has Well And Truly Bitten
- Posts: 291
- Joined: July 23rd, 2011, 8:25 am
- Location: S.E.Bulgaria..near the Turkish border
- Contact:
Re: CONTINUATION OF MY 1:20 SCALE SCRATCH BUILT B17G (RADIO
Hi guys
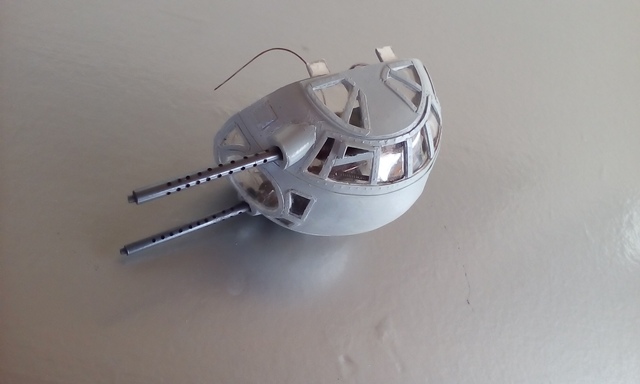
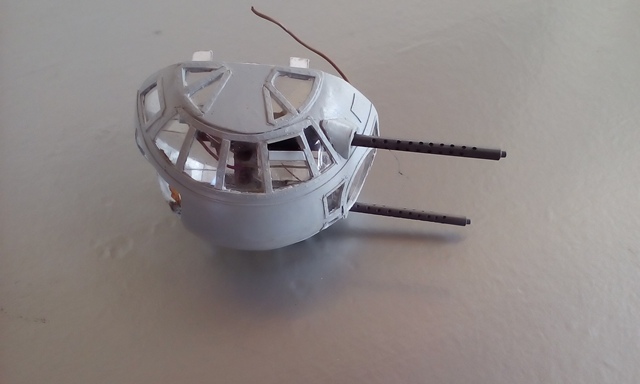
Time for an up date on this Ball turret!
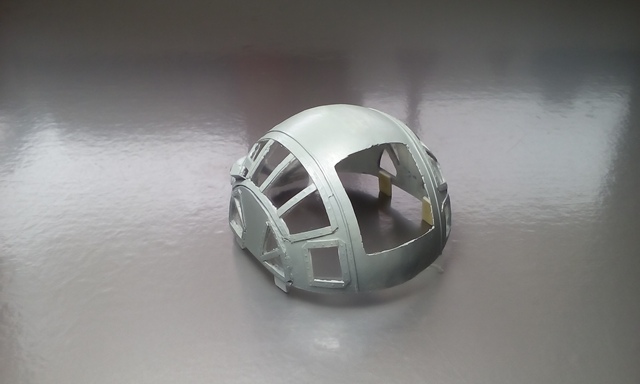
So after a lot of cursing the designers of this turret...namely Mr Sperry! ...I finally managed to complete the outer parts of the bottom half of the turret..... leaving me to start next on the dreaded interior!
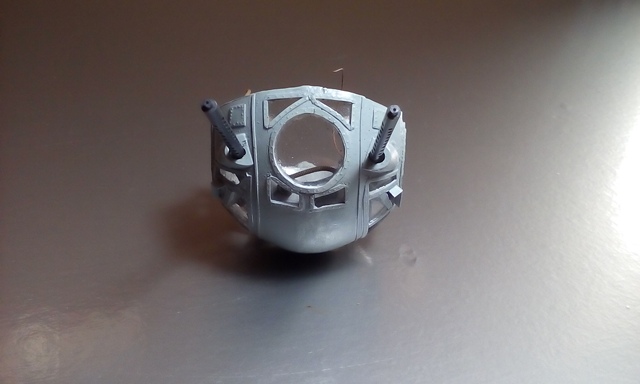
The hardest part was trying to replicate where the 50 cals go into the turret....I tried all sorts of ideas but in the end decided to use wire insulation. Very fiddly I have to say and a few attempts had to be made before I was kind of satisfied that it looked the part.
Here's a photo of me in the process of making them..............

I have done this method many times before but this time it seemed harder due to the circular shape they had to be attached to!...Each piece of insulation was 1 cm in length and had to be opened up and cut to shape.....and a small piece of plastic with a hole drilled out that will take the barrels later on........
Here you have it......
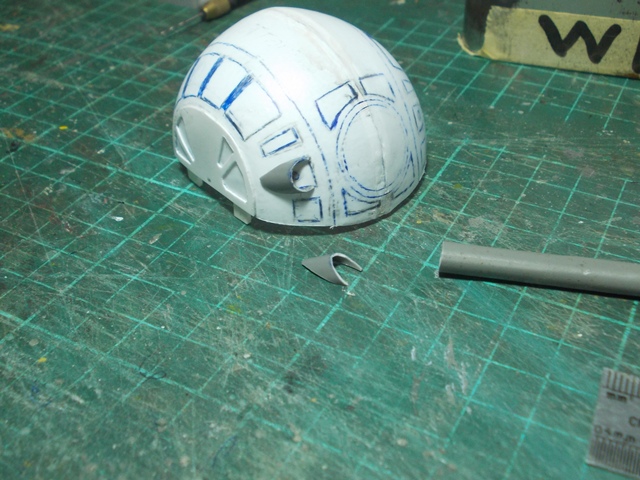
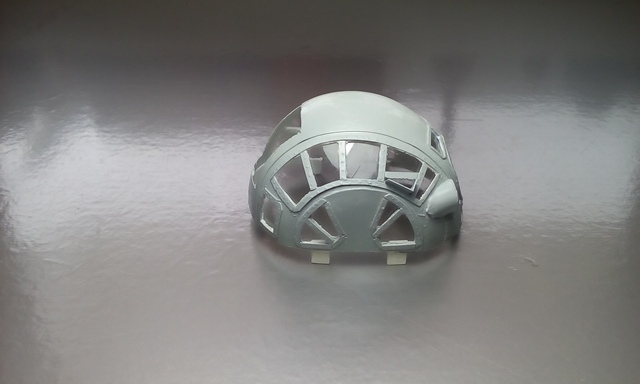
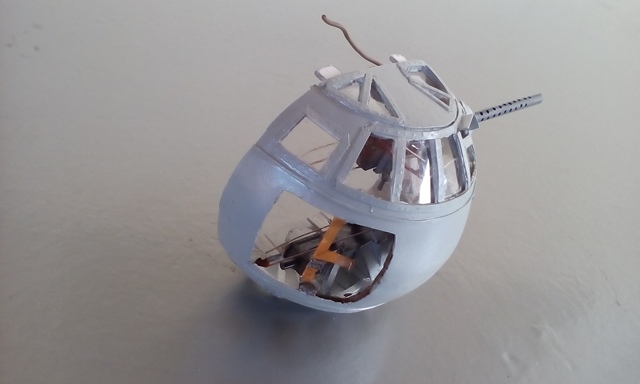
Next up was also pretty dam difficult and that was cutting out all the glazing positions.....but finally the bottom half of the turret was ready for glazing.............
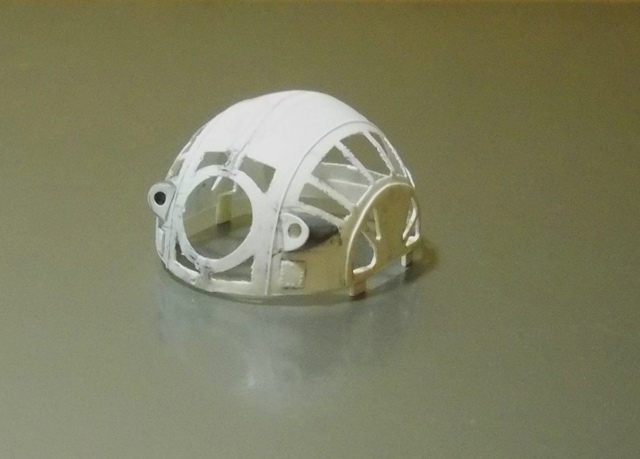
After the glazing was done using cut pieces of an old food clear packaging plastic...I then placed all the framing around the glass.
Here it is then ready to start the detailing of the interior........
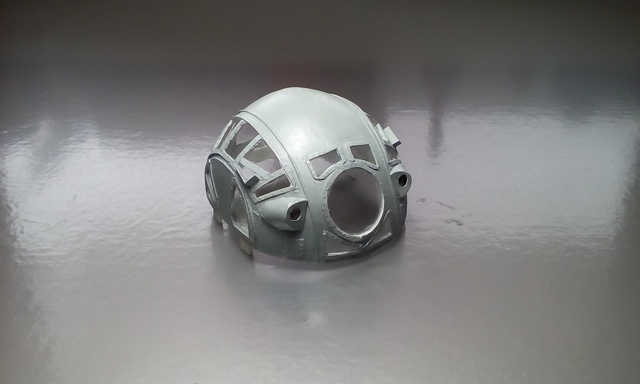
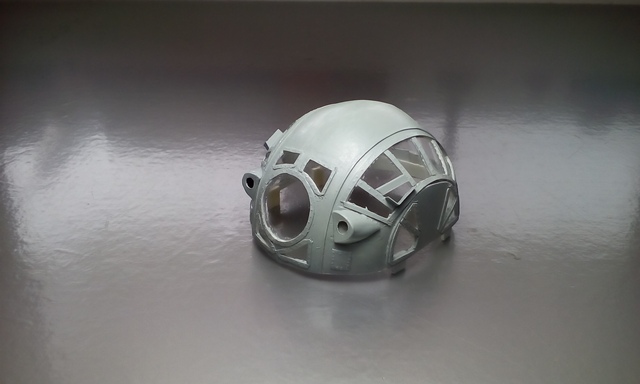
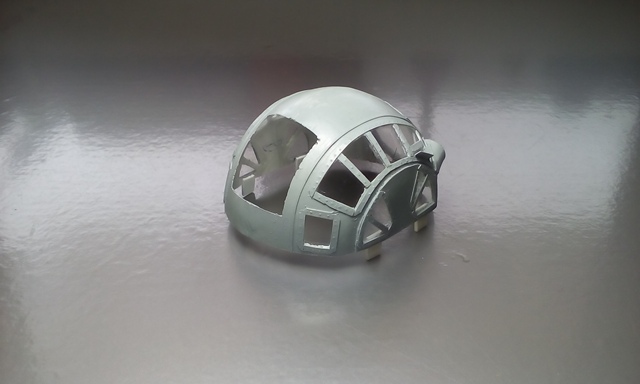
....and with the top on to give some sort of reference that it is.... in fact... supposed to be a ball turret!!!
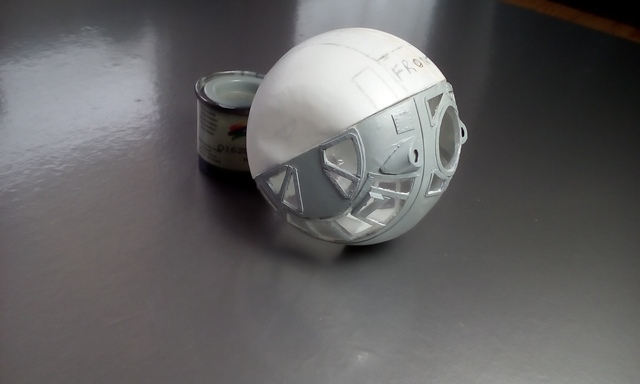
I have to say I am glad that that hurdle is over with.....although the top half will be awkward at least it wont have all that glazing!
When I started this project back in the dark ages I really wasn't going to do the entire B17G....it was just supposed to be the nose section......one of the reasons why I shied away from it is the fact that I would have to do this turret....but I guess that's what scratch building is all about....pushing your self to the limit...and this ball turret has pushed me right to the edge!! ha ha!
so......I am now going to have a go at the bottom half of the interior...so I better start looking at the 1652 photos I have as reference!!
I shall be back...and thanks for looking in!
Fozzy
Time for an up date on this Ball turret!
So after a lot of cursing the designers of this turret...namely Mr Sperry!
The hardest part was trying to replicate where the 50 cals go into the turret....I tried all sorts of ideas but in the end decided to use wire insulation. Very fiddly I have to say and a few attempts had to be made before I was kind of satisfied that it looked the part.
Here's a photo of me in the process of making them..............
I have done this method many times before but this time it seemed harder due to the circular shape they had to be attached to!...Each piece of insulation was 1 cm in length and had to be opened up and cut to shape.....and a small piece of plastic with a hole drilled out that will take the barrels later on........
Here you have it......
Next up was also pretty dam difficult and that was cutting out all the glazing positions.....but finally the bottom half of the turret was ready for glazing.............
After the glazing was done using cut pieces of an old food clear packaging plastic...I then placed all the framing around the glass.
Here it is then ready to start the detailing of the interior........
....and with the top on to give some sort of reference that it is.... in fact... supposed to be a ball turret!!!
I have to say I am glad that that hurdle is over with.....although the top half will be awkward at least it wont have all that glazing!
When I started this project back in the dark ages I really wasn't going to do the entire B17G....it was just supposed to be the nose section......one of the reasons why I shied away from it is the fact that I would have to do this turret....but I guess that's what scratch building is all about....pushing your self to the limit...and this ball turret has pushed me right to the edge!! ha ha!
so......I am now going to have a go at the bottom half of the interior...so I better start looking at the 1652 photos I have as reference!!
I shall be back...and thanks for looking in!
Fozzy
FOZZY
Visit my Facebook page https://www.facebook.com/martinfosterss ... uiltmodels
Ready for inspection.....1:24 Scale Cutaway Spifire Mk1...1:24 Scale Cutaway Ju 87B-2......1:30 scale scratch built Westland Lysander...P51D seviced in a Hangar
Visit my Facebook page https://www.facebook.com/martinfosterss ... uiltmodels
Ready for inspection.....1:24 Scale Cutaway Spifire Mk1...1:24 Scale Cutaway Ju 87B-2......1:30 scale scratch built Westland Lysander...P51D seviced in a Hangar

Re: CONTINUATION OF MY 1:20 SCALE SCRATCH BUILT B17G (RADIO
Wow.
Hoping to return to modelling sometime this year!! 
Owner of Marky's Model Emporium since 2013!.
Owner of Marky's Model Emporium since 2013!.
-
JohnRatzenberger

- Why is he so confused ?
- Posts: 15734
- Joined: April 5th, 2011, 3:42 pm
- Location: Living on a sandbar - Nags Head, NC.
Re: CONTINUATION OF MY 1:20 SCALE SCRATCH BUILT B17G (RADIO
Not much I can say, my jaw is locked in the dropped position ...
John Ratzenberger 
It's my model and I'll do what I want with it.
It's my model and I'll do what I want with it.
-
iggie
- Modelling Gent and Scholar
- Posts: 23437
- Joined: July 31st, 2013, 11:04 am
- Location: North Somercotes, Lincolnshire
- Contact:
Re: CONTINUATION OF MY 1:20 SCALE SCRATCH BUILT B17G (RADIO
Not bad.......
Only kidding; it's bloomin' awesome!
Only kidding; it's bloomin' awesome!
Best wishes
Jim
If you can walk away from a landing, it's a good landing. If you use the airplane the next day, it's an outstanding landing
"Never put off till tomorrow, what you can do the day after tomorrow"
Jim
If you can walk away from a landing, it's a good landing. If you use the airplane the next day, it's an outstanding landing
"Never put off till tomorrow, what you can do the day after tomorrow"
-
ShaunW
- NOT the sheep
- Posts: 26188
- Joined: November 26th, 2011, 6:11 pm
- Location: Pontefract West Yorkshire
Re: CONTINUATION OF MY 1:20 SCALE SCRATCH BUILT B17G (RADIO
Man alive. Undoubtedly Fozzy you are one of the best modellers I've come across. And this is proper modelling, from scratch, not kit assembling like what I do where most of the hard work has been kindly done for me by the kit manufacturer 
Doing - Tamiya 1/35th Universal Carrier.
Work is the curse of the modelling classes!
IPMS#12300
Work is the curse of the modelling classes!
IPMS#12300
-
Fozzy
- The Bug Has Well And Truly Bitten
- Posts: 291
- Joined: July 23rd, 2011, 8:25 am
- Location: S.E.Bulgaria..near the Turkish border
- Contact:
Re: CONTINUATION OF MY 1:20 SCALE SCRATCH BUILT B17G (RADIO
Thanks a lot guys...appreciate you coming along for the ride...its going to be a long ride though!!
FOZZY
Visit my Facebook page https://www.facebook.com/martinfosterss ... uiltmodels
Ready for inspection.....1:24 Scale Cutaway Spifire Mk1...1:24 Scale Cutaway Ju 87B-2......1:30 scale scratch built Westland Lysander...P51D seviced in a Hangar
Visit my Facebook page https://www.facebook.com/martinfosterss ... uiltmodels
Ready for inspection.....1:24 Scale Cutaway Spifire Mk1...1:24 Scale Cutaway Ju 87B-2......1:30 scale scratch built Westland Lysander...P51D seviced in a Hangar
-
Fozzy
- The Bug Has Well And Truly Bitten
- Posts: 291
- Joined: July 23rd, 2011, 8:25 am
- Location: S.E.Bulgaria..near the Turkish border
- Contact:
Re: CONTINUATION OF MY 1:20 SCALE SCRATCH BUILT B17G (RADIO
Hi guys
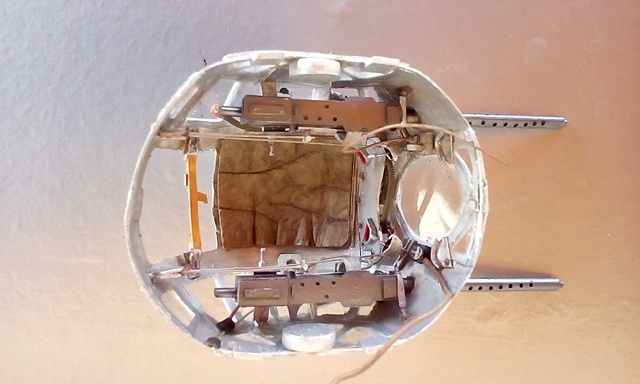
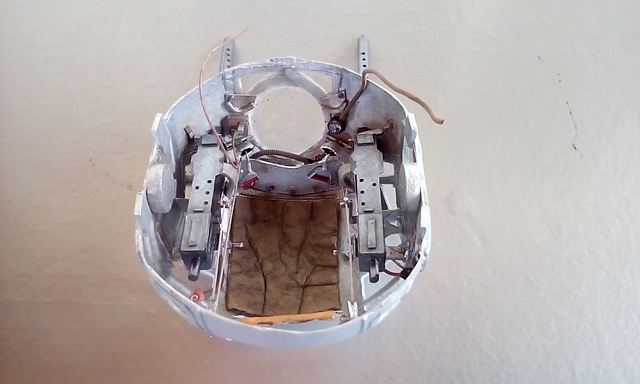
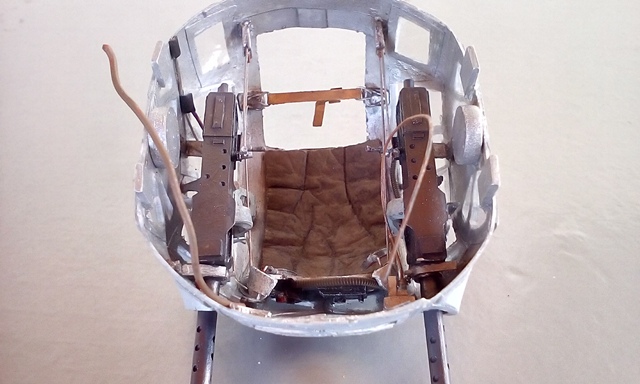
I have managed to finish detailing the lower half of the Ball turret.
I really had to think carefully how to approach doing this...because A. ..there is a hell of a lot going on in there!! and B....what I scratch build in the lower half will eventually have to marry up with the top half!.
Luckily I have of photos of "said subject" but of course no dimensions!....and so this was all done by eye balling the photos and trying to scale it in my head down to 1:20.....how ever I am used to this and this is the part of the build I love doing.
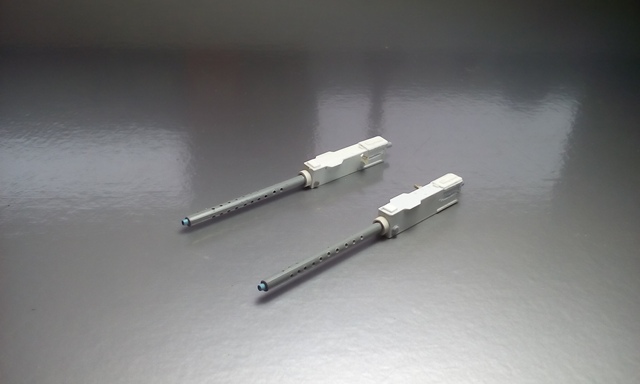
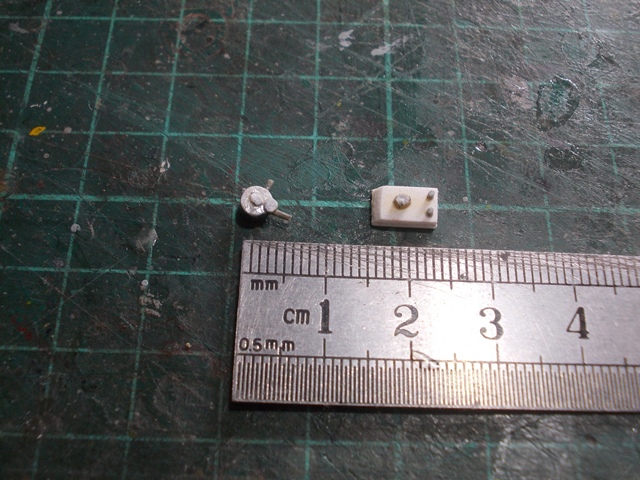
I started by building the two 50 cal Browning's.
So it was time to get out my favorite box and tin of the only materials I seem to ever use when doing this................
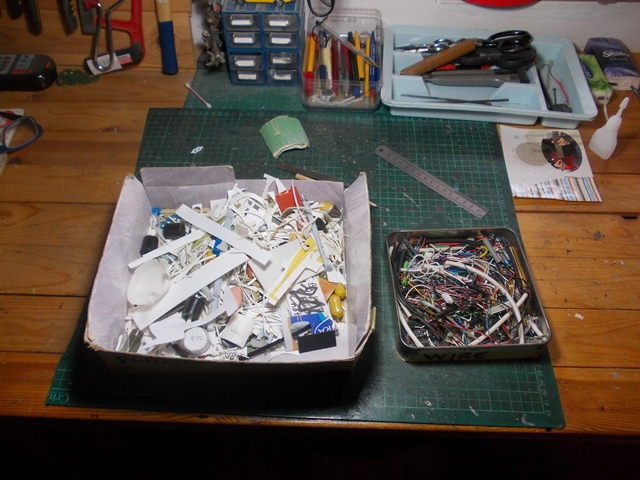
Scrap plastic and bits of wire!....and I think I used a Christmas card some where in bottom half of this turret!
So here we have the two Browning's ready for a bit of paint...
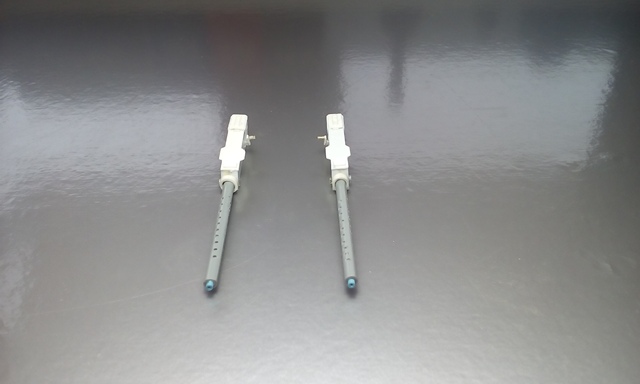
The guns were placed into the turret ..(that was a nightmare!....took ages!)...and then on with a few more parts to be scratched.
Here for example is the air regulator and heated suit unit that are tucked away in front of the armored plate that protects the gunners under cart!
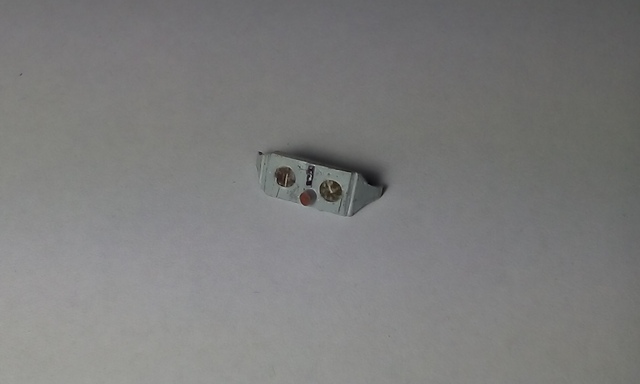
and here are the Air pressure gauges on their panel....
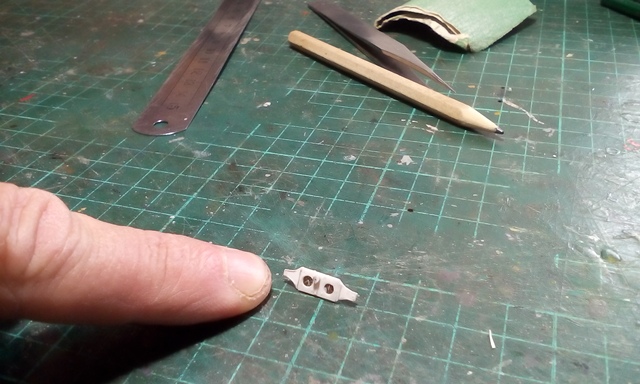
...and with a little colour attached....
There was times I built a part and then had to start all over again....mainly a scale issue...but got there in the end!
Tomorrow I will take photos of the completed bottom half and post again...its late here in Bulgaria...my bed is calling!!;)
Until tomorrow then....
Fozzy
I have managed to finish detailing the lower half of the Ball turret.
I really had to think carefully how to approach doing this...because A. ..there is a hell of a lot going on in there!! and B....what I scratch build in the lower half will eventually have to marry up with the top half!.
Luckily I have of photos of "said subject" but of course no dimensions!....and so this was all done by eye balling the photos and trying to scale it in my head down to 1:20.....how ever I am used to this and this is the part of the build I love doing.
I started by building the two 50 cal Browning's.
So it was time to get out my favorite box and tin of the only materials I seem to ever use when doing this................
Scrap plastic and bits of wire!....and I think I used a Christmas card some where in bottom half of this turret!
So here we have the two Browning's ready for a bit of paint...
The guns were placed into the turret ..(that was a nightmare!....took ages!)...and then on with a few more parts to be scratched.
Here for example is the air regulator and heated suit unit that are tucked away in front of the armored plate that protects the gunners under cart!
and here are the Air pressure gauges on their panel....
...and with a little colour attached....
There was times I built a part and then had to start all over again....mainly a scale issue...but got there in the end!
Tomorrow I will take photos of the completed bottom half and post again...its late here in Bulgaria...my bed is calling!!;)
Until tomorrow then....
Fozzy
FOZZY
Visit my Facebook page https://www.facebook.com/martinfosterss ... uiltmodels
Ready for inspection.....1:24 Scale Cutaway Spifire Mk1...1:24 Scale Cutaway Ju 87B-2......1:30 scale scratch built Westland Lysander...P51D seviced in a Hangar
Visit my Facebook page https://www.facebook.com/martinfosterss ... uiltmodels
Ready for inspection.....1:24 Scale Cutaway Spifire Mk1...1:24 Scale Cutaway Ju 87B-2......1:30 scale scratch built Westland Lysander...P51D seviced in a Hangar
-
ShaunW
- NOT the sheep
- Posts: 26188
- Joined: November 26th, 2011, 6:11 pm
- Location: Pontefract West Yorkshire
Re: CONTINUATION OF MY 1:20 SCALE SCRATCH BUILT B17G (RADIO
Lovely job of those Brownings and the details for the turret interior, Fozzy. I have similar boxes containing off-cuts of plastic card, PE and sundry other pieces of junk useful bits and pieces dotted around my lair.
Doing - Tamiya 1/35th Universal Carrier.
Work is the curse of the modelling classes!
IPMS#12300
Work is the curse of the modelling classes!
IPMS#12300
-
Fozzy
- The Bug Has Well And Truly Bitten
- Posts: 291
- Joined: July 23rd, 2011, 8:25 am
- Location: S.E.Bulgaria..near the Turkish border
- Contact:
Re: CONTINUATION OF MY 1:20 SCALE SCRATCH BUILT B17G (RADIO
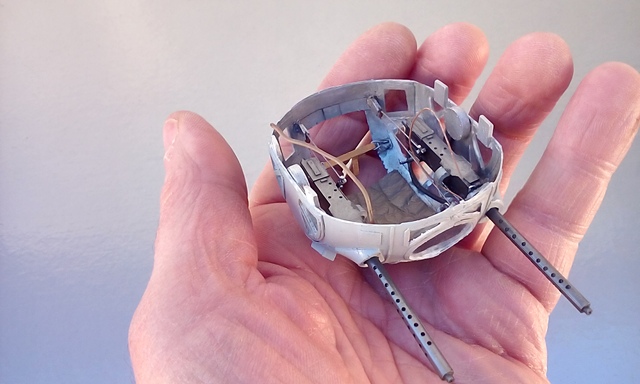
Afternoon all!
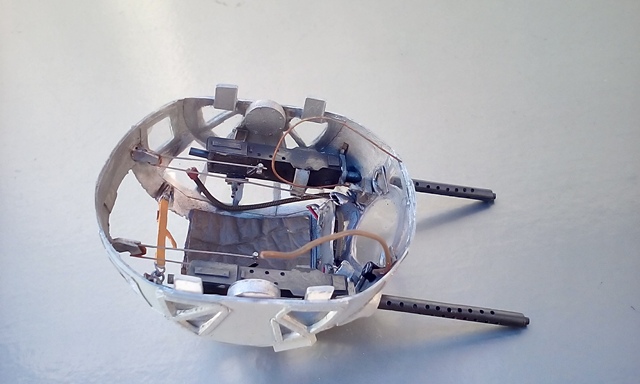
OK then.... I took photos of the bottom half of this turret this morning so that I could show you the progress that I have made so far. I have to say that I found researching the Sperry Ball Turret fascinating and it was ...and still is...pretty difficult to put it all together!...If I thought the lower section was hard it will be nothing compared to the upper half!.,..as I said in my last post it was difficult at times to know which part to scratch build first...wires and cables were hidden behind parts so I really had to think it all through!....this is my excuse in case you see any flaws...and believe me there are a few!...
But I am happy with the way it turned out....so far!
So here are the photos then......I think that the whole thing will look better when the top half is joined..........
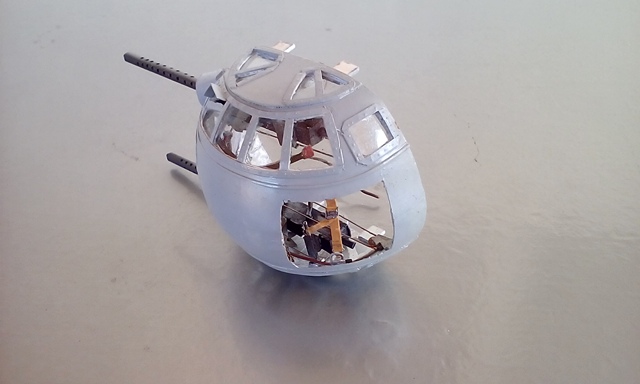
...and just so you can get an idea of the scale.......
The next few photos show all the bits and bobs that go into the lower half of the ball....
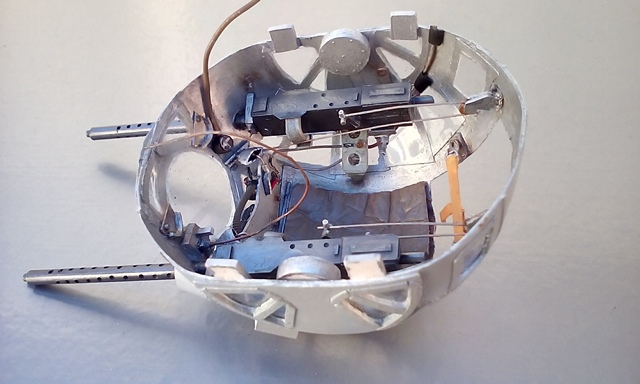
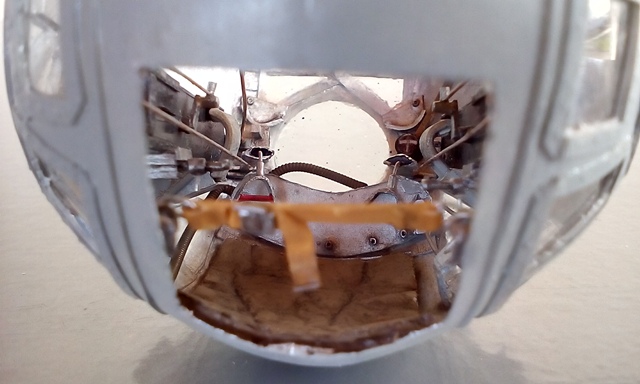
So ....thinking ahead of the upper half I think I am going to have to think outside the box on this one as so far with this project I have put the emphasis on being able to see the internal workings of the B17G.....EG...the nose section was only skinned up to the cockpit plexiglass...so you could see into the cockpit....same as the last section I built...the bomb bay...although I think I might have to re visit the bomb bay as I don't think you can see into the bay very well....and so to this radio room....and to that end this Ball turret....I think I will design it so that the top of the ball is open enabling you to see down into the ball......its a load of balls really... ...but I think you know where I'm going with this!
Unfortunately My Wife has fallen ill and I have to return to the UK for a few weeks to look after her and so I don't think I will be able to post any more up dates for a while ....might be able to slip a small one in before I go!.....this post is full of double entendre's!!
Cheers for looking in chaps
Fozzy
OK then.... I took photos of the bottom half of this turret this morning so that I could show you the progress that I have made so far. I have to say that I found researching the Sperry Ball Turret fascinating and it was ...and still is...pretty difficult to put it all together!...If I thought the lower section was hard it will be nothing compared to the upper half!.,..as I said in my last post it was difficult at times to know which part to scratch build first...wires and cables were hidden behind parts so I really had to think it all through!....this is my excuse in case you see any flaws...and believe me there are a few!...
But I am happy with the way it turned out....so far!
So here are the photos then......I think that the whole thing will look better when the top half is joined..........
...and just so you can get an idea of the scale.......
The next few photos show all the bits and bobs that go into the lower half of the ball....
So ....thinking ahead of the upper half I think I am going to have to think outside the box on this one as so far with this project I have put the emphasis on being able to see the internal workings of the B17G.....EG...the nose section was only skinned up to the cockpit plexiglass...so you could see into the cockpit....same as the last section I built...the bomb bay...although I think I might have to re visit the bomb bay as I don't think you can see into the bay very well....and so to this radio room....and to that end this Ball turret....I think I will design it so that the top of the ball is open enabling you to see down into the ball......its a load of balls really...
Unfortunately My Wife has fallen ill and I have to return to the UK for a few weeks to look after her and so I don't think I will be able to post any more up dates for a while ....might be able to slip a small one in before I go!.....this post is full of double entendre's!!
Cheers for looking in chaps
Fozzy
FOZZY
Visit my Facebook page https://www.facebook.com/martinfosterss ... uiltmodels
Ready for inspection.....1:24 Scale Cutaway Spifire Mk1...1:24 Scale Cutaway Ju 87B-2......1:30 scale scratch built Westland Lysander...P51D seviced in a Hangar
Visit my Facebook page https://www.facebook.com/martinfosterss ... uiltmodels
Ready for inspection.....1:24 Scale Cutaway Spifire Mk1...1:24 Scale Cutaway Ju 87B-2......1:30 scale scratch built Westland Lysander...P51D seviced in a Hangar
-
iggie
- Modelling Gent and Scholar
- Posts: 23437
- Joined: July 31st, 2013, 11:04 am
- Location: North Somercotes, Lincolnshire
- Contact:
Re: CONTINUATION OF MY 1:20 SCALE SCRATCH BUILT B17G (RADIO
Awesome work as ever Fozzy; even as a scale model, you can get a sense of how cramped and terrifying it must have been to be a ball turret gunner...superb work
Best wishes
Jim
If you can walk away from a landing, it's a good landing. If you use the airplane the next day, it's an outstanding landing
"Never put off till tomorrow, what you can do the day after tomorrow"
Jim
If you can walk away from a landing, it's a good landing. If you use the airplane the next day, it's an outstanding landing
"Never put off till tomorrow, what you can do the day after tomorrow"
-
Kitaholic

- Modelling Gent and Scholar
- Posts: 3765
- Joined: November 10th, 2014, 7:53 pm
- Location: 5 mins from SMW
Re: CONTINUATION OF MY 1:20 SCALE SCRATCH BUILT B17G (RADIO
Outstanding work as ever. Best wishes to your wife and a speedy recovery
Regards
Gord
Desperately trying to find his MOJO, don't know where I left it
Gord
Desperately trying to find his MOJO, don't know where I left it