1/48th Minicraft Beechcraft Bonanza V35
-
bromo

- On a long, long journey
- Posts: 1249
- Joined: May 2nd, 2011, 7:05 pm
- Location: Wolverhampton,England
Re: 1/48th Minicraft Beechcraft Bonanza V35
ooooooh Shaun more filler, how much did you pay for this load per tonne?  i hear the price is coming down.Seriously though its coming along very nicely,and makes a change from things with jets and guns.
BEEN A WHILE
-
ShaunW
- NOT the sheep
- Posts: 26188
- Joined: November 26th, 2011, 6:11 pm
- Location: Pontefract West Yorkshire
Re: 1/48th Minicraft Beechcraft Bonanza V35
Cheers Bromo, I seem to be attracted to kits that require filler by the ton, I suppose it's because most of my stash is from the last century  It does make a change to build something non-warlike, but the techniques are all the same. Despite the poor fit in parts and the appetite for nose weight, this isn't a bad kit and I'm enjoying the build. I'm going to have to try a bit of re-scribing though to replace some the panel line detail that is inevitably going to bite the dust. Less sanding and filler than the 747 though!
Doing - Tamiya 1/35th Universal Carrier.
Work is the curse of the modelling classes!
IPMS#12300
Work is the curse of the modelling classes!
IPMS#12300
-
ShaunW
- NOT the sheep
- Posts: 26188
- Joined: November 26th, 2011, 6:11 pm
- Location: Pontefract West Yorkshire
Re: 1/48th Minicraft Beechcraft Bonanza V35
The first round of sanding is now complete. The fuse join feels smooth to the Mark I finger, the part that appears as a dark line in the pics, is over the painted areas of the cabin.
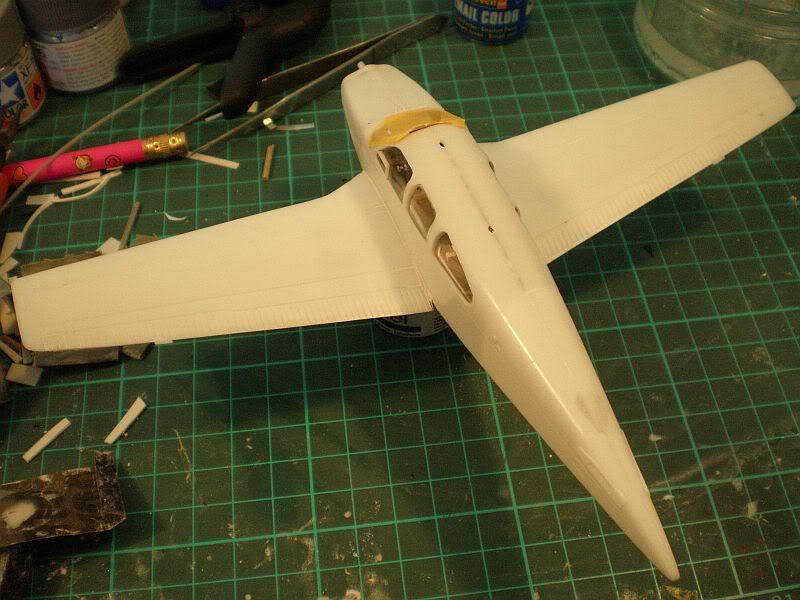
I've now managed to blend in the wingtip underside joins, there was quite a gap and a step on both sides and ditto the underside wing/fuselage join, which also had a pronounced step.
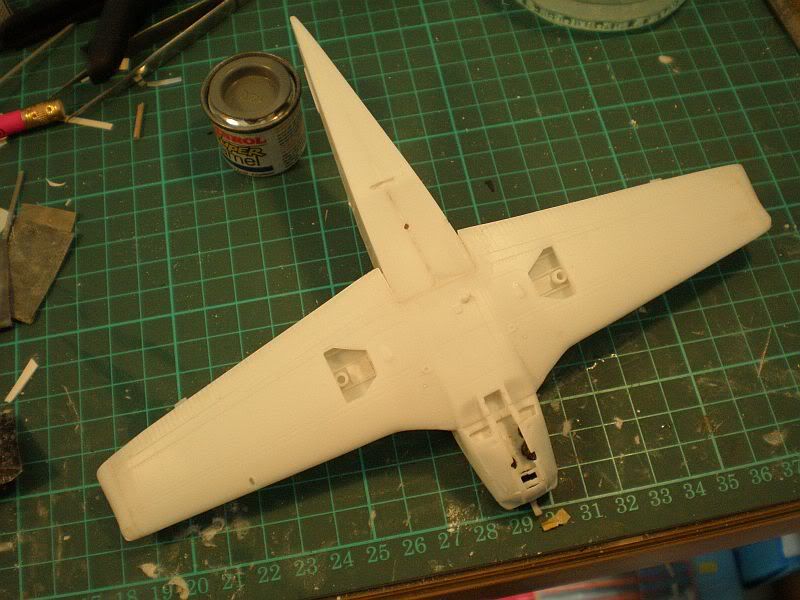
At the front, the engine bay hood still needs a little bit of work, especially on the starboard side, but it's not far off. The first coat of paint will reveal any further work required.

Of course, as a result of this sanding work I have lost detail, especially on the upper fuselage spine. I've lost the upper nav light and a small air scoop above the front of the cabin. I'll figure out a replacement for the air scoop out of something or other. The nav beacon will be replaced by clear sprue, he says with conviction never actually having tried that before. In this scale I think clear sprue for the nav lights, painted with Tamiya clear colours will look more convincing than solid colours painted over the white plastic. So I'm also going to cut out the wing tip nav lights and the ventral nav light and have a go at clear replacements also. The rear dorsal intake thingy between the tails needs a bit of work as well, probably drilling out, though I'll have to be careful not to open the fuse join. In addition, I've also lost some panel line detail and I'll have a go at rescribing that. The front screen will be left out until the painting is finished. I've checked the fit and it is OK. Leaving this item out allows some access into the cabin so that I have at least a chance of removing any stray sanding debris and replacing any of the windows should they get pushed in during masking etc (fingers crossed that won't happen of course!).
Thanks for looking.
I've now managed to blend in the wingtip underside joins, there was quite a gap and a step on both sides and ditto the underside wing/fuselage join, which also had a pronounced step.
At the front, the engine bay hood still needs a little bit of work, especially on the starboard side, but it's not far off. The first coat of paint will reveal any further work required.
Of course, as a result of this sanding work I have lost detail, especially on the upper fuselage spine. I've lost the upper nav light and a small air scoop above the front of the cabin. I'll figure out a replacement for the air scoop out of something or other. The nav beacon will be replaced by clear sprue, he says with conviction never actually having tried that before. In this scale I think clear sprue for the nav lights, painted with Tamiya clear colours will look more convincing than solid colours painted over the white plastic. So I'm also going to cut out the wing tip nav lights and the ventral nav light and have a go at clear replacements also. The rear dorsal intake thingy between the tails needs a bit of work as well, probably drilling out, though I'll have to be careful not to open the fuse join. In addition, I've also lost some panel line detail and I'll have a go at rescribing that. The front screen will be left out until the painting is finished. I've checked the fit and it is OK. Leaving this item out allows some access into the cabin so that I have at least a chance of removing any stray sanding debris and replacing any of the windows should they get pushed in during masking etc (fingers crossed that won't happen of course!).
Thanks for looking.
Doing - Tamiya 1/35th Universal Carrier.
Work is the curse of the modelling classes!
IPMS#12300
Work is the curse of the modelling classes!
IPMS#12300
-
ShaunW
- NOT the sheep
- Posts: 26188
- Joined: November 26th, 2011, 6:11 pm
- Location: Pontefract West Yorkshire
Re: 1/48th Minicraft Beechcraft Bonanza V35
I've made a little bit of early week progress with this, so thought I'd share it with you. Anything to get a bit of GA back to the top of the page
As I mentioned earlier, rather than paint the moulded wingtip lights I thought I'd replace them with clear sprue, which if done..er.. properly (don't look at me!) looks better in the larger scales IMHO. To that end, I took my razor saw and small files to the moulded on wingtip lights and cut them out and then fitted in some of the model's own clear sprue, which will subsequently be shaped and polished back to a degree of clarity before being painted with Tamiya clear paints. He hopes. I've never actually tried this before but have seen others do it so why not have a go? how hard can it be? If it all goes belly up then I'll have to get the filler out!
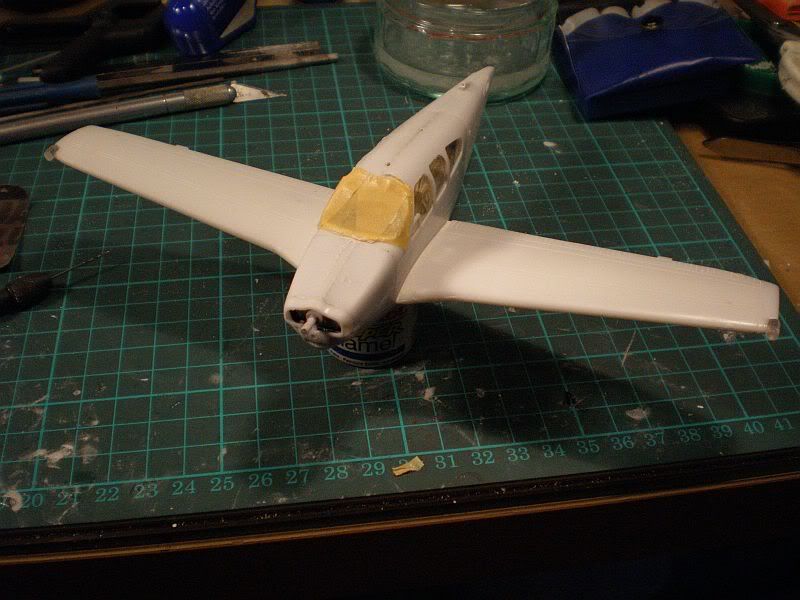
I have also previously mentioned the rear air scoop, which is not brilliant OOB. I decided to sand it back and thereafter fitted a small piece of square section strip, which I had drilled out beforehand, to the front of the remaining stub. I then shaped the intake entrance a little more and blended the attached section with the remains of the moulded scoop using a bit of filler and wet and dry paper.
I think the result is a bit more convincing.
Thanks for looking (and I know someone is because the viewing count keeps steadily rising )
As I mentioned earlier, rather than paint the moulded wingtip lights I thought I'd replace them with clear sprue, which if done..er.. properly (don't look at me!) looks better in the larger scales IMHO. To that end, I took my razor saw and small files to the moulded on wingtip lights and cut them out and then fitted in some of the model's own clear sprue, which will subsequently be shaped and polished back to a degree of clarity before being painted with Tamiya clear paints. He hopes. I've never actually tried this before but have seen others do it so why not have a go? how hard can it be?
I have also previously mentioned the rear air scoop, which is not brilliant OOB. I decided to sand it back and thereafter fitted a small piece of square section strip, which I had drilled out beforehand, to the front of the remaining stub. I then shaped the intake entrance a little more and blended the attached section with the remains of the moulded scoop using a bit of filler and wet and dry paper.
I think the result is a bit more convincing.
Thanks for looking (and I know someone is because the viewing count keeps steadily rising
Doing - Tamiya 1/35th Universal Carrier.
Work is the curse of the modelling classes!
IPMS#12300
Work is the curse of the modelling classes!
IPMS#12300
-
bromo
- On a long, long journey
- Posts: 1249
- Joined: May 2nd, 2011, 7:05 pm
- Location: Wolverhampton,England
Re: 1/48th Minicraft Beechcraft Bonanza V35
I'm looking Shaun, more good progress being made,there may be something in this GA thing.
BEEN A WHILE
-
ShaunW
- NOT the sheep
- Posts: 26188
- Joined: November 26th, 2011, 6:11 pm
- Location: Pontefract West Yorkshire
Re: 1/48th Minicraft Beechcraft Bonanza V35
Thanks boys, sometimes building something like this feels like the loneliness of the long distance runner . Bruce you may certainly comment, but only if you're going to tell me how ace it looks 
Doing - Tamiya 1/35th Universal Carrier.
Work is the curse of the modelling classes!
IPMS#12300
Work is the curse of the modelling classes!
IPMS#12300
-
MerlinJones
Re: 1/48th Minicraft Beechcraft Bonanza V35
It looks really ace, Shaun.
...Or at least it will, when it's eventually finished!
...Or at least it will, when it's eventually finished!

Re: 1/48th Minicraft Beechcraft Bonanza V35
That's looking damn fine. All credit to you Shaun for getting this old kit into such a great looking model so far. Can't wait to see the finished article.
All the best.
Greg
All the best.
Greg
Two things are infinite: the universe and human stupidity; and I'm not sure about the the universe.
The difference between stupidity and genius is that genius has its limits.
Albert Einstein
The difference between stupidity and genius is that genius has its limits.
Albert Einstein
-
ShaunW
- NOT the sheep
- Posts: 26188
- Joined: November 26th, 2011, 6:11 pm
- Location: Pontefract West Yorkshire
Re: 1/48th Minicraft Beechcraft Bonanza V35
Thanks for your kind comments boys, I needed cheering up having got off to a pretty uber rubbish start to the working week  I won't bore you with the details, but I've had better days in the office! Managed to spend a bit of time tonight shaping the wing tip navigation lights and now I think it's time to start moving on to masking and painting.
Doing - Tamiya 1/35th Universal Carrier.
Work is the curse of the modelling classes!
IPMS#12300
Work is the curse of the modelling classes!
IPMS#12300
-
ShaunW
- NOT the sheep
- Posts: 26188
- Joined: November 26th, 2011, 6:11 pm
- Location: Pontefract West Yorkshire
Re: 1/48th Minicraft Beechcraft Bonanza V35
My goodness, this has been a slow modelling week, even by my pedestrian standards!
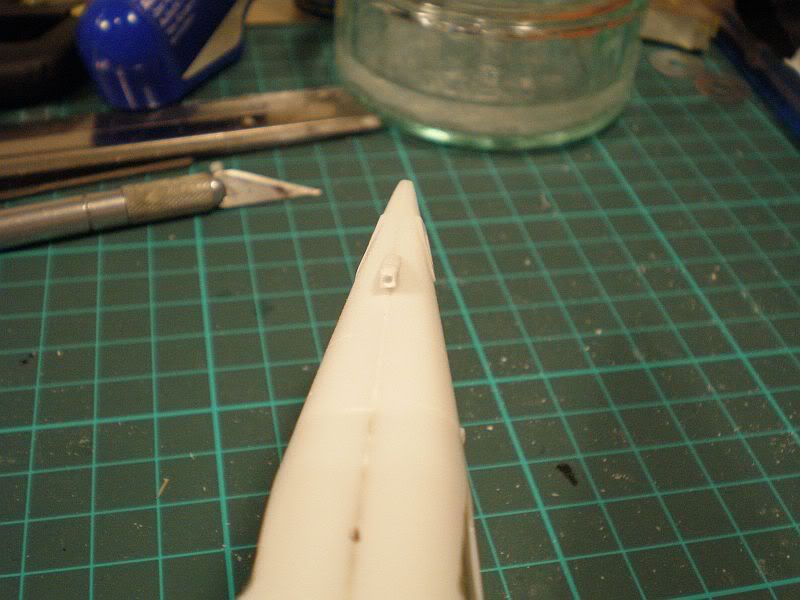
Not a great deal to show, but I have managed to complete my first attempt at wing tip nav lights made out of clear sprue. Earlier pics on this thread depict the sprue, which was cylindrical in shape and was firmly glued into cut-outs in the wingtips, thereby replacing the moulded-in detail. After careful sanding, a degree of clarity was restored to the sprue using Micromesh and Micromesh polishing compound. These clear areas will be masked using Maskol during the painting process and will thereafter be painted using clear red and green Tamiya acrylics. Overall, I think the effect will be an improvement over OOB.
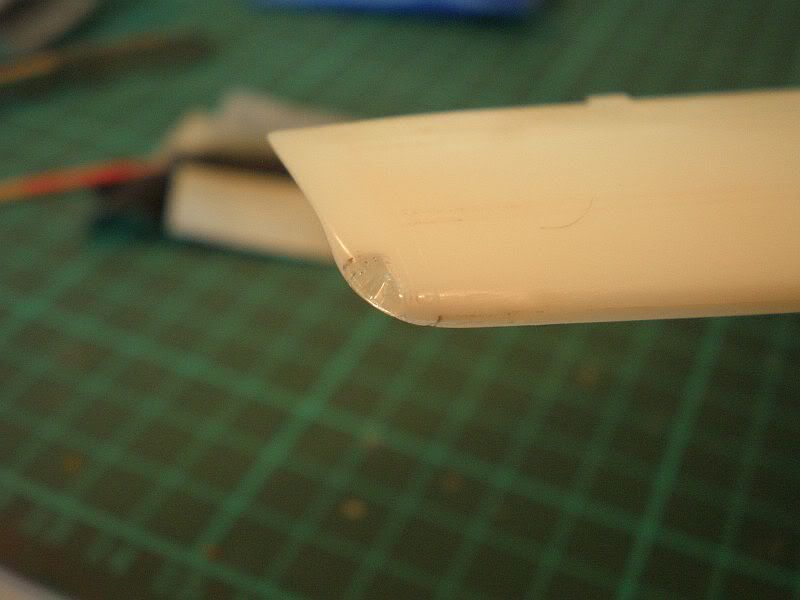
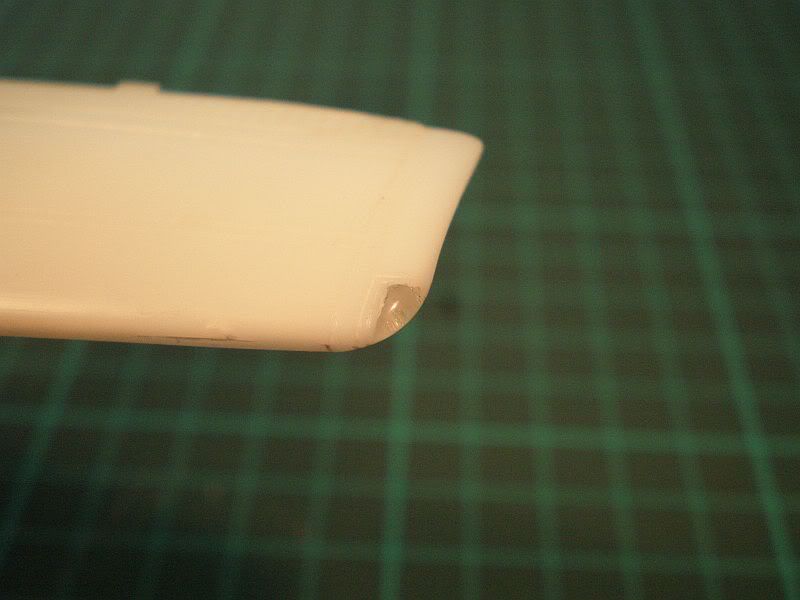
I will also be replacing the ventral and dorsal nav lights and will be using some other clear sprue pictured below, which I saved for the shape thinking that it would make decent nav lights at some point. The pieces are quite small, the pic has been taken with the camera on a macro setting - each of the background squares on my cutting mat is 1cm square. I will cut one of these pieces in half, to create two dome shapes and sand to final shape before restoring clarity as per the wingtip lights and again will colour them using clear Tamiya acrylics.

I've also dealt with cleaning filler out of the panel lines using a needle chucked into a pin vice, a pretty onerous task but one that is worthwhile. Using the same needle and pin vice I also touched up some of the panel lines with a bit of light rescribing. Next up will be to deal with the window masking and then to start applying the paint.
Thanks for looking.
Not a great deal to show, but I have managed to complete my first attempt at wing tip nav lights made out of clear sprue. Earlier pics on this thread depict the sprue, which was cylindrical in shape and was firmly glued into cut-outs in the wingtips, thereby replacing the moulded-in detail. After careful sanding, a degree of clarity was restored to the sprue using Micromesh and Micromesh polishing compound. These clear areas will be masked using Maskol during the painting process and will thereafter be painted using clear red and green Tamiya acrylics. Overall, I think the effect will be an improvement over OOB.
I will also be replacing the ventral and dorsal nav lights and will be using some other clear sprue pictured below, which I saved for the shape thinking that it would make decent nav lights at some point. The pieces are quite small, the pic has been taken with the camera on a macro setting - each of the background squares on my cutting mat is 1cm square. I will cut one of these pieces in half, to create two dome shapes and sand to final shape before restoring clarity as per the wingtip lights and again will colour them using clear Tamiya acrylics.
I've also dealt with cleaning filler out of the panel lines using a needle chucked into a pin vice, a pretty onerous task but one that is worthwhile. Using the same needle and pin vice I also touched up some of the panel lines with a bit of light rescribing. Next up will be to deal with the window masking and then to start applying the paint.
Thanks for looking.
Doing - Tamiya 1/35th Universal Carrier.
Work is the curse of the modelling classes!
IPMS#12300
Work is the curse of the modelling classes!
IPMS#12300
-
bromo
- On a long, long journey
- Posts: 1249
- Joined: May 2nd, 2011, 7:05 pm
- Location: Wolverhampton,England
Re: 1/48th Minicraft Beechcraft Bonanza V35
Thats coming along very nicely Shaun,you are doing a great job on her.
BEEN A WHILE
-
MerlinJones
Re: 1/48th Minicraft Beechcraft Bonanza V35
Although relatively tiny, those laights will stand out well, especially on your huge 1/48 model.
Good work so far.
Regards,
Bruce
Good work so far.
Regards,
Bruce
-
ShaunW
- NOT the sheep
- Posts: 26188
- Joined: November 26th, 2011, 6:11 pm
- Location: Pontefract West Yorkshire
Re: 1/48th Minicraft Beechcraft Bonanza V35
Thanks boys.
That's the joy of macro Bruce, it makes everything so much bigger, well almost everything
That's the joy of macro Bruce, it makes everything so much bigger, well almost everything
Doing - Tamiya 1/35th Universal Carrier.
Work is the curse of the modelling classes!
IPMS#12300
Work is the curse of the modelling classes!
IPMS#12300