Airfix 1/72 Mitsubishi Dinah **FINISHED**
Moderator: JamesPerrin

Re: Airfix 1/72 Mitsubishi Dinah
Looks really nice James. I like the tiny efforts you did. It will be a magnificent view if it's all pieced together!
2012 A:02 B:29 C:00
On the bench : Buccaneer // B-52D // 1/48 Lancaster
Coming up : Spitfire XIV (SKGB)
On the bench : Buccaneer // B-52D // 1/48 Lancaster
Coming up : Spitfire XIV (SKGB)
-
JamesPerrin

- Looks like his avatar
- Posts: 13686
- Joined: April 5th, 2011, 8:09 pm
- Location: W. Yorkshire
- Contact:
Re: Airfix 1/72 Mitsubishi Dinah
Made a start on my base. I've decided to go for curves this year.
A frame was made made of 5mm foam board. The pieces were glued together with woodglue - many as it was to hand and not as wet as some PVAs. The grid lines on your cutting board are really handy for keeping everything square. The horizontal braces were strategically placed to 1) attached the backdrop card too and 2) form the basis of the supports for the models.
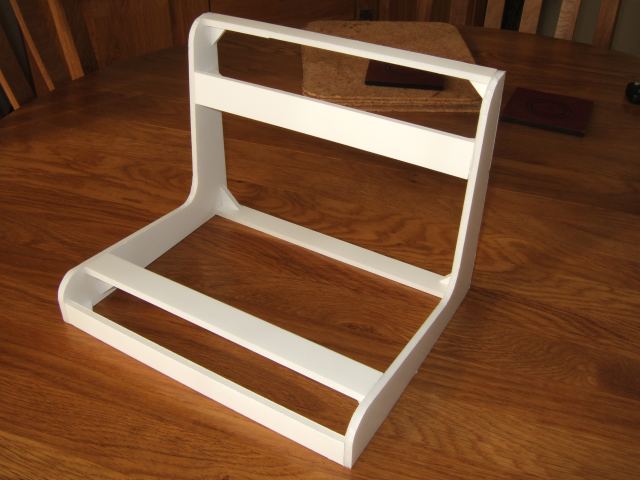
I still had some nice thickish card left over from last year's builds. I put some curves in it in the appropriate places by drawing it over the edge of the table. It was then attached to the frame using double sided sticky tape on the horizontal braces and wood glue along the edges. The bits of tape are just holding the edges down while it dries.
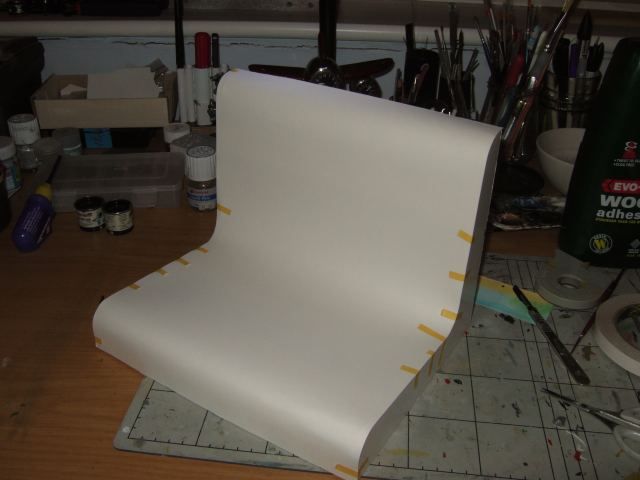
While that set I've got on with the huts, the results of which I'll post next time
A frame was made made of 5mm foam board. The pieces were glued together with woodglue - many as it was to hand and not as wet as some PVAs. The grid lines on your cutting board are really handy for keeping everything square. The horizontal braces were strategically placed to 1) attached the backdrop card too and 2) form the basis of the supports for the models.
I still had some nice thickish card left over from last year's builds. I put some curves in it in the appropriate places by drawing it over the edge of the table. It was then attached to the frame using double sided sticky tape on the horizontal braces and wood glue along the edges. The bits of tape are just holding the edges down while it dries.
While that set I've got on with the huts, the results of which I'll post next time
Classic British Kits SIG Leader Better to fettle than to fill
(2024 A:B 5:2) (2023 13:8:7) (2022 21:11) (2021 15:8) (2020 8:4:4)
(2024 A:B 5:2) (2023 13:8:7) (2022 21:11) (2021 15:8) (2020 8:4:4)
-
JamesPerrin
- Looks like his avatar
- Posts: 13686
- Joined: April 5th, 2011, 8:09 pm
- Location: W. Yorkshire
- Contact:
Re: Airfix 1/72 Mitsubishi Dinah
Bumper issue tonight!
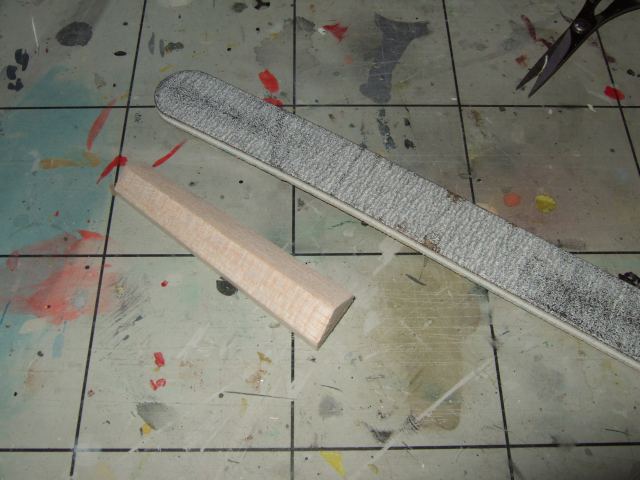
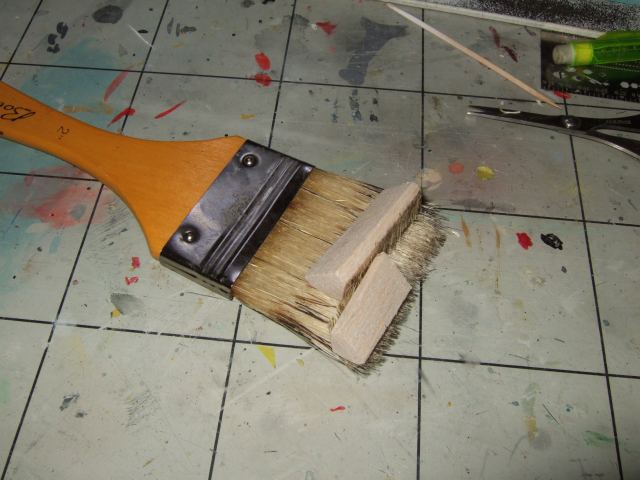
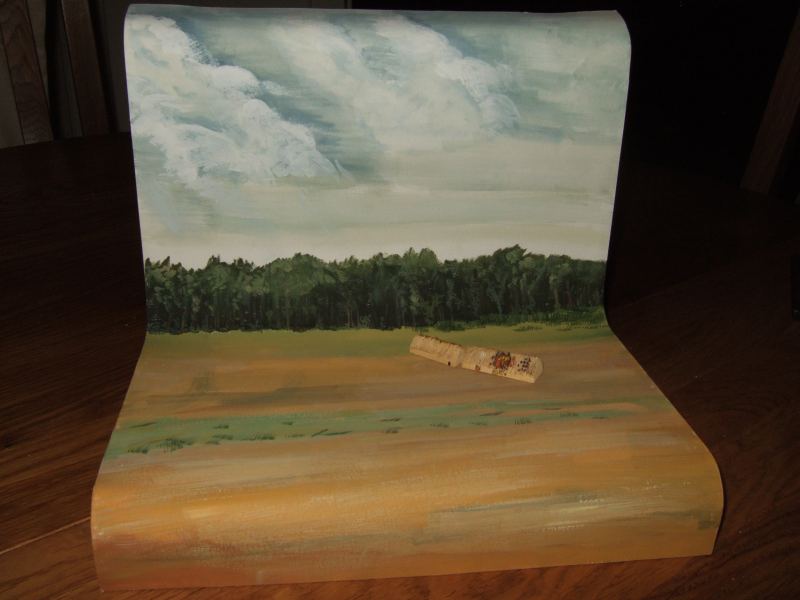
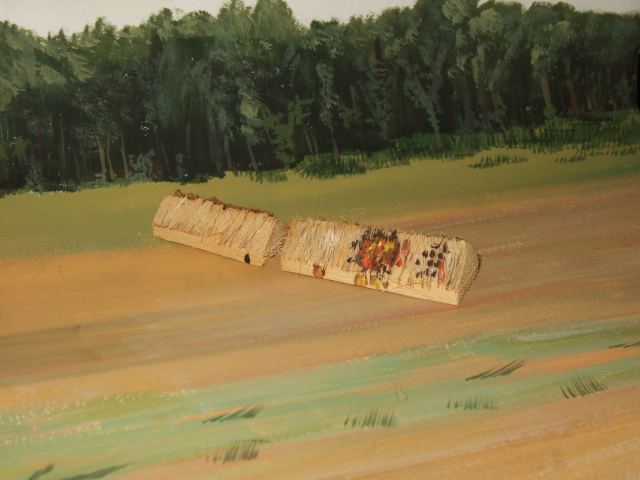
First up, hut building and thatching. Some basic shapes were cut and sanded from balsa wood. A perspective tapering was used to give the illusion of depth. I then glue the roofs to an old cheap paint brush which had straw coloured bristles. When the glue had set I cut the huts out and trimmed their thatch, then repeated the process on the other side. Some bald spots needed touching up by hand later but I just wanted to give the impression of straw/reed roof so didn't get too obsessed. These got painted up when I did the back drop, see below.
Last year I used water colours to produce the washed out skies for my builds. This worked really well except that the card buckled a bit due to the moisture of the the washes. This year with a more complex backdrop I decided I needed I need more opaque paints that wouldn't transfer so much water onto the card. I managed to pick up some Gouache paints (thick opaque water colours) for 4 pounds including two free brushes from a stationary shop. I've not used these before so this was a bit of an experiment for me. Though I rarely paint I'm more familiar with using water colours from GCSE Art.
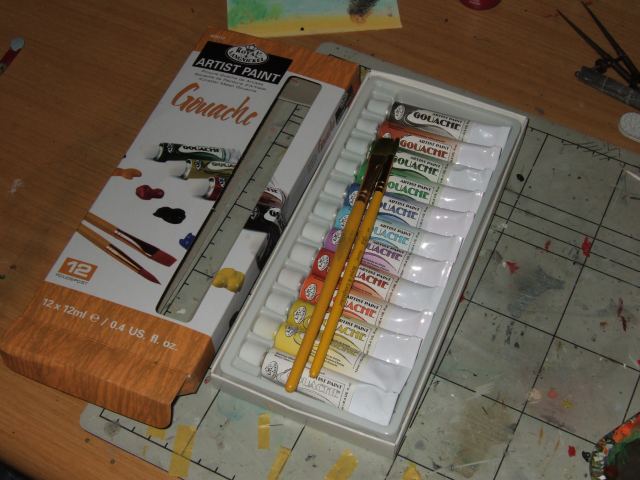
The ground when on well, but the sky needed a lot of work. Thankfully you can build up layers with this kind of paint (like oils and acrylics) so you can keep working until you get it right whereas with regular water colours you need to paint the final image from the start. Eventually it start to look right and I'm reasonable pleased with the result. The forest was much easier to accomplish, dark green base, add tree trunks and then stipple the leaves and looks the most effective.
First up, hut building and thatching. Some basic shapes were cut and sanded from balsa wood. A perspective tapering was used to give the illusion of depth. I then glue the roofs to an old cheap paint brush which had straw coloured bristles. When the glue had set I cut the huts out and trimmed their thatch, then repeated the process on the other side. Some bald spots needed touching up by hand later but I just wanted to give the impression of straw/reed roof so didn't get too obsessed. These got painted up when I did the back drop, see below.
Last year I used water colours to produce the washed out skies for my builds. This worked really well except that the card buckled a bit due to the moisture of the the washes. This year with a more complex backdrop I decided I needed I need more opaque paints that wouldn't transfer so much water onto the card. I managed to pick up some Gouache paints (thick opaque water colours) for 4 pounds including two free brushes from a stationary shop. I've not used these before so this was a bit of an experiment for me. Though I rarely paint I'm more familiar with using water colours from GCSE Art.
The ground when on well, but the sky needed a lot of work. Thankfully you can build up layers with this kind of paint (like oils and acrylics) so you can keep working until you get it right whereas with regular water colours you need to paint the final image from the start. Eventually it start to look right and I'm reasonable pleased with the result. The forest was much easier to accomplish, dark green base, add tree trunks and then stipple the leaves and looks the most effective.
Classic British Kits SIG Leader Better to fettle than to fill
(2024 A:B 5:2) (2023 13:8:7) (2022 21:11) (2021 15:8) (2020 8:4:4)
(2024 A:B 5:2) (2023 13:8:7) (2022 21:11) (2021 15:8) (2020 8:4:4)
-
Jagewa

- Modelling Gent and Scholar
- Posts: 2752
- Joined: April 6th, 2011, 2:18 am
- Location: Christchurch, New Zealand
- Contact:
Re: Airfix 1/72 Mitsubishi Dinah
Holly shmollies, I hope you "rarely paint" more often, don't sell yourself short, that is bloody lovely.
Great info on using gouche paints.
Cheers
Jim
Great info on using gouche paints.
Cheers
Jim
-
Nax

- Modelling Gent and Scholar
- Posts: 1193
- Joined: December 26th, 2011, 2:09 am
- Location: Wagga, Australia
Re: Airfix 1/72 Mitsubishi Dinah
First time I've looked in on this part of the forum, excellent work Mr Perrin, very inspiring stuff, can't wait to see the finished product.
Steve/Nax
Enjoying trying to make them look real.
Enjoying trying to make them look real.
-
JamesPerrin
- Looks like his avatar
- Posts: 13686
- Joined: April 5th, 2011, 8:09 pm
- Location: W. Yorkshire
- Contact:
Re: Airfix 1/72 Mitsubishi Dinah
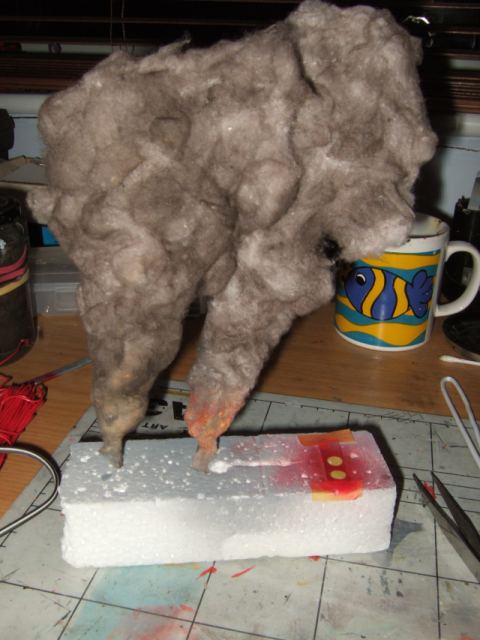
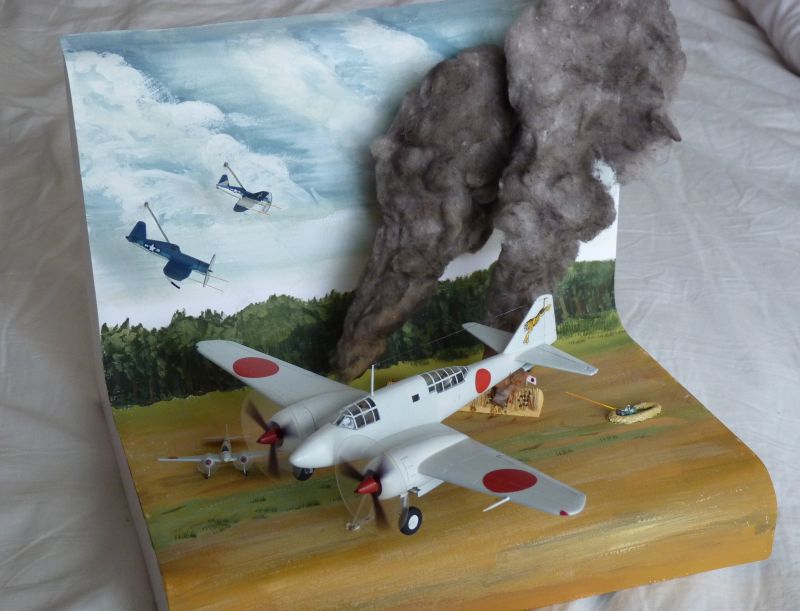
There is s lot of smoke in this scene and I quickly decided to go down the cotton wool route. I had no other ideas and looked very effective on Matt's Apollo splash down scene last year. My thoughts were on how to colour the cotton wool. I've tried using chalk pastel dust which despite begin messy has worked out pretty well.
Some sheets of cotton wool were pulled out to the require shapes and the liberally coated with black and brown dust which was patted into the wool. This was repeated until I got the colour density I was after. Some tweezers were used to tease out the cotton wool as it had got rather flattened in the process and I want to capture to billowing effect in the box art.
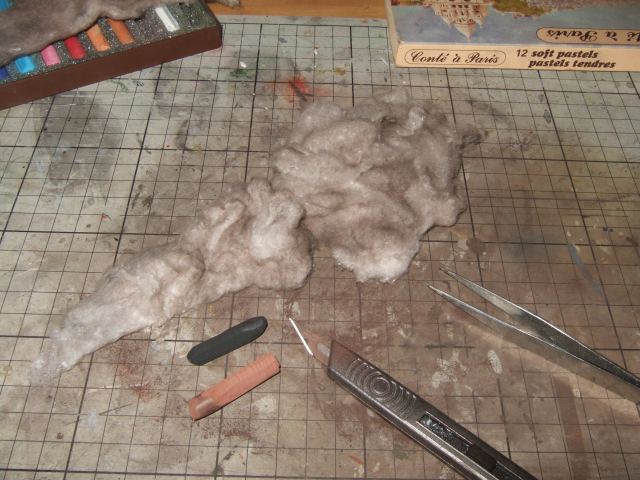
The 'smoke' was then sprayed with some cheap hairspray - I think I had this lying around for 'fixing' the pastels anyway.
Finally some wire armatures threaded into the wool and glued in position so that they stand up.
Some sheets of cotton wool were pulled out to the require shapes and the liberally coated with black and brown dust which was patted into the wool. This was repeated until I got the colour density I was after. Some tweezers were used to tease out the cotton wool as it had got rather flattened in the process and I want to capture to billowing effect in the box art.
The 'smoke' was then sprayed with some cheap hairspray - I think I had this lying around for 'fixing' the pastels anyway.
Finally some wire armatures threaded into the wool and glued in position so that they stand up.
Classic British Kits SIG Leader Better to fettle than to fill
(2024 A:B 5:2) (2023 13:8:7) (2022 21:11) (2021 15:8) (2020 8:4:4)
(2024 A:B 5:2) (2023 13:8:7) (2022 21:11) (2021 15:8) (2020 8:4:4)
-
TomW

- Modelling Gent and Scholar
- Posts: 2279
- Joined: May 1st, 2011, 8:09 am
- Location: Devizes, Wiltshire
Re: Airfix 1/72 Mitsubishi Dinah
That looks great James, I cant wait to see this on the stand. Only 19 days to go now 
Regards
Tom
Regards
Tom
Veni, Venari, Vamoosi
Coastal Command SIG Leader 2012 - 2016
We'll call him Dinghy Watts...... - Paul Bradley
2016 A:B = 29:11
2015 A:B = 38:14
2014 A:B = 25:9
2013 A:B = 20:17
2012 A:B = I didn't keep score
2011 A:B = 39:11
2010 A:B = 51:10
Coastal Command SIG Leader 2012 - 2016
We'll call him Dinghy Watts...... - Paul Bradley
2016 A:B = 29:11
2015 A:B = 38:14
2014 A:B = 25:9
2013 A:B = 20:17
2012 A:B = I didn't keep score
2011 A:B = 39:11
2010 A:B = 51:10
-
mightymikeD

- …can't ever get enough Spitfires
- Posts: 1616
- Joined: July 31st, 2012, 12:30 am
- Location: London
Re: Airfix 1/72 Mitsubishi Dinah
Gobsmacked is the only word... I'm hoping to to be able to pop up to Telford for at least a day (work may scupper this) and can't wait to see this in the flesh..
Bravo!
Bravo!
Let's Go Hawks!/Allons 'Awks!
A:B=24:28
A:B=24:28

Re: Airfix 1/72 Mitsubishi Dinah
Brilliant, James... the painting really looks the business. What a neat idea for the thatching, as well.
bestest,
M.
bestest,
M.

Re: Airfix 1/72 Mitsubishi Dinah
Fantastic job, James!
Your attention to detail in all areas is most impressive.
regards,
Martin
Your attention to detail in all areas is most impressive.
regards,
Martin
-
JamesPerrin
- Looks like his avatar
- Posts: 13686
- Joined: April 5th, 2011, 8:09 pm
- Location: W. Yorkshire
- Contact:
Re: Airfix 1/72 Mitsubishi Dinah
After prep'ing and painting the back room for 6 hours there isn't a lot of time left or energy for modelling. I've however managed to get a a lot if the final details sorted out most of them involving stretched sprue.
Two anti-aircraft gun emplacements had been created with milliput. The men and machineguns were very simply drawn on card with colouring pencils and then cut out.
Machine guns bursts on the anti-aircraft and Corsairs were all made from white sprue which was then painted flame yellow and orange. The sprue also made the flag pole.
The larger Corsair is dropping a bomb. Rather than fiddling with a tiny bomb and wires to hang it by I stretched some clear sprue and bent it into a curve while still soft. One end is glued to the underside of the a/c the other painted black to represent the bomb.
The burning Dinah was made quickly from scrap plastic - I've not even painted it apart from the roundel. I needed a fireball to added to it from which the smoke will emanate. After playing around I found that pulling expanded polystyrene apart created nice shapes and would really work well for larger fireballs. I only needed a tiny one but it's something worth trying.
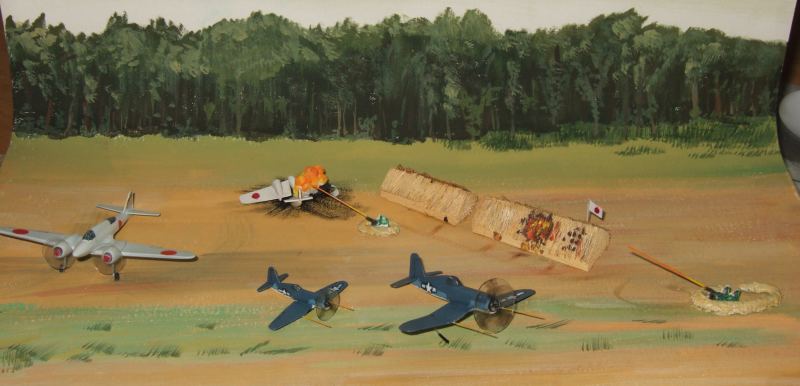
Just the finally construction to do now. Getting everything mounted in a strong and transportable way.
Two anti-aircraft gun emplacements had been created with milliput. The men and machineguns were very simply drawn on card with colouring pencils and then cut out.
Machine guns bursts on the anti-aircraft and Corsairs were all made from white sprue which was then painted flame yellow and orange. The sprue also made the flag pole.
The larger Corsair is dropping a bomb. Rather than fiddling with a tiny bomb and wires to hang it by I stretched some clear sprue and bent it into a curve while still soft. One end is glued to the underside of the a/c the other painted black to represent the bomb.
The burning Dinah was made quickly from scrap plastic - I've not even painted it apart from the roundel. I needed a fireball to added to it from which the smoke will emanate. After playing around I found that pulling expanded polystyrene apart created nice shapes and would really work well for larger fireballs. I only needed a tiny one but it's something worth trying.
Just the finally construction to do now. Getting everything mounted in a strong and transportable way.
Classic British Kits SIG Leader Better to fettle than to fill
(2024 A:B 5:2) (2023 13:8:7) (2022 21:11) (2021 15:8) (2020 8:4:4)
(2024 A:B 5:2) (2023 13:8:7) (2022 21:11) (2021 15:8) (2020 8:4:4)
Re: Airfix 1/72 Mitsubishi Dinah
Can you elaborate a bit more, James? this sounds like it could be just the ticket for the flak bursts I will need shortly...JamesPerrin wrote: I found that pulling expanded polystyrene apart created nice shapes and would really work well for larger fireballs.
bestest,
M.
-
JamesPerrin
- Looks like his avatar
- Posts: 13686
- Joined: April 5th, 2011, 8:09 pm
- Location: W. Yorkshire
- Contact:
Re: Airfix 1/72 Mitsubishi Dinah
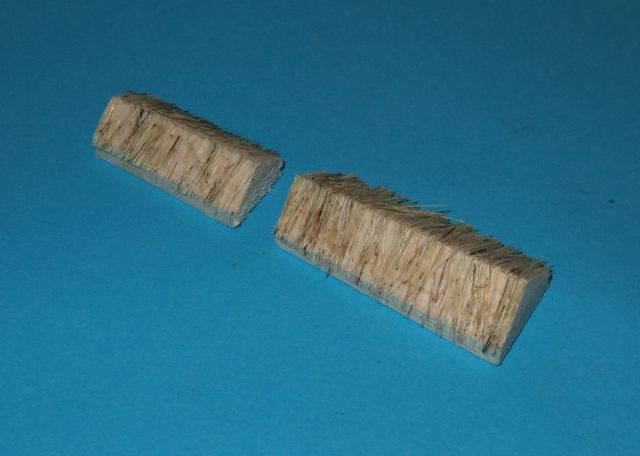
Looks like you've got there by yourself Matt. http://uamf.org.uk/viewtopic.php?p=84693#p84693; Anyway here's a quick shot of what I was taking about.
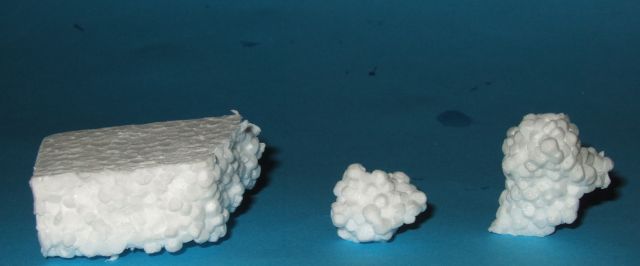
Starting with a block of polystyrene you basically pull bits out to carve out the shape that you want. The little balls that make up the styrene give you a nice billowing form. The one on the left is about 1inch high.
Starting with a block of polystyrene you basically pull bits out to carve out the shape that you want. The little balls that make up the styrene give you a nice billowing form. The one on the left is about 1inch high.
Classic British Kits SIG Leader Better to fettle than to fill
(2024 A:B 5:2) (2023 13:8:7) (2022 21:11) (2021 15:8) (2020 8:4:4)
(2024 A:B 5:2) (2023 13:8:7) (2022 21:11) (2021 15:8) (2020 8:4:4)
-
JamesPerrin
- Looks like his avatar
- Posts: 13686
- Joined: April 5th, 2011, 8:09 pm
- Location: W. Yorkshire
- Contact:
Re: Airfix 1/72 Mitsubishi Dinah
Just about finished! I took the opportunity to grab a couple of quick shots in the morning "sun" before coming in to work. I drilled holes and fixed Al or plastic tube at to mount the smoke and planes. These are all push fit to allow adjustment, disassembly etc. I may glue these in place if I find a suitable box for it to go as is.
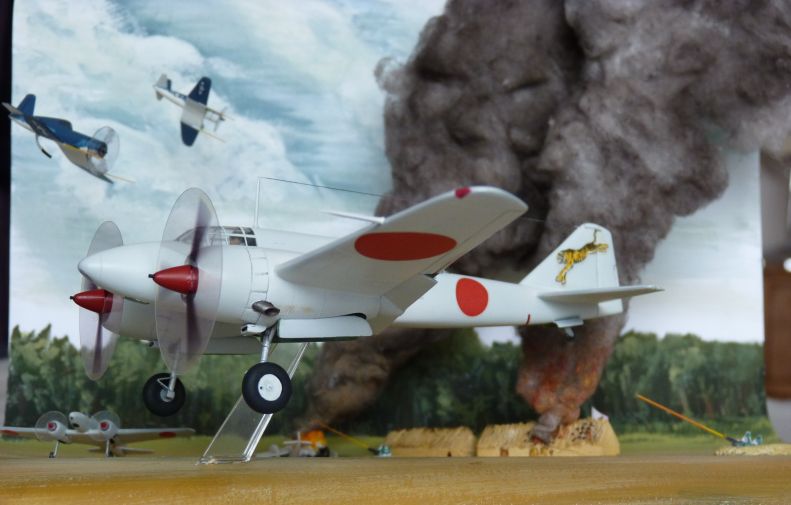
There is a little more fiddling to do and a couple of minor details to added for the pedants
There is a little more fiddling to do and a couple of minor details to added for the pedants
Classic British Kits SIG Leader Better to fettle than to fill
(2024 A:B 5:2) (2023 13:8:7) (2022 21:11) (2021 15:8) (2020 8:4:4)
(2024 A:B 5:2) (2023 13:8:7) (2022 21:11) (2021 15:8) (2020 8:4:4)
Re: Airfix 1/72 Mitsubishi Dinah
..and just to emphasise what a BRILLIANT job that is:
Awesome, James.... just awesome. I'm really looking forward to seeing it in the flesh!
bestest,
M.
Awesome, James.... just awesome. I'm really looking forward to seeing it in the flesh!
bestest,
M.