Looking good. I'm almost tempted to restart my smaller one but I have something else I must get off the bench first.
David
Stand by for Action, we are about to launch Stingray!
-
DavidWomby

- Modelling Gent and Scholar
- Posts: 11750
- Joined: May 1st, 2011, 8:09 pm
- Location: Florida, USA
-
giulio_gobbi

- Modelling Gent and Scholar
- Posts: 1971
- Joined: May 4th, 2011, 8:37 pm
- Location: Naples, Italy
- Contact:
Re: Stand by for Action, we are about to launch Stingray!
Suberb!
Sometimes the talent consists exactly in that: try five dozen times when others stop at three dozen...! (F.Labelle)
I think that modeling is a subtle mix of zen philosophy and absolute crazyness - but in my case I would not dare to specify the respective percentage of each......
I think that modeling is a subtle mix of zen philosophy and absolute crazyness - but in my case I would not dare to specify the respective percentage of each......
-
Justin1980
- Active Participant
- Posts: 643
- Joined: June 27th, 2011, 6:58 pm
- Location: Lincoln
Re: Stand by for Action, we are about to launch Stingray!
Looking awesome!
The lighting looks really effective,
Justin
The lighting looks really effective,
Justin
If there are no stupid questions, then what kind of questions do stupid people ask? Do they get smart just in time to ask questions?

Re: Stand by for Action, we are about to launch Stingray!
Thanks guys  Had a couple of days off work this week coz I felt like a bit of a mini-holiday and took the opportunity to progress.
First that base has been developing nicely, look at this:
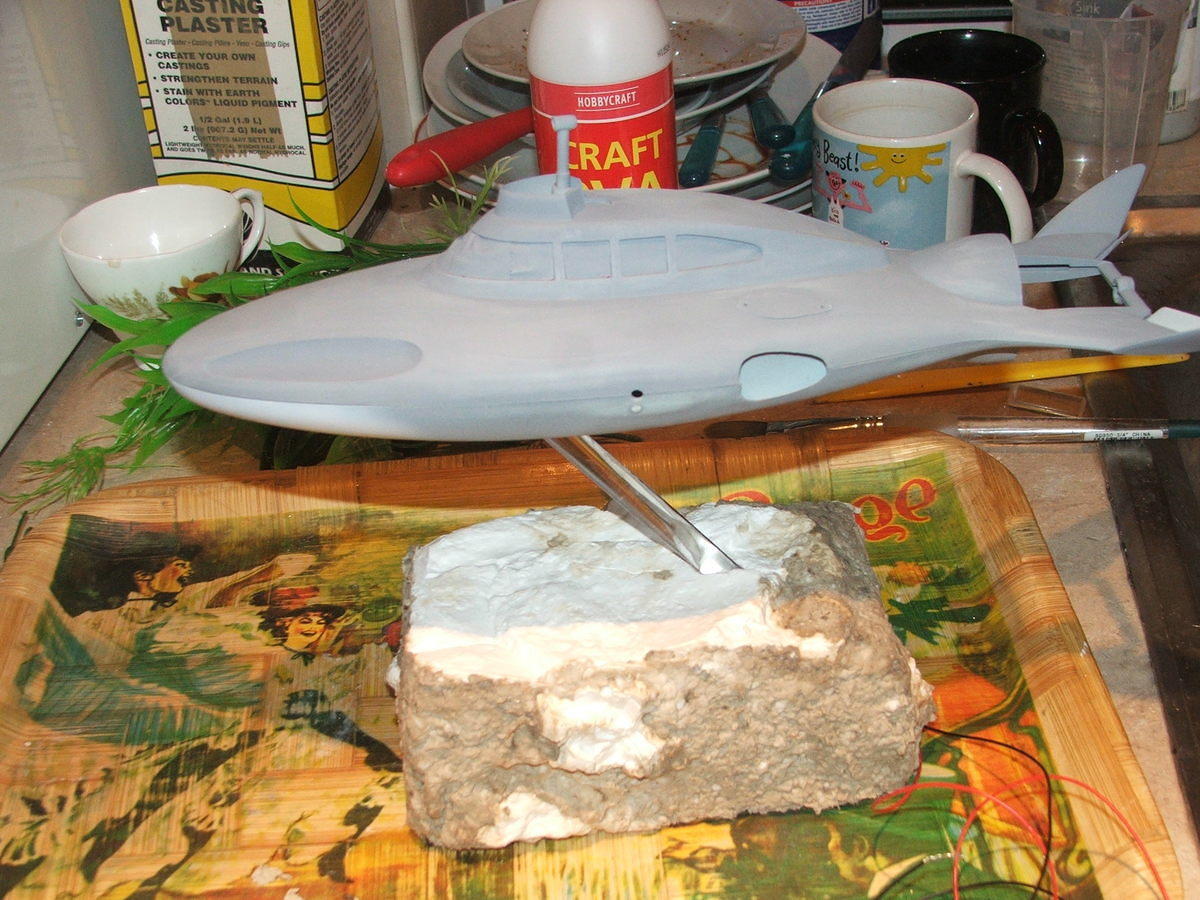
The acrylic rod supports the model very well and this was another opportunity to do an electrical test which passed with flying... er... swimming colours! As you can see Stingray has had its primer coat ready for painting! In fact painting has progressed even though I haven't joined the two halves. I decided that rather than try to mask the big transparent impeller thingy, I'd doing most of the spraying while it was in two halves then when they get joined it will be just a matter of touching up the joint with - in the most part - silver.
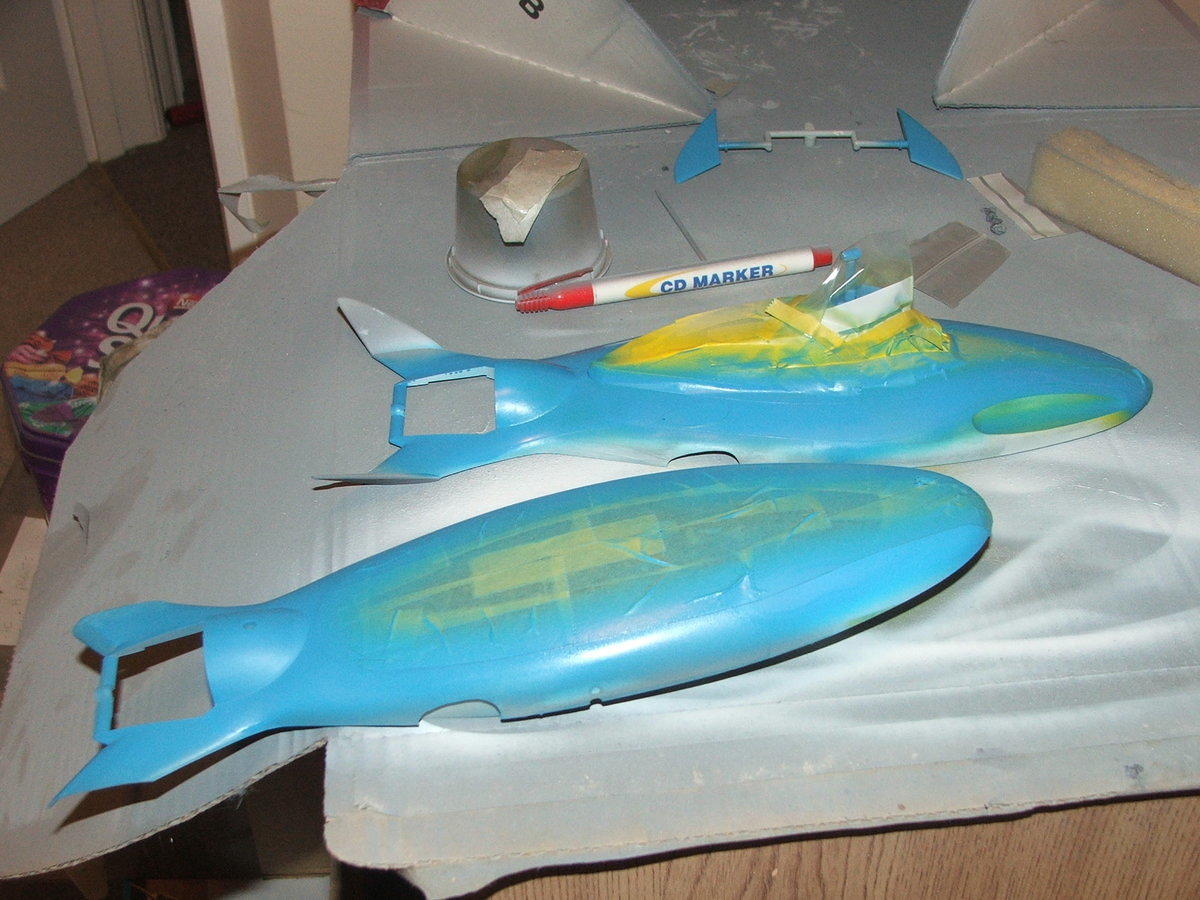
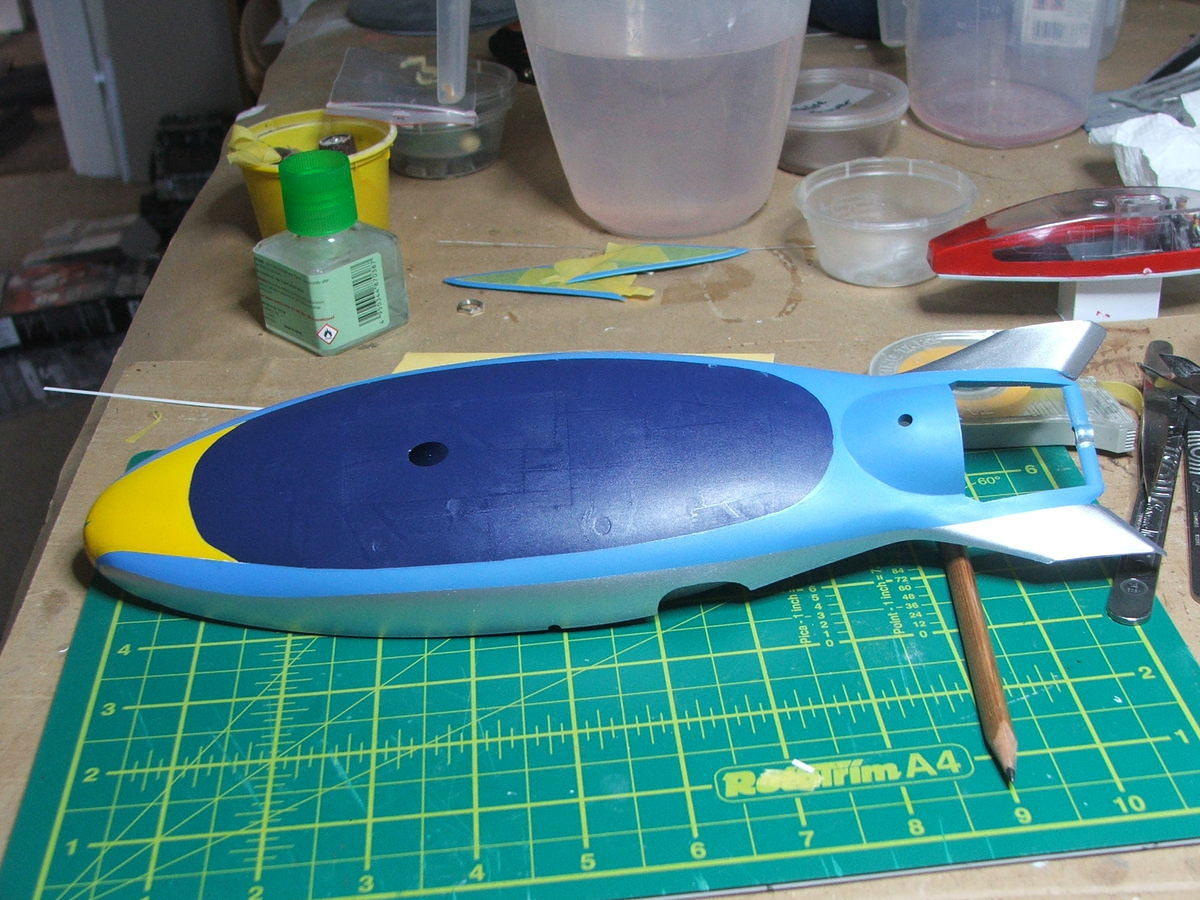
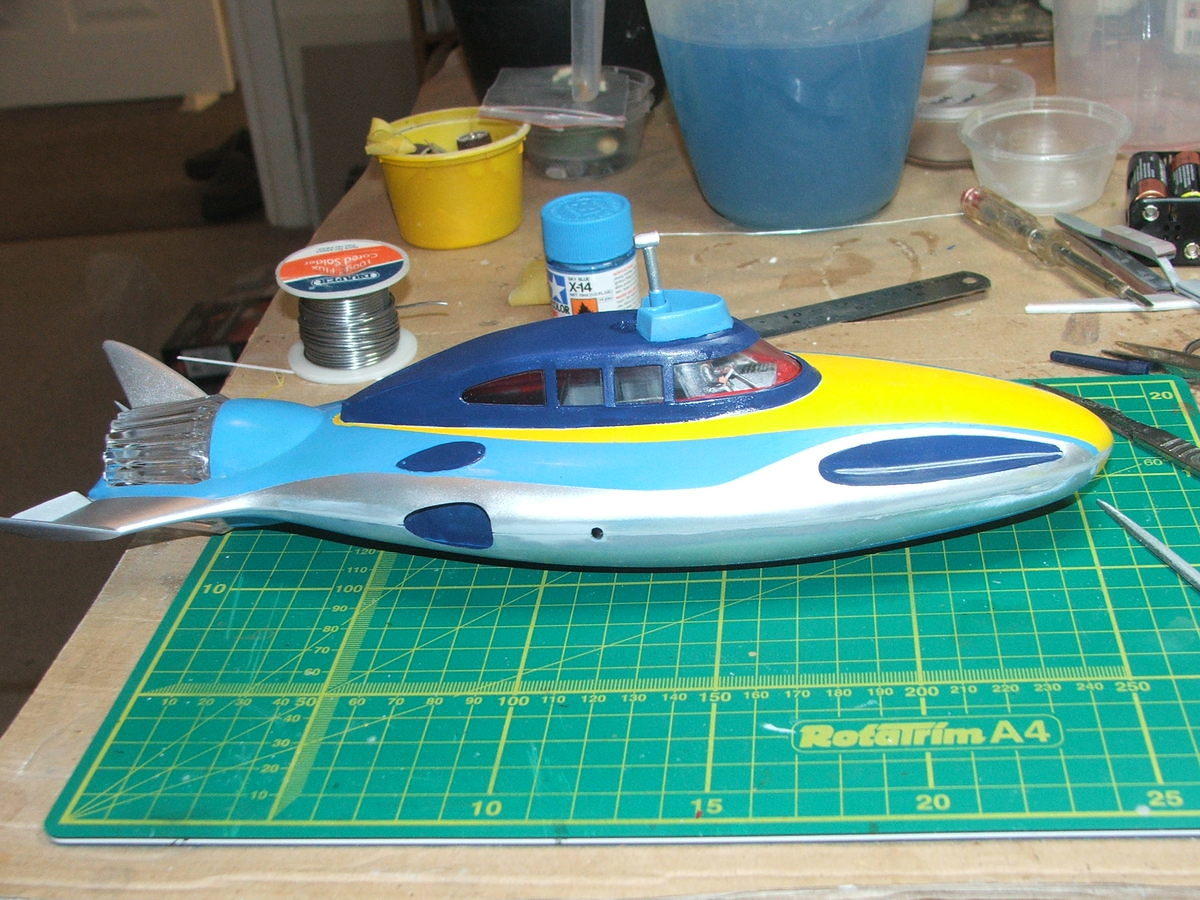
The top surface has had the dark blue of the cockpit painted, plus the light blue of the "crows nest" and the yellow band. In the picture below you can see I've got as far as the light blue bands. This will be a bit hit or miss as I'm masking each section after its painted and moving on to the next, so I won't see the mess that will almost certainly have been made by the paint creep until its all done and I can unmask the lot!
The lower have has had the complicated curved yellow triangle at the front painted and the dark blue oval painted and masked and again we are onto the light blue here as well.
So then its back to the cockpit. I spent several days trying to work out how to scratch build the steering wheels (tillers?)

and eventually came up with a plan. First I got some 0.25mm x 2mm plastic strip left over from the bar armour and wrapped some of this tightly around a 4mm brass rod 3 or 4 times. I then dipped this lot into boiling water to "set" the plastic in the curve I wanted. Once this was dry and cool I cut a ring from the strip and then sliced it lengthwise to get 2 1mm wide rings, of which I cut 2/3 out and then cut that in half - each of these was one of the handles.
The long column has to be quite rigid as its well, long... so I cut up a thick paper clip and used the straight bits for the column - its also silver already! The tiller attaches to the column via a cone-shaped connector. This was built up using nothing more than a blob of Mr Dissolved Putty on the end of the column. Its very small and a bit crude, but that should be okay because it is very small!
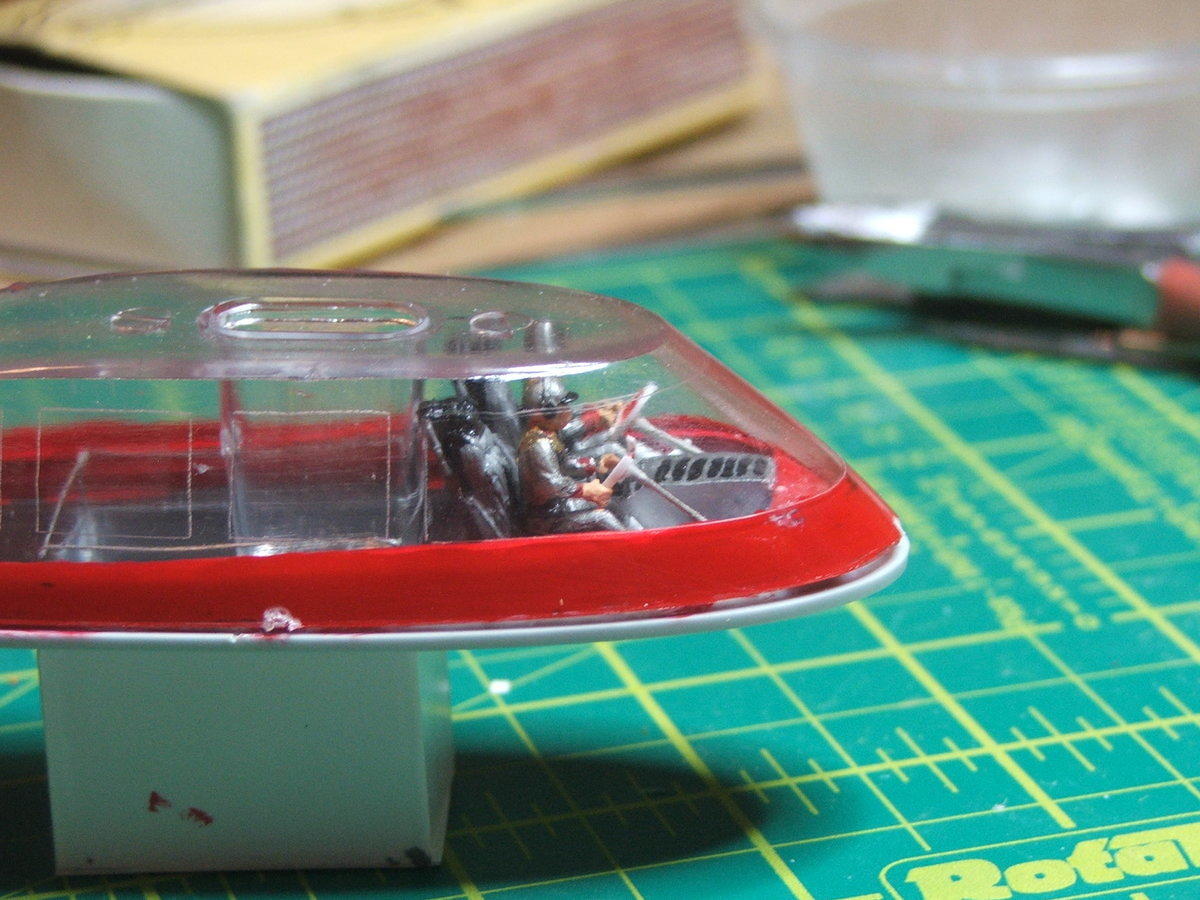
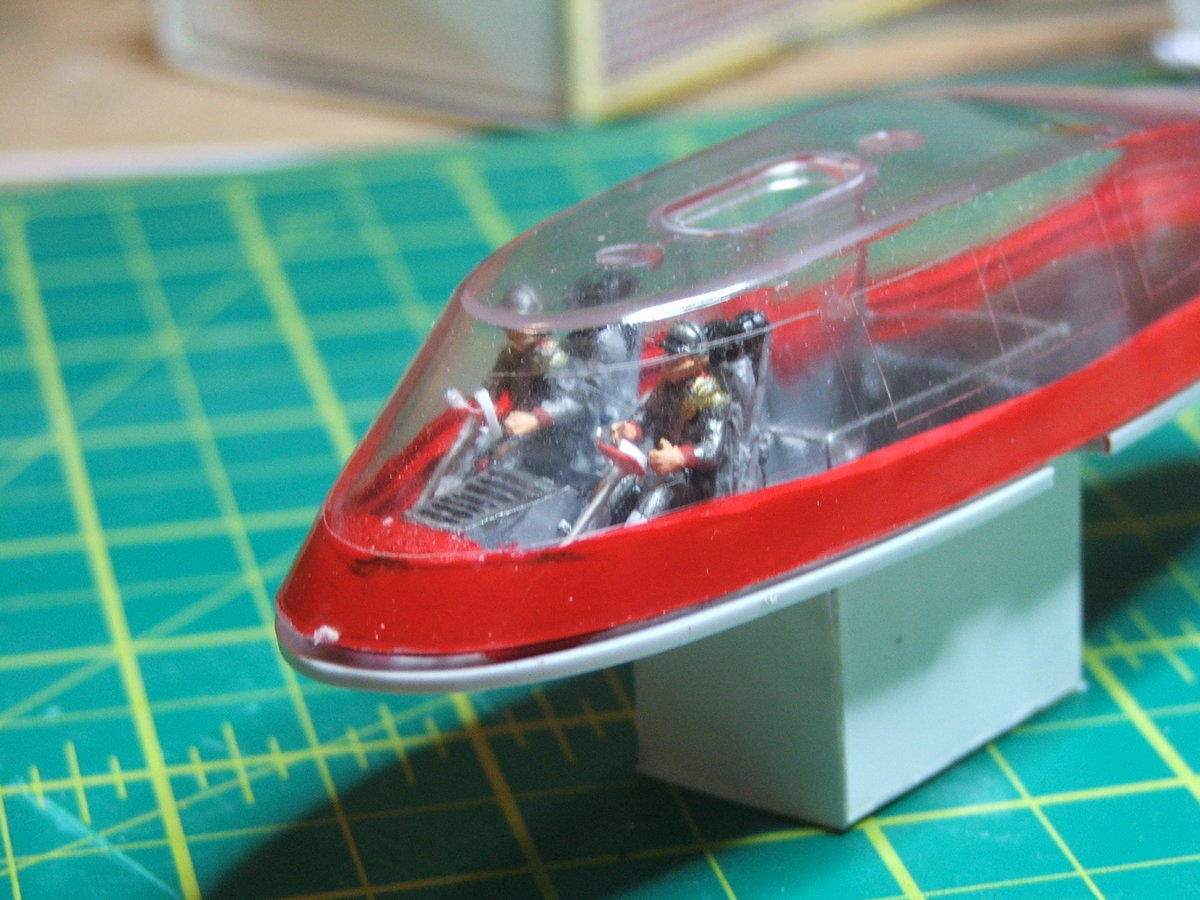
I added some levers with thin wire and blobs of coloured paint on the end. Troy Tempest and Phones have also been painted up. I couldn't face scratch building their shoulder epaulettes in this scale so I just dabbed a bit of gold on to represent them so here is the cockpit
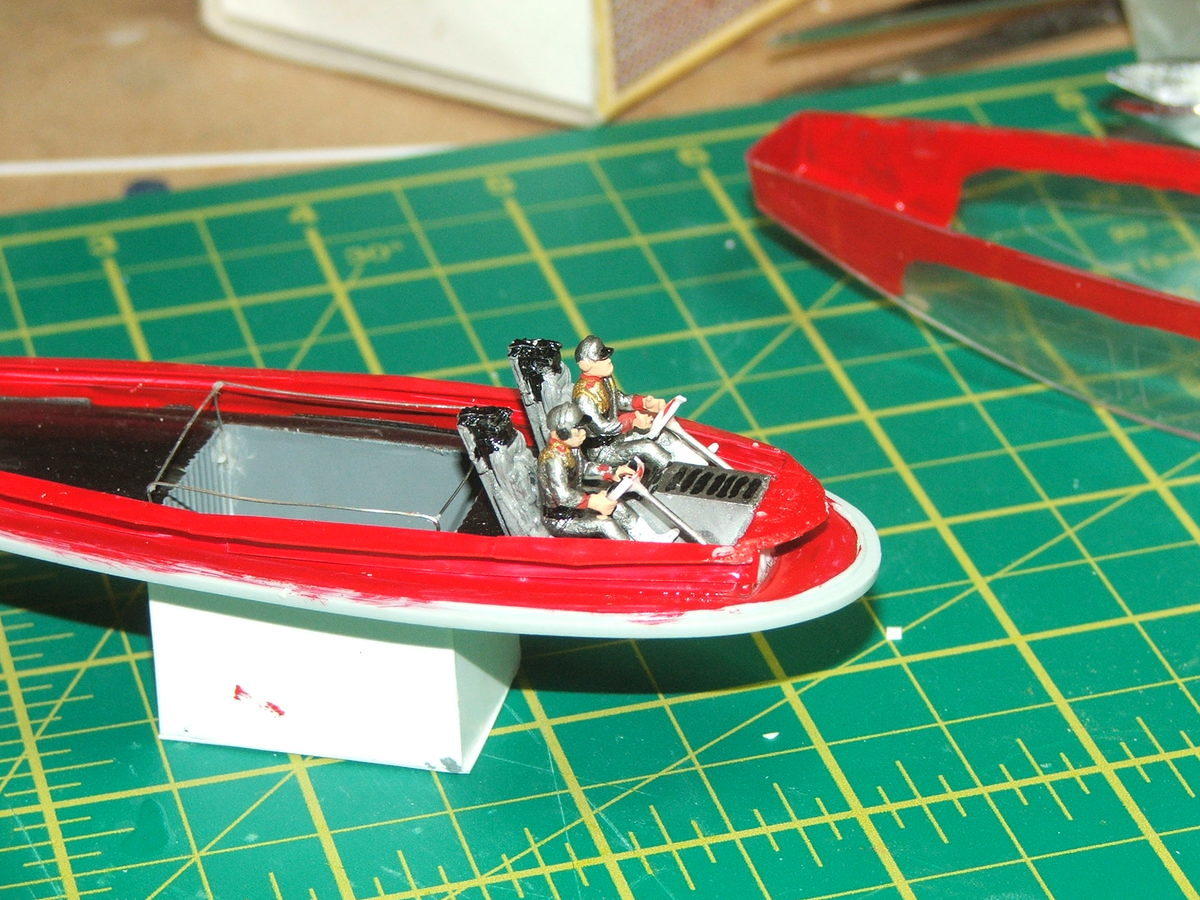
and with the transparency on you can see even less clearly!
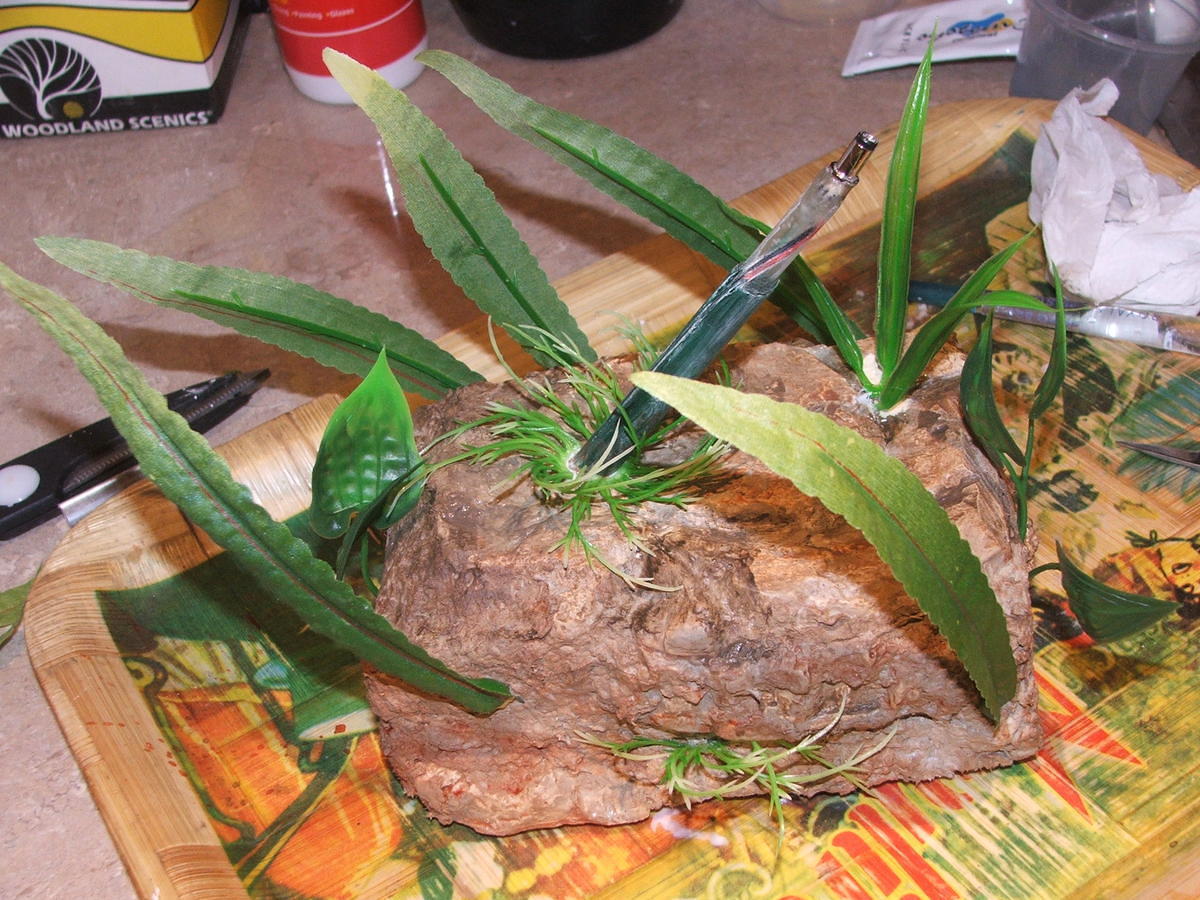
And finally, remember that base? Well I got a suggestion of using some aquarium ferns as decoration, so I popped into the local Pets at Home shop yesterday and found some cheap plastic aquarium "plants" which were perfect when cut up and added appropriately...
More to come, including tomorrow in theory should be the "Great Unveiling" where I will discover just how bad the paint runs are
First that base has been developing nicely, look at this:
The acrylic rod supports the model very well and this was another opportunity to do an electrical test which passed with flying... er... swimming colours! As you can see Stingray has had its primer coat ready for painting! In fact painting has progressed even though I haven't joined the two halves. I decided that rather than try to mask the big transparent impeller thingy, I'd doing most of the spraying while it was in two halves then when they get joined it will be just a matter of touching up the joint with - in the most part - silver.
The top surface has had the dark blue of the cockpit painted, plus the light blue of the "crows nest" and the yellow band. In the picture below you can see I've got as far as the light blue bands. This will be a bit hit or miss as I'm masking each section after its painted and moving on to the next, so I won't see the mess that will almost certainly have been made by the paint creep until its all done and I can unmask the lot!
The lower have has had the complicated curved yellow triangle at the front painted and the dark blue oval painted and masked and again we are onto the light blue here as well.
So then its back to the cockpit. I spent several days trying to work out how to scratch build the steering wheels (tillers?)
and eventually came up with a plan. First I got some 0.25mm x 2mm plastic strip left over from the bar armour and wrapped some of this tightly around a 4mm brass rod 3 or 4 times. I then dipped this lot into boiling water to "set" the plastic in the curve I wanted. Once this was dry and cool I cut a ring from the strip and then sliced it lengthwise to get 2 1mm wide rings, of which I cut 2/3 out and then cut that in half - each of these was one of the handles.
The long column has to be quite rigid as its well, long... so I cut up a thick paper clip and used the straight bits for the column - its also silver already! The tiller attaches to the column via a cone-shaped connector. This was built up using nothing more than a blob of Mr Dissolved Putty on the end of the column. Its very small and a bit crude, but that should be okay because it is very small!
I added some levers with thin wire and blobs of coloured paint on the end. Troy Tempest and Phones have also been painted up. I couldn't face scratch building their shoulder epaulettes in this scale so I just dabbed a bit of gold on to represent them so here is the cockpit
and with the transparency on you can see even less clearly!
And finally, remember that base? Well I got a suggestion of using some aquarium ferns as decoration, so I popped into the local Pets at Home shop yesterday and found some cheap plastic aquarium "plants" which were perfect when cut up and added appropriately...
More to come, including tomorrow in theory should be the "Great Unveiling" where I will discover just how bad the paint runs are
Re: Stand by for Action, we are about to launch Stingray!
Oh yes its the Great Unveiling!
The lower hull:
Just a little bit of paint creep around the yellow and the rear curve of the dark blue needs tidying up.
The upper hull:
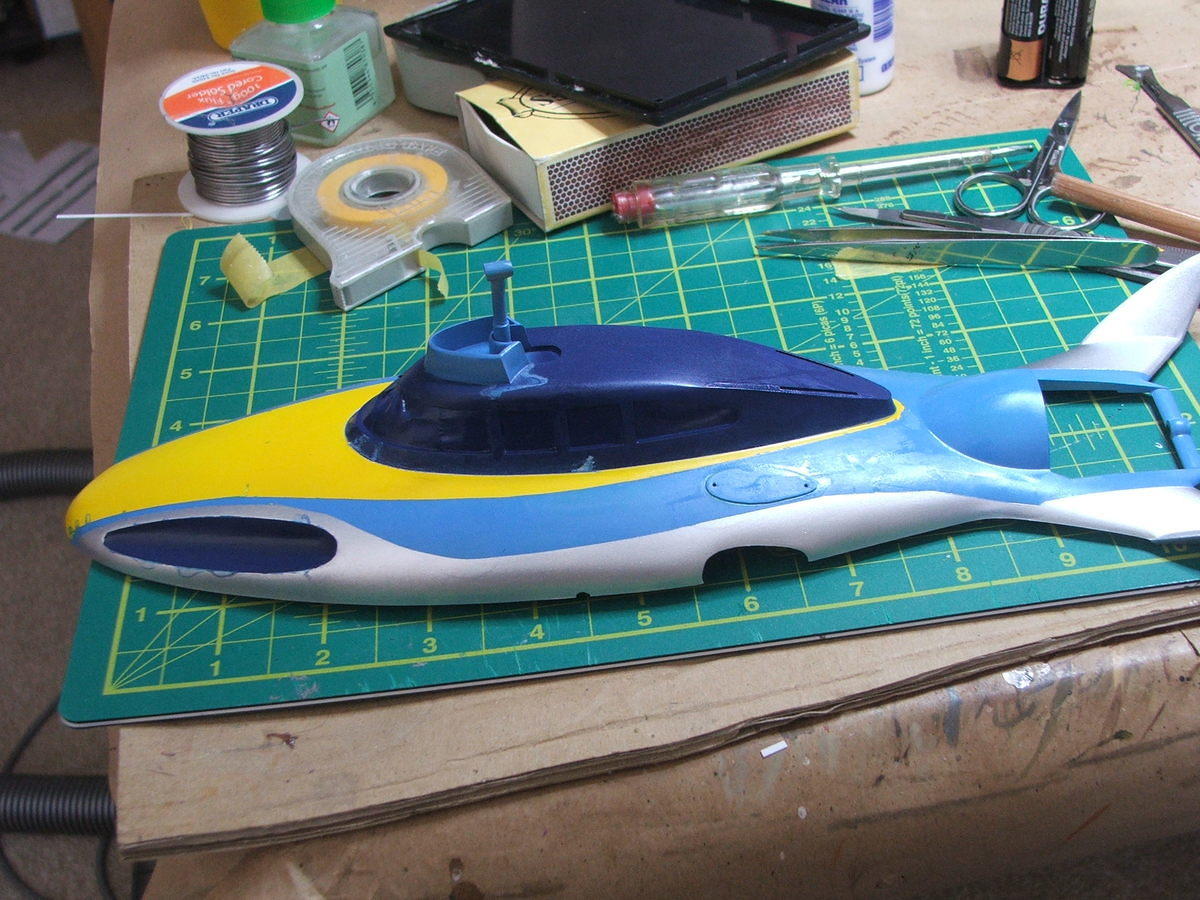
Here you can see some of the paint creep in the dark blue above the windows, under the windows, near the nose and around the "torpedo tube". Not as bad as I expected! So all that was easy to fix, so next is gluing the cockpit into the upper hull, gluing the "impeller thingy" into the lower hull and fixing the LEDs permanentlyand then joining the two hull halves together. No sooner said that done!
Some filler/sanding required on the joint so the paint will need some repairs, but that shouldn't be too difficult! Blimey I think this might be almost complete, but but but... its only been a week or so, I obviously haven't complicated this enough!!!
The lower hull:
Just a little bit of paint creep around the yellow and the rear curve of the dark blue needs tidying up.
The upper hull:
Here you can see some of the paint creep in the dark blue above the windows, under the windows, near the nose and around the "torpedo tube". Not as bad as I expected! So all that was easy to fix, so next is gluing the cockpit into the upper hull, gluing the "impeller thingy" into the lower hull and fixing the LEDs permanentlyand then joining the two hull halves together. No sooner said that done!
Some filler/sanding required on the joint so the paint will need some repairs, but that shouldn't be too difficult! Blimey I think this might be almost complete, but but but... its only been a week or so, I obviously haven't complicated this enough!!!
-
SJPONeill

- Modelling Gent and Scholar
- Posts: 3524
- Joined: May 1st, 2011, 12:01 am
- Location: Near the Spiral, NZ.
- Contact:
Re: Stand by for Action, we are about to launch Stingray!
That's looking great!! I have a resin MiM Stingray slowly wending its way here from the States...current ETA late November when my safehand courier comes here for a meeting....this build has been a great referecne source for when I start that baby...
Please critique my posts honestly i.e. say what you think so I can learn and improve...
The World According To Me
The World According To Me
-
lancfan

- Avro's Rivet Rhapsodizer
- Posts: 8761
- Joined: May 2nd, 2011, 3:55 pm
- Location: Nelson, Lancashire
Re: Stand by for Action, we are about to launch Stingray!
That is awesome, when I was little I had one that floated in the bath and ran on a rubber band. Must get a kit of this.
David.
David.
David.
If you forget the past, you may lose the future.
If you forget the past, you may lose the future.
-
MerlinJones
Re: Stand by for Action, we are about to launch Stingray!
Good interior and exterior work.
For future reference, I sometimes take slices of plastic tube and cut sections out of these for 'steering'; column handles. If you cut your slice at an angle, you can usually get exactly the right curve you need.
Regards,
Bruce
For future reference, I sometimes take slices of plastic tube and cut sections out of these for 'steering'; column handles. If you cut your slice at an angle, you can usually get exactly the right curve you need.
Regards,
Bruce
-
SJPONeill
- Modelling Gent and Scholar
- Posts: 3524
- Joined: May 1st, 2011, 12:01 am
- Location: Near the Spiral, NZ.
- Contact:
Re: Stand by for Action, we are about to launch Stingray!
Considering that Stingray was filmed 50 odd years ago, I am amazed that it still has the following that it and other Gerry Anderson series still have today - not that I'm knocking it: Stingray was the first TV that I remember watching ever (through my fingers and from behind the sofa as it was pretty scary) when I was about three, so circa 1967...while my grand-daughters haven't gotten into Stingray, Joe 90 or Captain Scarlet, by the time they were three (five now) a four episode DVD of Thunderbirds would keep them entranced for hours...
Supercar and XLR were before my time and I have only started to watch them in the last couple of years after scoring the boxset with them and The Secret Service...I still prefer the early series over the later ones - I have a single four episode DVD of Space 1999 and that's about all I can take and Terrahawks I never got into...UFO is probably the one that had the greatest effect on me but Thunderbirds (less the 2004 disaster) remains my alltime favourite...
I intensely follow any and all builds of Gerry Anderson-related models...
Please critique my posts honestly i.e. say what you think so I can learn and improve...
The World According To Me
The World According To Me
-
Justin1980
- Active Participant
- Posts: 643
- Joined: June 27th, 2011, 6:58 pm
- Location: Lincoln
Re: Stand by for Action, we are about to launch Stingray!
Truly awesome, the paint looks spectacular even with the creep!
Regards
Justin
Regards
Justin
If there are no stupid questions, then what kind of questions do stupid people ask? Do they get smart just in time to ask questions?
-
ntrocket88

- Active Participant
- Posts: 827
- Joined: July 2nd, 2012, 11:49 pm
- Location: New Jersey, USA
Re: Stand by for Action, we are about to launch Stingray!
Excellent work. The interior looks especially impressive.
Neil
'With every model I learn a little more...and then the next one takes longer!'
'With every model I learn a little more...and then the next one takes longer!'
-
DavidWomby
- Modelling Gent and Scholar
- Posts: 11750
- Joined: May 1st, 2011, 8:09 pm
- Location: Florida, USA
Re: Stand by for Action, we are about to launch Stingray!
Since I am the one who sold that to you, I'll watch THAT build with extra interest :-)SJPONeill wrote:.......I have a resin MiM Stingray slowly wending its way here from the States...current ETA late November when my safehand courier comes here for a meeting....
David
-
ShaunW
- NOT the sheep
- Posts: 26180
- Joined: November 26th, 2011, 6:11 pm
- Location: Pontefract West Yorkshire
Re: Stand by for Action, we are about to launch Stingray!
That looks great, it really does and a good effort on the interior too. Stingray takes me back a bit and I also remember having a toy one for the bath. Thunderbirds was my fave though closely followed by UFO and Space 1999, which, although not as good as UFO, did have some hot looking chicks in it which was a prime motivator for watching at the time - as well as the better spaceships of course 
Doing - Tamiya 1/35th Universal Carrier.
Work is the curse of the modelling classes!
IPMS#12300
Work is the curse of the modelling classes!
IPMS#12300
Re: Stand by for Action, we are about to launch Stingray!
I foolishly bought a Warp resin and white metal Eagle Laboratory kit at the Smallspace show in July. Now that is a complex little kit that will require the patience of a sodding saint to clean all the flash off the white metal struts!!!
I'm having enough trouble at the moment trying to get the two halves of Stingray to join without a seam the size of the Grand Canyon appearing in the silver paint!
I'm having enough trouble at the moment trying to get the two halves of Stingray to join without a seam the size of the Grand Canyon appearing in the silver paint!
-
lancfan
- Avro's Rivet Rhapsodizer
- Posts: 8761
- Joined: May 2nd, 2011, 3:55 pm
- Location: Nelson, Lancashire
Re: Stand by for Action, we are about to launch Stingray!
Please watch your language online Boldman.
David.
David.
David.
If you forget the past, you may lose the future.
If you forget the past, you may lose the future.