James' AModel 1/72 Yak-17 **FINISHED**

First generation jets, 1939-1949.
Runs April 1st to 30th, 2012.
GBL: Kruaxi
User avatar
JamesPerrin
Looks like his avatar
Posts: 13669
Joined: April 5th, 2011, 8:09 pm
Location: W. Yorkshire
Contact:

James' AModel 1/72 Yak-17 **FINISHED**

Post by JamesPerrin »

Three small, but packed, spruces of low pressure injection moulded soft, slightly flaky grey plastic. Fine engraved lines soft put plentiful detail. Industrial sized attachment points and flash, mould lines everywhere. Reasonable canopy not shown.

Image

Four sets of markings, I'll be going for a silver or grey machine with Red Stars 'cos it's a Russian plane innit! Decals look good, thin and in reg.

Image

I'm going to be spending quite a bit of time cleaning parts up, indeed the first thing I did was give everything a wash in soapy water. I've made a start on the cockpit so that once I've got the fuselage halves prepared I can get them together.
Classic British Kits SIG Leader Better to fettle than to fill
(2024 A:B 5:2) (2023 13:8:7) (2022 21:11) (2021 15:8) (2020 8:4:4)
MerlinJones

Re: James AModel 1/72 Yak-17

Post by MerlinJones »

Looks a tad more complex than the PM kit!
Watch out for those stars when you get to that stage of the build...the points may have a tendency to fold over at inopportune moments.

Regards,
Bruce
User avatar
JamesPerrin
Looks like his avatar
Posts: 13669
Joined: April 5th, 2011, 8:09 pm
Location: W. Yorkshire
Contact:

Re: James AModel 1/72 Yak-17

Post by JamesPerrin »

Every edge needs straightening, every curve needs smoothing and every seam line needs scraping. Eventually though the parts that you want appear and thankfully they do fit together once freed from their plastic incarceration.

Amodel has decided that you need the whole jet pipe on which to mount the impeller and exhaust rather than just attaching these parts direct to the fuselage. The cockpit also rides on top mounted on a a 'saddle'. With limited run kits alarm bells start to ring; there is no way all that is going to sit nicely inside the fuselage halves, get the big file out :shock: . Thankfully though Amodel have got their sums right and it all does fit in there, nice and snugly :grin:

Image

The big issue is the intake lip, I need to sort out this tatty mess but with the intake bullet in there it's going to be very difficult. I need to do as much as I can before I join the fuselage halves.

Image

The cockpit painted up according to the instructions. I replaced the chunky kit stick with a piece of wire. I've got some painted tape straps to yet add.

Image
Classic British Kits SIG Leader Better to fettle than to fill
(2024 A:B 5:2) (2023 13:8:7) (2022 21:11) (2021 15:8) (2020 8:4:4)
User avatar
JamesPerrin
Looks like his avatar
Posts: 13669
Joined: April 5th, 2011, 8:09 pm
Location: W. Yorkshire
Contact:

Re: James AModel 1/72 Yak-17

Post by JamesPerrin »

I've just checked with photos and that intake bullet is centred in the intake. The way the it is mounted on the 'engine' means it currently points off centre.
Classic British Kits SIG Leader Better to fettle than to fill
(2024 A:B 5:2) (2023 13:8:7) (2022 21:11) (2021 15:8) (2020 8:4:4)
User avatar
JamesPerrin
Looks like his avatar
Posts: 13669
Joined: April 5th, 2011, 8:09 pm
Location: W. Yorkshire
Contact:

Re: James AModel 1/72 Yak-17

Post by JamesPerrin »

Nothing much to show yet. I've been pottering along cleaning up the odd part here and there over the last week while focusing on completing my previous GB models and decorating the house.

I split the trunking behind the intake compressor so the bullet lay centrally in the intake. This was a good idea as I then read another build/review on IPMS Stockholm which reminded me to add some nose weight. So I spent 15mins dropping in shot through the split. Another 15mins was wasted when I knocked my pot of shot over! I'm sure I'll be finding the little buggers for years to come.

I had partially repaired the intake by taping the fuselage halves together and then filling and sanding the hole. I then carefully prised apart the fuselage and thankfully most of the filler stayed in place. The reviewer went as far as joining the fuselage and then cutting the nose off so the engine could be installed after fixing the intake!

In the end I removed the saddle from the engine as it didn't seem to help locate the cockpit, with a little bit of fettling I got everything to fit snugly inside the fuselage. It has been thorough clamped and left to cure. I then got on and cleaned up most of the remaining parts. Usually I would leave small parts on the spruce but as they need so much tidying up esp the attachment points it's not worth leaving them on. However the parts do look pretty good once cleaned up.
Classic British Kits SIG Leader Better to fettle than to fill
(2024 A:B 5:2) (2023 13:8:7) (2022 21:11) (2021 15:8) (2020 8:4:4)
User avatar
JamesPerrin
Looks like his avatar
Posts: 13669
Joined: April 5th, 2011, 8:09 pm
Location: W. Yorkshire
Contact:

Re: James' AModel 1/72 Yak-17

Post by JamesPerrin »

So I've filled and sanded the fuselage. No gaps really just untidy joins. I got a pretty got fit of the wing after filing the faces flat. However there is bit of step on one side at the, so plenty of sanding still ahead.

Image
Classic British Kits SIG Leader Better to fettle than to fill
(2024 A:B 5:2) (2023 13:8:7) (2022 21:11) (2021 15:8) (2020 8:4:4)
User avatar
JamesPerrin
Looks like his avatar
Posts: 13669
Joined: April 5th, 2011, 8:09 pm
Location: W. Yorkshire
Contact:

Re: James' AModel 1/72 Yak-17

Post by JamesPerrin »

Nothing much to show other than I've finished the filling and sanding. The canopy has been cleanup and Kleared. Once that is on I'll give the kit a coat of primer which will probably indicate some areas needing attention. The guns port and various inlets have been drilled out. The tip tanks needed a lot of cleaning up but fit the model very nicely indeed. You can't see but the flaps are separate and I'll model them lowered, they'll get painted along with the undercarriage doors.

Image
Classic British Kits SIG Leader Better to fettle than to fill
(2024 A:B 5:2) (2023 13:8:7) (2022 21:11) (2021 15:8) (2020 8:4:4)
User avatar
Jagewa
Modelling Gent and Scholar
Posts: 2752
Joined: April 6th, 2011, 2:18 am
Location: Christchurch, New Zealand
Contact:

Re: James' AModel 1/72 Yak-17

Post by Jagewa »

Looking good James, certainly looks nicer than the PM Yak-15.

Cheers
Jim
User avatar
JamesPerrin
Looks like his avatar
Posts: 13669
Joined: April 5th, 2011, 8:09 pm
Location: W. Yorkshire
Contact:

Re: James' AModel 1/72 Yak-17

Post by JamesPerrin »

Just put a light coat of Hu 147 on and it revealed all my poor filling and sanding and a few mould bogies. Doesn' look like I'll be make much progress today.
Classic British Kits SIG Leader Better to fettle than to fill
(2024 A:B 5:2) (2023 13:8:7) (2022 21:11) (2021 15:8) (2020 8:4:4)
User avatar
JamesPerrin
Looks like his avatar
Posts: 13669
Joined: April 5th, 2011, 8:09 pm
Location: W. Yorkshire
Contact:

Re: James' AModel 1/72 Yak-17

Post by JamesPerrin »

I'm coming to the conclusion that my airbrush (Iwata Revolution CR) doesn't like Humbrol Enamels. Apart from Gloss Black, it seems to struggle getting any paint out of the nozzle. With Hu 147 which is a pale matt grey I've tried thin, with the consequential poor coverage and a thicker consistency with corresponding increase in air pressure. This was a new tin so I doubt it was polluted with particles of dried paint. Anyway the upshot is I reverted to the non-air brush and slapped nice consistent coat over it. I did find I had to get the hurry on as the paint went tacky within a few minutes so by the time I joined two areas up I got some paint drag. I just smoothed these out at the end with the brush dampened with thinners. I think it will need a light rub down with some micro mesh and another thin coat to finish it off.

No pic, just imagine it looks a slightly paler grey all over.
Classic British Kits SIG Leader Better to fettle than to fill
(2024 A:B 5:2) (2023 13:8:7) (2022 21:11) (2021 15:8) (2020 8:4:4)
User avatar
JamesPerrin
Looks like his avatar
Posts: 13669
Joined: April 5th, 2011, 8:09 pm
Location: W. Yorkshire
Contact:

Re: James' AModel 1/72 Yak-17

Post by JamesPerrin »

This model seems to be a complete fluff and dust magnet. Airbrush, brush and Klear have all added another set of particles. Not that it really detracts from the models. The fact I seem only able to sand filler out of the gaps they are meant to fill means the finish is not really up to par.

However I've pressed on. Decals on, I went for the big yellow 30 - note the instructions also show this on a Czech machine too but I think this should have the no 22 on instead.

Image

I'm going to try spraying Xtracrylix Gloss varnish to see how it goes in. Then just the undercarriage to install and paint.
Classic British Kits SIG Leader Better to fettle than to fill
(2024 A:B 5:2) (2023 13:8:7) (2022 21:11) (2021 15:8) (2020 8:4:4)
User avatar
JamesPerrin
Looks like his avatar
Posts: 13669
Joined: April 5th, 2011, 8:09 pm
Location: W. Yorkshire
Contact:

Re: James' AModel 1/72 Yak-17

Post by JamesPerrin »

Finished this yesterday bar the pitot tube, which I'd forgotten until I showed it to my wife, too late in the evening to do anything about. Pics this evening if anyone is still interested - at least the sun has come out for the last day of the GB.
Classic British Kits SIG Leader Better to fettle than to fill
(2024 A:B 5:2) (2023 13:8:7) (2022 21:11) (2021 15:8) (2020 8:4:4)
User avatar
sesquipedalian
Getting well comfy!
Posts: 90
Joined: January 26th, 2012, 12:22 am
Location: Chess Valley, UK

Re: James' AModel 1/72 Yak-17

Post by sesquipedalian »

Interested!
I like sanding.
User avatar
JamesPerrin
Looks like his avatar
Posts: 13669
Joined: April 5th, 2011, 8:09 pm
Location: W. Yorkshire
Contact:

Re: James' AModel 1/72 Yak-17

Post by JamesPerrin »

Cheers, unfortunately I missed the daylight today as the lawn demanded my attention while it wasn't a swamp. I'm afraid this will have to do for now:

Image

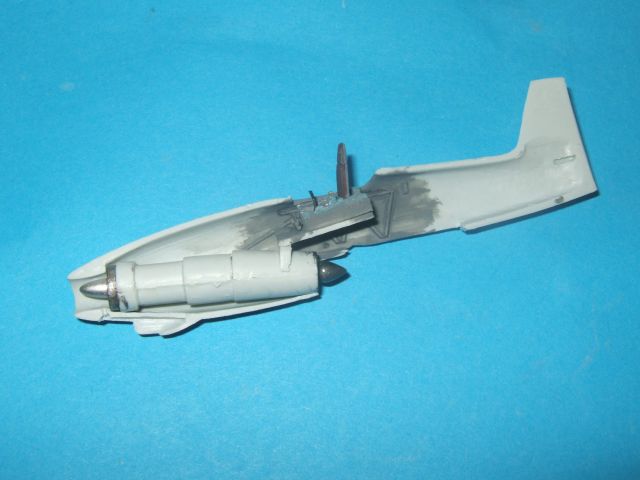
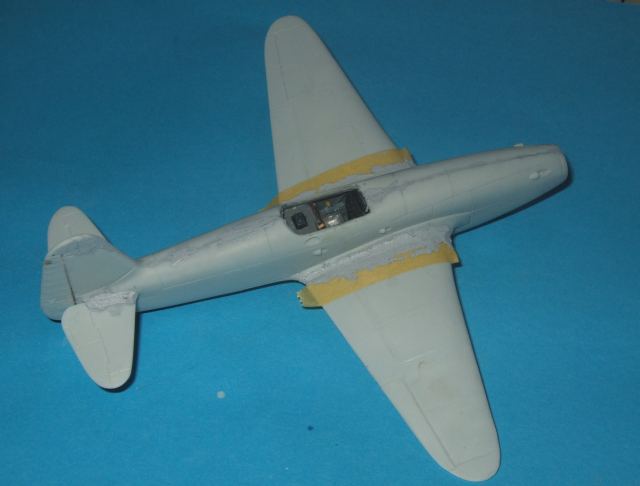
I gave it a coat of Xtracrylix Gloss Varnish. This is very easy to use, dilute and clean up with water. However it doesn't really give you a shiny gloss finish, more Satin. I'll just relabel the bottle. Undercarriage was installed and then painted Hu 64, this was far easier than trying to paint the fiddly little bits separately. I managed to drill through the wing deepening the hole for the main leg - don't bother trying there is barely a skin of plastic. A thin wash of brown/black was applied to the control surfaces and undercarriage. Using the same wash some exhaust and fuel stains were added, blended in with a cotton bud.

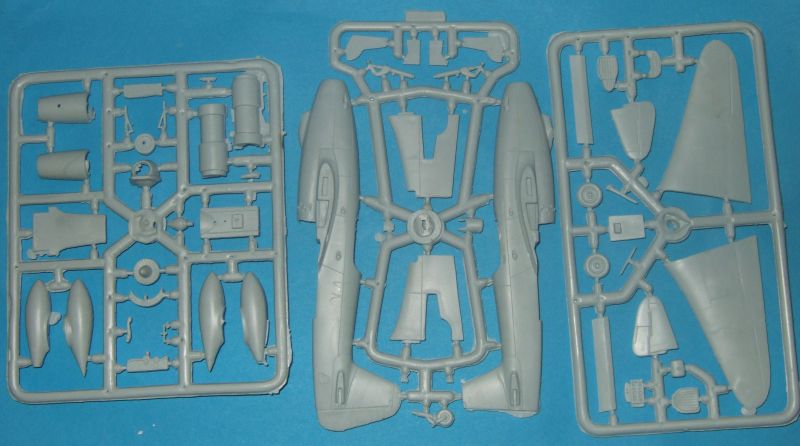
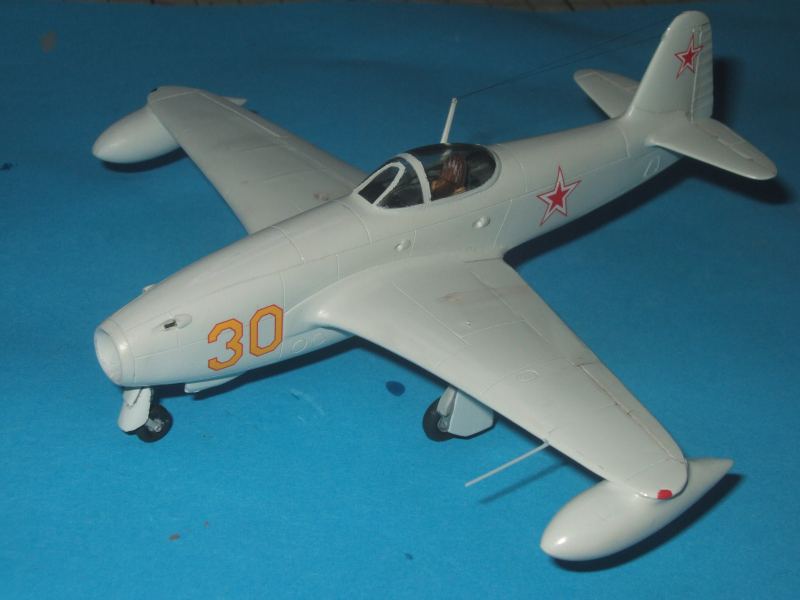
The finished kits is really below my current par. My filling and sanding let me down, as I said despite the shortrunness of the kit the parts are all there but need TLC. Then the painting really put the boot in as every bit of fluff and speck wanted to adhere to the model both when airbrushing and hair brushing. Might not show in the piic, but when seen close up it's not what I expect of myself.

I do rather like these early 'underslung' Russian jets and I should really get hold of the more serious Yak-23 'Flora'. I've got a Mig-9 also from Amodel to do, and I will be taking my time when it is its turn.
Classic British Kits SIG Leader Better to fettle than to fill
(2024 A:B 5:2) (2023 13:8:7) (2022 21:11) (2021 15:8) (2020 8:4:4)
ShaunW
NOT the sheep
Posts: 26180
Joined: November 26th, 2011, 6:11 pm
Location: Pontefract West Yorkshire

Re: James' AModel 1/72 Yak-17 **FINISHED**

Post by ShaunW »

It looks good in the pic James. Dust and fluff can plague my builds as well - I've tried using upturned boxes etc with mixed results - dust specks always seem to find a way onto the finish :evil:
Doing - Tamiya 1/35th Universal Carrier.

Work is the curse of the modelling classes!
IPMS#12300
Locked

Return to “Early Jets”