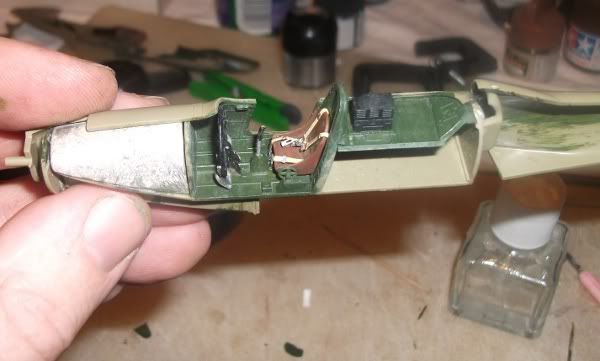
No fuss included...just had some time of my hands waiting for some assemblies to dry and wanted to see what I could do to break up the solid mass of green in the cockpit and gear bays...
Have ordered in another pallet of cocktail sticks...I applied the internal cockpit colour to the exterior of the canopy (so it shows through into the inside of the cockpit) but, shock horror, when I looked at it from the inside some of the masks had lifted slightly along one edge (despite being burnished in place) and some of the paint had leaked under on the clear parts....
Simon's Red From Under The Bed
-
SJPONeill

- Modelling Gent and Scholar
- Posts: 3525
- Joined: May 1st, 2011, 12:01 am
- Location: Near the Spiral, NZ.
- Contact:
Re: Simon's Red From Under The Bed
Please critique my posts honestly i.e. say what you think so I can learn and improve...
The World According To Me
The World According To Me
-
SJPONeill
- Modelling Gent and Scholar
- Posts: 3525
- Joined: May 1st, 2011, 12:01 am
- Location: Near the Spiral, NZ.
- Contact:
Re: Simon's Red From Under The Bed
Normally...absolutely...Brews wrote:You were just being lazy.
This time I think I have just stumbled onto a new lesson (and I'm writing a Lessons Learned handbook for work at the moment!!)...what I did was apply the masks to the exterior of the canopy, then paint the interior colour over the masks ont he outside of the canopy, with the intention of then applying the exterior colour over the top of that, thus giving me the impression of the interior colour on the interior and the exterior colour on the exterior...
If I understand you correctly - and you may need to type slower just for me - what I should have done was apply the masks, seal any gaps by applying a coat of Kleer over the top and THEN apply the interior colour layer...?
Please critique my posts honestly i.e. say what you think so I can learn and improve...
The World According To Me
The World According To Me
-
SJPONeill
- Modelling Gent and Scholar
- Posts: 3525
- Joined: May 1st, 2011, 12:01 am
- Location: Near the Spiral, NZ.
- Contact:
Re: Simon's Red From Under The Bed
OK...then...that's 8 hours and 17 minutes for the Queen today - now once more unto the breach...
Please critique my posts honestly i.e. say what you think so I can learn and improve...
The World According To Me
The World According To Me
-
SJPONeill
- Modelling Gent and Scholar
- Posts: 3525
- Joined: May 1st, 2011, 12:01 am
- Location: Near the Spiral, NZ.
- Contact:
Re: Simon's Red From Under The Bed
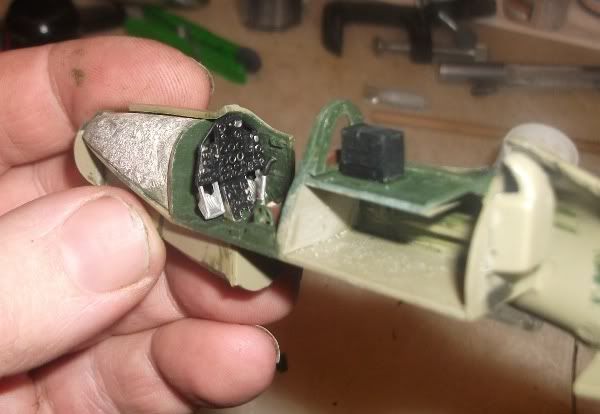
Got the seat in and most of the little switches into the cockpit...
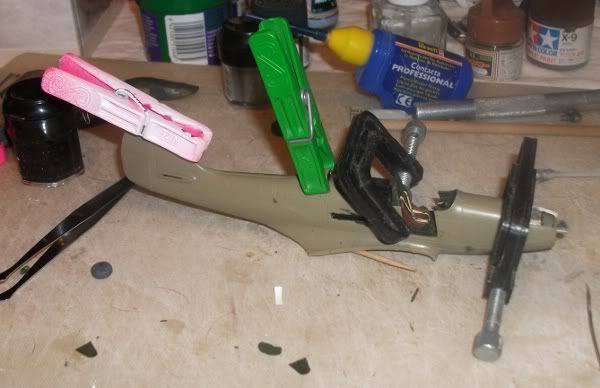
Fuselage halves joined and the join is curing now...remembered to remove the masks from the armoured window behind the seat just in time...
Finished painting the wheels but not impressed with the masks that were fractionally too small and so the tyre colour extends on to the wheels...
Fuselage halves joined and the join is curing now...remembered to remove the masks from the armoured window behind the seat just in time...
Finished painting the wheels but not impressed with the masks that were fractionally too small and so the tyre colour extends on to the wheels...
Please critique my posts honestly i.e. say what you think so I can learn and improve...
The World According To Me
The World According To Me
-
SJPONeill
- Modelling Gent and Scholar
- Posts: 3525
- Joined: May 1st, 2011, 12:01 am
- Location: Near the Spiral, NZ.
- Contact:
Re: Simon's Red From Under The Bed
You can't see them but I even added the minuscule decals for the inside of the cockpit...very fiddly and I'm not sure anything so small really adds that much value. Personally I would rather have had a decent set for the instrument panel or one of the normal Eduard 'sandwich' panels.
I was also wondering why, on a kit that is so well engineered, the joystick is attached to the sprue at its top end and not at the bottom end that fits in the hole in the cockpit floor...
Am behind schedule but will ride this one all the way to the end...
I was also wondering why, on a kit that is so well engineered, the joystick is attached to the sprue at its top end and not at the bottom end that fits in the hole in the cockpit floor...
Am behind schedule but will ride this one all the way to the end...
Please critique my posts honestly i.e. say what you think so I can learn and improve...
The World According To Me
The World According To Me
-
SJPONeill
- Modelling Gent and Scholar
- Posts: 3525
- Joined: May 1st, 2011, 12:01 am
- Location: Near the Spiral, NZ.
- Contact:
Re: Simon's Red From Under The Bed
Another first (for me)...using wet tissue to mask previously painted cavities... 
Have fixed the nose gun panel in place - fit was suboptimal and will need to be filled around where the prop shaft comes out...
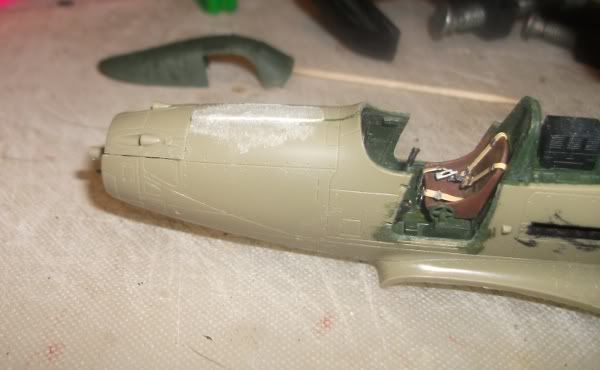
You can send the still masked canopy in the background...I've done a test fit and the uber-clamping of the fuselgae halves to the cockpit roll bar seems to have done the trick and the fit of the canopy to the fuselage looks OK. Unfortunately in applying the uber-clamps, I have slightly skewed the fuselgae halves and have a very small step between each half...
Have fixed the nose gun panel in place - fit was suboptimal and will need to be filled around where the prop shaft comes out...
You can send the still masked canopy in the background...I've done a test fit and the uber-clamping of the fuselgae halves to the cockpit roll bar seems to have done the trick and the fit of the canopy to the fuselage looks OK. Unfortunately in applying the uber-clamps, I have slightly skewed the fuselgae halves and have a very small step between each half...
Please critique my posts honestly i.e. say what you think so I can learn and improve...
The World According To Me
The World According To Me
-
SJPONeill
- Modelling Gent and Scholar
- Posts: 3525
- Joined: May 1st, 2011, 12:01 am
- Location: Near the Spiral, NZ.
- Contact:
Re: Simon's Red From Under The Bed
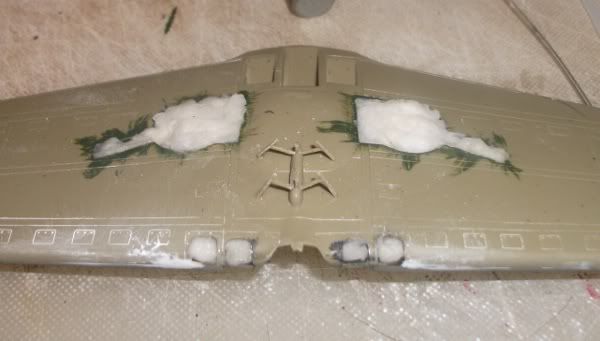
Well, geewillikers...that wasn't art of the plan - just did a test fit between the wings and the fuselage and all is not well in the state of Eduard...there is at least a 1mm gap between each wing root and the wing itself on both sides...
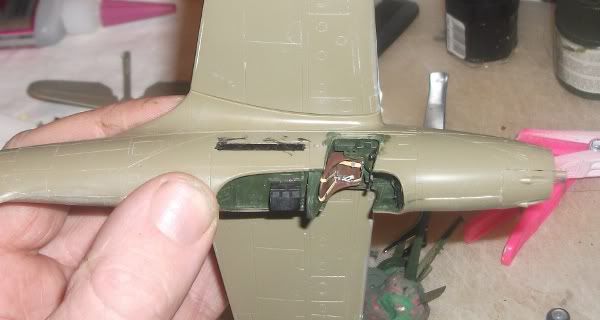
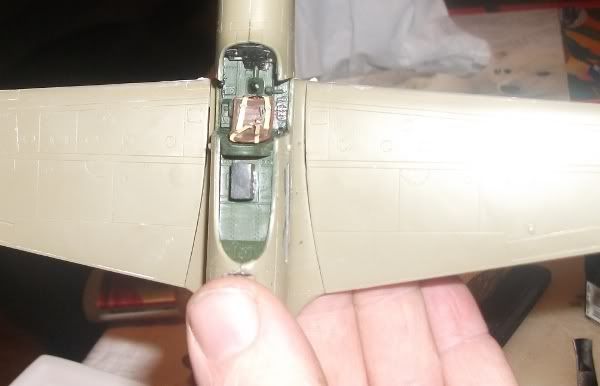
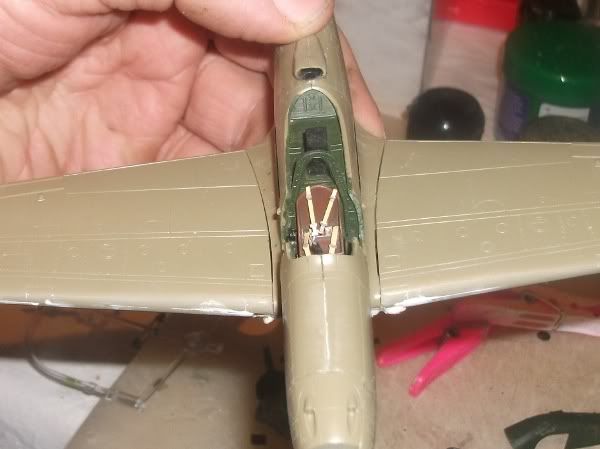
Filling this is not an insurmountable task but it may take some time...
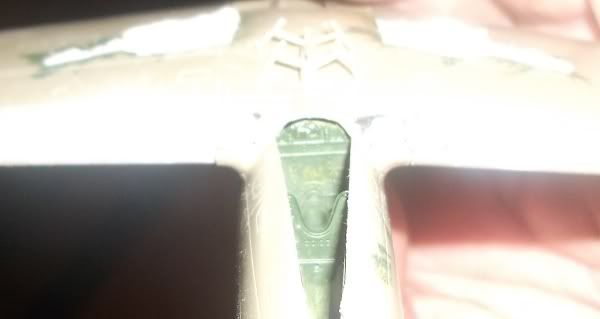
...everything else seems to fit OK in and around the wing root so I am assuming that this a direct result of clamping the fuselage halves to get a good canopy fit...it's nothing a little Miiliput won't fix...
Filling this is not an insurmountable task but it may take some time...
...everything else seems to fit OK in and around the wing root so I am assuming that this a direct result of clamping the fuselage halves to get a good canopy fit...it's nothing a little Miiliput won't fix...
Please critique my posts honestly i.e. say what you think so I can learn and improve...
The World According To Me
The World According To Me
-
SJPONeill
- Modelling Gent and Scholar
- Posts: 3525
- Joined: May 1st, 2011, 12:01 am
- Location: Near the Spiral, NZ.
- Contact:
Re: Simon's Red From Under The Bed
Oh, yes and htere's also a small step between the fuselage and wings on both side and nothing I am prepared to carry the can for...as above there doesn't seem to be anything out of place or otherwise obstructing the fit...annoying to say the least...
Please critique my posts honestly i.e. say what you think so I can learn and improve...
The World According To Me
The World According To Me
-
SJPONeill
- Modelling Gent and Scholar
- Posts: 3525
- Joined: May 1st, 2011, 12:01 am
- Location: Near the Spiral, NZ.
- Contact:
Re: Simon's Red From Under The Bed
Nope...if I'd trimmed the roll cage, the gap would be bigger if that's the cause...I would have needed to shim about 1mm ONTO the rollcage and then the fuselage would have been fractionally too wide for the canopy....if I do another of these - and I am quite keen to - I'd try the upper wings to the fuselage before adding in the one-piece lower wing...an old flying wing trick will means that any problematic seams are along the leading and trailing edges and somewhat easier to tidy up in the event of issues than the seam along the wing root...
Please critique my posts honestly i.e. say what you think so I can learn and improve...
The World According To Me
The World According To Me