2015 EDT - Defeat from the Jaws of Victory ?
With the future on, I proceeded to stick on the little bits --
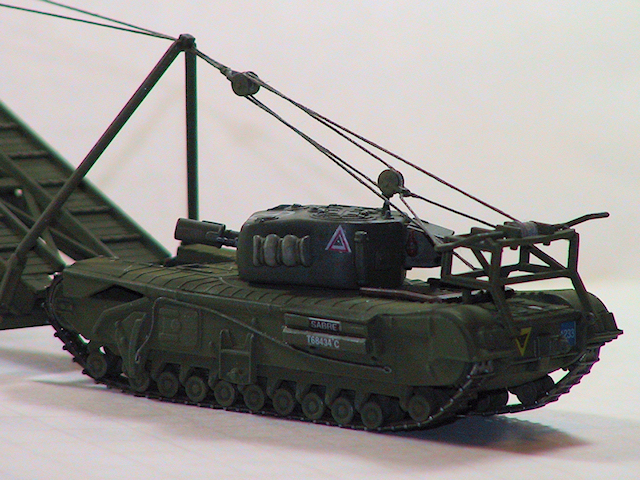
2 fire ext - check
2 besa - check
2 bags/covers on turret side - DO NOT FIT ON THEIR TABS !
20 minutes of frantic hollowing, carving, sanding, etc -- and they are on .... BUT, there's a finger print in the Future atop the turret, there's scratches and scapes on the turret sides .... AAAARRRGGH !!!!
I have done what I can. The turret will sit to the very last to be decaled and touched up.
Right now I'm off to do hull decals so I can start the final rigging ...
Back by 2200 ....
BTW, if you go back to where I said "I can see the light at the end of the tunnel..." you'll know exactly when things started going wrong ...
John's being funny ... * * * Finished * * *
-
JohnRatzenberger

- Why is he so confused ?
- Posts: 15734
- Joined: April 5th, 2011, 3:42 pm
- Location: Living on a sandbar - Nags Head, NC.
Re: John's being funny ... * * * Half-way and heading home *
John Ratzenberger 
It's my model and I'll do what I want with it.
It's my model and I'll do what I want with it.
-
JohnRatzenberger
- Why is he so confused ?
- Posts: 15734
- Joined: April 5th, 2011, 3:42 pm
- Location: Living on a sandbar - Nags Head, NC.
Re: John's being funny ... * * * Half-way and heading home *
22 Aug, 2125 EDT - 23hr 25min
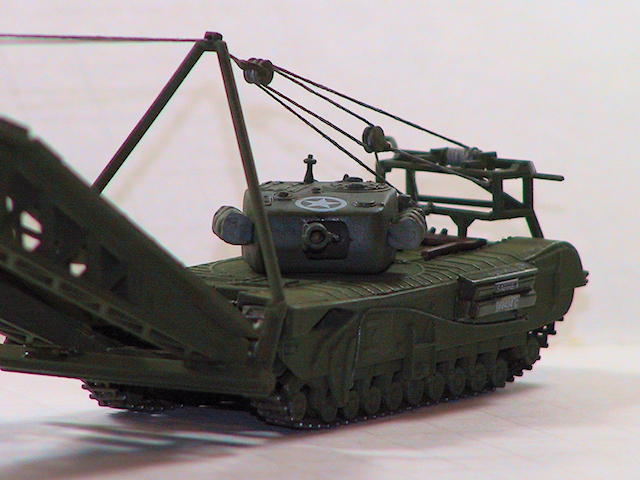
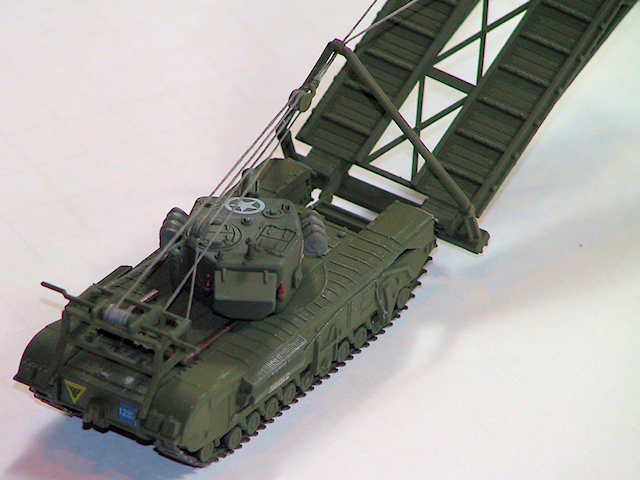
Finished. Well, the MicroSol is drying, and it needs a dull coat to see how the decals fit in.
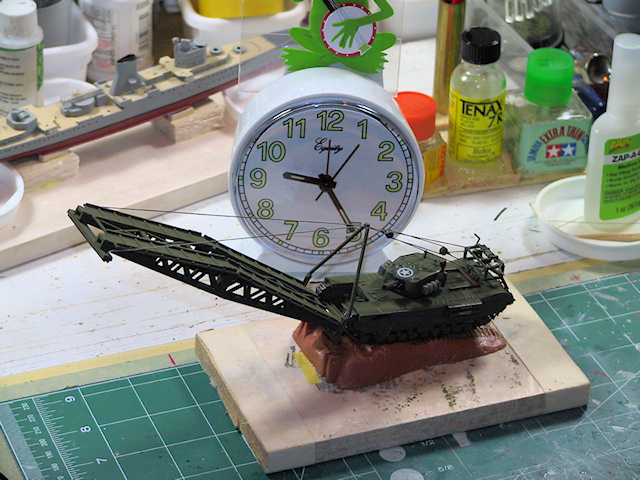
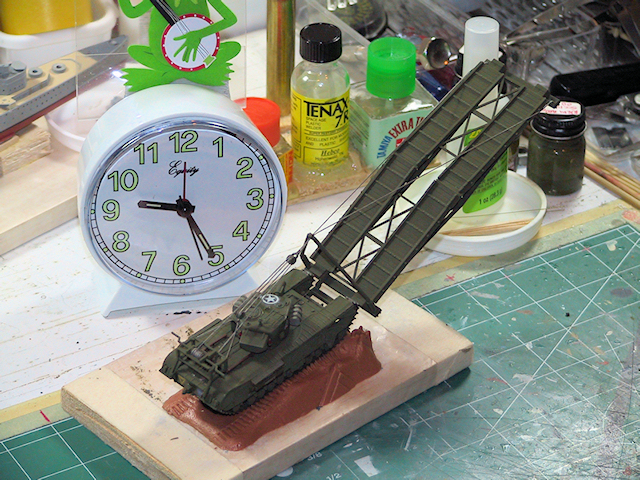
The SBG moves but not freely. My rope is too thick to slide freely in the "pullys", so it's a matter of setting the SBG at the desired angle then adjusting the tension of the rope until it looks OK going through the pullys, then wind the excess onto the winch. None of this is strong enough to take a lot of tugging.
The decals aren't very good. White background - white letters, couldn't see to cut them out, out of register, don't slide well -still unlike most the Chinese repops of Matchbox, they didn't just disintegrate. It says printed by RoG. I'm still concerned what the turret star & formation sign will look like after all the problems.
Glamor pix tomorrow, probably after I put dullcote over it. I'll do a summary then also ….
Finished. Well, the MicroSol is drying, and it needs a dull coat to see how the decals fit in.
The SBG moves but not freely. My rope is too thick to slide freely in the "pullys", so it's a matter of setting the SBG at the desired angle then adjusting the tension of the rope until it looks OK going through the pullys, then wind the excess onto the winch. None of this is strong enough to take a lot of tugging.
The decals aren't very good. White background - white letters, couldn't see to cut them out, out of register, don't slide well -still unlike most the Chinese repops of Matchbox, they didn't just disintegrate. It says printed by RoG. I'm still concerned what the turret star & formation sign will look like after all the problems.
Glamor pix tomorrow, probably after I put dullcote over it. I'll do a summary then also ….
John Ratzenberger
It's my model and I'll do what I want with it.
It's my model and I'll do what I want with it.
-
Dirkpitt289

- NUMA's Auto Mechanic
- Posts: 8724
- Joined: May 2nd, 2011, 1:55 am
- Location: New jersey USA
- Contact:
Re: John's being funny ... * * * Finished * * *
Very nice John
.... Dirk
Beware of the DOG's of WAR
My Youtube Channel
https://www.youtube.com/user/ModelingGu ... rid&view=0
Beware of the DOG's of WAR
My Youtube Channel
https://www.youtube.com/user/ModelingGu ... rid&view=0

Re: John's being funny ... * * * Finished * * *
Looks very nice in the end, well done  was it hard to rig the whole thing at all??
"When a prang (crash) seems inevitable, endeavor to strike the softest, cheapest object in the vicinity as slow and gently as possible." - Advice given to RAF pilots during WWII
-
TimJ

- Modelling Gent and Scholar
- Posts: 4290
- Joined: May 1st, 2011, 12:54 am
- Location: Oldbury, West Midlands
Re: John's being funny ... * * * Finished * * *
Great job John.
2020 A:35 B:18. 2021 A: 51 B:25 C:21 2022 A:63 B:23 C:11 2024 A:9 B:4 C:15
-
JamesPerrin

- Looks like his avatar
- Posts: 13687
- Joined: April 5th, 2011, 8:09 pm
- Location: W. Yorkshire
- Contact:
Re: John's being funny ... * * * Finished * * *
Brill work John.
Classic British Kits SIG Leader Better to fettle than to fill
(2024 A:B 5:2) (2023 13:8:7) (2022 21:11) (2021 15:8) (2020 8:4:4)
(2024 A:B 5:2) (2023 13:8:7) (2022 21:11) (2021 15:8) (2020 8:4:4)
-
splash

- Senior Service Rotorhead
- Posts: 13828
- Joined: May 1st, 2011, 11:02 am
- Location: Somerset England
Re: John's being funny ... * * * Finished * * *
Hi John
Congratulations on an excellent finish.
It shows my ignorance when I asked how does it compare with the new Airfix Bridge Layer, not being a WWII AFV buff, I did not realise they had built several different types of bridge layer using the same Churchill base. The New Airfix version looks like a later model .
I like the look of the Matchbox version and after seeing your build will try and get one to build.
Regards
Splash
My work bench is starting to look like Portsmouth Naval Dockyard.
-
MerlinJones
Re: John's being funny ... * * * Finished * * *
The Matchbox one is still a tank that can shoot things, before laying its bridge, so that it can cross the river and shoot some more things.
Good finish John. I was worried the rigging side of things might trip you up, but you've clearly had a proper education.
Nicely done, sir.
Regards,
Bruce
Good finish John. I was worried the rigging side of things might trip you up, but you've clearly had a proper education.
Nicely done, sir.
Regards,
Bruce
-
theconfidencestoat
- Active Participant
- Posts: 517
- Joined: May 1st, 2011, 3:49 am
Re: John's being funny ... * * * Finished * * *
Brilliant work......all those cables....

Re: John's being funny ... * * * Finished * * *
Excellent stuff, John. Well done.
Besting 60 years of mediocre building of average kits in the stand off scale
-
JohnRatzenberger
- Why is he so confused ?
- Posts: 15734
- Joined: April 5th, 2011, 3:42 pm
- Location: Living on a sandbar - Nags Head, NC.
Re: John's being funny ... * * * Finished * * *
23 August - Summary.
I put a little dullcote on the decals only and it looks OK - no silvering.
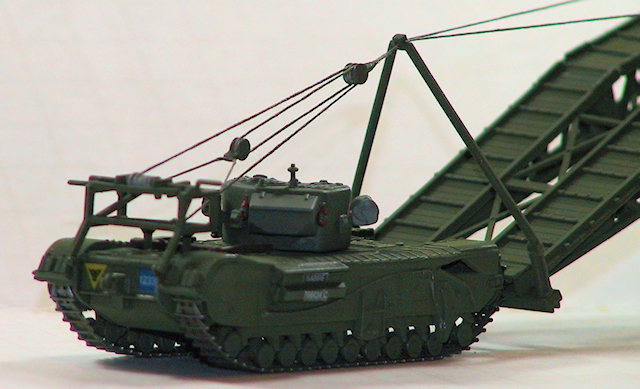
I'm happy with my build, even though I really didn't achieve my goal of having a ready-to-go AVRE-SBG model to start my collection of variants -- darn, I'll have to do another, but at least I've learned all the quirks of this kit and can avoid them next time.
My build plan was fine, even though I deviated from it a bit. I identified the critical 'let the glue cure' steps, etc, to be sure I had a strong build to work with and I wasn't dealing with parts separating, etc.
I had 4 problems with the kit, all ,mentioned in the build:
-- decals are RoG and are off-register and a bit difficult to use. The white decals do not show on white backing paper so they are very difficult to cut. The kit instructions do not clearly show the red triangle on option A. I have some Aleran Miniatures sheets that I will use next time.
-- the very weak track connection; fortunately there is plenty of surface inside the sponson to glue it to.
-- the sprocket teeth are ruined by the sprue gate, but worse, the track does not fit down on them. Fortunately very little of the sprockets can be seen, so next time I will remove the invisible teeth to allow the track to lay on the sprockets neatly. Oh, yes, contrary to the instructions, I think you should make 4 sets of 29+30 with the spokes facing outward.
-- the bag/cover mounting tab and the bag, marking option A only. Test fit that before you do anything else on the turret. You've seen the last minute angst it caused me.
Other than that, it's a good kit. The detail is pretty good, there are only a few seams, no ejector marks, the sprue gates are intelligently placed and mostly small. The parts fit well -- the sponsons build up nicely and then it is really easy to build the rest of the hull between them, with a good tight fit. I'm impressed.
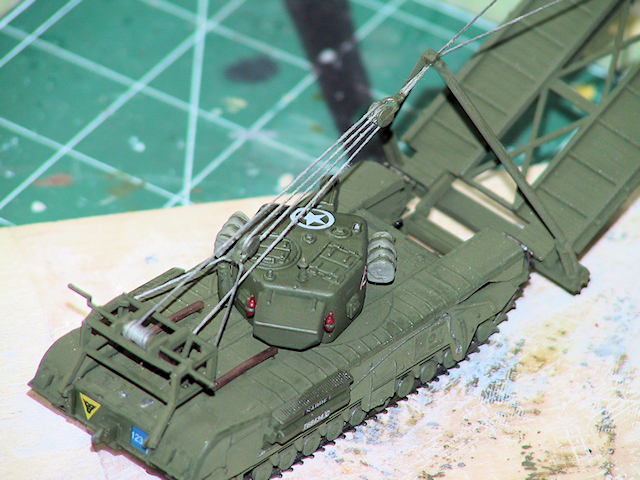
What will scare many off is the rigging, but it isn't that bad if you take your time and be sure you have allowed glue to cure well. Also, for neatness sake, be gentle gluing the 'wire rope' so it looks natural. Here's how I did it, and frankly, it will read much like one of Bruce's airplane rigging tutorials, just a slightly different material.
Choose a small diameter thread. Mine is not small enough. Alternatively you could work at opening up the sheaves in the pulleys but that would be a lot of work. In the build, I gave a quick tutorial on how I make 'wire rope' out of thread - you may have aftermarket or a better method. The key is flexibility as you can see the sharp turns it has to make.
Rigging the SBG bridge.
Instructions show a 148mm length from each end of the bank seat to the boom, then a single strand 10mm long from the boom to the double-block pulley. Too hard. First, instead of attaching the rope to the stubs on the bank seat, cut 'em off and drill through instead, then open up the hole in the boom so a double strand can pass through. Cut your rope 148+148+10+10+9= 325mm long, where the 148+148+10+10 are the kit lengths, with the 10mm section doubled, and the 9mm is enough extra to stick in the holes, pass thru the boom, and attach the pulley in the middle. This isn't a critical length and you might even have a bit extra under the bank seat you can trim off.
Now, take your rope and stretch it out straight along your bench, find and mark the halfway point, then tape it down so that you have about 5mm on each side and it is nice and tight. I put wax paper under where I'm going to glue. Anyway dip the end of your block in a tiny bit of superglue and carefully stick it onto the rope, standing straight up -- don't worry superglue and thread bond quickly. You can hit it with accelerator if you want. When dry, lift it off and carefully apply a decent blob over the string to form a bigger block-end and hit it with accelerator. Again, do not allow glue to spread sideways making the rope stiff. Once done, a bit of paint and it looks like a decent double-blocked pulley.
Now thread the two ends through the boom, back to front, and attach each end at the bank seat in the same manner - superglue, accelerator, touch-up paint. Make sure your ropes run true and aren't twisted.
Do not glue the rope where it passes through the boom -- save that for the very end when you have all the rigging in place, nice and tight, and there is weight on it from the boom -- then hit that spot with the usual.
Making the pulley-yoke attached to the front on the winch cage.
The kit says 21mm for each leg of the yoke, I cut 21+21+6=48, with the extra 6 being for the block and attachment points on the cage. Do the same as with the bridge. Stretch it out, mark the end point, glue the block, paint, etc. Then put a small blob of superglue under one of the top front corners, drip one end of the string in accelerator and carefull push the string into the blob. Be careful, ensure your string/block are in the right position and that you hit it at a good angle to minimize twists and such. When dry, again ensure the string/block are laying correctly and do the other side. Touch 'em both up.
Doing the winch and the rigging.
The kit says a 290mm length, it can be longer and you can trim it off. The key is to understand that this rope runs from the winch to the double-block, back to the single-block, back to the double-block then back to 'tie off' on the front of the winch cage, I used the lower bar as it looks neater.
I drilled a small hole into the winch at one side and glued the rope in there for strength, again being careful …. In all these following steps, remember that winch and it's cranks are very delicate -- be gentle.
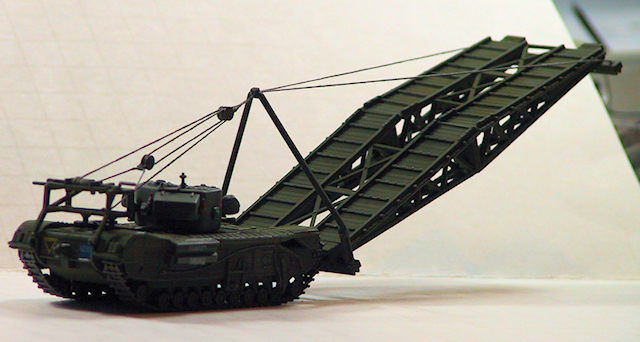
With everything well dry, I started rigging. Prop the bridge up at a 30-40 degree angle to give you a long piece of rope to work with. Wind a full drum of rope onto the winch. Run the rest of the rope off the top of the winch-drum into the top of the double-block, out the bottom of the double-block into the bottom of the single-block, out the top of the single-block into the top of the double-block, then out the bottom of the double-block back down and tie it off on the cage.
At each step ensure your blocks are staying up right, ropes are crossing, etc -- neatness counts. Once happy, glue the 'tie-off' on the cage and tidy it up.
Getting the final look.
Decide how you want the bridge to sit and lower/raise it accordingly, working at it a run at a time to get the rope taut. If you have done a good job gluing and are gentle, nothing will come adrift. Do not worry about the first run of rope from the winch to the double-block, we'll take up any slack with the winch itself -- just get all the others taut. I had difficulty because my rope was too thick and all I could do is loosen & pull then loosen & pull one run at a time.
When you've got the look and the bridge is hanging nicely, it's a good time to glue the rope passing through the boom, as I mentioned above. You can wind excess onto the winch. The good news about my ropes binding is that they hold the bridge in place with no effort. If yours run freely then the winch may unwind under weight.
Of course if you are a heathen and no longer care about the bridge raising/lowering, then apply some glue ….
In all, it's really NOT difficult to rig if you take your time ....
Been a very good group build, thanks to Greg for running it and to all the participants !!
I put a little dullcote on the decals only and it looks OK - no silvering.
I'm happy with my build, even though I really didn't achieve my goal of having a ready-to-go AVRE-SBG model to start my collection of variants -- darn, I'll have to do another, but at least I've learned all the quirks of this kit and can avoid them next time.
My build plan was fine, even though I deviated from it a bit. I identified the critical 'let the glue cure' steps, etc, to be sure I had a strong build to work with and I wasn't dealing with parts separating, etc.
I had 4 problems with the kit, all ,mentioned in the build:
-- decals are RoG and are off-register and a bit difficult to use. The white decals do not show on white backing paper so they are very difficult to cut. The kit instructions do not clearly show the red triangle on option A. I have some Aleran Miniatures sheets that I will use next time.
-- the very weak track connection; fortunately there is plenty of surface inside the sponson to glue it to.
-- the sprocket teeth are ruined by the sprue gate, but worse, the track does not fit down on them. Fortunately very little of the sprockets can be seen, so next time I will remove the invisible teeth to allow the track to lay on the sprockets neatly. Oh, yes, contrary to the instructions, I think you should make 4 sets of 29+30 with the spokes facing outward.
-- the bag/cover mounting tab and the bag, marking option A only. Test fit that before you do anything else on the turret. You've seen the last minute angst it caused me.
Other than that, it's a good kit. The detail is pretty good, there are only a few seams, no ejector marks, the sprue gates are intelligently placed and mostly small. The parts fit well -- the sponsons build up nicely and then it is really easy to build the rest of the hull between them, with a good tight fit. I'm impressed.
What will scare many off is the rigging, but it isn't that bad if you take your time and be sure you have allowed glue to cure well. Also, for neatness sake, be gentle gluing the 'wire rope' so it looks natural. Here's how I did it, and frankly, it will read much like one of Bruce's airplane rigging tutorials, just a slightly different material.
Choose a small diameter thread. Mine is not small enough. Alternatively you could work at opening up the sheaves in the pulleys but that would be a lot of work. In the build, I gave a quick tutorial on how I make 'wire rope' out of thread - you may have aftermarket or a better method. The key is flexibility as you can see the sharp turns it has to make.
Rigging the SBG bridge.
Instructions show a 148mm length from each end of the bank seat to the boom, then a single strand 10mm long from the boom to the double-block pulley. Too hard. First, instead of attaching the rope to the stubs on the bank seat, cut 'em off and drill through instead, then open up the hole in the boom so a double strand can pass through. Cut your rope 148+148+10+10+9= 325mm long, where the 148+148+10+10 are the kit lengths, with the 10mm section doubled, and the 9mm is enough extra to stick in the holes, pass thru the boom, and attach the pulley in the middle. This isn't a critical length and you might even have a bit extra under the bank seat you can trim off.
Now, take your rope and stretch it out straight along your bench, find and mark the halfway point, then tape it down so that you have about 5mm on each side and it is nice and tight. I put wax paper under where I'm going to glue. Anyway dip the end of your block in a tiny bit of superglue and carefully stick it onto the rope, standing straight up -- don't worry superglue and thread bond quickly. You can hit it with accelerator if you want. When dry, lift it off and carefully apply a decent blob over the string to form a bigger block-end and hit it with accelerator. Again, do not allow glue to spread sideways making the rope stiff. Once done, a bit of paint and it looks like a decent double-blocked pulley.
Now thread the two ends through the boom, back to front, and attach each end at the bank seat in the same manner - superglue, accelerator, touch-up paint. Make sure your ropes run true and aren't twisted.
Do not glue the rope where it passes through the boom -- save that for the very end when you have all the rigging in place, nice and tight, and there is weight on it from the boom -- then hit that spot with the usual.
Making the pulley-yoke attached to the front on the winch cage.
The kit says 21mm for each leg of the yoke, I cut 21+21+6=48, with the extra 6 being for the block and attachment points on the cage. Do the same as with the bridge. Stretch it out, mark the end point, glue the block, paint, etc. Then put a small blob of superglue under one of the top front corners, drip one end of the string in accelerator and carefull push the string into the blob. Be careful, ensure your string/block are in the right position and that you hit it at a good angle to minimize twists and such. When dry, again ensure the string/block are laying correctly and do the other side. Touch 'em both up.
Doing the winch and the rigging.
The kit says a 290mm length, it can be longer and you can trim it off. The key is to understand that this rope runs from the winch to the double-block, back to the single-block, back to the double-block then back to 'tie off' on the front of the winch cage, I used the lower bar as it looks neater.
I drilled a small hole into the winch at one side and glued the rope in there for strength, again being careful …. In all these following steps, remember that winch and it's cranks are very delicate -- be gentle.
With everything well dry, I started rigging. Prop the bridge up at a 30-40 degree angle to give you a long piece of rope to work with. Wind a full drum of rope onto the winch. Run the rest of the rope off the top of the winch-drum into the top of the double-block, out the bottom of the double-block into the bottom of the single-block, out the top of the single-block into the top of the double-block, then out the bottom of the double-block back down and tie it off on the cage.
At each step ensure your blocks are staying up right, ropes are crossing, etc -- neatness counts. Once happy, glue the 'tie-off' on the cage and tidy it up.
Getting the final look.
Decide how you want the bridge to sit and lower/raise it accordingly, working at it a run at a time to get the rope taut. If you have done a good job gluing and are gentle, nothing will come adrift. Do not worry about the first run of rope from the winch to the double-block, we'll take up any slack with the winch itself -- just get all the others taut. I had difficulty because my rope was too thick and all I could do is loosen & pull then loosen & pull one run at a time.
When you've got the look and the bridge is hanging nicely, it's a good time to glue the rope passing through the boom, as I mentioned above. You can wind excess onto the winch. The good news about my ropes binding is that they hold the bridge in place with no effort. If yours run freely then the winch may unwind under weight.
Of course if you are a heathen and no longer care about the bridge raising/lowering, then apply some glue ….
In all, it's really NOT difficult to rig if you take your time ....
Been a very good group build, thanks to Greg for running it and to all the participants !!
John Ratzenberger
It's my model and I'll do what I want with it.
It's my model and I'll do what I want with it.

Re: John's being funny ... * * * Finished * * *
Great work John. Very impressive modelling.
All the best.
Greg
All the best.
Greg
Two things are infinite: the universe and human stupidity; and I'm not sure about the the universe.
The difference between stupidity and genius is that genius has its limits.
Albert Einstein
The difference between stupidity and genius is that genius has its limits.
Albert Einstein
-
lancfan

- Avro's Rivet Rhapsodizer
- Posts: 8763
- Joined: May 2nd, 2011, 3:55 pm
- Location: Nelson, Lancashire
Re: John's being funny ... * * * Finished * * *
Well done John, just great.
David.
David.
David.
If you forget the past, you may lose the future.
If you forget the past, you may lose the future.
-
philp

- Modelling Gent and Scholar
- Posts: 1279
- Joined: May 1st, 2011, 12:14 am
- Location: Kearns, Utah
- Contact:
Re: John's being funny ... * * * Finished * * *
Great job. Had this kit and sold it off a long time ago. Want one in true 72nd scale (and a DD, and a Crab, and a Fascine, etc) but may need to rethink as can get most of this in 76th with some resin kits.

Re: John's being funny ... * * * Finished * * *
Missed this due to having been camping at the coast. You've made a great job of that, as well as providing some clear, concise instructions for the rest of us for the cabling of the beast. You should be very proud.
I'm a mostly full-time modeller put a part-time poster....