Wow - great work. Especially on those sponsons! Is there no AH-64 kit that comes with those on the mould or are they all the earlier sponson design?
David
Airfix 1/72 Apache Longbow
-
DavidWomby

- Modelling Gent and Scholar
- Posts: 11759
- Joined: May 1st, 2011, 8:09 pm
- Location: Florida, USA
Re: Airfix 1/72 Apache Longbow
Shaun,
Thanks for the tip on the grab handles. Those sponsons look like hard work, so I'm following this build with interest.
John
Thanks for the tip on the grab handles. Those sponsons look like hard work, so I'm following this build with interest.
John
If all else fails, read the instructions...
Building: My first Vacform - Rareplanes Shorts Tucano
Building: My first Vacform - Rareplanes Shorts Tucano
-
ShaunW
- NOT the sheep
- Posts: 26188
- Joined: November 26th, 2011, 6:11 pm
- Location: Pontefract West Yorkshire
Re: Airfix 1/72 Apache Longbow
Thanks to all for your interest in my efforts to bash this thing into shape 
Jim - I don't know for certain that epoxy will fog the clear parts, I'm just working on that assumption.
David - I don't think that 1/72 scale is served with an accurate British Army version, I believe that 1/48th is however.
John - it's a pleasure, I'm very much a trial and error modeller though and don't always get the same results twice
Doing - Tamiya 1/35th Universal Carrier.
Work is the curse of the modelling classes!
IPMS#12300
Work is the curse of the modelling classes!
IPMS#12300
-
AndrewR

- In the basement lab
- Posts: 24100
- Joined: April 5th, 2011, 4:13 pm
- Location: Ottawa, Ontario, The Great White North
- Contact:
Re: Airfix 1/72 Apache Longbow
The vapour from CA glue will react with the canopy and form tiny droplets on the canopy if not well ventilated. The droplets scatter the light and cloud the canopy (just like drops of water in cloud in the sky). A coat of Klear beforehand stops the vapour reacting with the plastic. Alternatively, a coat of Klear afterwards should trap the little droplets in a layer of Klear which has the same refractive index (optical properties) as the droplets, and so remove the clouding.
Here endeth the first physics lesson...
I think you are right about 1/72 not having a correct British Army AH.1. As I don't build in 1/48, I've not really looked at the alternatives there. My head might explode. :
:
Nice work Shaun
Cheers
Andrew
Here endeth the first physics lesson...
I think you are right about 1/72 not having a correct British Army AH.1. As I don't build in 1/48, I've not really looked at the alternatives there. My head might explode.
Nice work Shaun
Cheers
Andrew
Up in the Great White North
-
ShaunW
- NOT the sheep
- Posts: 26188
- Joined: November 26th, 2011, 6:11 pm
- Location: Pontefract West Yorkshire
Re: Airfix 1/72 Apache Longbow
Aaaaaaargh! physics!! I only just scraped through my "O" Level on that subject - it was a very ordinary grade too! Still, it's nice to know that we've got some one with brains in this GB
I can't remember which manufacturer does the 1/48th example of the British Apache, I just noticed some build photos during my regular trawling of Google Images for this build. I'll try and take note next time I'm searching.
I can't remember which manufacturer does the 1/48th example of the British Apache, I just noticed some build photos during my regular trawling of Google Images for this build. I'll try and take note next time I'm searching.
Doing - Tamiya 1/35th Universal Carrier.
Work is the curse of the modelling classes!
IPMS#12300
Work is the curse of the modelling classes!
IPMS#12300
-
AndrewR
- In the basement lab
- Posts: 24100
- Joined: April 5th, 2011, 4:13 pm
- Location: Ottawa, Ontario, The Great White North
- Contact:
Re: Airfix 1/72 Apache Longbow
It's all right Shaun, I do this for a living, and that was what we call in the trade "a teachable moment".ShaunW wrote:Aaaaaaargh! physics!! I only just scraped through my "O" Level on that subject - it was a very ordinary grade too! Still, it's nice to know that we've got some one with brains in this GB
I can't remember which manufacturer does the 1/48th example of the British Apache, I just noticed some build photos during my regular trawling of Google Images for this build. I'll try and take note next time I'm searching.
And I had a very, very good teacher for Physics O-level - 17 out of 30 in her class got grade A.
I think Revell and, heaven help us, Italeri, do Apache Longbows in 1/48 with British options.
Up in the Great White North
-
ShaunW
- NOT the sheep
- Posts: 26188
- Joined: November 26th, 2011, 6:11 pm
- Location: Pontefract West Yorkshire
Re: Airfix 1/72 Apache Longbow
I need the appliance of science on those blasted sponsons. Yes, I managed to wear through the plastic and have had to fit repair pieces in. I haven't therefore got any further other than to apply yet more filler. I'm beginning to get the feeling that I'm making a drama out of a crisis here. At the moment, work seems to be more fun. Let's have some beer instead 
Doing - Tamiya 1/35th Universal Carrier.
Work is the curse of the modelling classes!
IPMS#12300
Work is the curse of the modelling classes!
IPMS#12300
-
AndrewR
- In the basement lab
- Posts: 24100
- Joined: April 5th, 2011, 4:13 pm
- Location: Ottawa, Ontario, The Great White North
- Contact:
Re: Airfix 1/72 Apache Longbow
I'm having the same issues with my P-38L at the moment. I've just started round 4 of the fill, sand, prime, inspect cycleShaunW wrote:I need the appliance of science on those blasted sponsons. Yes, I managed to wear through the plastic and have had to fit repair pieces in. I haven't therefore got any further other than to apply yet more filler. I'm beginning to get the feeling that I'm making a drama out of a crisis here. At the moment, work seems to be more fun. Let's have some beer instead
More wine is in the fridge.
Cheers
Andrew
Up in the Great White North
-
ShaunW
- NOT the sheep
- Posts: 26188
- Joined: November 26th, 2011, 6:11 pm
- Location: Pontefract West Yorkshire
Re: Airfix 1/72 Apache Longbow
I've been having a gander at your P-38 and that is a bind with the join lines. That's the problem with NMF, it shows everything - the good, the bad and the ugly
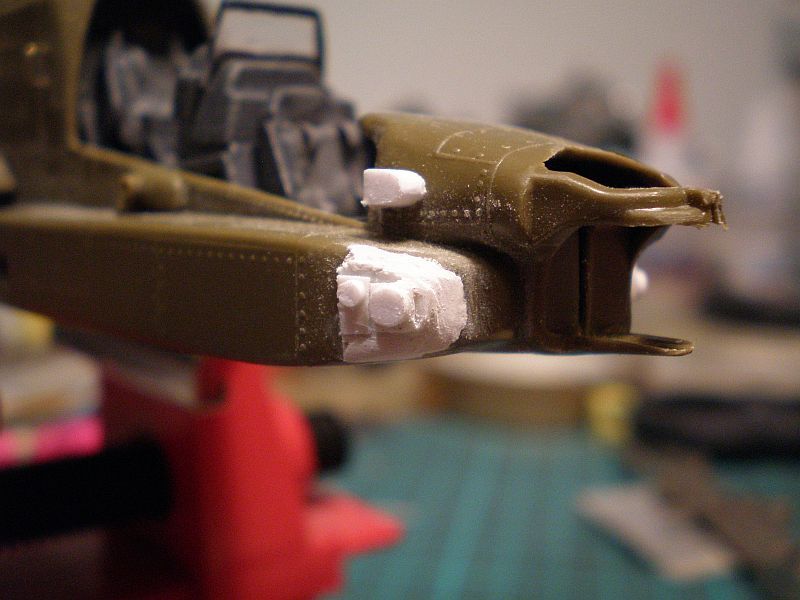
Well, after having a little of the beer that refreshes the parts other beers cannot reach I returned to the saga and made some progress. After more filler, I added some panels to the sponsons which, with a little imagination, look a little like those actually fitted to the British Army Apaches. Rear vents? schments! I'm not going to trouble myself further!!
As you can see, I've now added the engine pods and the sponsons live nicely in the shadows - I reckon under paint they will just about pass muster.
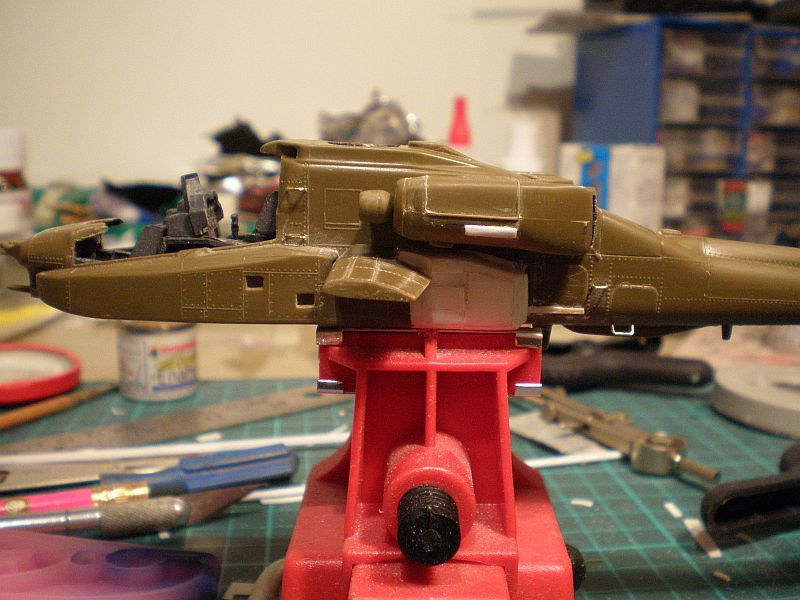
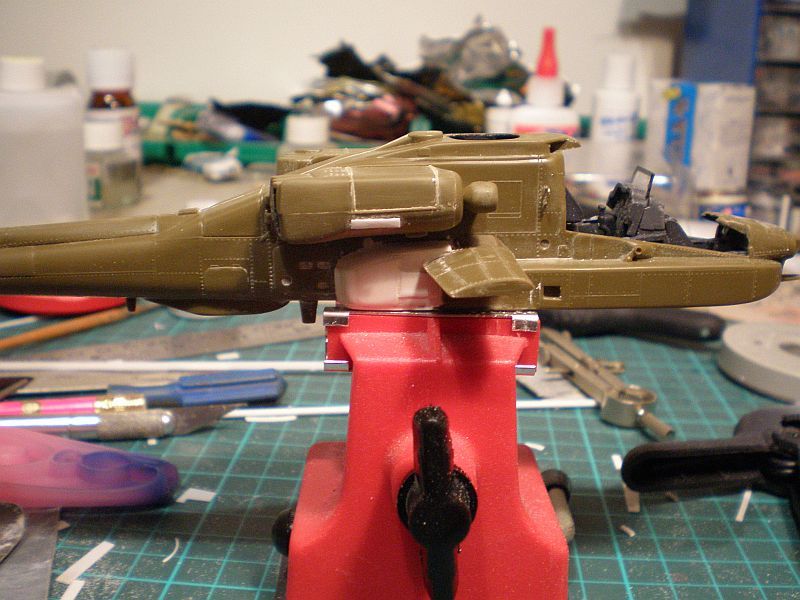
The airframe needs a bit of a clean up as I've managed to get filler just about everywhere Next up I'll start having a look at fitting some lumps and bumps.
Thanks for looking.
Well, after having a little of the beer that refreshes the parts other beers cannot reach I returned to the saga and made some progress. After more filler, I added some panels to the sponsons which, with a little imagination, look a little like those actually fitted to the British Army Apaches. Rear vents? schments! I'm not going to trouble myself further!!
As you can see, I've now added the engine pods and the sponsons live nicely in the shadows - I reckon under paint they will just about pass muster.
The airframe needs a bit of a clean up as I've managed to get filler just about everywhere
Thanks for looking.
Doing - Tamiya 1/35th Universal Carrier.
Work is the curse of the modelling classes!
IPMS#12300
Work is the curse of the modelling classes!
IPMS#12300
-
Jagewa

- Modelling Gent and Scholar
- Posts: 2752
- Joined: April 6th, 2011, 2:18 am
- Location: Christchurch, New Zealand
- Contact:
Re: Airfix 1/72 Apache Longbow
Nicely done, good'un sponson my old son!
Cheers
Jim
Cheers
Jim
-
JamesPerrin

- Looks like his avatar
- Posts: 13687
- Joined: April 5th, 2011, 8:09 pm
- Location: W. Yorkshire
- Contact:
Re: Airfix 1/72 Apache Longbow
It's starting to really look the part now Shaun.
Classic British Kits SIG Leader Better to fettle than to fill
(2024 A:B 5:2) (2023 13:8:7) (2022 21:11) (2021 15:8) (2020 8:4:4)
(2024 A:B 5:2) (2023 13:8:7) (2022 21:11) (2021 15:8) (2020 8:4:4)
-
ShaunW
- NOT the sheep
- Posts: 26188
- Joined: November 26th, 2011, 6:11 pm
- Location: Pontefract West Yorkshire
Re: Airfix 1/72 Apache Longbow
Thanks boys, lumps and bumps next which should be a bit more interesting than filling and sanding. However, work has risen its ugly head in the form of an urgent matter so I've had it for any modelling tonight 
Doing - Tamiya 1/35th Universal Carrier.
Work is the curse of the modelling classes!
IPMS#12300
Work is the curse of the modelling classes!
IPMS#12300
-
ShaunW
- NOT the sheep
- Posts: 26188
- Joined: November 26th, 2011, 6:11 pm
- Location: Pontefract West Yorkshire
Re: Airfix 1/72 Apache Longbow
Well, we have one Apache finished, well done to Andrew and here's what I've been up to this afternoon.
Using pics on Google Images as a guide, I've worked around the airframe starting to add all the lumps and bumps that feature on Apaches lurking in the British Army. I've made use of thin scrap plastic card, rod and square section pieces, sanded and cut to shape. You would not believe how long it took due in part to bits pinging off into the ether and having to be remade.
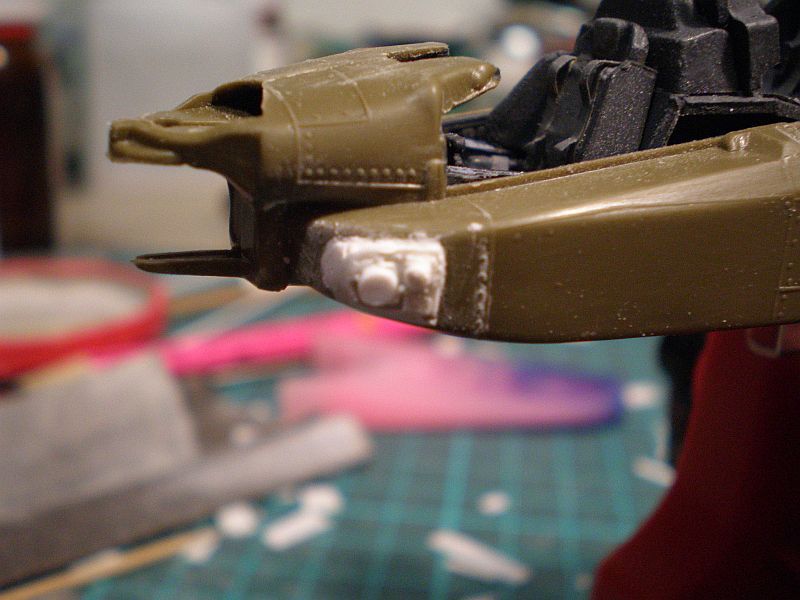
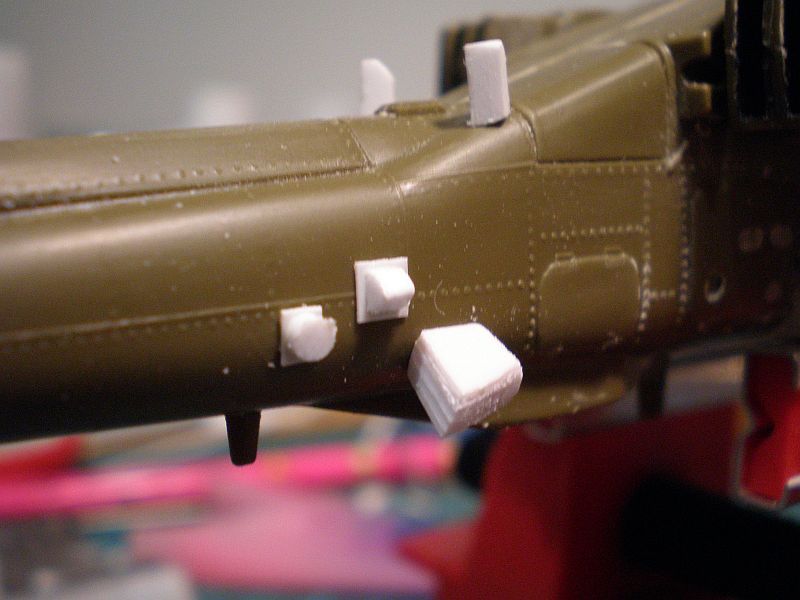
Don't ask me what any of these bits represent because I haven't got the foggiest. I've tried to get the shapes as near as possible although some are a bit out of scale - modeller's license is claimed there. The front sensor thingies could do with being further round the front of the sponsons but, ho hum, they're on now and I'll live with it. A bit of tidying up is needed hither and thither as some bits look a little rough and ready but all being well, it'll look OK under paint. More stuff will be added tomorrow.
Thanks for looking.
Using pics on Google Images as a guide, I've worked around the airframe starting to add all the lumps and bumps that feature on Apaches lurking in the British Army. I've made use of thin scrap plastic card, rod and square section pieces, sanded and cut to shape. You would not believe how long it took due in part to bits pinging off into the ether and having to be remade.
Don't ask me what any of these bits represent because I haven't got the foggiest. I've tried to get the shapes as near as possible although some are a bit out of scale - modeller's license is claimed there. The front sensor thingies could do with being further round the front of the sponsons but, ho hum, they're on now and I'll live with it. A bit of tidying up is needed hither and thither as some bits look a little rough and ready but all being well, it'll look OK under paint. More stuff will be added tomorrow.
Thanks for looking.
Doing - Tamiya 1/35th Universal Carrier.
Work is the curse of the modelling classes!
IPMS#12300
Work is the curse of the modelling classes!
IPMS#12300
-
AndrewR
- In the basement lab
- Posts: 24100
- Joined: April 5th, 2011, 4:13 pm
- Location: Ottawa, Ontario, The Great White North
- Contact:
Re: Airfix 1/72 Apache Longbow
I know exactly how long it takes to put all those boxes and bits on  I turned a Nelsonian blind eye to some of them.
Nice work!
Nice work!
Up in the Great White North
-
ShaunW
- NOT the sheep
- Posts: 26188
- Joined: November 26th, 2011, 6:11 pm
- Location: Pontefract West Yorkshire
Re: Airfix 1/72 Apache Longbow
Thank you kind sir. My Nelsonian eye is missing its patch unfortunately and is seeing rather too much
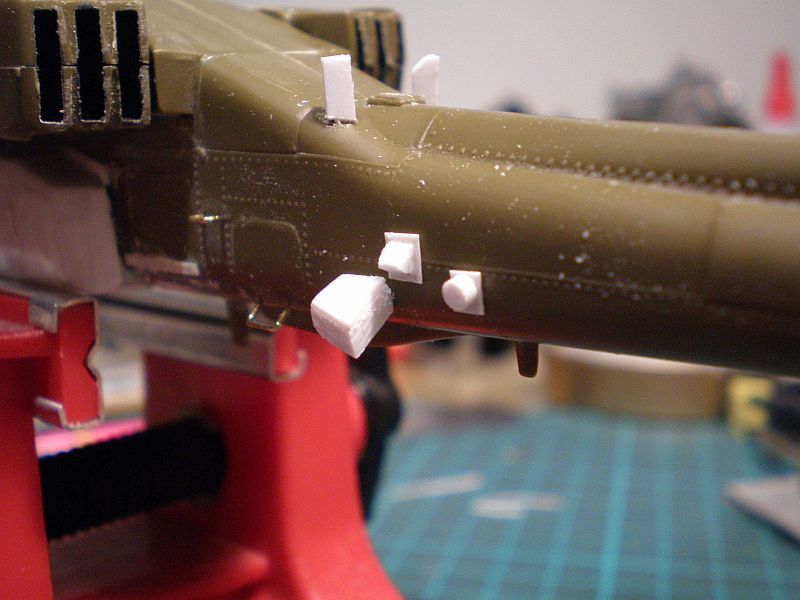
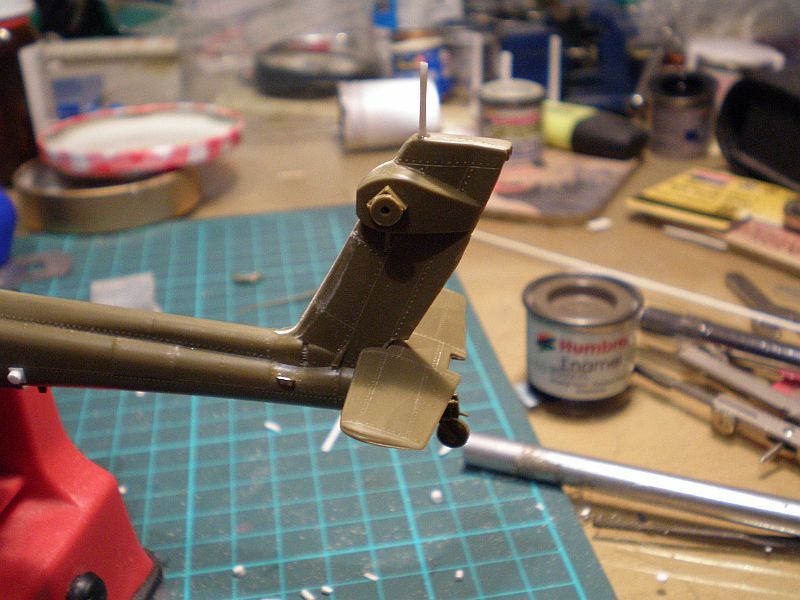
A bit more progress today towards the eventual aim of finishing this beastie. I've continued adding bits and bobs to the airframe. Starting with the engine pods I drilled out a hole at the rear of each pod after making reference to yet more photos on Google and inserted plastic rod in order to mount the arms at the end of which are little vanes, which I presume are attitude indicators. I would have preferred to use tubing for this but unfortunately I don't possess any that is fine enough and so ended up drilling out the rod with 0.5mm drill bit chucked into my smallest pin vice. The purpose of drilling out the rod is to allow for the better mounting of the vane support arms which will be made out of brass wire. I don't exactly know how I'm going to make the vanes, but I'm sure something will crop up.
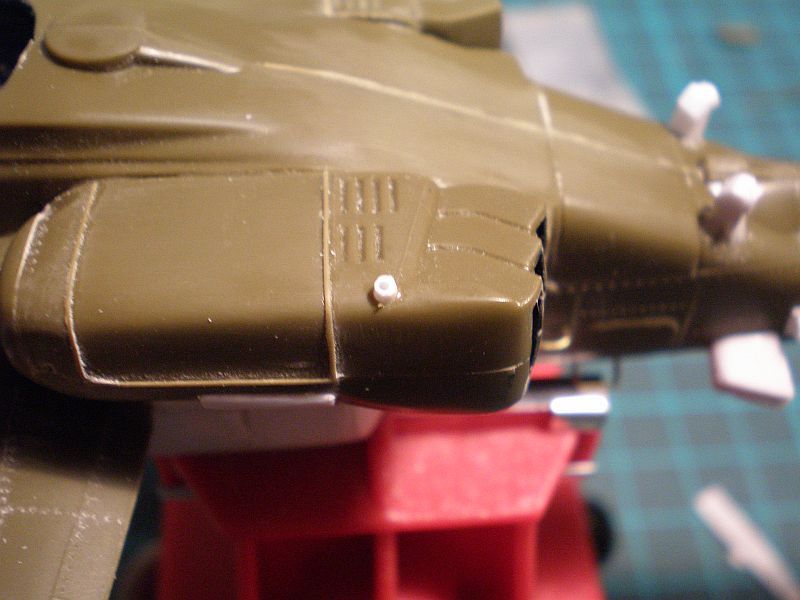
Whilst I was on with the engine pods I also added steady bars to the underside of the exhausts from brass rod to each pod, which you can just about see peeping out under the left hand side pod in this photo.
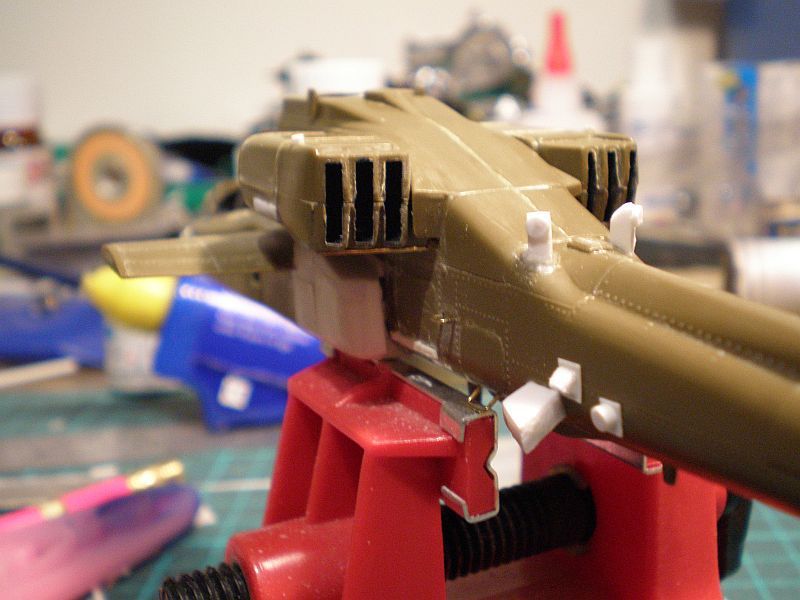
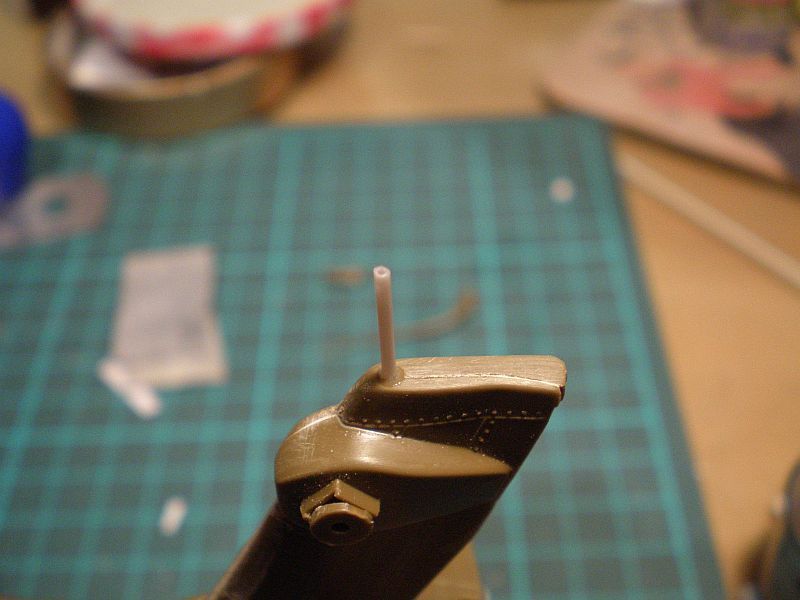
Moving on to the tail of the helicopter, I have noticed from quite a few shots that British Army machines often sport a long whip antenna on the top of the tail. This appears to consist of a thicker base section topped by a finer whip antenna. Once again, the pin vice driller killer came out to drill out a hole in the front top of the tail. Into this I inserted a length of plastic rod, once more due to the absence of any tubing fine enough, to make the thicker base and again I ended up drilling out this rod also. Due to this rod being quite fine, I had to use my smallest 0.3mm drill bit. This will allow me to add the whip antenna using stretched sprue and, as with the attitude vane arms, will give a better join than if I simply tried to glue the sprue directly to the top of the rod.
Finally after all that eyesight straining stuff I added a big bit in the form of the tailplane, which did not fit particularly well, being loose and floppy and requiring a bit of care and attention in order to get it to sit straight and level.
A few more bits to go, some of which actually come with the kit, before I can finally get around to adding some paint. One of my next tasks is to dig around in my spares to see if I can come up with some useable external fuel tanks, otherwise I'll try to modify those incorrect flat fronted rocket pods or just learn to live with them as is
Thanks for looking.
A bit more progress today towards the eventual aim of finishing this beastie. I've continued adding bits and bobs to the airframe. Starting with the engine pods I drilled out a hole at the rear of each pod after making reference to yet more photos on Google and inserted plastic rod in order to mount the arms at the end of which are little vanes, which I presume are attitude indicators. I would have preferred to use tubing for this but unfortunately I don't possess any that is fine enough and so ended up drilling out the rod with 0.5mm drill bit chucked into my smallest pin vice. The purpose of drilling out the rod is to allow for the better mounting of the vane support arms which will be made out of brass wire. I don't exactly know how I'm going to make the vanes, but I'm sure something will crop up.
Whilst I was on with the engine pods I also added steady bars to the underside of the exhausts from brass rod to each pod, which you can just about see peeping out under the left hand side pod in this photo.
Moving on to the tail of the helicopter, I have noticed from quite a few shots that British Army machines often sport a long whip antenna on the top of the tail. This appears to consist of a thicker base section topped by a finer whip antenna. Once again, the pin vice driller killer came out to drill out a hole in the front top of the tail. Into this I inserted a length of plastic rod, once more due to the absence of any tubing fine enough, to make the thicker base and again I ended up drilling out this rod also. Due to this rod being quite fine, I had to use my smallest 0.3mm drill bit. This will allow me to add the whip antenna using stretched sprue and, as with the attitude vane arms, will give a better join than if I simply tried to glue the sprue directly to the top of the rod.
Finally after all that eyesight straining stuff I added a big bit in the form of the tailplane, which did not fit particularly well, being loose and floppy and requiring a bit of care and attention in order to get it to sit straight and level.
A few more bits to go, some of which actually come with the kit, before I can finally get around to adding some paint. One of my next tasks is to dig around in my spares to see if I can come up with some useable external fuel tanks, otherwise I'll try to modify those incorrect flat fronted rocket pods or just learn to live with them as is
Thanks for looking.
Doing - Tamiya 1/35th Universal Carrier.
Work is the curse of the modelling classes!
IPMS#12300
Work is the curse of the modelling classes!
IPMS#12300