Tom's Seaside Chip Snatcher **Failed to fledge**
-
JohnRatzenberger

- Why is he so confused ?
- Posts: 15727
- Joined: April 5th, 2011, 3:42 pm
- Location: Living on a sandbar - Nags Head, NC.
Re: Tom's Seaside Chip Snatcher
Thanks, MDT ! When I get home, I'll look at the pix and see if that holds for other aircraft. I'm not clever enough to pick up on things like that by myself.
John Ratzenberger 
It's my model and I'll do what I want with it.
It's my model and I'll do what I want with it.
-
TomW

- Modelling Gent and Scholar
- Posts: 2279
- Joined: May 1st, 2011, 8:09 am
- Location: Devizes, Wiltshire
Re: Tom's Seaside Chip Snatcher
Thanks both of you  looks like we've got this one sorted. That's what I really like about this forum, everybody is always so willing to help!
Regards
Tom
Regards
Tom
Veni, Venari, Vamoosi
Coastal Command SIG Leader 2012 - 2016
We'll call him Dinghy Watts...... - Paul Bradley
2016 A:B = 29:11
2015 A:B = 38:14
2014 A:B = 25:9
2013 A:B = 20:17
2012 A:B = I didn't keep score
2011 A:B = 39:11
2010 A:B = 51:10
Coastal Command SIG Leader 2012 - 2016
We'll call him Dinghy Watts...... - Paul Bradley
2016 A:B = 29:11
2015 A:B = 38:14
2014 A:B = 25:9
2013 A:B = 20:17
2012 A:B = I didn't keep score
2011 A:B = 39:11
2010 A:B = 51:10
-
TomW
- Modelling Gent and Scholar
- Posts: 2279
- Joined: May 1st, 2011, 8:09 am
- Location: Devizes, Wiltshire
Re: Tom's Seaside Chip Snatcher
One rudimentary cockpit:
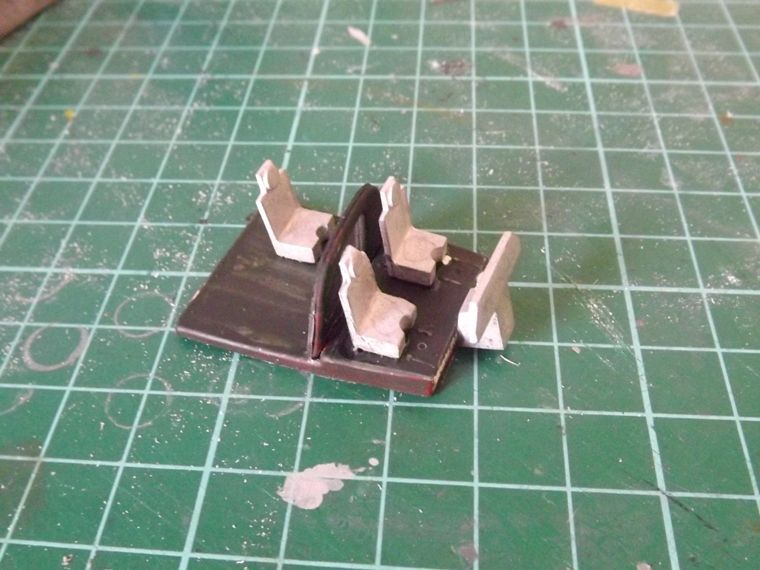
I'll add belts when the seats are painted and have a dig in the spares box for some suitable control columns. I've also cut out the observers windows in the fuselage and nacelle pylon, these have been glazed with PVA. I've also filled and sanded the wing leading and trailing edges to get a smooth aerofoil shape.
Regards
Tom
Veni, Venari, Vamoosi
Coastal Command SIG Leader 2012 - 2016
We'll call him Dinghy Watts...... - Paul Bradley
2016 A:B = 29:11
2015 A:B = 38:14
2014 A:B = 25:9
2013 A:B = 20:17
2012 A:B = I didn't keep score
2011 A:B = 39:11
2010 A:B = 51:10
Coastal Command SIG Leader 2012 - 2016
We'll call him Dinghy Watts...... - Paul Bradley
2016 A:B = 29:11
2015 A:B = 38:14
2014 A:B = 25:9
2013 A:B = 20:17
2012 A:B = I didn't keep score
2011 A:B = 39:11
2010 A:B = 51:10
Re: Tom's Seaside Chip Snatcher
That is starting to look really good Tom.
I hope the rest of the kit goes well, looking forward to seeing the finished article.
Steve
I hope the rest of the kit goes well, looking forward to seeing the finished article.
Steve
-
TomW
- Modelling Gent and Scholar
- Posts: 2279
- Joined: May 1st, 2011, 8:09 am
- Location: Devizes, Wiltshire
Re: Tom's Seaside Chip Snatcher
Cheers Steve
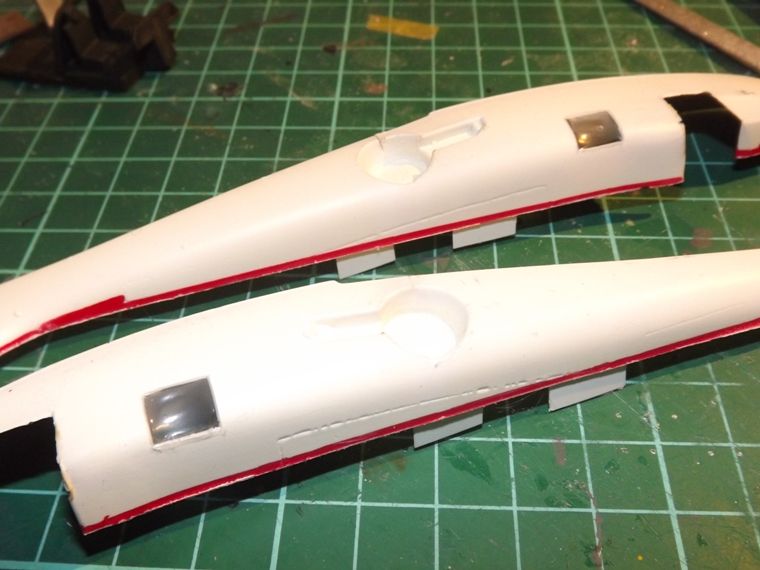
Two nights condensed into one this evening as modelling time is a little tight this week. Last night I followed James' advice and cut a few tabs to strengthen the area under the engine nacelle, You can also see where I've cut the fuselage windows out and glazed them with PVA:
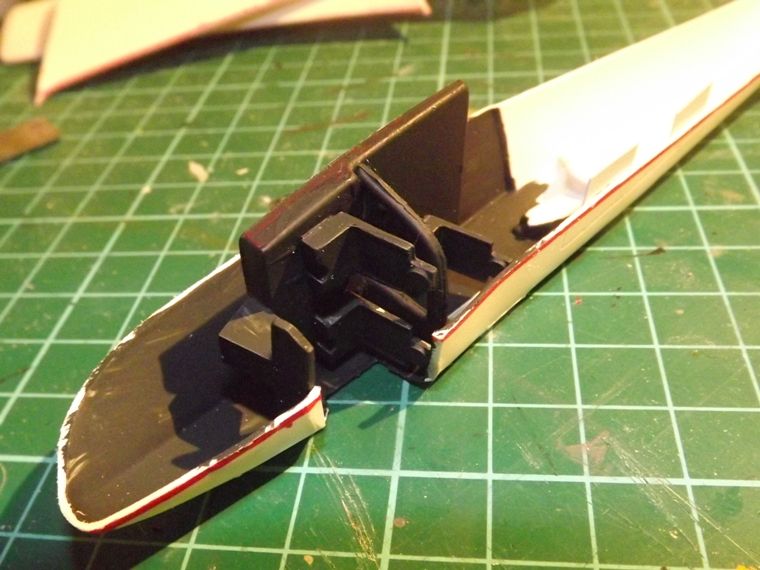
This evening I've gotten the cockpit installed and closed up the fuselage halves, I'll let them fully cure for a day before cleaning up the joins:
More as it happens folks (still enjoying my first Vacform!)
Regards
Tom
Two nights condensed into one this evening as modelling time is a little tight this week. Last night I followed James' advice and cut a few tabs to strengthen the area under the engine nacelle, You can also see where I've cut the fuselage windows out and glazed them with PVA:
This evening I've gotten the cockpit installed and closed up the fuselage halves, I'll let them fully cure for a day before cleaning up the joins:
More as it happens folks
Regards
Tom
Veni, Venari, Vamoosi
Coastal Command SIG Leader 2012 - 2016
We'll call him Dinghy Watts...... - Paul Bradley
2016 A:B = 29:11
2015 A:B = 38:14
2014 A:B = 25:9
2013 A:B = 20:17
2012 A:B = I didn't keep score
2011 A:B = 39:11
2010 A:B = 51:10
Coastal Command SIG Leader 2012 - 2016
We'll call him Dinghy Watts...... - Paul Bradley
2016 A:B = 29:11
2015 A:B = 38:14
2014 A:B = 25:9
2013 A:B = 20:17
2012 A:B = I didn't keep score
2011 A:B = 39:11
2010 A:B = 51:10
-
splash

- Senior Service Rotorhead
- Posts: 13828
- Joined: May 1st, 2011, 11:02 am
- Location: Somerset England
Re: Tom's Seaside Chip Snatcher
That's going to be one cool a/c Tom.
Regards Splash
Regards Splash
My work bench is starting to look like Portsmouth Naval Dockyard.
-
Barry
- Modelling Gent and Scholar
- Posts: 2612
- Joined: May 1st, 2011, 1:23 am
- Location: Eastvale, California, USA
Re: Tom's Seaside Chip Snatcher
That PVA glazing looks surprisingly good, especially considering that it's on a curved part of the fuselage.
2012 A:12 B:13 C:0
-
TomW
- Modelling Gent and Scholar
- Posts: 2279
- Joined: May 1st, 2011, 8:09 am
- Location: Devizes, Wiltshire
Re: Tom's Seaside Chip Snatcher
Thanks guys I made sure the fuselage halves were inverted whilst the PVA dried so it would naturally bulge outwards more than if it was left the right way up.
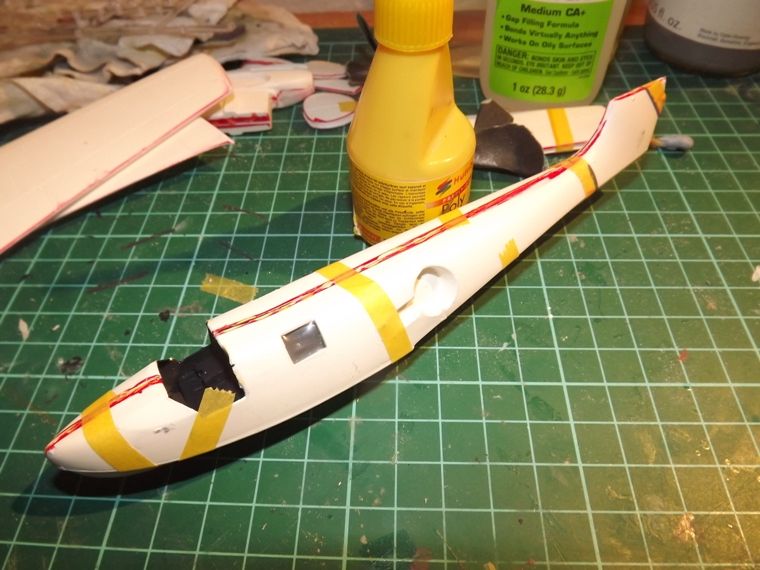
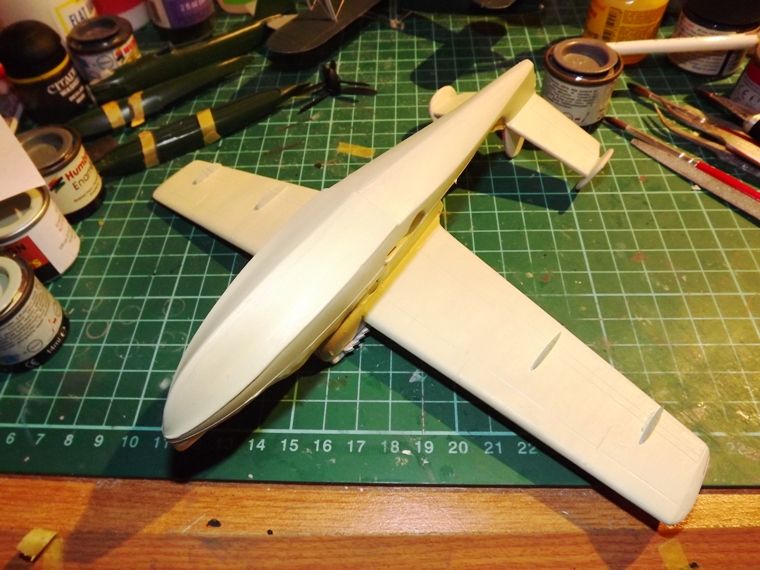
Major progress today before and after work:
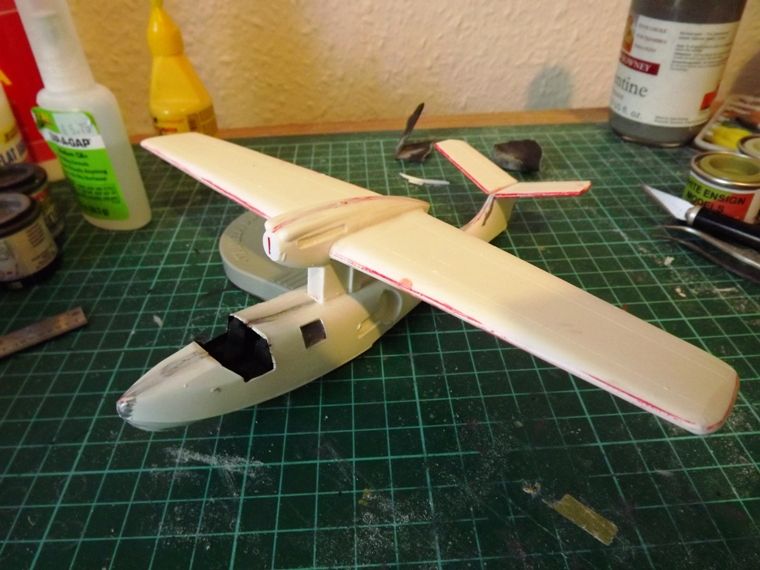
The parts were attached first with superglue because of the slight uneveness of the mating surfaces and once it was dry I ran liquid poly around the edges to strengthen the join. I'll let this cure off properly before filling and sanding.
Regards
Tom
Major progress today before and after work:
The parts were attached first with superglue because of the slight uneveness of the mating surfaces and once it was dry I ran liquid poly around the edges to strengthen the join. I'll let this cure off properly before filling and sanding.
Regards
Tom
Veni, Venari, Vamoosi
Coastal Command SIG Leader 2012 - 2016
We'll call him Dinghy Watts...... - Paul Bradley
2016 A:B = 29:11
2015 A:B = 38:14
2014 A:B = 25:9
2013 A:B = 20:17
2012 A:B = I didn't keep score
2011 A:B = 39:11
2010 A:B = 51:10
Coastal Command SIG Leader 2012 - 2016
We'll call him Dinghy Watts...... - Paul Bradley
2016 A:B = 29:11
2015 A:B = 38:14
2014 A:B = 25:9
2013 A:B = 20:17
2012 A:B = I didn't keep score
2011 A:B = 39:11
2010 A:B = 51:10
-
JamesPerrin

- Looks like his avatar
- Posts: 13669
- Joined: April 5th, 2011, 8:09 pm
- Location: W. Yorkshire
- Contact:
Re: Tom's Seaside Chip Snatcher
Looking bob on Tom.
Classic British Kits SIG Leader Better to fettle than to fill
(2024 A:B 5:2) (2023 13:8:7) (2022 21:11) (2021 15:8) (2020 8:4:4)
(2024 A:B 5:2) (2023 13:8:7) (2022 21:11) (2021 15:8) (2020 8:4:4)
-
TomW
- Modelling Gent and Scholar
- Posts: 2279
- Joined: May 1st, 2011, 8:09 am
- Location: Devizes, Wiltshire
Re: Tom's Seaside Chip Snatcher
Cheers James 
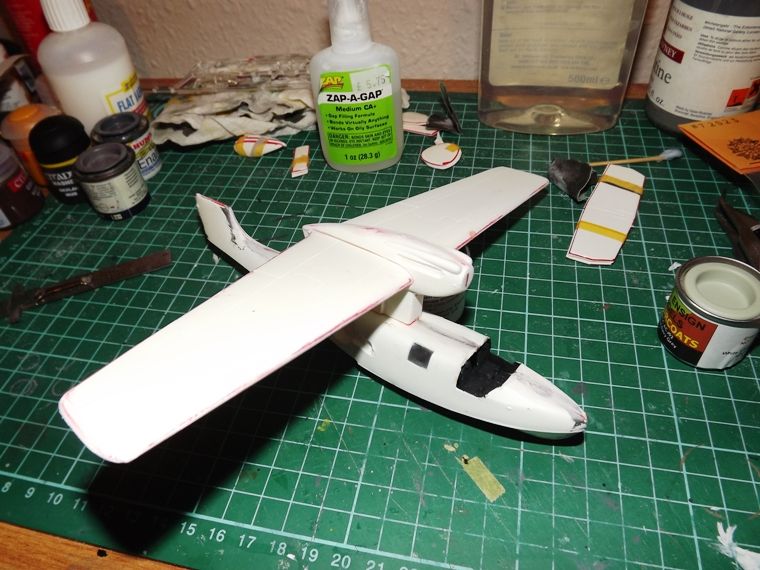
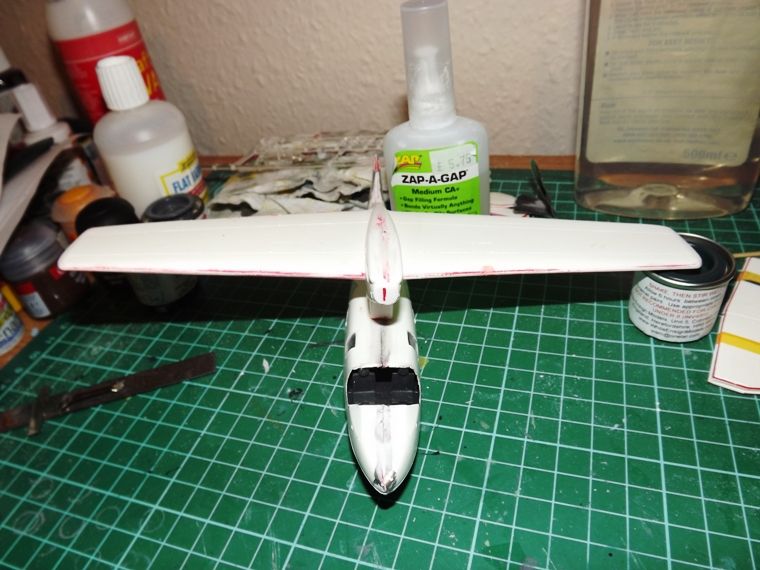
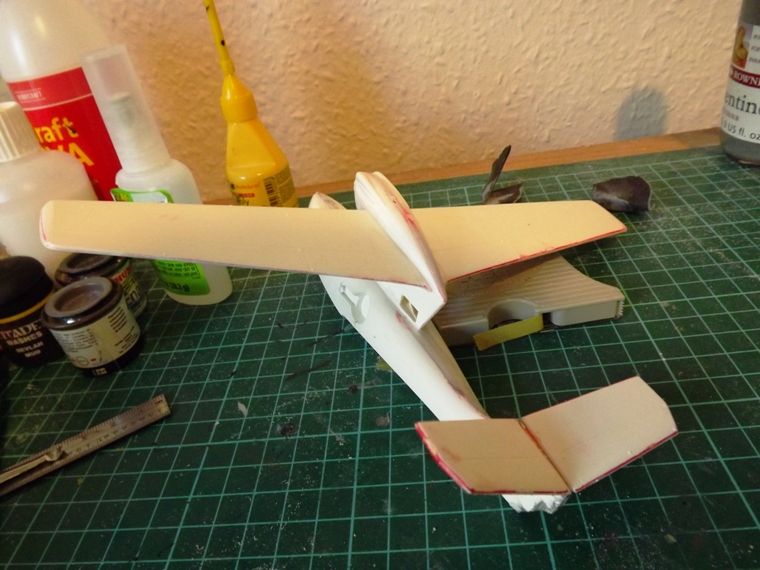
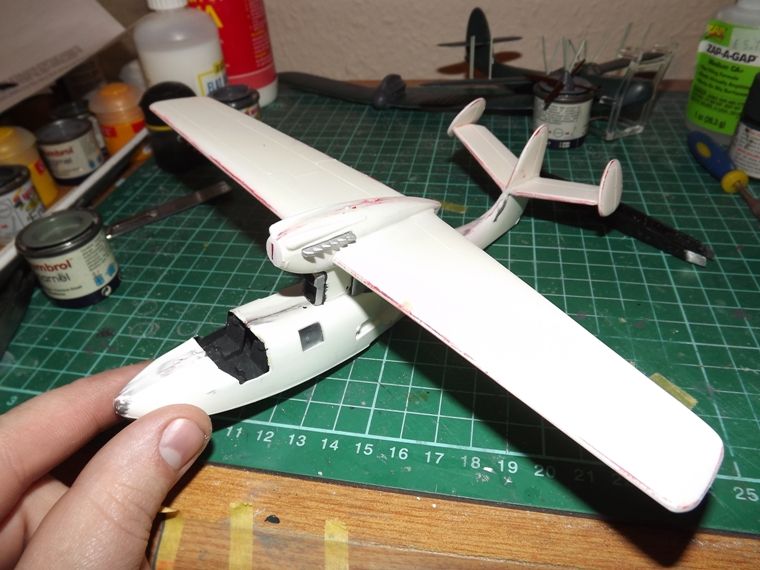
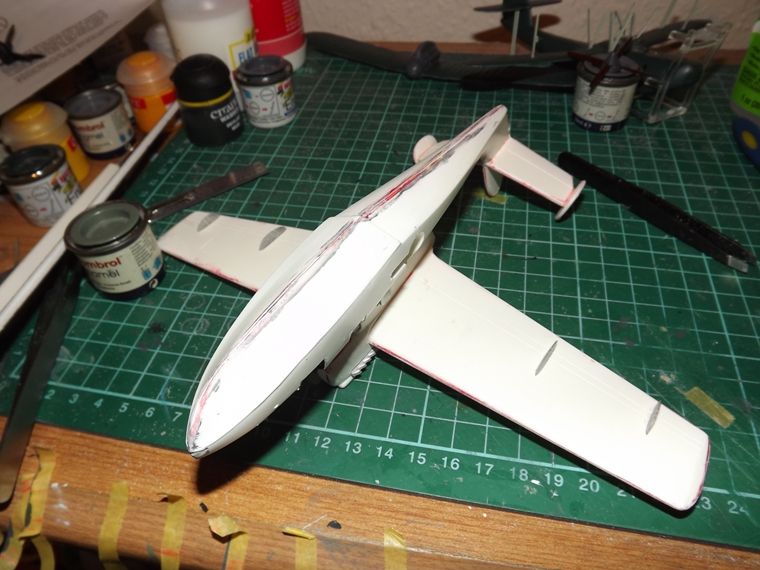
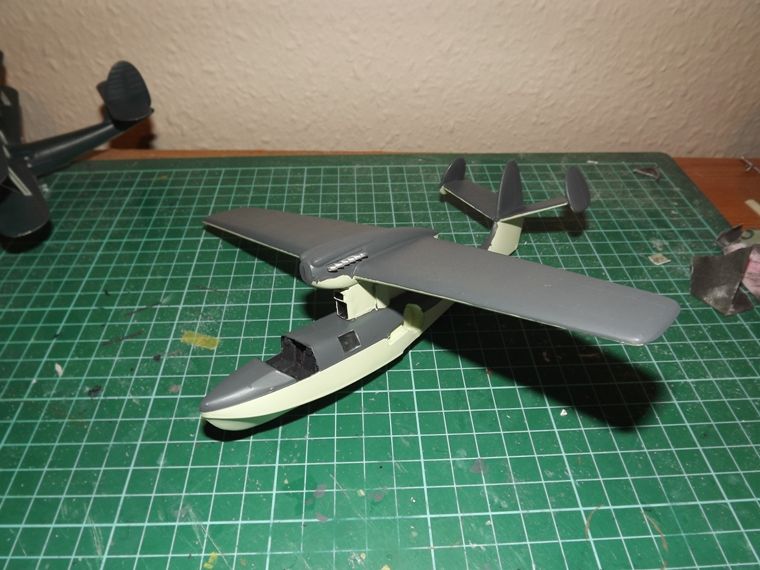
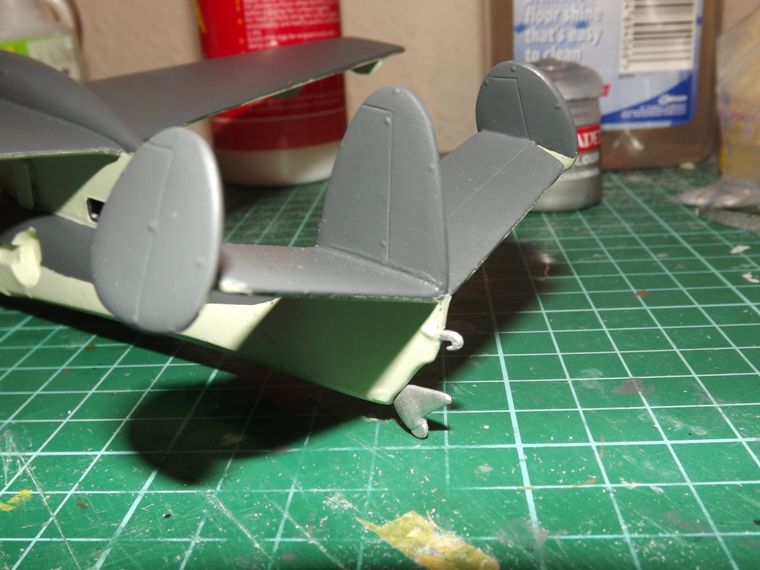
Cracked out the filler this morning and sorted the joins at the wing roots and between the pylon and hull, sanded it smooth and then had a play with the tailplanes to try and figure out the right angles for them. Once I was happish I got out the big sanding stick and sanded a flat attachment area on each side of the lower fin. The tailplanes were then attached in the same manner as the main wings, CA first and liquid poly after.
This is how the Seagull looks right now:
Regards
Tom
Veni, Venari, Vamoosi
Coastal Command SIG Leader 2012 - 2016
We'll call him Dinghy Watts...... - Paul Bradley
2016 A:B = 29:11
2015 A:B = 38:14
2014 A:B = 25:9
2013 A:B = 20:17
2012 A:B = I didn't keep score
2011 A:B = 39:11
2010 A:B = 51:10
Coastal Command SIG Leader 2012 - 2016
We'll call him Dinghy Watts...... - Paul Bradley
2016 A:B = 29:11
2015 A:B = 38:14
2014 A:B = 25:9
2013 A:B = 20:17
2012 A:B = I didn't keep score
2011 A:B = 39:11
2010 A:B = 51:10
-
TomW
- Modelling Gent and Scholar
- Posts: 2279
- Joined: May 1st, 2011, 8:09 am
- Location: Devizes, Wiltshire
Re: Tom's Seaside Chip Snatcher
Time for an update on the Seagulls' progress towards fledging
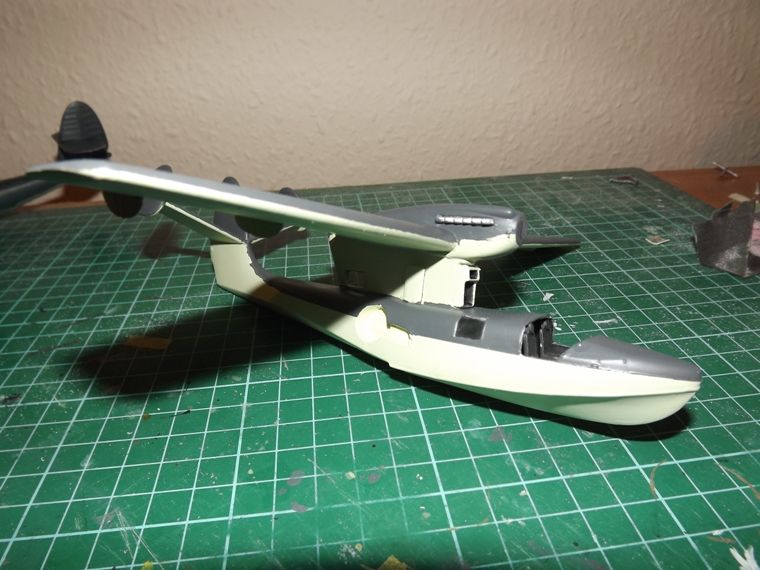
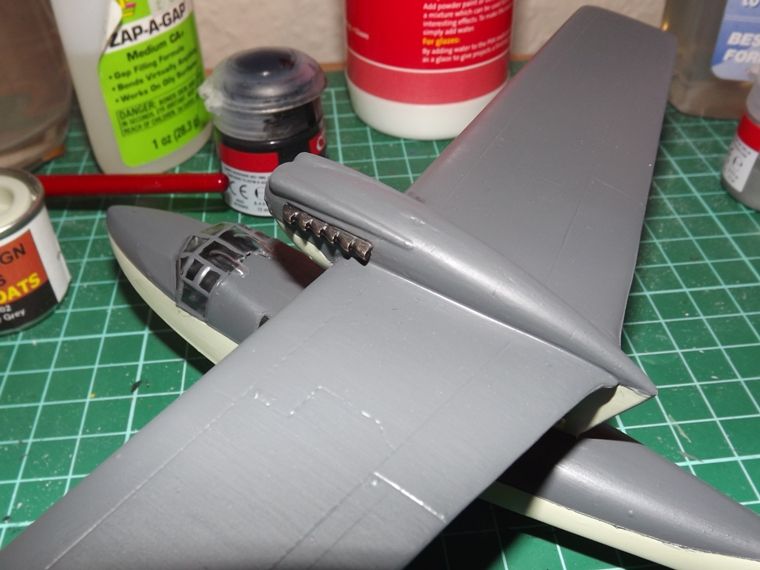
The majority of the structure is together now and all filled / sanded smooth, the floats and their struts will be left to later as they could be a little fragile. So now Im working on adding all the bits of white metal detail that are really bringing the kit to life.
Firstly the engine radiator intakes. I decided that these needed a little something extra to disguise their spartan-ness, so out came the copper mesh and here we go:
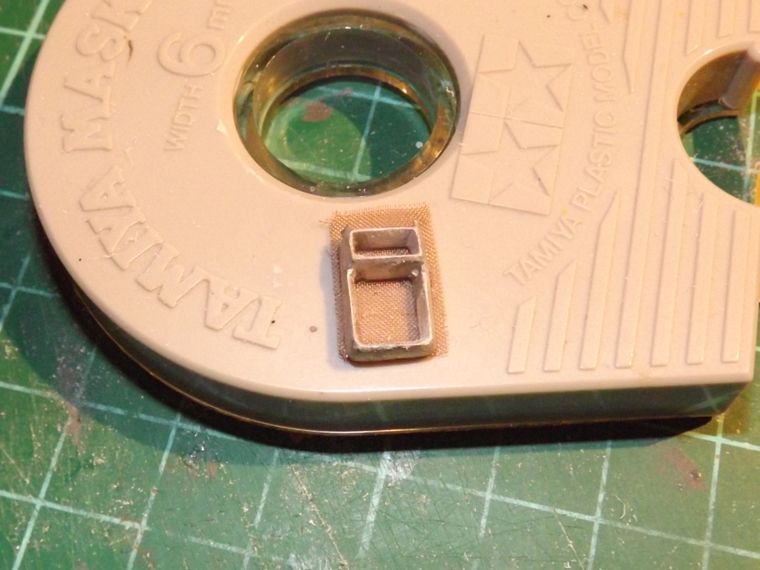
Installed on the fuselage and painted black:
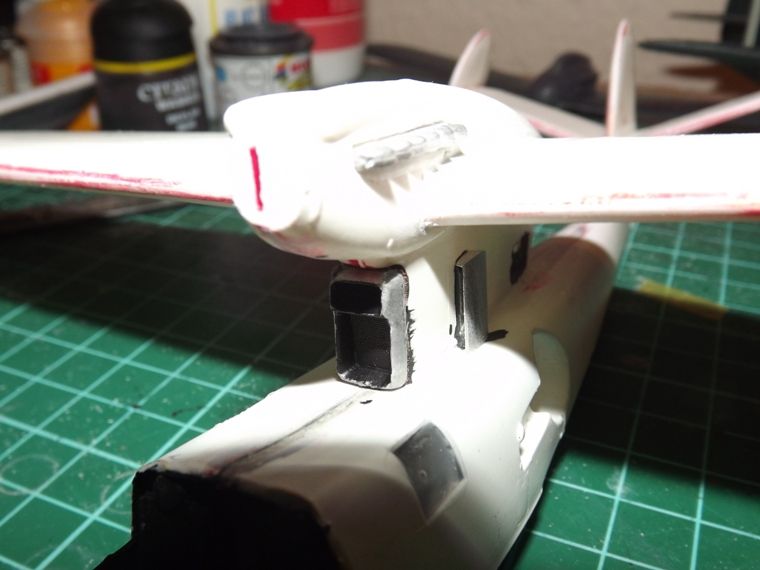
I'll be drybrushing it in a gunmetal colour to bring the detail back out
Also added are the side radiator baths, exhaust stacks and the flap actuators:
Next up is the painting stage.
Regards
Tom
The majority of the structure is together now and all filled / sanded smooth, the floats and their struts will be left to later as they could be a little fragile. So now Im working on adding all the bits of white metal detail that are really bringing the kit to life.
Firstly the engine radiator intakes. I decided that these needed a little something extra to disguise their spartan-ness, so out came the copper mesh and here we go:
Installed on the fuselage and painted black:
I'll be drybrushing it in a gunmetal colour to bring the detail back out
Also added are the side radiator baths, exhaust stacks and the flap actuators:
Next up is the painting stage.
Regards
Tom
Veni, Venari, Vamoosi
Coastal Command SIG Leader 2012 - 2016
We'll call him Dinghy Watts...... - Paul Bradley
2016 A:B = 29:11
2015 A:B = 38:14
2014 A:B = 25:9
2013 A:B = 20:17
2012 A:B = I didn't keep score
2011 A:B = 39:11
2010 A:B = 51:10
Coastal Command SIG Leader 2012 - 2016
We'll call him Dinghy Watts...... - Paul Bradley
2016 A:B = 29:11
2015 A:B = 38:14
2014 A:B = 25:9
2013 A:B = 20:17
2012 A:B = I didn't keep score
2011 A:B = 39:11
2010 A:B = 51:10
-
TomW
- Modelling Gent and Scholar
- Posts: 2279
- Joined: May 1st, 2011, 8:09 am
- Location: Devizes, Wiltshire
Re: Tom's Seaside Chip Snatcher
Its been far too long without an update to this build  unfortunately work has gone crazy this past week and I've been pulling 12 hour days so haven't had any energy for the workbench
I did manage to get a little painting done though in the 5 minutes I've had spare:
This showed up a few gaps and surface blemishes so back out with the filler:

Tomorrow is my last day before an 11 day Christmas holiday so I aim to make some major progress over the next week or so
Regards
Tom
I did manage to get a little painting done though in the 5 minutes I've had spare:
This showed up a few gaps and surface blemishes so back out with the filler:
Tomorrow is my last day before an 11 day Christmas holiday so I aim to make some major progress over the next week or so
Regards
Tom
Veni, Venari, Vamoosi
Coastal Command SIG Leader 2012 - 2016
We'll call him Dinghy Watts...... - Paul Bradley
2016 A:B = 29:11
2015 A:B = 38:14
2014 A:B = 25:9
2013 A:B = 20:17
2012 A:B = I didn't keep score
2011 A:B = 39:11
2010 A:B = 51:10
Coastal Command SIG Leader 2012 - 2016
We'll call him Dinghy Watts...... - Paul Bradley
2016 A:B = 29:11
2015 A:B = 38:14
2014 A:B = 25:9
2013 A:B = 20:17
2012 A:B = I didn't keep score
2011 A:B = 39:11
2010 A:B = 51:10
-
TomW
- Modelling Gent and Scholar
- Posts: 2279
- Joined: May 1st, 2011, 8:09 am
- Location: Devizes, Wiltshire
Re: Tom's Seaside Chip Snatcher
And that major progress never materialised  it took 5 coats of Hu90 to get an acceptable coverage over the white plastic, add to that the minimum 1 day drying time for the enamels meant that the painting was all I achieved during my restful sojurn with the familia.
Here is the current state of play:
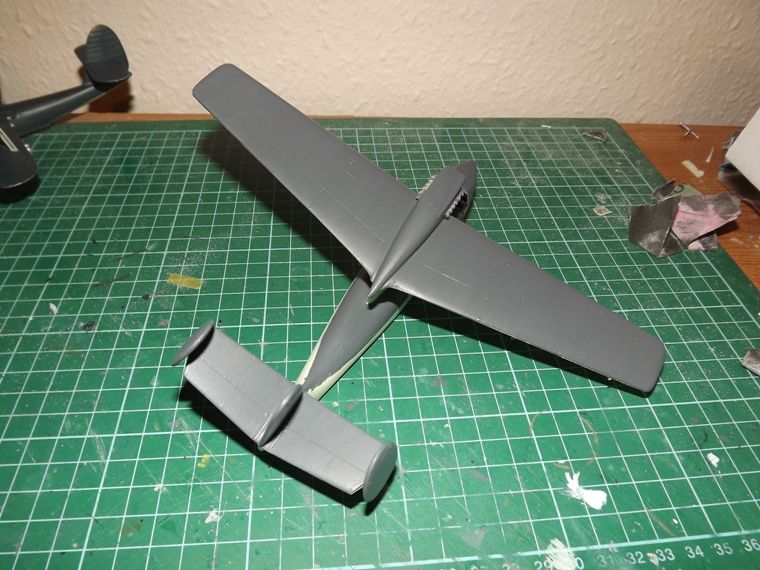
I need to touch up a couple of paint bleeds around the tail and nacelle before I can start Klearing, decalling and adding the final touches, I'll be striving for the deadline but I dont want to rush this as I've fallen in love with the aircraft
Regards
Tom
Here is the current state of play:
I need to touch up a couple of paint bleeds around the tail and nacelle before I can start Klearing, decalling and adding the final touches, I'll be striving for the deadline but I dont want to rush this as I've fallen in love with the aircraft
Regards
Tom
Veni, Venari, Vamoosi
Coastal Command SIG Leader 2012 - 2016
We'll call him Dinghy Watts...... - Paul Bradley
2016 A:B = 29:11
2015 A:B = 38:14
2014 A:B = 25:9
2013 A:B = 20:17
2012 A:B = I didn't keep score
2011 A:B = 39:11
2010 A:B = 51:10
Coastal Command SIG Leader 2012 - 2016
We'll call him Dinghy Watts...... - Paul Bradley
2016 A:B = 29:11
2015 A:B = 38:14
2014 A:B = 25:9
2013 A:B = 20:17
2012 A:B = I didn't keep score
2011 A:B = 39:11
2010 A:B = 51:10
-
TomW
- Modelling Gent and Scholar
- Posts: 2279
- Joined: May 1st, 2011, 8:09 am
- Location: Devizes, Wiltshire
Re: Tom's Seaside Chip Snatcher
Still making progress on the Seagull though the deadline is fast approaching and Im pretty certain this one will miss it
I've added the canopy this week as well as the white metal landing gear and other details, also sorted some of the detail painting:

3 days to go, this is going to be tight....
Regards
Tom
I've added the canopy this week as well as the white metal landing gear and other details, also sorted some of the detail painting:
3 days to go, this is going to be tight....
Regards
Tom
Veni, Venari, Vamoosi
Coastal Command SIG Leader 2012 - 2016
We'll call him Dinghy Watts...... - Paul Bradley
2016 A:B = 29:11
2015 A:B = 38:14
2014 A:B = 25:9
2013 A:B = 20:17
2012 A:B = I didn't keep score
2011 A:B = 39:11
2010 A:B = 51:10
Coastal Command SIG Leader 2012 - 2016
We'll call him Dinghy Watts...... - Paul Bradley
2016 A:B = 29:11
2015 A:B = 38:14
2014 A:B = 25:9
2013 A:B = 20:17
2012 A:B = I didn't keep score
2011 A:B = 39:11
2010 A:B = 51:10
-
Jagewa

- Modelling Gent and Scholar
- Posts: 2752
- Joined: April 6th, 2011, 2:18 am
- Location: Christchurch, New Zealand
- Contact:
Re: Tom's Seaside Chip Snatcher
She's looking great Tom, I'm guessing you are eyeing up some more vac forms now ;)
CHeers
Jim
CHeers
Jim