Simon's SRA.1 Stingray

Splashbau II, but for Flying Boats only.
Runs December 1st to January 13th.
GB Leader is: AceSeafire.
User avatar
SJPONeill
Modelling Gent and Scholar
Posts: 3525
Joined: May 1st, 2011, 12:01 am
Location: Near the Spiral, NZ.
Contact:

Re: Simon's SRA.1 Stingray

Post by SJPONeill »

Take 2 held OK and I've joined the rear fuselage leaving just two large gaps where the fuselage halves will not meet regardless of the size of clamps applied...

To strengthen the fuselage join, I intended screwing a sheet of thick plastic card across the back of the intake which I plan on covering with an intake cover but on checking the fit of the wings realised that a spar would be essential and also serve the reinforce the fuselage seam...

Image

Image

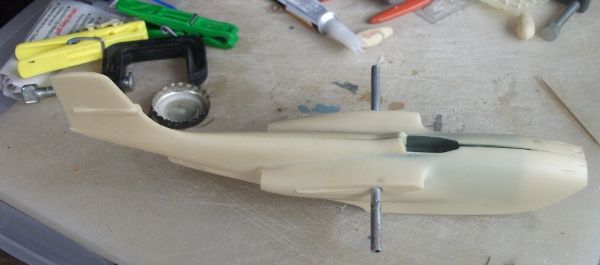
I was surprised how soft the resin is as I was able to finger twiddle a drill bit to make the spar holes, only deferring to Messrs Black and Decker to ream it out for the spar...

Image

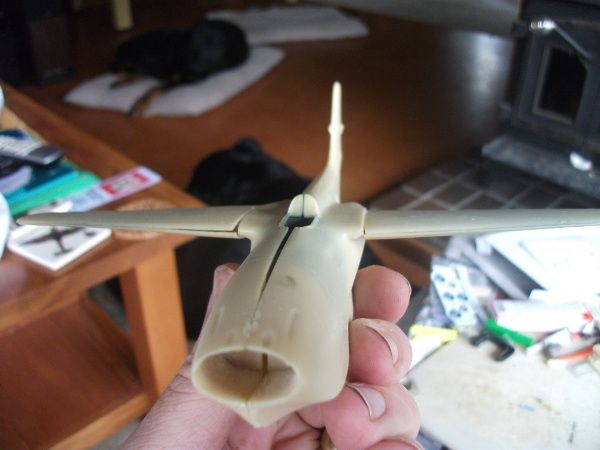
This gives an idea of the disparity between the thin wings and the rather chunky wing roots molded into the fuselage halves. The spar also helps push the wing halves apart so that they better align with the roots. Once fixed firmly in place using CA and Milliput, I hope to be able to tidy up the root/wing joins...

My overall impression of this kit is that it is a real pig and nothing at all like the other Planet kits that I have worked on...

The next phase will be rolling together enough Milliput to fill the remaining fuselage seam chasms...

Edit: first time round, I uploaded the original his-rez images so have just replaced them with the web-friendly ones I intended...
Please critique my posts honestly i.e. say what you think so I can learn and improve...
The World According To Me
User avatar
SJPONeill
Modelling Gent and Scholar
Posts: 3525
Joined: May 1st, 2011, 12:01 am
Location: Near the Spiral, NZ.
Contact:

Re: Simon's SRA.1 Stingray

Post by SJPONeill »

While waiting for the Milliput to cure, I have been freeing some of the smaller parts from the reson wafers they come in. I have had a good play around with the float assemblies and can not see any way in which the assembly shown in the plans would have worked on the real thing...I think that the door that covers the strut opening on the float is incorrectly placed on the instructions as the inboard position shown would obstruct the float strut as the float rotates 180 degrees into the retracted position. I think that this cover goes outboard of the strut in the open position so that's where I'm going to put it...for now...til I change my mind...
Please critique my posts honestly i.e. say what you think so I can learn and improve...
The World According To Me
DHDrover

Re: Simon's SRA.1 Stingray

Post by DHDrover »

I have some unopened brush CA. PM me yr addy and I'll send it over.

Dai
User avatar
JohnRatzenberger
Why is he so confused ?
Posts: 15734
Joined: April 5th, 2011, 3:42 pm
Location: Living on a sandbar - Nags Head, NC.

Re: Simon's SRA.1 Stingray

Post by JohnRatzenberger »

Wow, I know you know what you are doing, but those gaps on the fuselage, being about same place upper & lower, suggest something is too wide inside there ?

As to your assessment of the kit, I'd have to agree from what I've seen.
John Ratzenberger :???:
It's my model and I'll do what I want with it.
User avatar
MDT
Modelling Gent and Scholar
Posts: 1555
Joined: May 1st, 2011, 3:41 pm

Re: Simon's SRA.1 Stingray

Post by MDT »

keep fighting there it'll be fine!
User avatar
SJPONeill
Modelling Gent and Scholar
Posts: 3525
Joined: May 1st, 2011, 12:01 am
Location: Near the Spiral, NZ.
Contact:

Re: Simon's SRA.1 Stingray

Post by SJPONeill »

jRatz wrote:Wow, I know you know what you are doing, but those gaps on the fuselage, being about same place upper & lower, suggest something is too wide inside there ?

As to your assessment of the kit, I'd have to agree from what I've seen.
I would have thought so as well but the only thing inside the fuselage is the cockpit tub and that is way narrower than the inside of the fuselage. I test fitted the canopy and even with that gap, it looks too wide so am going to run with it as is and fill (as opposed to try to remedy) the gaps...

Most if not all of the other parts that need to be joined together have been crappy fits so far so why should the fuselage be any different? I imagine that Lancfan is having far more fun with his SRA.1 scratchbuild than I am with this kit - which I WAS really looking forward to building...Still I'll persevere although all the extra work is unlikely to see me meet the upcoming GB cut-off deadline, and I would like to reiterate that this kit should not reflect on Planet kits generally as others I have worked on have been good to work on...
Please critique my posts honestly i.e. say what you think so I can learn and improve...
The World According To Me
User avatar
lancfan
Avro's Rivet Rhapsodizer
Posts: 8763
Joined: May 2nd, 2011, 3:55 pm
Location: Nelson, Lancashire

Re: Simon's SRA.1 Stingray

Post by lancfan »

It looks very like the parts were either removed from the mould before the resin had properly cured or the mould was placed on an uneven surface whilst it did cure. This would explain the poor alignment of the fuselage halves.


David.
David.

If you forget the past, you may lose the future.
User avatar
SJPONeill
Modelling Gent and Scholar
Posts: 3525
Joined: May 1st, 2011, 12:01 am
Location: Near the Spiral, NZ.
Contact:

Re: Simon's SRA.1 Stingray

Post by SJPONeill »

The way I'm thinking as well, David...I have 'banana'd' resin parts before when sanding the pouring stubs off but in this case the stubs were at either end of the fuselage and any excessive sanding would have created the opposite banana effect...from memory, i think this kit was on special when when a I bought so so maybe the seller knew something I'm now learning...
Please critique my posts honestly i.e. say what you think so I can learn and improve...
The World According To Me
User avatar
SJPONeill
Modelling Gent and Scholar
Posts: 3525
Joined: May 1st, 2011, 12:01 am
Location: Near the Spiral, NZ.
Contact:

Re: Simon's SRA.1 Stingray

Post by SJPONeill »

Image

Seems like the last week or so, all I have done is poured CA filler into this thing and sanded, sanded sanded...the wing to fuselage join is almost as good as the fuselage halves...it's not as bad as it may appear in the picture as the CA dries clear so the gaps still appear to be there...

I'm clearly not going to be finishing this in the allocated GB time but this time it's not my fault (my story and I'm sticking to it!!) but I will continue on with it in my workbench thread - after all, it couldn't get any worse could it?
Please critique my posts honestly i.e. say what you think so I can learn and improve...
The World According To Me
Locked

Return to “Flying Boat GB”