The Empire Boat -- ** DNF **
-
JamesPerrin

- Looks like his avatar
- Posts: 13687
- Joined: April 5th, 2011, 8:09 pm
- Location: W. Yorkshire
- Contact:
Re: The Empire Boat
A bewildering jigsaw there. At least you finally found the solution.
Classic British Kits SIG Leader Better to fettle than to fill
(2024 A:B 5:2) (2023 13:8:7) (2022 21:11) (2021 15:8) (2020 8:4:4)
(2024 A:B 5:2) (2023 13:8:7) (2022 21:11) (2021 15:8) (2020 8:4:4)
-
JohnRatzenberger

- Why is he so confused ?
- Posts: 15734
- Joined: April 5th, 2011, 3:42 pm
- Location: Living on a sandbar - Nags Head, NC.
Re: The Empire Boat
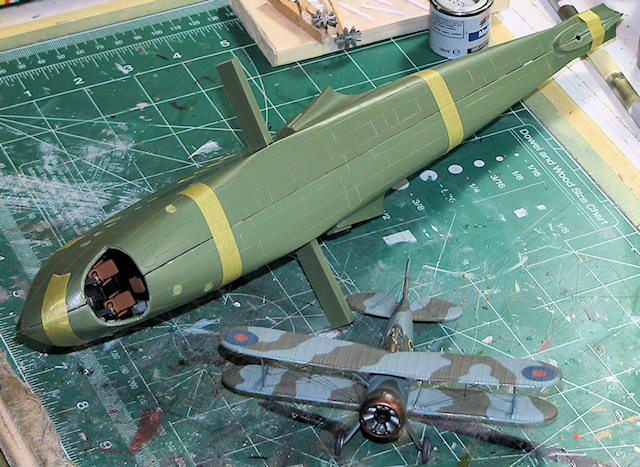
With the cockpit refitted and glued into one half, I taped the two hull halves together. The next step will be gluing the hull, as I described earlier, but I don't want to start that job until I can finish it in 1-2 sittings. You can see the sze of this thing by the Gladiator - it's about same size as a Sunderland.
That will be it for now as we'll be having a brief family Christmas, 24th-28th, in Seattle. Back to work next weekend, everyone have a Merry Christmas ….
That will be it for now as we'll be having a brief family Christmas, 24th-28th, in Seattle. Back to work next weekend, everyone have a Merry Christmas ….
John Ratzenberger 
It's my model and I'll do what I want with it.
It's my model and I'll do what I want with it.
-
VickersVandal

- Modelling Gent and Scholar
- Posts: 5037
- Joined: October 4th, 2012, 3:37 am
- Location: Sydney, Australia
Re: The Empire Boat
I'm a bit surprised they didn't include any interior detail at all apart from the cockpit. There's a lot of glass on that bird and surely the interior would be fairly visible.
Looking good so far.....and, yes, big!
Looking good so far.....and, yes, big!
Must.....build....ALL the Sopwith Camels!...
My Biggles Model display website: https://tinyurl.com/y74ydzae
My Biggles Model display website: https://tinyurl.com/y74ydzae
-
JohnRatzenberger
- Why is he so confused ?
- Posts: 15734
- Joined: April 5th, 2011, 3:42 pm
- Location: Living on a sandbar - Nags Head, NC.
Re: The Empire Boat
No, the ports may look big, but I doubt much detail would be seen, a few seat backs maybe -- fine by me ....
John Ratzenberger
It's my model and I'll do what I want with it.
It's my model and I'll do what I want with it.
-
Barry
- Modelling Gent and Scholar
- Posts: 2612
- Joined: May 1st, 2011, 1:23 am
- Location: Eastvale, California, USA
Re: The Empire Boat
My experience (in 1/72) has been that even with fairly large windows, interior details won't be seen simply because its tooo dark in there. Like you said...a bit of the seat back if the seat is parked right up against the glass and that's about it. There are a lot of ports on that boat but they're really not very big.
2012 A:12 B:13 C:0
-
JohnRatzenberger
- Why is he so confused ?
- Posts: 15734
- Joined: April 5th, 2011, 3:42 pm
- Location: Living on a sandbar - Nags Head, NC.
Re: The Empire Boat
And there is always the 'drawn curtain' option to fall back on 
John Ratzenberger
It's my model and I'll do what I want with it.
It's my model and I'll do what I want with it.
-
JohnRatzenberger
- Why is he so confused ?
- Posts: 15734
- Joined: April 5th, 2011, 3:42 pm
- Location: Living on a sandbar - Nags Head, NC.
Re: The Empire Boat
Back from our family Christmas, and back at the bench - time to get the hull glued shut.
As I mentioned before, my plan was to glue the top in small segments using the Mk.I finger clamp. That went well and served to get most of the bumps and dips out of it. Here we are with clamps holding things tight for a while.

And same plan for the bottom, which aligned much better …. wouldn't you know it.

All that was done Saturday. I spent time on Sunday and today carefully sanding down the hull seams, filling and rescribing where needed. The top will not be totally smooth and I'm not sure I'm really done with it yet. I think I need a coat of paint on it to see just what it looks like.
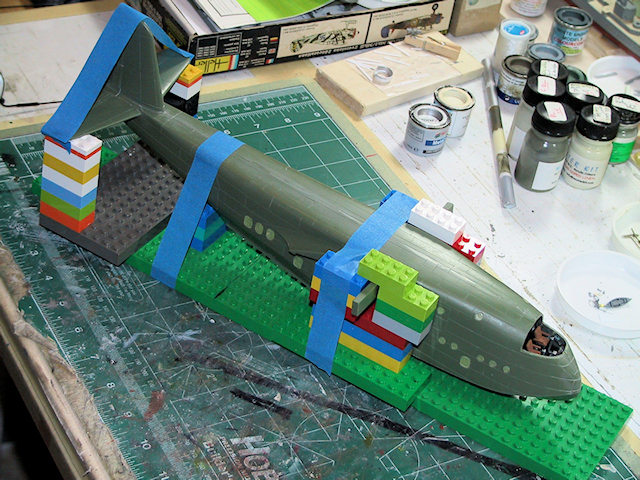
In the meantime, I decided to get the tail onto it using the ever-handy custom made Lego erection stand.
We have had a set-back of sorts. While cleaning the hull seams, I dropped it. There was no apparent damage, no seams broke loose, etc …. until I luckily happened to look down at the floor before I stood up and saw the radio rack laying there. It seemed fixable, but while doing so, I broke out the operator's seat and the little bulkhead the rack mounts against. The seat is easily fixed. The radio was difficult but do-able until the bulkhead broke out. I've made several tries without success to get the bulkhead/radio back in. Fortunately they aren't real visible if I cannot get it fixed before I close up the cockpit.
But it is a bummer ….
Next I think will be a coat of silver on the hull/tail just to see what it looks like. And it's time to start on the wings, meaning I've got to take my sanding board out in the cold …
As I mentioned before, my plan was to glue the top in small segments using the Mk.I finger clamp. That went well and served to get most of the bumps and dips out of it. Here we are with clamps holding things tight for a while.
And same plan for the bottom, which aligned much better …. wouldn't you know it.
All that was done Saturday. I spent time on Sunday and today carefully sanding down the hull seams, filling and rescribing where needed. The top will not be totally smooth and I'm not sure I'm really done with it yet. I think I need a coat of paint on it to see just what it looks like.
In the meantime, I decided to get the tail onto it using the ever-handy custom made Lego erection stand.
We have had a set-back of sorts. While cleaning the hull seams, I dropped it. There was no apparent damage, no seams broke loose, etc …. until I luckily happened to look down at the floor before I stood up and saw the radio rack laying there. It seemed fixable, but while doing so, I broke out the operator's seat and the little bulkhead the rack mounts against. The seat is easily fixed. The radio was difficult but do-able until the bulkhead broke out. I've made several tries without success to get the bulkhead/radio back in. Fortunately they aren't real visible if I cannot get it fixed before I close up the cockpit.
But it is a bummer ….
Next I think will be a coat of silver on the hull/tail just to see what it looks like. And it's time to start on the wings, meaning I've got to take my sanding board out in the cold …
John Ratzenberger
It's my model and I'll do what I want with it.
It's my model and I'll do what I want with it.
-
VickersVandal
- Modelling Gent and Scholar
- Posts: 5037
- Joined: October 4th, 2012, 3:37 am
- Location: Sydney, Australia
Re: The Empire Boat
Aaaaaaargh......
Must.....build....ALL the Sopwith Camels!...
My Biggles Model display website: https://tinyurl.com/y74ydzae
My Biggles Model display website: https://tinyurl.com/y74ydzae
-
AceSeafire
- Onto the Clever Stuff, Now.
- Posts: 196
- Joined: February 24th, 2012, 7:32 pm
Re: The Empire Boat
Starting to take shape now. Shame about the mishap though.
I love the use of the Lego too
Incidentally, I just watched a Pixar movie and saw a 'John Ratzenberger' in the credits....one and the same?
I love the use of the Lego too
Incidentally, I just watched a Pixar movie and saw a 'John Ratzenberger' in the credits....one and the same?
-
PaulBradley

- Staring out the window
- Posts: 21212
- Joined: April 6th, 2011, 3:08 pm
- Location: Flagstaff, AZ
Re: The Empire Boat
The Curse of the Aaaarrrgghh Strikes Again!!
Ace - no; our JohnR is the famous one, the other just does acting on the side (he's really a mailman).
Ace - no; our JohnR is the famous one, the other just does acting on the side (he's really a mailman).
Paul
За демократію і незалежний Україну
"For Democracy and a Free Ukraine"
За демократію і незалежний Україну
"For Democracy and a Free Ukraine"
-
JohnRatzenberger
- Why is he so confused ?
- Posts: 15734
- Joined: April 5th, 2011, 3:42 pm
- Location: Living on a sandbar - Nags Head, NC.
Re: The Empire Boat
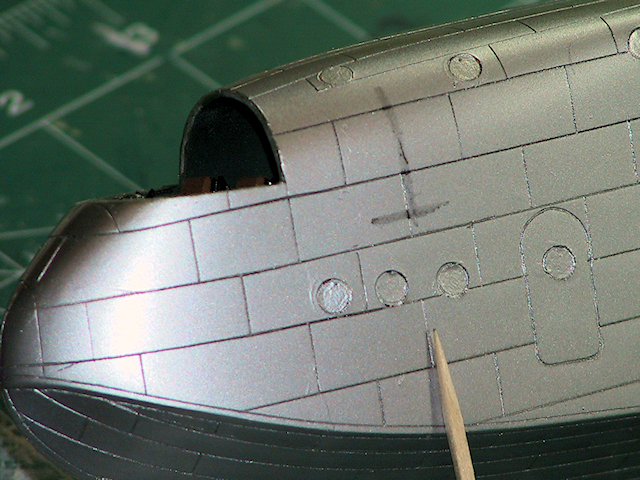
First up, I put a coat of rattle-can Tamiya TS-17 Gloss Aluminum on the fuselage, just to see how it looks. I like this paint for natural metal and doped fabric. Goes on easy & well, no muss, no fuss -- and stays on no matter what you do afterwards, including spray gloss-/matte-/semigloss-coats which can be harsh.
Top deck isn't perfectly flat & smooth, but I've got most of it out. I'm not sure how much more work I want to put into it.

The panel lines are a bit deep and my simple coat didn't fill them all in -- it's not a pre-/post-shade trick.
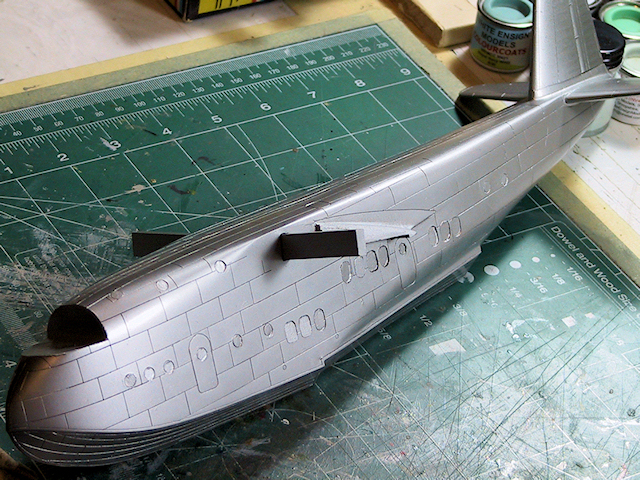
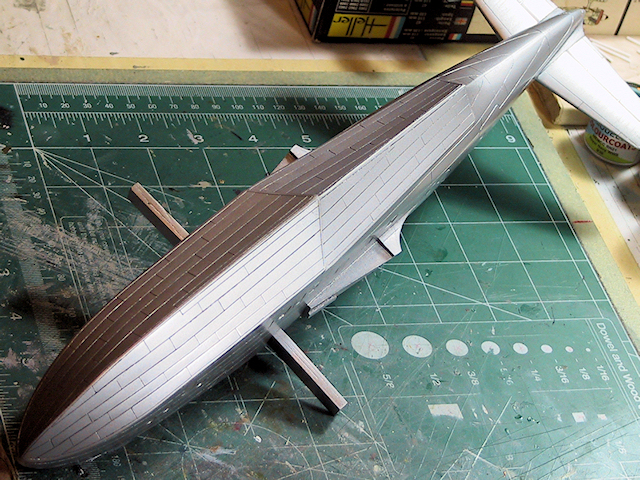
And the underside looks OK also.
More importantly, I decided to stop whining about the radio & etc that came loose when I dropped the fuselage. Yes, theradio is hardly visible but there is a big hole right here ….
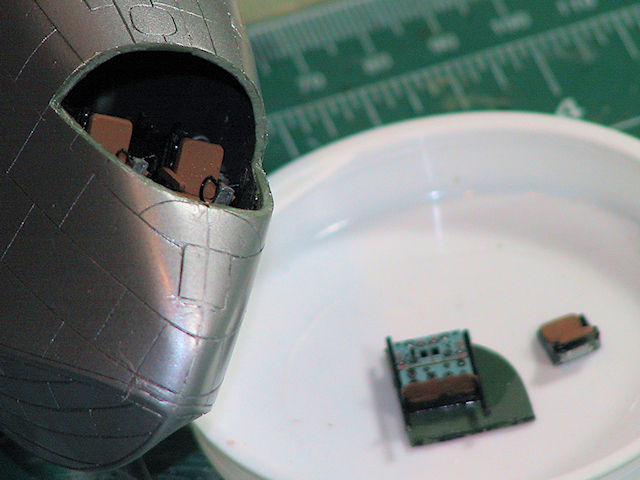
You can see the root of the problem here -- the bulkhead was a simple butt-joint to the floor. I should have reinforced that join with a piece of angle-plastic. Of course if I hadn't dropped it, but that's water under the planing hull …
I had tried to insert the whole thing before but there was no place to set it into squarely or to rest it against. So, after putzing around, I shoved a cocktail stick into the cockpit and tried to measure how far back the floor went and how far below the window line it was. I marked that on the side of the fuselage, then drilled .020" holes in the panel lines (trenches) on both sides.
That let me run two pieces of .020" brass rod through the fuselage to make something to rest the bulkhead against. It took me 4-5 tries, but I soon maneuvered the bulkhead/radio in place. Some CA tacked it back down to the floor and then I put the seat back in.
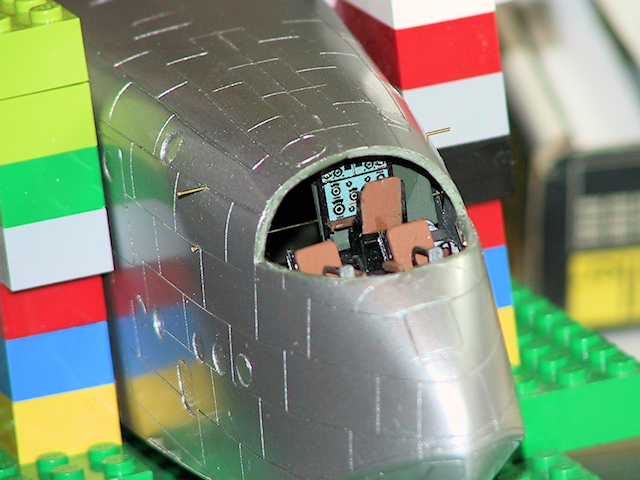
I haven't decided if I'll pull the rods completely or cut them flush. That's a task for tomorrow.
And, BTW, the radio still won't be visible but I, and now you, still know that it's really there …. Can't start the new year as a slacker now, can I ?
Top deck isn't perfectly flat & smooth, but I've got most of it out. I'm not sure how much more work I want to put into it.
The panel lines are a bit deep and my simple coat didn't fill them all in -- it's not a pre-/post-shade trick.
And the underside looks OK also.
More importantly, I decided to stop whining about the radio & etc that came loose when I dropped the fuselage. Yes, theradio is hardly visible but there is a big hole right here ….
You can see the root of the problem here -- the bulkhead was a simple butt-joint to the floor. I should have reinforced that join with a piece of angle-plastic. Of course if I hadn't dropped it, but that's water under the planing hull …
I had tried to insert the whole thing before but there was no place to set it into squarely or to rest it against. So, after putzing around, I shoved a cocktail stick into the cockpit and tried to measure how far back the floor went and how far below the window line it was. I marked that on the side of the fuselage, then drilled .020" holes in the panel lines (trenches) on both sides.
That let me run two pieces of .020" brass rod through the fuselage to make something to rest the bulkhead against. It took me 4-5 tries, but I soon maneuvered the bulkhead/radio in place. Some CA tacked it back down to the floor and then I put the seat back in.
I haven't decided if I'll pull the rods completely or cut them flush. That's a task for tomorrow.
And, BTW, the radio still won't be visible but I, and now you, still know that it's really there …. Can't start the new year as a slacker now, can I ?
John Ratzenberger
It's my model and I'll do what I want with it.
It's my model and I'll do what I want with it.
-
PaulBradley
- Staring out the window
- Posts: 21212
- Joined: April 6th, 2011, 3:08 pm
- Location: Flagstaff, AZ
Re: The Empire Boat
Good solution, John. You might want to leave those rods there, just in case....
Paul
За демократію і незалежний Україну
"For Democracy and a Free Ukraine"
За демократію і незалежний Україну
"For Democracy and a Free Ukraine"
-
TomW

- Modelling Gent and Scholar
- Posts: 2279
- Joined: May 1st, 2011, 8:09 am
- Location: Devizes, Wiltshire
Re: The Empire Boat
The big ones coming along real nicely John, took a quick peek at this one on Hannants and ran away when I saw the price 
Regards
Tom
Regards
Tom
Veni, Venari, Vamoosi
Coastal Command SIG Leader 2012 - 2016
We'll call him Dinghy Watts...... - Paul Bradley
2016 A:B = 29:11
2015 A:B = 38:14
2014 A:B = 25:9
2013 A:B = 20:17
2012 A:B = I didn't keep score
2011 A:B = 39:11
2010 A:B = 51:10
Coastal Command SIG Leader 2012 - 2016
We'll call him Dinghy Watts...... - Paul Bradley
2016 A:B = 29:11
2015 A:B = 38:14
2014 A:B = 25:9
2013 A:B = 20:17
2012 A:B = I didn't keep score
2011 A:B = 39:11
2010 A:B = 51:10
-
JohnRatzenberger
- Why is he so confused ?
- Posts: 15734
- Joined: April 5th, 2011, 3:42 pm
- Location: Living on a sandbar - Nags Head, NC.
Re: The Empire Boat
I did glue the rods in, after shortening them, shouldn't be too obvious.
I started cleaning the wings today but the mating surfaces are pretty rough and because of the way they were cast, I can't just lay them on sandpaper but work at it by hand. The problem is it is cold outside and I have a cold so I'm not sure about progress. Maybe I'll switch to the engines and beaching gear.
I started cleaning the wings today but the mating surfaces are pretty rough and because of the way they were cast, I can't just lay them on sandpaper but work at it by hand. The problem is it is cold outside and I have a cold so I'm not sure about progress. Maybe I'll switch to the engines and beaching gear.
John Ratzenberger
It's my model and I'll do what I want with it.
It's my model and I'll do what I want with it.
-
Barry
- Modelling Gent and Scholar
- Posts: 2612
- Joined: May 1st, 2011, 1:23 am
- Location: Eastvale, California, USA
Re: The Empire Boat
Elegant solution John. Painting the rods flat black will make them disappear in the void.
2012 A:12 B:13 C:0