Page 3 of 4
Re: Pegasus & Eastern Express Sopwith Snipes: BUILDING
Posted: December 10th, 2012, 9:08 pm
by MerlinJones
Good Question re Painting Plan..
I usually find it harder to paint the fuselage under the upper wing, if the upper wing is in place. So I usually paint at least as far as you can see in my pics.
I'll probably continue and finish painting the upper surface of lower wing and undersurface of upper wing, before uniting them.
I used Humbrol Aluminium metalcote, H27 and H155.
Regards,
Bruce
Re: Pegasus & Eastern Express Sopwith Snipes: BUILDING
Posted: December 11th, 2012, 3:42 am
by JohnRatzenberger
I got some work done, more than is visible here.

The obvious thing is that the decks are glued onto the fuselages. Some gap-filling and smoothing will be necessary.
The non-obvious is that I have been drilling control cable holes in, well, control surfaces and getting ready to mount control horns for same. Also a couple for tail plane rigging. I prefer to have runs of rigging rather than lots of short pieces. For the wings, however, I'm going to try your method.
I did get out paint and do some test brushing so I can then test a rattlecan satin-coat overtop. I have had Humbrol react to some of these in the past. I have H155 for PC-10 but I'll thinly overcoat that with Mr Kit PC-10. Mr Kit will provide the Grey & CDL also. For the other two, I also have the aluminum metalcotes although for fabric areas I am still tempted to go with Tamiya's rattle-can Gloss Aluminum, I have had good experience with that before.
Further progress was stopped by SWMBO and an electronic device malfunction that took me on a round-the-world trip through levels of tech support, including a hang-up necessitating a restart .... once I finally reached someone who could understand enough English to know that I had read the books (yeah I know, I'll lose my modeler's badge for that one), had followed the steps given, and did have a clue what I was talking about, it went smoothly .... and tranquilty returned to the home ....
Tomorrow starts with SWMBO's 2nd eye cataract surgery, at oh-dark-thirty, so once we're done with that and I have her all comfy, I hope to go back to work, at least until the annual HVAC inspection ....
Re: Pegasus & Eastern Express Sopwith Snipes: BUILDING
Posted: December 12th, 2012, 1:57 am
by JohnRatzenberger
I didn't accomplish what I wanted today.
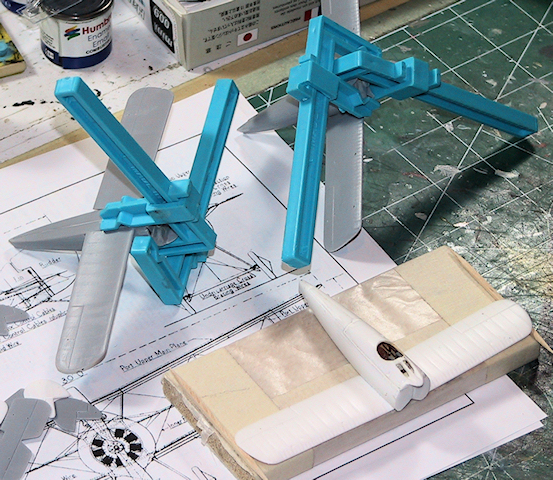
I finished drilling the control cable holes in the rear fuselages. I did some minor fill and fit on the top decks and I put on the lower wings. I had a bit of trouble with the Pegasus kit as the airfoil shape of the cut-out in the fuselage sides did not match the wing airfoil and I had to do a little carving/sanding of the fuselage to get a tighter fit. The EE ones didn't slide in that easy either but they took less work, despite what the clamping might imply.
Hopefully tomorrow is joint cleanup and mount the tail pieces to all. I need to cut some struts for the Pegasus kit and I'll simply use the EE kit struts as a template.
Re: Pegasus & Eastern Express Sopwith Snipes: BUILDING
Posted: December 16th, 2012, 2:21 am
by JohnRatzenberger
I have faked some control horns from brass rod, attached stab and rudders. The brass control horns aren't very "horny" but will serve to get the control cables off the flying/control surfaces a tad.
I think next is to start on struts while looking at painting / decaling before the upper wing goes on. I have to clean up my spray booth, change the filter, etc ....
I am gone again 24-28 so that's another delay ....
Re: Pegasus & Eastern Express Sopwith Snipes: BUILDING
Posted: December 21st, 2012, 3:32 am
by JohnRatzenberger
Painting has started.

The 2 EE kits will be "silver wings" and I use Tamiya rattle-can TS-17 for doped fabric; usually looks very good under a semi-gloss top coat. I have some clean-up to do and perhaps a light coat over the silver. Then I think I'll do the decaling before assembly and rigging.
The Pegasus kit is in PC-10/CDL and I use Mister Kit acrylics for that. This will be the first time I've brush painted a whole (albeit small) model in Mister Kit so it should be interesting. Usually I spray them. The CDL is about right except for the obvious seam of putty under the fuselage still showing though - I should have primered that. I'll start PC-10 & Battleship Grey tomorrow I think. I hate it than I did nothing to highlight ribs, etc, and may redo that.
Lastly, I started struts for the Pegasus kit, which has none. I took the quick route using the EE kit struts as a template and used Evergreen strip. The wing struts are .060" wide and the cabane/gear are .040". To get the right thickness, I laminated .010" and .015" to get a '025" thick strut -- looks about right. I'll do a bit of shaping of them. both profile and cross-section. That'll be a nice time-filler while paint is drying.
Re: Pegasus & Eastern Express Sopwith Snipes: BUILDING
Posted: December 21st, 2012, 10:01 am
by MerlinJones
"Time-filler" indeed, John. There's an obvious advantage to getting hold of proper strut material.
Regards,
Bruce
Re: Pegasus & Eastern Express Sopwith Snipes: BUILDING
Posted: December 21st, 2012, 2:46 pm
by JohnRatzenberger
I have some, but have it reserved for other projects. As you have poiinted out elsewhere, it is hard to come by.
It's my time, I fill it as I please ....
Re: Pegasus & Eastern Express Sopwith Snipes: BUILDING
Posted: December 21st, 2012, 6:46 pm
by MerlinJones
Indeed...I have an image of gently whittling away, whilst rocking gently, glass of something special, close to hand...
Re: Pegasus & Eastern Express Sopwith Snipes: BUILDING
Posted: December 22nd, 2012, 3:03 am
by JohnRatzenberger
that would be bandages close by ....
Silver is "done" on both. I'll Future tomoorow and start decals. I made one error (actually twelve) - I put the control horns on ailerons forgetting the decals must be put there, so out they came, fortunately easily ...
The CDL is done, save the "stripe" which needs another coat and I've started the PC-10 - two coats down, probably two more needed. Then the BG and then on to decals ... what few there will be.
No struts have been whittled today ....
Re: Pegasus & Eastern Express Sopwith Snipes: BUILDING
Posted: December 22nd, 2012, 1:10 pm
by MerlinJones
jRatz wrote:...that would be bandages close by.
Although a glass of a fine single malt assists in many ways.
Re: Pegasus & Eastern Express Sopwith Snipes: BUILDING
Posted: December 22nd, 2012, 3:17 pm
by JohnRatzenberger
medicinal purposes, of course ...
Re: Pegasus & Eastern Express Sopwith Snipes: BUILDING
Posted: December 22nd, 2012, 3:21 pm
by MerlinJones
Of course...numbs some pain...good sterilising agent...
Re: Pegasus & Eastern Express Sopwith Snipes: BUILDING
Posted: December 22nd, 2012, 9:13 pm
by JohnRatzenberger
help forget dearly departed body parts ...
Re: Pegasus & Eastern Express Sopwith Snipes: BUILDING
Posted: December 22nd, 2012, 9:16 pm
by MerlinJones
What body parts?

Re: Pegasus & Eastern Express Sopwith Snipes: BUILDING
Posted: December 23rd, 2012, 9:33 pm
by JohnRatzenberger
Decaling has started on the two 'silver wings'. I managed to not do both upper wings in blue-red roundels. I would have gone further except I realized I had not done the nose in polished aluminum and the squadron markings extend all the way forward. I may need some Micro Sol on these as they aren't sinking into the aileron line as expected.

I'll probably need one more coat of PC-10, then some fixups to the CDL, before I can start decaling there.
That will be it for now as we'll be having a brief family Christmas, 24th-28th, in Seattle. Back to work next weekend, have a Merry Christmas ….