
I'll take one with the bonnet just for you, James...
The seats are all-plastic. I had to scrape off the inaccurate moulded belts anyway, and after that I just added the distressed surface with liquid cement brushed on and textured a bit with the brush while wet and then did the central cracking (very visible in the pics of the real thing) with the tip of a knife blade. Then several layers of Vallejo paint and drybrush and Citadel "Ogryn Flesh" wash...
bestest,
M.
Ferrari 288 GTO vs Jaguar XKSS dogfight double!
Re: Ferrari 288 GTO vs Jaguar XKSS dogfight double!
Here's the cockpit going in:

Those door handles facing upward on the upside-down top half are real "because God can see" details. There isn't an angle that you can see them from, even without the seats in place! But I know they are there...
And a first look at those lovely curves:

The back end is now very firmly glued together, and setting...
bestest,
M.
Those door handles facing upward on the upside-down top half are real "because God can see" details. There isn't an angle that you can see them from, even without the seats in place! But I know they are there...
And a first look at those lovely curves:
The back end is now very firmly glued together, and setting...
bestest,
M.
-
JamesPerrin

- Looks like his avatar
- Posts: 13671
- Joined: April 5th, 2011, 8:09 pm
- Location: W. Yorkshire
- Contact:
Re: Ferrari 288 GTO vs Jaguar XKSS dogfight double!
..and so does anyone reading this forummattbacon wrote:Those door handles facing upward on the upside-down top half are real "because God can see" details. There isn't an angle that you can see them from, even without the seats in place! But I know they are there...
Classic British Kits SIG Leader Better to fettle than to fill
(2024 A:B 5:2) (2023 13:8:7) (2022 21:11) (2021 15:8) (2020 8:4:4)
(2024 A:B 5:2) (2023 13:8:7) (2022 21:11) (2021 15:8) (2020 8:4:4)
-
Dirkpitt289

- NUMA's Auto Mechanic
- Posts: 8724
- Joined: May 2nd, 2011, 1:55 am
- Location: New jersey USA
- Contact:
Re: Ferrari 288 GTO vs Jaguar XKSS dogfight double!
HOLY ** EXPLETIVE** That is cool as **EXPLETIVE**!!!!mattbacon wrote:
M.

What is it? Does it come in 1/72? Where do I get one or 4????
.... Dirk
Beware of the DOG's of WAR
My Youtube Channel
https://www.youtube.com/user/ModelingGu ... rid&view=0
Beware of the DOG's of WAR
My Youtube Channel
https://www.youtube.com/user/ModelingGu ... rid&view=0
-
Dirkpitt289
- NUMA's Auto Mechanic
- Posts: 8724
- Joined: May 2nd, 2011, 1:55 am
- Location: New jersey USA
- Contact:
Re: Ferrari 288 GTO vs Jaguar XKSS dogfight double!
I was so taken by the plane I forgot to say how sharp the Jaguar XKSS is looking. I have a feeling its going to be a real head turner
.... Dirk
Beware of the DOG's of WAR
My Youtube Channel
https://www.youtube.com/user/ModelingGu ... rid&view=0
Beware of the DOG's of WAR
My Youtube Channel
https://www.youtube.com/user/ModelingGu ... rid&view=0
Re: Ferrari 288 GTO vs Jaguar XKSS dogfight double!
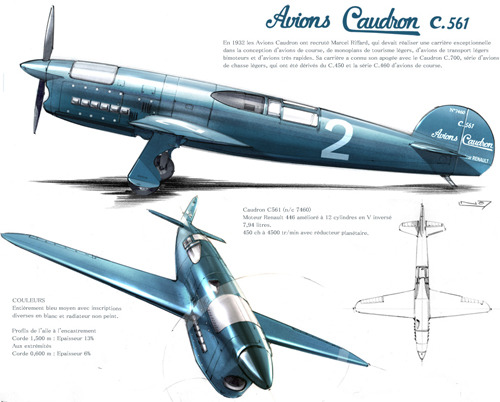
Ah, Dirk... that would be a Williams Brothers 1/32 Caudron Racer. There are some resin 1/72 kits by Dujin of the whole series of Caudron racers, including the super-cool Caudron 561:
You could try contacting Sharkit (http://www.sharkit.com;) to see if they still have them...
bestest,
M.
You could try contacting Sharkit (http://www.sharkit.com;) to see if they still have them...
bestest,
M.
Re: Ferrari 288 GTO vs Jaguar XKSS dogfight double!
And now, after the break, back to our main programme!


The body is firmly glued together, filled, sanded and then rescribed, to make sure that it is solidly fixed, but with panel lines in the right place. You can see my first experiments with rivets, but I decided to do the rest AFTER the primer was on. They should be raised, but I have a neat little tool for large scale rivets, and they aren't hugely visible on the real thing, so I'm going for the impression of rivets rather than an accurate "boilerplate" look...
This is pretty much every kind of masking tool I have - tape, foil, cosmetic foam, pink blu-tak and even some Copydex glue here and there...
... and here is the riveter - a hypodermic needle, cut off square and sharpened on my Dremel.

And finally, my answer to those "How do you strip Chrome?" questions:

Caustic Soda from the hardware shop. A teaspoon of powder in a big yoghurt pot half full of water, stir and let it cool, and then dump the chromed parts in. 30 seconds to strip the chrome, a minute more to take the varnish off too, back to bare plastic...
bestest,
M.
The body is firmly glued together, filled, sanded and then rescribed, to make sure that it is solidly fixed, but with panel lines in the right place. You can see my first experiments with rivets, but I decided to do the rest AFTER the primer was on. They should be raised, but I have a neat little tool for large scale rivets, and they aren't hugely visible on the real thing, so I'm going for the impression of rivets rather than an accurate "boilerplate" look...
This is pretty much every kind of masking tool I have - tape, foil, cosmetic foam, pink blu-tak and even some Copydex glue here and there...
... and here is the riveter - a hypodermic needle, cut off square and sharpened on my Dremel.
And finally, my answer to those "How do you strip Chrome?" questions:
Caustic Soda from the hardware shop. A teaspoon of powder in a big yoghurt pot half full of water, stir and let it cool, and then dump the chromed parts in. 30 seconds to strip the chrome, a minute more to take the varnish off too, back to bare plastic...
bestest,
M.
-
JamesPerrin
- Looks like his avatar
- Posts: 13671
- Joined: April 5th, 2011, 8:09 pm
- Location: W. Yorkshire
- Contact:
Re: Ferrari 288 GTO vs Jaguar XKSS dogfight double!
Household bleach also works well though may take a little longer (<30mins), but has the advantage of being a bit safer to handle. Though you don't want to get either on your skin.
Classic British Kits SIG Leader Better to fettle than to fill
(2024 A:B 5:2) (2023 13:8:7) (2022 21:11) (2021 15:8) (2020 8:4:4)
(2024 A:B 5:2) (2023 13:8:7) (2022 21:11) (2021 15:8) (2020 8:4:4)
Re: Ferrari 288 GTO vs Jaguar XKSS dogfight double!
Yes... I guess I should say wear rubber gloves, and pick the parts out with metal tweezers, dump in a big pot of water, and rinse very well....
bestest,
M.
bestest,
M.
-
AndrewR

- In the basement lab
- Posts: 24064
- Joined: April 5th, 2011, 4:13 pm
- Location: Ottawa, Ontario, The Great White North
- Contact:
Re: Ferrari 288 GTO vs Jaguar XKSS dogfight double!
I'd also add:mattbacon wrote:Yes... I guess I should say wear rubber gloves, and pick the parts out with metal tweezers, dump in a big pot of water, and rinse very well....
bestest,
M.
Wear Safety Glasses
Add the caustic soda to the water in the yogurt pot. Don't put the caustic soda in the pot first and then add water. This minimises any chance of "spitting" as the caustic soda dissolves.
Be careful not to get it on your skin. Caustic soda (sodium hyroxide) will react with the fat under the skin and turn it into soap
Let's be careful out there.
Cheers
Andrew
Up in the Great White North
Re: Ferrari 288 GTO vs Jaguar XKSS dogfight double!

Here's the body primed and "riveted". There are lots of the darn things, so this is more about impression than strict accuracy. They'll look less stark than this under a coat or two of paint. The lines of rivets are in the right places, there should just be more of them, and raised...

...and here is that coat of paint - Tamiya TS-9 British Green. It's only part-cured here, so it won't be quite that "wet-look" until I've finished polishing it, but I'm not going to do that for a couple of weeks. I can still work on the car, but it's not ready for Novus until the paint is cured cured cured...

And finally the wheels. Tamiya Mica Silver on the stripped wheels to get the proper Dunlop racing look - they aren't really highly polished, except possibly on Steve McQueen's car! The knock-offs, however, ARE chrome, and although they are slightly screwy in shape, it's not that obvious, so I'm living with them.
Apart from this lot, some detail bits are under way - windscreen, replacement sidescreens and steering wheel, but not much to photograph as yet...
bestest,
M.
Re: Ferrari 288 GTO vs Jaguar XKSS dogfight double!

Tamiya sprays are pretty impressive! Three coats and this is what you get. No polishing yet, this is straight out of the can...
bestest,
M.
-
JamesPerrin
- Looks like his avatar
- Posts: 13671
- Joined: April 5th, 2011, 8:09 pm
- Location: W. Yorkshire
- Contact:
Re: Ferrari 288 GTO vs Jaguar XKSS dogfight double!
Yes very impressive indeed. Are you spraying in the shed or outside proper ie are you avoiding the variable weather we're having at the moment?
Classic British Kits SIG Leader Better to fettle than to fill
(2024 A:B 5:2) (2023 13:8:7) (2022 21:11) (2021 15:8) (2020 8:4:4)
(2024 A:B 5:2) (2023 13:8:7) (2022 21:11) (2021 15:8) (2020 8:4:4)
Re: Ferrari 288 GTO vs Jaguar XKSS dogfight double!
I'm in the shed, and it's jolly lovely...
These are the new sidescreens:

The plastic is from an Easter egg package; the framing is kitchen foil bent double, with white glue to hold it together, and the "rivets" embossed into the back using a 0.25mm Rotring pen.
Here's a couple of "dry fits" to see what it might look like...


Lots more work to do, but I'm feeling hopeful that it will come together nicely...
bestest,
M.
These are the new sidescreens:
The plastic is from an Easter egg package; the framing is kitchen foil bent double, with white glue to hold it together, and the "rivets" embossed into the back using a 0.25mm Rotring pen.
Here's a couple of "dry fits" to see what it might look like...
Lots more work to do, but I'm feeling hopeful that it will come together nicely...
bestest,
M.
Re: Ferrari 288 GTO vs Jaguar XKSS dogfight double!
I think this is pretty much it for the engine:


OOB except I've added a couple of pipes to the carburettors. You could spend hours detailing the engine bay if you have good photos, as I do, but I decided just to "busy it up" a little.

The completed cockpit. Nice and simple, just a few parts and four decals, but it looks like the real thing...

The state of play at the moment. Bonnet is set on its mountings, and is taped closed while the cement sets thoroughly, which (hopefully) will result in a bonnet that clicks shut and stays shut when it's finished.The headlight lenses are in, with the usual trimming and dry-fits. One day someone will make a car kit with faired-in headlight covers that actually fit! The windscreen is drying - the thick black rubber seal is highly visible on the real thing, and disguises the oversized chromework nicely. Hood is in primer, and that odd-shaped bit at the bottom of the picture is some lead foil which will be the leather cover behind the seats. The hole is for the filler cap.
Now to figure out how to make a chrome surround for the headlight covers...
bestest,
M.
OOB except I've added a couple of pipes to the carburettors. You could spend hours detailing the engine bay if you have good photos, as I do, but I decided just to "busy it up" a little.
The completed cockpit. Nice and simple, just a few parts and four decals, but it looks like the real thing...
The state of play at the moment. Bonnet is set on its mountings, and is taped closed while the cement sets thoroughly, which (hopefully) will result in a bonnet that clicks shut and stays shut when it's finished.The headlight lenses are in, with the usual trimming and dry-fits. One day someone will make a car kit with faired-in headlight covers that actually fit! The windscreen is drying - the thick black rubber seal is highly visible on the real thing, and disguises the oversized chromework nicely. Hood is in primer, and that odd-shaped bit at the bottom of the picture is some lead foil which will be the leather cover behind the seats. The hole is for the filler cap.
Now to figure out how to make a chrome surround for the headlight covers...
bestest,
M.