Honda CB1100R

Time to pimp them rides!
User avatar
Dazzled
Modelling Gent and Scholar
Posts: 9592
Joined: October 1st, 2011, 11:08 pm
Location: Mid Glamorgan, South Wales
Contact:

Re: Honda CB1100R

Post by Dazzled »

I couldn't resist a quick dry fit while I had the seat and tank to hand.

Image

They don't seem to be too bad a fit. The seat unit fits very positively onto a pair of holes in the frame. I'd also assembled, painted and attached the rear mudguard/light unit.

Then, with everything a little less dry than I would have liked but with "Mr impatience" rearing his ugly head, I rather gingerly assembled the front end and attached it to the bike.

Image

It's on it's wheels at last :-D .

It does need to be left to dry for a while and some paintwork sorting but it's certainly an encouraging step.

I'm also making progress with the instrument panel.

Image

Still got the dial decals to go on but I'm pleased with it so far. 8-)
COLD WAR S.I.G. LEADER

Wherever there's danger, wherever there's trouble, wherever there's important work to be done....I'll be somewhere else building a model!
User avatar
Clashcityrocker
Modelling Gent and Scholar
Posts: 10823
Joined: May 1st, 2011, 12:31 am
Location: Adelaide. South Australia

Re: Honda CB1100R

Post by Clashcityrocker »

Coming together nicely.

Nigel
User avatar
Sissel
Modelling Lady and Scholar
Posts: 4097
Joined: October 31st, 2011, 12:39 pm
Location: Island in Norway

Re: Honda CB1100R

Post by Sissel »

Great bit of building here. Glad to see you have the same type of superglue as me.
Confused as always, and somewhere in hiding on the Scandinavian peninsula...
ShaunW
NOT the sheep
Posts: 26188
Joined: November 26th, 2011, 6:11 pm
Location: Pontefract West Yorkshire

Re: Honda CB1100R

Post by ShaunW »

Lovely work Dazzled, this is shaping up really nicely. Those seams are pretty ugly and, as you say, are typical of kits from the period. A fair bit of sanding in front of you then. Not much different to a typical a/c build then :roll: Keep at her though, this is a great looking 80's classic!
Doing - Tamiya 1/35th Universal Carrier.

Work is the curse of the modelling classes!
IPMS#12300
User avatar
Dazzled
Modelling Gent and Scholar
Posts: 9592
Joined: October 1st, 2011, 11:08 pm
Location: Mid Glamorgan, South Wales
Contact:

Re: Honda CB1100R

Post by Dazzled »

With a couple of GBs behind me and, given the limitations imposed by my injured arm, not wanting to commit to another straight away, I've wheeled the Honda back on to the bench.

Progress has been a little halting as I'm finding it difficult to move about at the bench. I have trouble getting paint from the rack for instance, having to twist around and use the opposite hand. I'm sure I'll have become a well-practised contortionist before this gets better ;-) .

I have, however, soldiered on (even extreme pain is better than watching most of the dross on TV) and made some progress.

Image

The rear light is painted and fitted and the handlebar ends fitted and hooked up to the clutch cable.

I've also been paying some attention to the bodywork. A fair amount of filling and sanding seems to have eliminated any potentially visible seams, not to mention removing the big step in the tank. A coat of primer indicates that all appears well in this respect although, given my dodgy eyesight 8-) , I think I'll check under a magnifier before applying the white topcoat.

Those with better eyesight may have noticed the absence of the fairing. This is because I've decided to treat it as a separate entity due to the relative complexity required to construct and paint this component. I reckon it'll absorb a couple of days on it's own.

More progress soon.
COLD WAR S.I.G. LEADER

Wherever there's danger, wherever there's trouble, wherever there's important work to be done....I'll be somewhere else building a model!
User avatar
Dazzled
Modelling Gent and Scholar
Posts: 9592
Joined: October 1st, 2011, 11:08 pm
Location: Mid Glamorgan, South Wales
Contact:

Re: Honda CB1100R

Post by Dazzled »

Had a look at the fairing this morning.

This is why I'm treating it separately from the rest of the kit....

Image

As you can see, the fit isn't the best. It's all supposed to be seamless. In fact Tamiya would have the builder paint the headlight insert first and "simply pop it into place. Personally, I think some blending is in order plus a not inconsiderable amount of masking prior to any paint going on.

That's the joy of older kits though :roll: .
COLD WAR S.I.G. LEADER

Wherever there's danger, wherever there's trouble, wherever there's important work to be done....I'll be somewhere else building a model!
ShaunW
NOT the sheep
Posts: 26188
Joined: November 26th, 2011, 6:11 pm
Location: Pontefract West Yorkshire

Re: Honda CB1100R

Post by ShaunW »

Good to see this back on the go Darryl, despite the pain from your arm. The fit on the fairing is indeed pretty poor and not what we have come to expect from Tamiya. I think I would have approached this in the same way, the fairing is better done separately, if nothing else it would be a pain to mask and paint it it was on the frame for sure.
Doing - Tamiya 1/35th Universal Carrier.

Work is the curse of the modelling classes!
IPMS#12300
User avatar
Dazzled
Modelling Gent and Scholar
Posts: 9592
Joined: October 1st, 2011, 11:08 pm
Location: Mid Glamorgan, South Wales
Contact:

Re: Honda CB1100R

Post by Dazzled »

Thanks Shaun :) .

I've made a little more progress between yesterday and this morning.

Mrs Dazzled kindly drove me down to our local branch of Halfords to pick up some rattle cans. I'm unable to drive at the moment as I can't change gear :cry: . I am thinking I might have better luck on my bike.

I picked up some white primer, matt black and appliance white as I've decided to use the appliance white rather than go to the trouble of using my airbrush. I know it's the soft option but it's a little easier given my lack of mobility.


Image

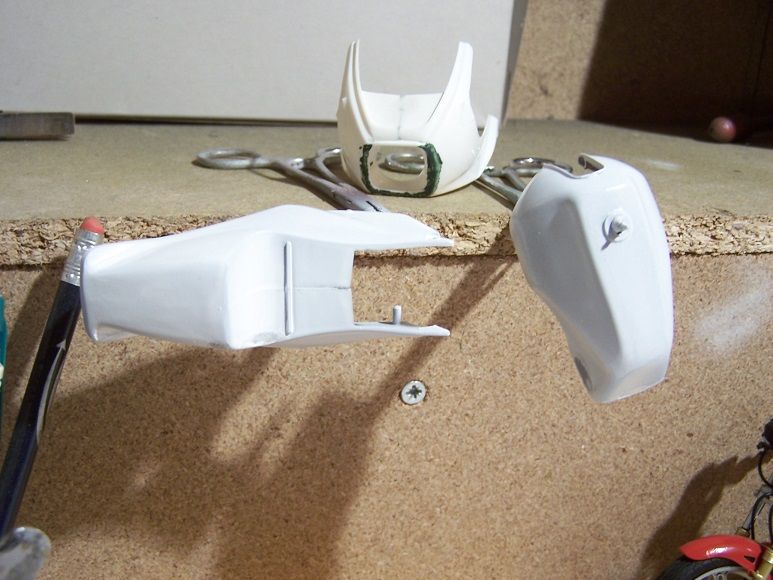
It was a bit troublesome making my arm move at the right speed and I did get a couple of runs but I'm not too bothered about this as I estimate that painting will take a couple of days minimum to get a nice finish. I've also been filling the fairing seams. The Green Stuff is the third round having tried Zap-a-Gap and Squadron White Putty previously. I will get a smooth finish :twisted: .

While things were drying I "wired up" the front end.

Image

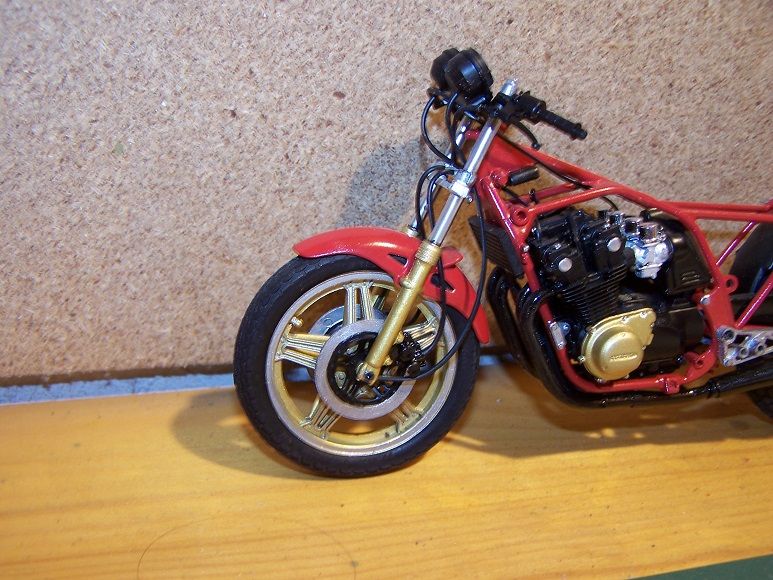
So the brake lines and the speedo drive cable are all on. The only line left to attach now is the fuel tank breather tube which will, obviously, come later.

While prepping some of the remaining parts I noticed, after dry fitting, that there is a slight issue with this....

Image

This is the gear change lever and linkage. The linkage part on the left should be quite a bit longer (15mm) so that it mates with the appropriate part of the lower engine casing. As it is now it just floats in mid air. If I let it go it'll always look wrong to me, so I'll be doing another bit of modification.

Never mind though. It's all good fun ;-) .
COLD WAR S.I.G. LEADER

Wherever there's danger, wherever there's trouble, wherever there's important work to be done....I'll be somewhere else building a model!
User avatar
Dazzled
Modelling Gent and Scholar
Posts: 9592
Joined: October 1st, 2011, 11:08 pm
Location: Mid Glamorgan, South Wales
Contact:

Re: Honda CB1100R

Post by Dazzled »

And a little more progress today.

The gear linkage suitably modified.


Image


And given it's first coat of overall paint. Plasticote Chrome Silver in this instance.

Image


Also the fairing is coming along.


Image

I've eliminated the seams and attached the mirrors. These are more items that fit where they touch so some gap filling was in order using Citadel Green Stuff.

More progress soon.
COLD WAR S.I.G. LEADER

Wherever there's danger, wherever there's trouble, wherever there's important work to be done....I'll be somewhere else building a model!
User avatar
Clashcityrocker
Modelling Gent and Scholar
Posts: 10823
Joined: May 1st, 2011, 12:31 am
Location: Adelaide. South Australia

Re: Honda CB1100R

Post by Clashcityrocker »

Nice work. Looks good.

Nigel
User avatar
Dazzled
Modelling Gent and Scholar
Posts: 9592
Joined: October 1st, 2011, 11:08 pm
Location: Mid Glamorgan, South Wales
Contact:

Re: Honda CB1100R

Post by Dazzled »

Thank you Nigel.

I've plodded haltingly along today. I don't seem to be much use for anything else at the moment :sad: .

With quite a few parts painted and ready to go on there seemed little point in hanging about so, with a nagging urge for some visible progress, the glue was broken out and some major components attached.

Image

Image

As the pictures obviously indicate, the fuel tank and seat unit are now on. These weren't exactly an simple fit unfortunately. The seat unit in particular was a bit of a pig to fit and I'm still not convinced of the prototypical accuracy of the way it's mounted. I don't think the rear mounting holes in the frame should be visible. It's too late to alter the frame now but I do feel that something should have been included in the instructions. On the bright side it is on and, now, it's on straight.

The fuel tank needed a pipe attaching to the feed valve. This was also omitted from the instructions :frown: .

Easier progress was attaching the footpegs and brake lever which popped straight on, with only a minor amount of tweaking required, and, as I'm sure many will have noticed, I've added the decals for the instrument dials. I also put the VIN plate decal on the frame and the info sticker decal on the chainguard. All of these behaved perfectly (as one would expect from Tamiya's decals) and went down nicely with a little Microset.

As I had to use liquid glue to put the tank on, to allow for some manoeuvring time, I'm leaving everything to dry overnight. In the meantime I think I'll have another fiddle with the fairing which seems to be as much hassle as a 50 year old kit for rounds of filling and sanding at the moment. I hope I've got it cracked now.

Fingers crossed 8-) .

Darryl
COLD WAR S.I.G. LEADER

Wherever there's danger, wherever there's trouble, wherever there's important work to be done....I'll be somewhere else building a model!
User avatar
Sissel
Modelling Lady and Scholar
Posts: 4097
Joined: October 31st, 2011, 12:39 pm
Location: Island in Norway

Re: Honda CB1100R

Post by Sissel »

This is coming along great. Fantastic work with this bike!
I see you used Plasticote Chrome Silver for the chrome, and it actually looks like chrome. I've been searching for car paints that will give a chrome finish, but have yet to find one. Shame the one you're using can't be sent to Norway.
Confused as always, and somewhere in hiding on the Scandinavian peninsula...
User avatar
IvanV22
Modelling Gent and Scholar
Posts: 1205
Joined: January 24th, 2012, 9:36 am
Location: Norway

Re: Honda CB1100R

Post by IvanV22 »

Looking great, Why is it that this build makes my right arm twitch..
Best from Ivan
ShaunW
NOT the sheep
Posts: 26188
Joined: November 26th, 2011, 6:11 pm
Location: Pontefract West Yorkshire

Re: Honda CB1100R

Post by ShaunW »

This is looking very nice Darryl, nice bit of corrective surgery where required as well. The level of detail is very impressive and I think this will look great when it's finished 8-)
Doing - Tamiya 1/35th Universal Carrier.

Work is the curse of the modelling classes!
IPMS#12300
User avatar
JamesPerrin
Looks like his avatar
Posts: 13695
Joined: April 5th, 2011, 8:09 pm
Location: W. Yorkshire
Contact:

Re: Honda CB1100R

Post by JamesPerrin »

I had not looked at this thread till now, a well documented and interesting build though admittedly my knowledge and interest in bikes rates in the single figures. Did build a Tamiya bike once, probably of a similar vintage but can't say I've ever had the urge again. Then again I said that about cars :roll:
Classic British Kits SIG Leader Better to fettle than to fill
(2024 A:B 5:2) (2023 13:8:7) (2022 21:11) (2021 15:8) (2020 8:4:4)
Post Reply

Return to “Cars, Trucks, Bikes, Locos and other civvie vehicles”