A Big Kat
-
bromo

- On a long, long journey
- Posts: 1249
- Joined: May 2nd, 2011, 7:05 pm
- Location: Wolverhampton,England
Re: A Big Kat
The big Kat is looking very good, and a nice triumph with the re-chrome parts. Checking through my copies of PS I agree with you regards the black plug caps I am off tomorrow to look at a Yamaha FZ750 with a view to purchasing it a 1989 model so I may have a real 80's bike soon.
BEEN A WHILE
-
Dazzled

- Modelling Gent and Scholar
- Posts: 9592
- Joined: October 1st, 2011, 11:08 pm
- Location: Mid Glamorgan, South Wales
- Contact:
Re: A Big Kat
Thanks both.
I hope the bike works out Martin. The weather's certainly shaping up into being right for a bike, so much so that I took my Intruder out to a classic bike show today. It was a glorious day for a ride and great to see some beautifully restored machines of all ages on display.
Now, back to the model.
I've undertaken another bout of painting of small parts and been working on the bodywork too. It's been a struggle hiding the joins and not helped when I dropped the tank and mudguard onto the bench while setting up the picture . Mrs Dazzled has now learned some new words
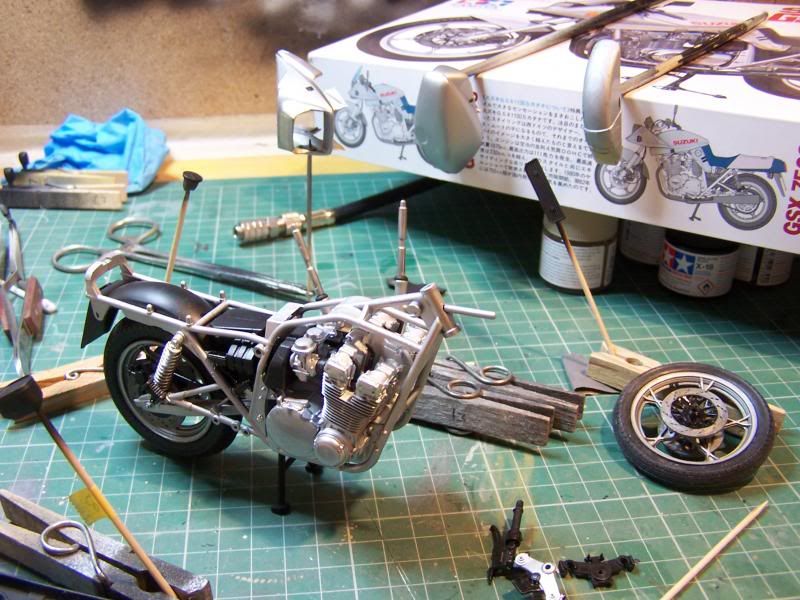
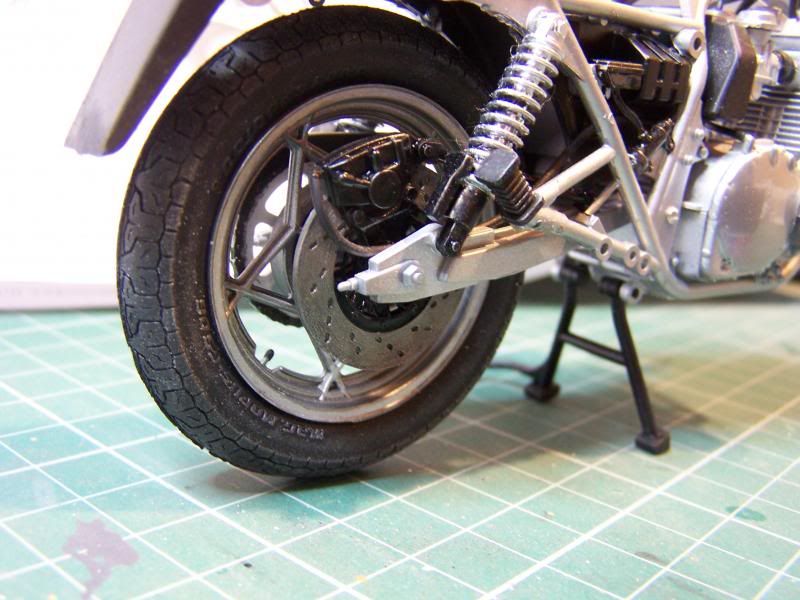
As the pictures show, I've also got the shiny bits, including the rear shocks, on the bike.
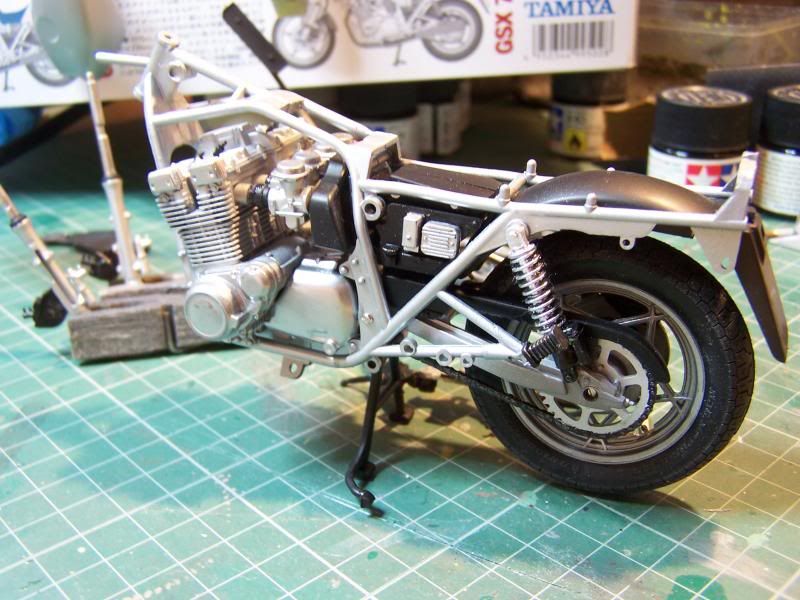
The thread masking method worked quite well again on the shocks with just a few loose wisps to pick off.
So something went right at least
I have a busy week planned so updates may become a bit erratic. At least this flu bug seems to be easing off, so that'll help .
.
More updates when I can manage it.
Darryl
I hope the bike works out Martin. The weather's certainly shaping up into being right for a bike, so much so that I took my Intruder out to a classic bike show today. It was a glorious day for a ride and great to see some beautifully restored machines of all ages on display.
Now, back to the model.
I've undertaken another bout of painting of small parts and been working on the bodywork too. It's been a struggle hiding the joins and not helped when I dropped the tank and mudguard onto the bench while setting up the picture

As the pictures show, I've also got the shiny bits, including the rear shocks, on the bike.

The thread masking method worked quite well again on the shocks with just a few loose wisps to pick off.
So something went right at least
I have a busy week planned so updates may become a bit erratic. At least this flu bug seems to be easing off, so that'll help
More updates when I can manage it.
Darryl
COLD WAR S.I.G. LEADER
Wherever there's danger, wherever there's trouble, wherever there's important work to be done....I'll be somewhere else building a model!
Wherever there's danger, wherever there's trouble, wherever there's important work to be done....I'll be somewhere else building a model!
-
Clashcityrocker

- Modelling Gent and Scholar
- Posts: 10823
- Joined: May 1st, 2011, 12:31 am
- Location: Adelaide. South Australia
Re: A Big Kat
It's looking good,coming together nicely.
Nigel
Nigel
-
bromo
- On a long, long journey
- Posts: 1249
- Joined: May 2nd, 2011, 7:05 pm
- Location: Wolverhampton,England
Re: A Big Kat
You are making a fantastic job of the Kat, did you see the Turbo one in this months PS ? A 750 Kat with an 1100 Turbo motor 150 BHP of sheer lunacy or what. Hopefully over the holidays I can finally make a start on the CB
BEEN A WHILE
-
ShaunW
- NOT the sheep
- Posts: 26188
- Joined: November 26th, 2011, 6:11 pm
- Location: Pontefract West Yorkshire
Re: A Big Kat
Keep at her Darryl, this is looking really good.
Doing - Tamiya 1/35th Universal Carrier.
Work is the curse of the modelling classes!
IPMS#12300
Work is the curse of the modelling classes!
IPMS#12300
-
Dazzled
- Modelling Gent and Scholar
- Posts: 9592
- Joined: October 1st, 2011, 11:08 pm
- Location: Mid Glamorgan, South Wales
- Contact:
Re: A Big Kat
Thanks for the kind comments chaps.
I've had a bit more of a bash at me bike and this is how it's going .
A few of the extraneous bits have been through the mill.
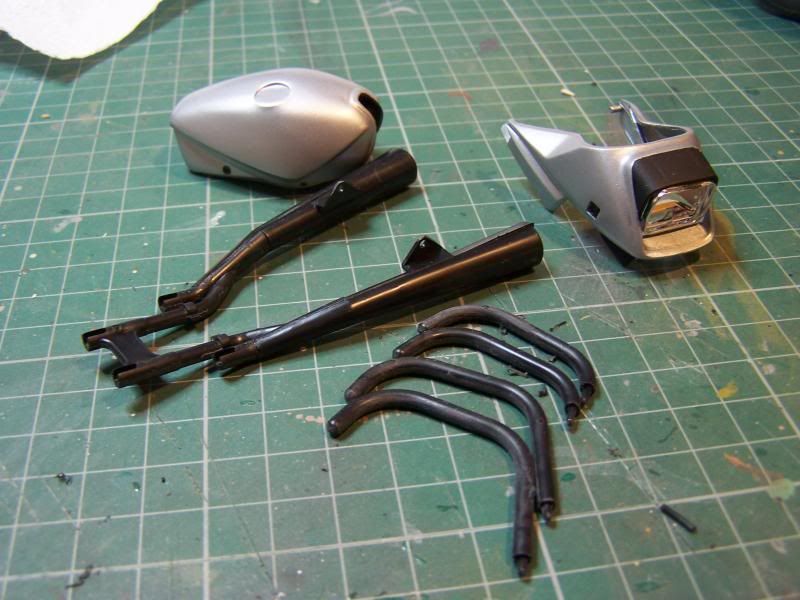
The tank is painted, as is the fairing with headlight inserted. The exhausts are also being worked at the moment. The mould lines around the downpipes are off and smoothed and the collector box and end cans are all together. When the liquid poly has had a good chance to set I'll smooth the seams in these and look to painting.
After I sorted out the paint on the front mudguard I was able to assemble the front end.
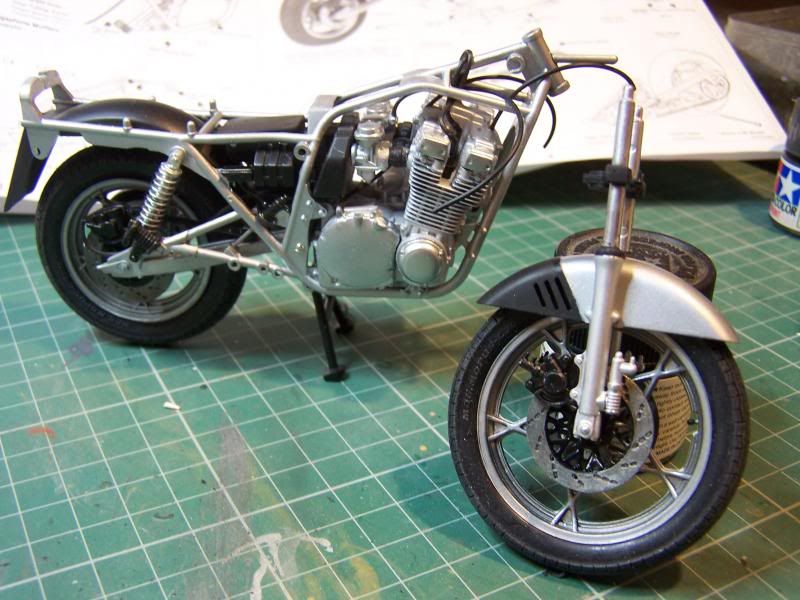
It can't go on for a little while however as the sequence called for requires the fairing to go on first and the forks pushed through. It didn't seem logical but, looking at the fairing, it'll be much easier to get the oil cooler in with the fairing off.
My other efforts have been directed at a bit of plumbing.
Oddly enough, Tamiya have the spark plugs linked to each other. .
.
A look at the real thing though, confirmed that the plug leads are supposed to face backwards and, as the tank on the model is bottomless and the side panels cover up the back end, the leads will disappear realistically under the tank.
Another little anomaly...
In typical fashion for a Tamiya kit of this vintage the brake pipes come off at the wrong angle so I attached mine at the correct angle as per references. I also had a bit of a job getting the front attachment on. I should probably have attached it before putting the frame together.
I'll start reading instructions one day .
There may be a short update delay as I have to get one of my 1:1 scale bikes MOT'd this week which will eat into my modelling time.
Thanks for looking.
Darryl
I've had a bit more of a bash at me bike and this is how it's going
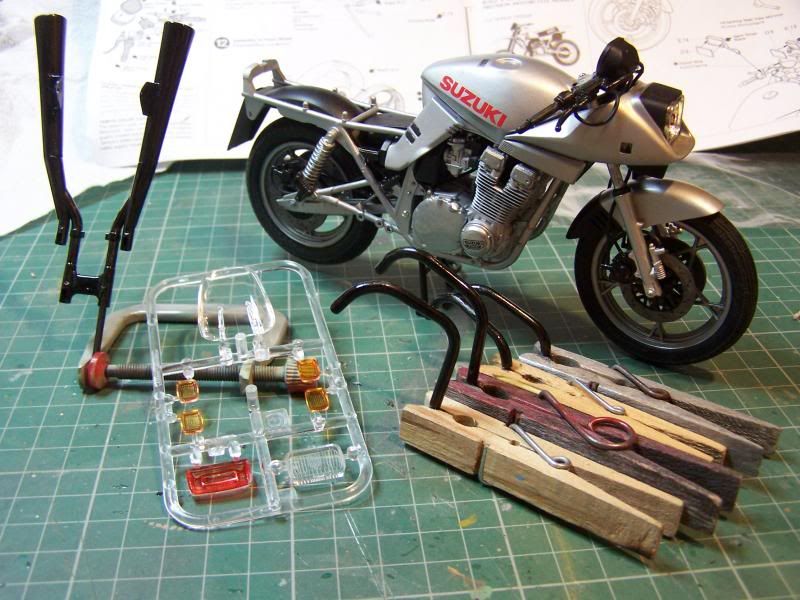
A few of the extraneous bits have been through the mill.

The tank is painted, as is the fairing with headlight inserted. The exhausts are also being worked at the moment. The mould lines around the downpipes are off and smoothed and the collector box and end cans are all together. When the liquid poly has had a good chance to set I'll smooth the seams in these and look to painting.
After I sorted out the paint on the front mudguard I was able to assemble the front end.

It can't go on for a little while however as the sequence called for requires the fairing to go on first and the forks pushed through. It didn't seem logical but, looking at the fairing, it'll be much easier to get the oil cooler in with the fairing off.
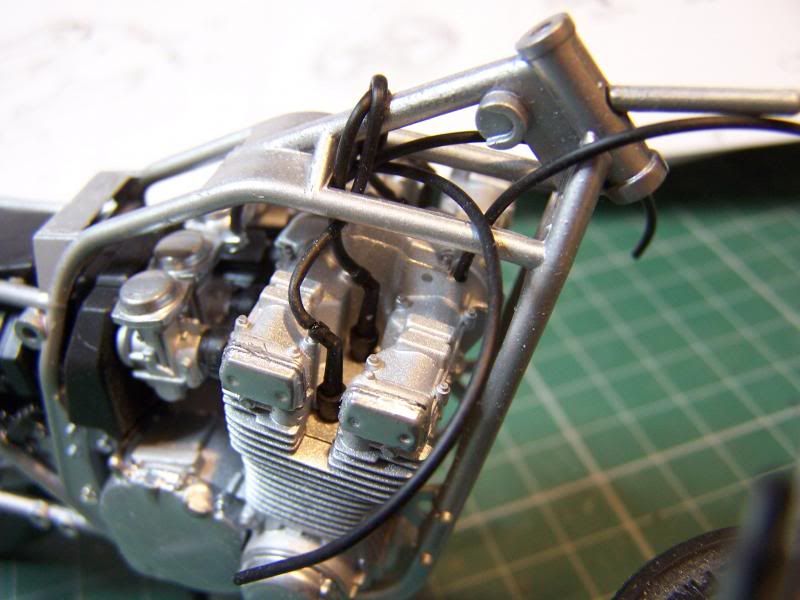
My other efforts have been directed at a bit of plumbing.

Oddly enough, Tamiya have the spark plugs linked to each other.
A look at the real thing though, confirmed that the plug leads are supposed to face backwards and, as the tank on the model is bottomless and the side panels cover up the back end, the leads will disappear realistically under the tank.
Another little anomaly...

In typical fashion for a Tamiya kit of this vintage the brake pipes come off at the wrong angle so I attached mine at the correct angle as per references. I also had a bit of a job getting the front attachment on. I should probably have attached it before putting the frame together.
I'll start reading instructions one day
There may be a short update delay as I have to get one of my 1:1 scale bikes MOT'd this week which will eat into my modelling time.
Thanks for looking.
Darryl
COLD WAR S.I.G. LEADER
Wherever there's danger, wherever there's trouble, wherever there's important work to be done....I'll be somewhere else building a model!
Wherever there's danger, wherever there's trouble, wherever there's important work to be done....I'll be somewhere else building a model!
-
ShaunW
- NOT the sheep
- Posts: 26188
- Joined: November 26th, 2011, 6:11 pm
- Location: Pontefract West Yorkshire
Re: A Big Kat
Great work. What are instructions but merely the manufacturer's opinion as to how the thing should go together - we modellers know better though don't we? 
Doing - Tamiya 1/35th Universal Carrier.
Work is the curse of the modelling classes!
IPMS#12300
Work is the curse of the modelling classes!
IPMS#12300
-
Dazzled
- Modelling Gent and Scholar
- Posts: 9592
- Joined: October 1st, 2011, 11:08 pm
- Location: Mid Glamorgan, South Wales
- Contact:
Re: A Big Kat
Very true Shaun ...
And with that in mind it's time for a focus on the latest bodges from the bench .
.
I did manage a couple of hours on the model for the last two evenings so I have made some progress, I haven't been taking a lot of progress pictures however. Truth is that I've been a bit too engrossed in building.
It's either that or senility setting in. You decide
Actually the progress has been quite good. See for yourselves.
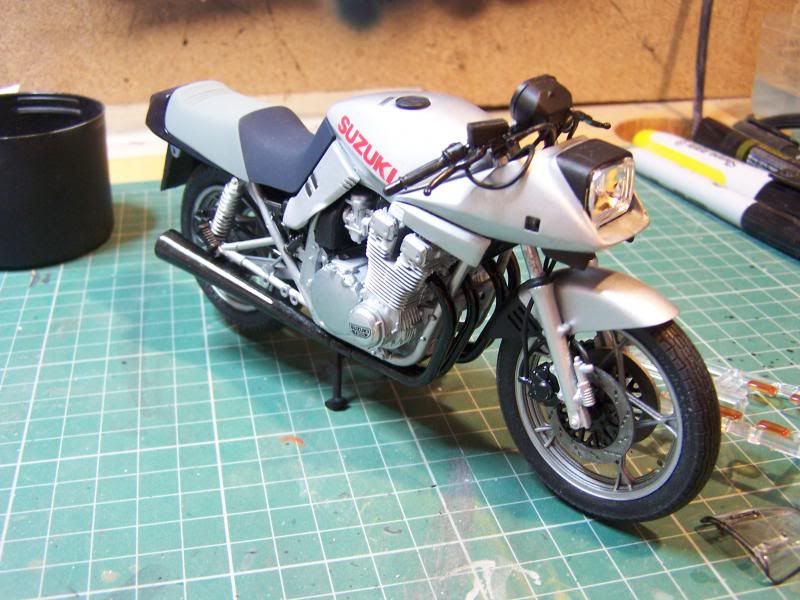
I've finally got the Kat on both paws.
This was after some more plumbing at the front, a bout of decalling, painting of the side panels and, of course attaching them and the tank and bodywork. Actually feeding the front end up through the fairing and getting it attached was a bit fiddly and involved several attempts, some swearing, a modicum of frustrated sobbing and a drill .
But I got there in the end.
Then I threaded through the cables with a fine pair of tweezers and finished off the plumbing.
As you can see, the exhausts are together now and smoothed off. They've had a coat of Humbrol metallic black on top of a matt black undercoat and will be ready for attachment on the weekend. The end plugs in the baffles are still to go in but, as they are a different shade of black, I thought I'd leave them until later.
And I've painted the insides of the tail light and indicator lenses.
There are still a number of jobs to do, not least of which is painting the seat and tail unit, but I'm quite happy so far .
More updates soon.
Darryl
And with that in mind it's time for a focus on the latest bodges from the bench
I did manage a couple of hours on the model for the last two evenings so I have made some progress, I haven't been taking a lot of progress pictures however. Truth is that I've been a bit too engrossed in building.
It's either that or senility setting in. You decide
Actually the progress has been quite good. See for yourselves.

I've finally got the Kat on both paws.
This was after some more plumbing at the front, a bout of decalling, painting of the side panels and, of course attaching them and the tank and bodywork. Actually feeding the front end up through the fairing and getting it attached was a bit fiddly and involved several attempts, some swearing, a modicum of frustrated sobbing and a drill
But I got there in the end.
Then I threaded through the cables with a fine pair of tweezers and finished off the plumbing.
As you can see, the exhausts are together now and smoothed off. They've had a coat of Humbrol metallic black on top of a matt black undercoat and will be ready for attachment on the weekend. The end plugs in the baffles are still to go in but, as they are a different shade of black, I thought I'd leave them until later.
And I've painted the insides of the tail light and indicator lenses.
There are still a number of jobs to do, not least of which is painting the seat and tail unit, but I'm quite happy so far
More updates soon.
Darryl
COLD WAR S.I.G. LEADER
Wherever there's danger, wherever there's trouble, wherever there's important work to be done....I'll be somewhere else building a model!
Wherever there's danger, wherever there's trouble, wherever there's important work to be done....I'll be somewhere else building a model!
-
Dazzled
- Modelling Gent and Scholar
- Posts: 9592
- Joined: October 1st, 2011, 11:08 pm
- Location: Mid Glamorgan, South Wales
- Contact:
Re: A Big Kat
Just a little update today.
I've been removing some of the last parts from the sprues and prepping them ready for installation. Nothing exciting, just some sanding and painting of footpegs , stand, etc. The main components left are the seat and rear cowl.
They needed a bit of cleaning up, and dry fitting revealed the need for a little fettling to achieve a nice easy fit. I don't want to discover fit difficulties post paint.
The paint for the cowl is a mix of Tamiya X-3 and XF-1 in a 2:1 ratio. The leftover paint can then be mixed with one part of flat clear and used for the front half of the seat. Tamiya XF-25 coats the rest of the seat.
Other than that, I've applied a little filler to the fairing in front of the headlamp to hide a slightly visible seam.
Hopefully, I'll get this finished before the end of the month.
Darryl
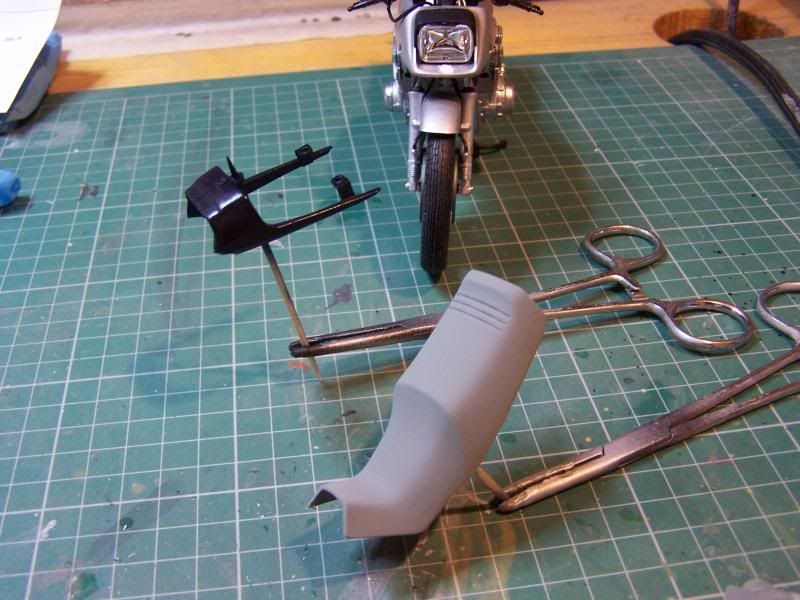
I've been removing some of the last parts from the sprues and prepping them ready for installation. Nothing exciting, just some sanding and painting of footpegs , stand, etc. The main components left are the seat and rear cowl.

They needed a bit of cleaning up, and dry fitting revealed the need for a little fettling to achieve a nice easy fit. I don't want to discover fit difficulties post paint.
The paint for the cowl is a mix of Tamiya X-3 and XF-1 in a 2:1 ratio. The leftover paint can then be mixed with one part of flat clear and used for the front half of the seat. Tamiya XF-25 coats the rest of the seat.
Other than that, I've applied a little filler to the fairing in front of the headlamp to hide a slightly visible seam.
Hopefully, I'll get this finished before the end of the month.
Darryl
COLD WAR S.I.G. LEADER
Wherever there's danger, wherever there's trouble, wherever there's important work to be done....I'll be somewhere else building a model!
Wherever there's danger, wherever there's trouble, wherever there's important work to be done....I'll be somewhere else building a model!
-
bromo
- On a long, long journey
- Posts: 1249
- Joined: May 2nd, 2011, 7:05 pm
- Location: Wolverhampton,England
Re: A Big Kat
That's looking just ace Darryl  I think I will have to get one of these now. That grey for the seat looks spot on as well was that a colour call out in the instructions? if I remember right the seat on the real thing had a kind of velour finish to it
  a right pain to keep clean. You have done a cracking job on this build and watching this has helped me get my own build going.
Just doing some surfing on 80's muscle bikes it seems that Suzuki also did a GSX1000 Katana I am now trying to find out why they did an 1100 and a 1000 as well as a 650(shaft drive) and 550!
Just doing some surfing on 80's muscle bikes it seems that Suzuki also did a GSX1000 Katana I am now trying to find out why they did an 1100 and a 1000 as well as a 650(shaft drive) and 550!
BEEN A WHILE
-
JohnRatzenberger

- Why is he so confused ?
- Posts: 15734
- Joined: April 5th, 2011, 3:42 pm
- Location: Living on a sandbar - Nags Head, NC.
Re: A Big Kat
Your build reminds me that it is (near the end of) Bike Week here on the Outer Banks, in fact I think world-wide ?
John Ratzenberger
It's my model and I'll do what I want with it.
It's my model and I'll do what I want with it.
-
Clashcityrocker
- Modelling Gent and Scholar
- Posts: 10823
- Joined: May 1st, 2011, 12:31 am
- Location: Adelaide. South Australia
Re: A Big Kat
Coming along nicely.
Nigel
Nigel
-
ShaunW
- NOT the sheep
- Posts: 26188
- Joined: November 26th, 2011, 6:11 pm
- Location: Pontefract West Yorkshire
Re: A Big Kat
This is fantastic Darryl, a very enjoyable build to watch and it's coming on a treat.
Doing - Tamiya 1/35th Universal Carrier.
Work is the curse of the modelling classes!
IPMS#12300
Work is the curse of the modelling classes!
IPMS#12300
-
Dazzled
- Modelling Gent and Scholar
- Posts: 9592
- Joined: October 1st, 2011, 11:08 pm
- Location: Mid Glamorgan, South Wales
- Contact:
Re: A Big Kat
Thanks guys.
Suzuki built the Katana in a number of sizes. The 1100 was just the biggest. There was, indeed a 100 and a very nice shaft drive 650. There was also a 750 and the "New Katana" 750 with a pop-up headlight. Not many were imported to the UK and they're quite sought after. Thankfully, they didn't all have the odd suede-like seat.
Well, I didn't finish the Katana this weekend. In fact, the weekend turned into a time wormhole. I spent it mostly studying and tiling the kitchen floor
Although a few beers and a visit to the cinema perked things up a little.
Tonight I did manage a couple of hours at the bench though.
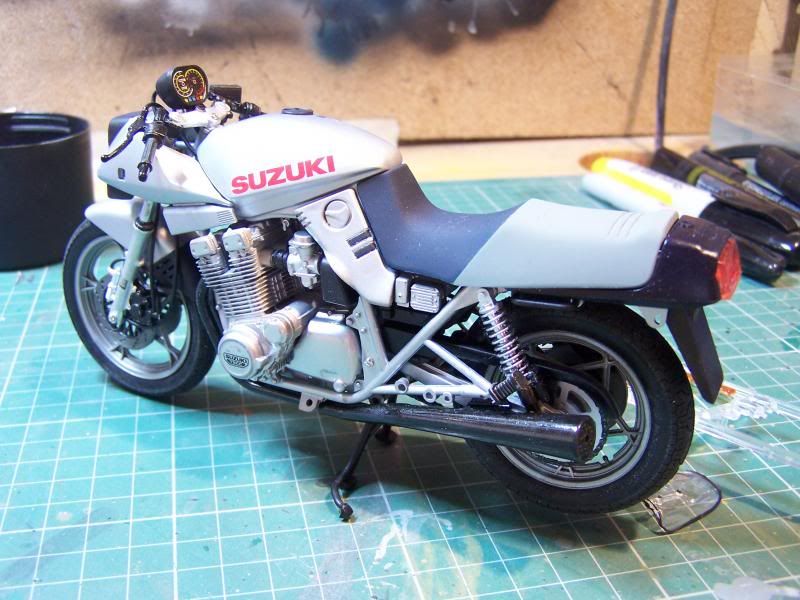
A lot of the last bits have dried so some more assembly was appropriate. I'm quite pleased with the way the seat turned out and it clicked into place quite nicely.
Apart from these few parts getting attached I'm working on the screen and numberplate. I've outlined the screen using a marker pen but I think I'll have to resort to paint for the brackets.
Hopefully, I'll manage another session tomorrow and get this one done.
Then it's on to the Mig-21 GB
Suzuki built the Katana in a number of sizes. The 1100 was just the biggest. There was, indeed a 100 and a very nice shaft drive 650. There was also a 750 and the "New Katana" 750 with a pop-up headlight. Not many were imported to the UK and they're quite sought after. Thankfully, they didn't all have the odd suede-like seat.
Well, I didn't finish the Katana this weekend. In fact, the weekend turned into a time wormhole. I spent it mostly studying and tiling the kitchen floor
Although a few beers and a visit to the cinema perked things up a little.
Tonight I did manage a couple of hours at the bench though.


A lot of the last bits have dried so some more assembly was appropriate. I'm quite pleased with the way the seat turned out and it clicked into place quite nicely.
Apart from these few parts getting attached I'm working on the screen and numberplate. I've outlined the screen using a marker pen but I think I'll have to resort to paint for the brackets.
Hopefully, I'll manage another session tomorrow and get this one done.
Then it's on to the Mig-21 GB
COLD WAR S.I.G. LEADER
Wherever there's danger, wherever there's trouble, wherever there's important work to be done....I'll be somewhere else building a model!
Wherever there's danger, wherever there's trouble, wherever there's important work to be done....I'll be somewhere else building a model!
-
general rocket

- Modelling Gent and Scholar
- Posts: 2791
- Joined: May 1st, 2011, 4:42 pm
- Location: Telford