They do look good folded and you can still see most of the cockpits from above.
Regards Splash
John's Two-in-One Build -- * DNF *
-
splash

- Senior Service Rotorhead
- Posts: 13828
- Joined: May 1st, 2011, 11:02 am
- Location: Somerset England
Re: John's Two-in-One Build
My work bench is starting to look like Portsmouth Naval Dockyard.
-
JohnRatzenberger

- Why is he so confused ?
- Posts: 15734
- Joined: April 5th, 2011, 3:42 pm
- Location: Living on a sandbar - Nags Head, NC.
Re: John's Two-in-One Build
Yeah, I agree, but for sure the floatplane markings deserve open wings .... still dithering about it ...splash wrote:They do look good folded and you can still see most of the cockpits from above.
Regards Splash
John Ratzenberger 
It's my model and I'll do what I want with it.
It's my model and I'll do what I want with it.
-
JohnRatzenberger
- Why is he so confused ?
- Posts: 15734
- Joined: April 5th, 2011, 3:42 pm
- Location: Living on a sandbar - Nags Head, NC.
Re: John's Two-in-One Build
Well, here's the pre-close-up picture … forgot I had it …
And here we are at the end …. but somehow I forgot to take a "big picture" picture, just cockpits. Not the best but you can see some of the Eduard photo-etch. It's not very difficult and adds quite a bit, I think ….

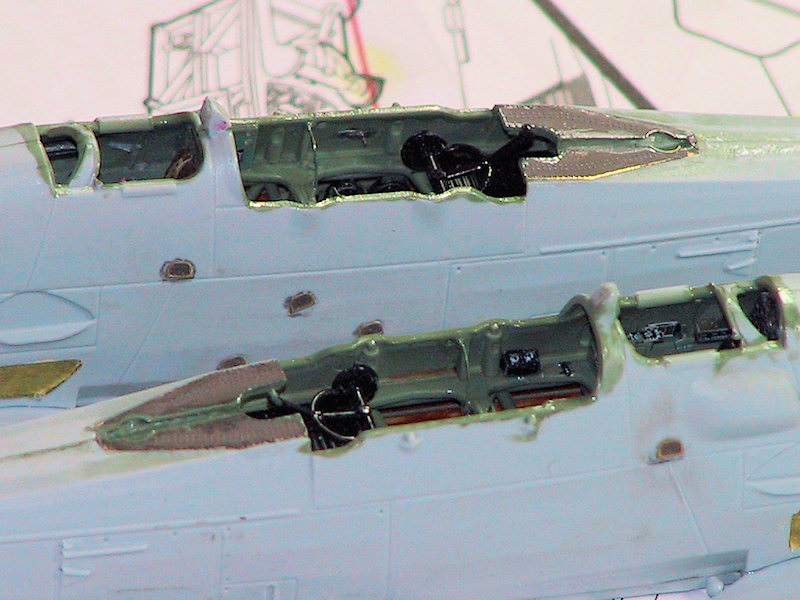
I really didn't have much trouble closing the fuselages. The sides don't quite line up with the bottom in the middle, a bit of a bulge, but I took part of it down and hope it will be OK. I also had to open the wing roots just a hair to get the underside to fit against the fuselage without a gap in the nose.
I've touched up the cockpit, sanded seams, fixed up a couple panel lines, etc.
I'm skipping the engine for a bit and moving on to get major parts on so I can do some painting …. Not shown is that I have the stabilizer on. One has to be careful to get it straight -- I think the offset fin plays visual tricks.
The Eduard photoetch wants me to replace the control horns, but I just thinned down the kit ones a bit. I also have the poorly molded support struts. After looking though other kit boxes I have (yes I have more than one), I think the wheel kit comes with one of the four struts short and the float kit comes with the complete, but warped struts. Sad …. I do hope they get a handle on this.
This is why I put the stab on first; I'll work at getting the struts right before putting on the elevators, rudder, etc.
Still dithering on wings. I think the float will have them both open because of the upper wing markings. The wheel maybe will be one open and one folded or maybe both closed. Still time to change my mind ….
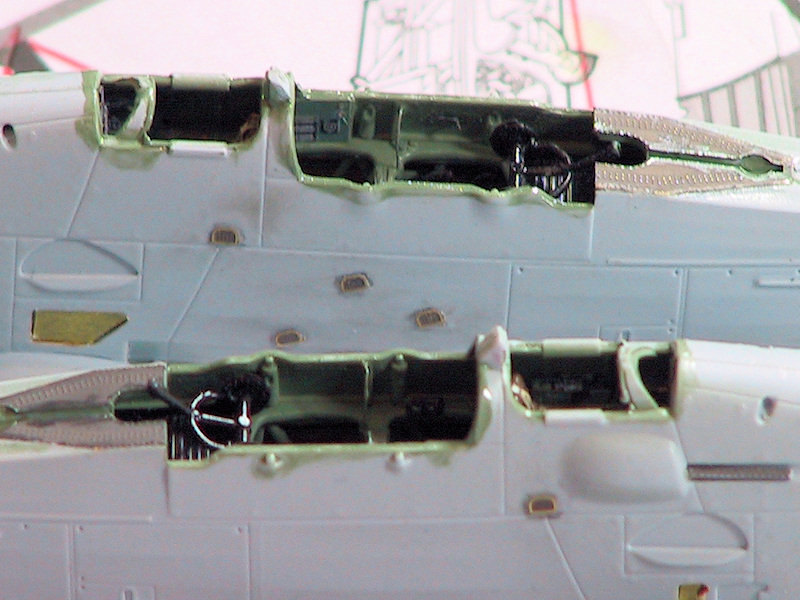
And here we are at the end …. but somehow I forgot to take a "big picture" picture, just cockpits. Not the best but you can see some of the Eduard photo-etch. It's not very difficult and adds quite a bit, I think ….
I really didn't have much trouble closing the fuselages. The sides don't quite line up with the bottom in the middle, a bit of a bulge, but I took part of it down and hope it will be OK. I also had to open the wing roots just a hair to get the underside to fit against the fuselage without a gap in the nose.
I've touched up the cockpit, sanded seams, fixed up a couple panel lines, etc.
I'm skipping the engine for a bit and moving on to get major parts on so I can do some painting …. Not shown is that I have the stabilizer on. One has to be careful to get it straight -- I think the offset fin plays visual tricks.
The Eduard photoetch wants me to replace the control horns, but I just thinned down the kit ones a bit. I also have the poorly molded support struts. After looking though other kit boxes I have (yes I have more than one), I think the wheel kit comes with one of the four struts short and the float kit comes with the complete, but warped struts. Sad …. I do hope they get a handle on this.
This is why I put the stab on first; I'll work at getting the struts right before putting on the elevators, rudder, etc.
Still dithering on wings. I think the float will have them both open because of the upper wing markings. The wheel maybe will be one open and one folded or maybe both closed. Still time to change my mind ….
John Ratzenberger
It's my model and I'll do what I want with it.
It's my model and I'll do what I want with it.
-
Old_Tonto

- Modelling Gent and Scholar
- Posts: 8063
- Joined: May 1st, 2011, 7:41 pm
- Location: Middlesbrough, Peoples Republic of Teesside.
Re: John's Two-in-One Build
That looks really nice although a bit too much work for me. 
2023 - A:0 B:0 C:0
Current Projects:
East German Air Force (1956-90)
South African Air Force (1958-93)
Current Projects:
East German Air Force (1956-90)
South African Air Force (1958-93)
-
JohnRatzenberger
- Why is he so confused ?
- Posts: 15734
- Joined: April 5th, 2011, 3:42 pm
- Location: Living on a sandbar - Nags Head, NC.
Re: John's Two-in-One Build
Given how far behind I am, it appears that it is too much for me also .... Should not have done two ...
John Ratzenberger
It's my model and I'll do what I want with it.
It's my model and I'll do what I want with it.
-
splash
- Senior Service Rotorhead
- Posts: 13828
- Joined: May 1st, 2011, 11:02 am
- Location: Somerset England
Re: John's Two-in-One Build
John they look fantastic and you are right folding the wings would hide to much of the super detail.
Regards Splash
Regards Splash
My work bench is starting to look like Portsmouth Naval Dockyard.
-
JohnRatzenberger
- Why is he so confused ?
- Posts: 15734
- Joined: April 5th, 2011, 3:42 pm
- Location: Living on a sandbar - Nags Head, NC.
Re: John's Two-in-One Build
Quite obviously, I am a DNF.
I'll post pix at state of play and some comments later, my day isn't going as planned ....
I'll post pix at state of play and some comments later, my day isn't going as planned ....
John Ratzenberger
It's my model and I'll do what I want with it.
It's my model and I'll do what I want with it.
-
splash
- Senior Service Rotorhead
- Posts: 13828
- Joined: May 1st, 2011, 11:02 am
- Location: Somerset England
Re: John's Two-in-One Build
John I have got a commission to build a Swordfish for a friend who flies back seat in the current RN Historic Flights Swordfish at RNAS Yeovilton.
In your opinion, do the improvements from adding the PE outweigh the cost and time they take to add? Please don’t take this the wrong way, as I think they look fantastic in the close up photos.
I’m just thinking, will the non-modeller spot the extra work and ultra-fine detail or be put off by the extra cost, bearing in mind, when I said I was building a Swordfish, he asked “Will it have as much detail as the Corgi Diecast?”
Regards Splash
My work bench is starting to look like Portsmouth Naval Dockyard.
-
JohnRatzenberger
- Why is he so confused ?
- Posts: 15734
- Joined: April 5th, 2011, 3:42 pm
- Location: Living on a sandbar - Nags Head, NC.
Re: John's Two-in-One Build
Splash, anyone should be happy with one you build.
If there's no great desire for additional detail, go OOB.
How many would he like built, in how much detail, for a ride ?
If there's no great desire for additional detail, go OOB.
How many would he like built, in how much detail, for a ride ?
John Ratzenberger
It's my model and I'll do what I want with it.
It's my model and I'll do what I want with it.
-
JohnRatzenberger
- Why is he so confused ?
- Posts: 15734
- Joined: April 5th, 2011, 3:42 pm
- Location: Living on a sandbar - Nags Head, NC.
Re: John's Two-in-One Build
DNF.
The fault is, of course, mine.
1. I started 2 kits, different markings and configuration.
2. with photo-etch -- that gave me effectively 4 sets of instructions to juggle
3. I never developed a good rhythm for any of it.
4. There were a few too many days away from the bench.
Two kits w/o PE, one kit with PE, all do-able …. not this ….
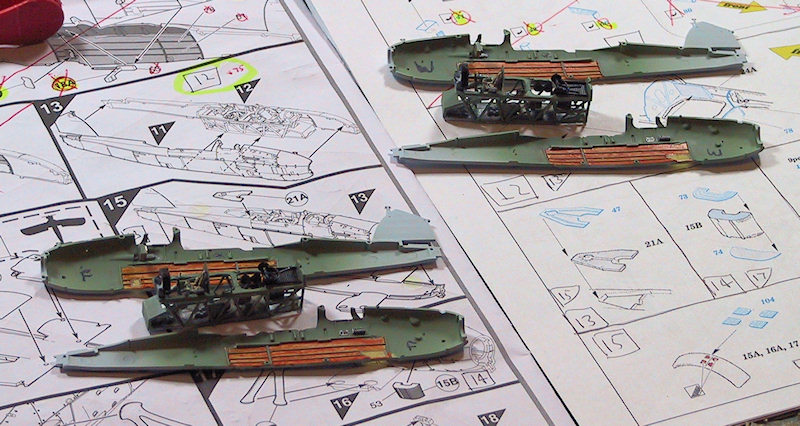
Here we are at the end, I'll start a continuation thread in Aircraft Modelling …. Both fuselages closed up and sanded. . Tails on, stab struts fixed and on. Engines & cowls started. Various pieces of wing constructed. Rigging holes made, etc.
Both are right about at the paint shop stage, which needs to get done, so I can move along with assembly.
As stated before, the float plane (top) will have both wings spread, while I have finally settled on one-folded, one-spread for the wheeled plane (bottom) and as someone, I think Splash, always says "I have a cunning plan" ….
You can see that one upper wing is mounted to the center section, while one has been built separate. I plan to mount the center section to the fuselage, using one of the two provided jigs and whatever I can to hold the other side in place. I have thought about cutting down that side jig as a helper …. not quite done with the cunning plan actually.
Anyway, at one point I was going to do both spread so I marked out the folded instructions. I had to go back and highlight those I really didn't want to skip, then I had to work through spread/folded sections picking pieces from each. It's a mess and will slow me up even more.
It's a good kit, but ….IMHO ….
1. Instructions are unnecessarily complex; I have commented earlier about too many steps, too dark, and now add shifting views where in one wings rotate from view to view for little purpose - it has confused me no end with the wheeled bird's different wings.
2. Short-shot or warped parts -- what the tail struts, the center section support, an engine nose cone, struts, etc -- and it varies on the same sprue between wheel and float. I sure hope they get a handle on that as it's extremely frustrating and would really sour those who are maybe on their first Swordfish/biplane kit and have no spares, etc.
3. Too closely engineered, or maybe, engineered to very close tolerances. A few too many parts where much test fit and trimming is needed to get an overall fit -- and quite possibly on thin or weak parts. I noted several people had trouble with the upper wing to center section fit -- mine fit perfectly, but only after I very gingerly and carefully sanded down the strut parts between wing & center section to get a tight fit, and it wasn't fun.
4. No rigging diagram and incomplete "starter holes" for all rigging.
5. Not for beginners, and from that perspective, a step backward from the CBK Swordfish.
Anyway, paints are out, I should be started by tomorrow or Thursday … watch for the thread in the aviation modeling forum ….
Oh, almost forgot. I want to thank Prisca for getting me interested in Vallejo paints, I'm now dabbling a bit, and Splash for getting me interested in Vallejo filler, which is now front & center on my bench .... So, I learned a couple things !!
The fault is, of course, mine.
1. I started 2 kits, different markings and configuration.
2. with photo-etch -- that gave me effectively 4 sets of instructions to juggle
3. I never developed a good rhythm for any of it.
4. There were a few too many days away from the bench.
Two kits w/o PE, one kit with PE, all do-able …. not this ….
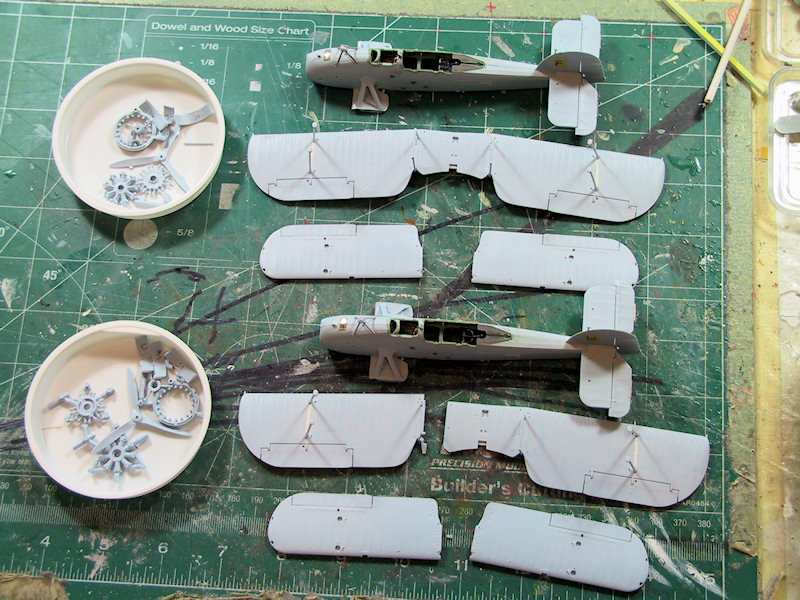
Here we are at the end, I'll start a continuation thread in Aircraft Modelling …. Both fuselages closed up and sanded. . Tails on, stab struts fixed and on. Engines & cowls started. Various pieces of wing constructed. Rigging holes made, etc.
Both are right about at the paint shop stage, which needs to get done, so I can move along with assembly.
As stated before, the float plane (top) will have both wings spread, while I have finally settled on one-folded, one-spread for the wheeled plane (bottom) and as someone, I think Splash, always says "I have a cunning plan" ….
You can see that one upper wing is mounted to the center section, while one has been built separate. I plan to mount the center section to the fuselage, using one of the two provided jigs and whatever I can to hold the other side in place. I have thought about cutting down that side jig as a helper …. not quite done with the cunning plan actually.
Anyway, at one point I was going to do both spread so I marked out the folded instructions. I had to go back and highlight those I really didn't want to skip, then I had to work through spread/folded sections picking pieces from each. It's a mess and will slow me up even more.
It's a good kit, but ….IMHO ….
1. Instructions are unnecessarily complex; I have commented earlier about too many steps, too dark, and now add shifting views where in one wings rotate from view to view for little purpose - it has confused me no end with the wheeled bird's different wings.
2. Short-shot or warped parts -- what the tail struts, the center section support, an engine nose cone, struts, etc -- and it varies on the same sprue between wheel and float. I sure hope they get a handle on that as it's extremely frustrating and would really sour those who are maybe on their first Swordfish/biplane kit and have no spares, etc.
3. Too closely engineered, or maybe, engineered to very close tolerances. A few too many parts where much test fit and trimming is needed to get an overall fit -- and quite possibly on thin or weak parts. I noted several people had trouble with the upper wing to center section fit -- mine fit perfectly, but only after I very gingerly and carefully sanded down the strut parts between wing & center section to get a tight fit, and it wasn't fun.
4. No rigging diagram and incomplete "starter holes" for all rigging.
5. Not for beginners, and from that perspective, a step backward from the CBK Swordfish.
Anyway, paints are out, I should be started by tomorrow or Thursday … watch for the thread in the aviation modeling forum ….
Oh, almost forgot. I want to thank Prisca for getting me interested in Vallejo paints, I'm now dabbling a bit, and Splash for getting me interested in Vallejo filler, which is now front & center on my bench .... So, I learned a couple things !!
John Ratzenberger
It's my model and I'll do what I want with it.
It's my model and I'll do what I want with it.
-
PaulBradley

- Staring out the window
- Posts: 21211
- Joined: April 6th, 2011, 3:08 pm
- Location: Flagstaff, AZ
Re: John's Two-in-One Build
A frank and valuable assessment there, John. I'd add that it seems that some of the parts are very fragile - more than just I had this issue. Certainly, having scale parts isn't always an advantage! For Airfix, it's a case of 'damned of you do, damned if you don't,' I suppose.
Paul
За демократію і незалежний Україну
"For Democracy and a Free Ukraine"
За демократію і незалежний Україну
"For Democracy and a Free Ukraine"