Jim's AJ A
-
ShaunW
- NOT the sheep
- Posts: 26180
- Joined: November 26th, 2011, 6:11 pm
- Location: Pontefract West Yorkshire
Re: Jim's AJ A
That is great Jim - super work with the aircrew and the front turret interior looks excellent under a coat of paint.
Doing - Tamiya 1/35th Universal Carrier.
Work is the curse of the modelling classes!
IPMS#12300
Work is the curse of the modelling classes!
IPMS#12300
-
Jagewa

- Modelling Gent and Scholar
- Posts: 2752
- Joined: April 6th, 2011, 2:18 am
- Location: Christchurch, New Zealand
- Contact:
Re: Jim's AJ A
Cheers Shaun.
Had a pleasant time assembling engine nacelles, I am impressed with the fit, they just fell together for me. I like the insert for the roof of the chin intake, means no nasty join to clean up, unlike the Airfix Lancaster nacelles.
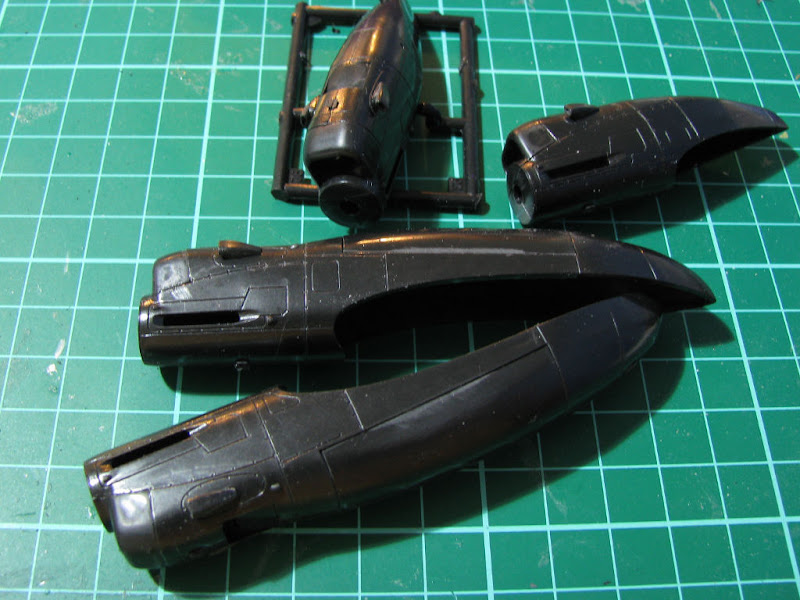
The undercarriage doors being modelled shut, helps with the nacelle assembly too. The only thing that took a bit of time was drilling out the carbie intakes for the lower sides of the engines, a tad fiddly.
Got the fuselage together, found it a good fit, a bit of pressure at the front of the bomb bay to close the nose up, but not big gaps to deal with.
The major bit to deal with is the bomb bay insert, which for me was too long, I've separated the front and rear fairings off, so easy but this step at the rear fairing is a poser. The fit is spot on in the bomb bay, decking is flush, the width is spot on as well, but it's about a millimetre too tall.
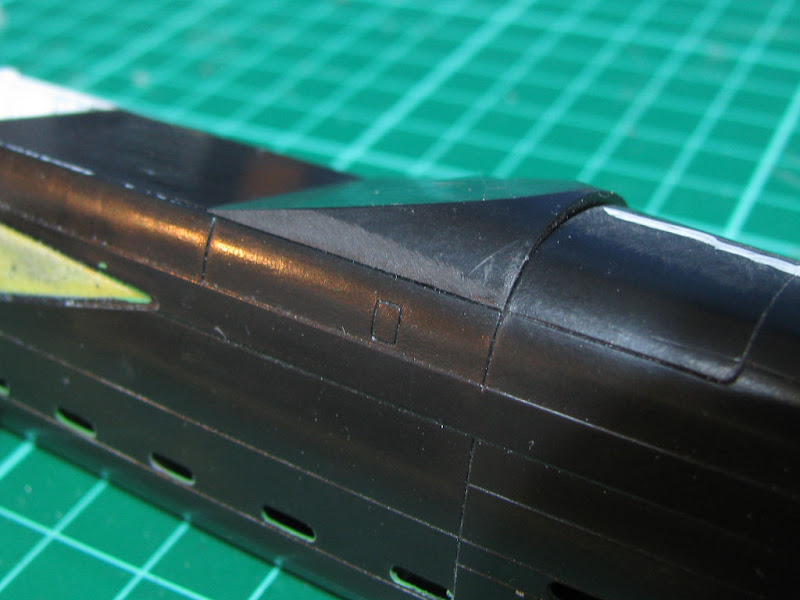
My plan at the moment is to slice it sand the cut down until it fits, cement it back on,a nd them fix that joint. So I don't upset the width at the base or destroy the nice curve at the top.
Cheers
Jim
Had a pleasant time assembling engine nacelles, I am impressed with the fit, they just fell together for me. I like the insert for the roof of the chin intake, means no nasty join to clean up, unlike the Airfix Lancaster nacelles.
The undercarriage doors being modelled shut, helps with the nacelle assembly too. The only thing that took a bit of time was drilling out the carbie intakes for the lower sides of the engines, a tad fiddly.
Got the fuselage together, found it a good fit, a bit of pressure at the front of the bomb bay to close the nose up, but not big gaps to deal with.
The major bit to deal with is the bomb bay insert, which for me was too long, I've separated the front and rear fairings off, so easy but this step at the rear fairing is a poser. The fit is spot on in the bomb bay, decking is flush, the width is spot on as well, but it's about a millimetre too tall.
My plan at the moment is to slice it sand the cut down until it fits, cement it back on,a nd them fix that joint. So I don't upset the width at the base or destroy the nice curve at the top.
Cheers
Jim
-
PaulBradley

- Staring out the window
- Posts: 21201
- Joined: April 6th, 2011, 3:08 pm
- Location: Flagstaff, AZ
Re: Jim's AJ A
Yikes - that's a nasty fit issue. An alternative might be to fair in aft of the fairing with a piece of plastic card and filler, keeping the line of the underside but making it a little deeper. If you see what I mean.
Paul
За демократію і незалежний Україну
"For Democracy and a Free Ukraine"
За демократію і незалежний Україну
"For Democracy and a Free Ukraine"
-
ShaunW
- NOT the sheep
- Posts: 26180
- Joined: November 26th, 2011, 6:11 pm
- Location: Pontefract West Yorkshire
Re: Jim's AJ A
Mmmmmm, that is a bit of a fit issue Jim. I'd be tempted to follow a similar idea to Paul's with placcy card and filler as that is quite a step twixt insert and fuselage. Careful sanding will be required to maintain the curvature of the piece but, hey, you've built an Italeri Apache so you should manage this no bother however you choose to approach it 
Doing - Tamiya 1/35th Universal Carrier.
Work is the curse of the modelling classes!
IPMS#12300
Work is the curse of the modelling classes!
IPMS#12300
-
AndrewR

- In the basement lab
- Posts: 24058
- Joined: April 5th, 2011, 4:13 pm
- Location: Ottawa, Ontario, The Great White North
- Contact:
Re: Jim's AJ A
A tricky problem. I think I'd be tempted to remove material from the fuselage to make the fairing sit lower. If it doesn't work then it would be relatively straightforward to repair.
Cheers
Andrew
Cheers
Andrew
Up in the Great White North
-
capri3
- Onto the Clever Stuff, Now.
- Posts: 105
- Joined: May 2nd, 2011, 8:22 pm
- Location: Aberdeenshire
Re: Jim's AJ A
I came across this problem when I built mine and thought initially I'd assembled something incorrectly. Didn't think that a new tool kit would have such an obvious problem and was far from impressed when I found out that this was indeed the case. Fixed it by sanding the fairing flush with the fuselage and then reshaping it. Not hard or too time consuming to do and it looks okay now but not what I expected to find on a kit like this.
-
Jagewa
- Modelling Gent and Scholar
- Posts: 2752
- Joined: April 6th, 2011, 2:18 am
- Location: Christchurch, New Zealand
- Contact:
Re: Jim's AJ A
Hi guys, hey, thanks for the input, I don't where the last week went, only had a chance for a bit of modelling in the last couple of days.
Picasaweb is having a go slow for me so I'm smashing the computer screen as we speak.... when it gets better I'll post an update..
Cheers
Jim
Picasaweb is having a go slow for me so I'm smashing the computer screen as we speak.... when it gets better I'll post an update..
Cheers
Jim
-
Jagewa
- Modelling Gent and Scholar
- Posts: 2752
- Joined: April 6th, 2011, 2:18 am
- Location: Christchurch, New Zealand
- Contact:
Re: Jim's AJ A
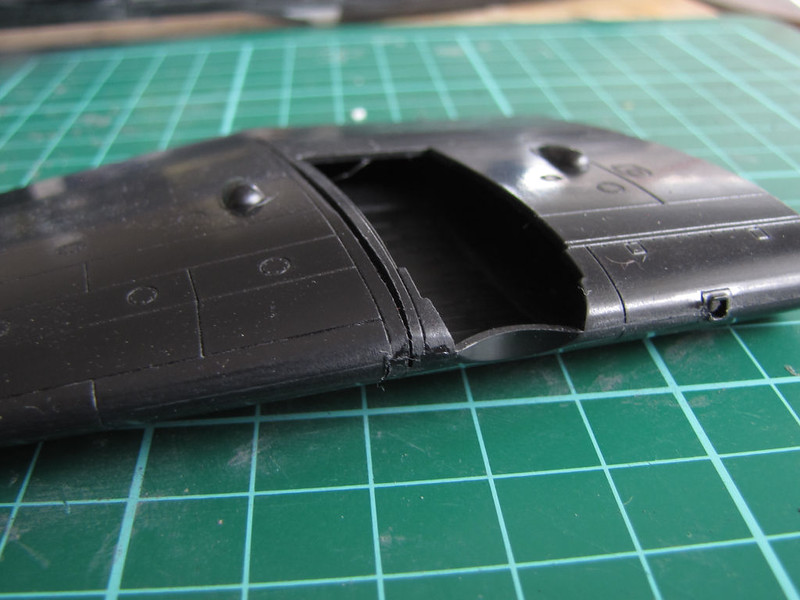
After throwing a man tanty, I've got a couple of progress piccies..
The rear fairing, after digesting your replies, I totally bashed on with another way
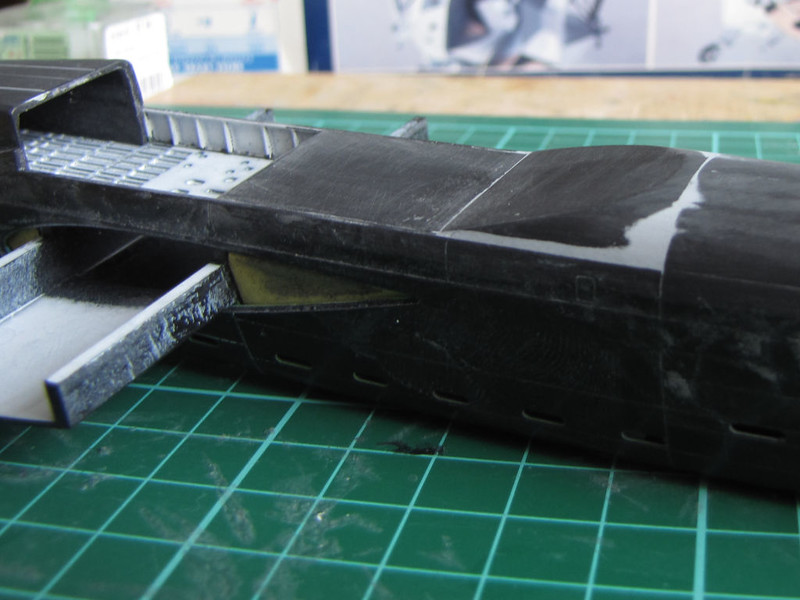
Cut the rear faing away from the insert that goes across the bomb bay, and then sanded on a slant so the rear was brought down but kept the forward edge roughly the same width, then filler applied.
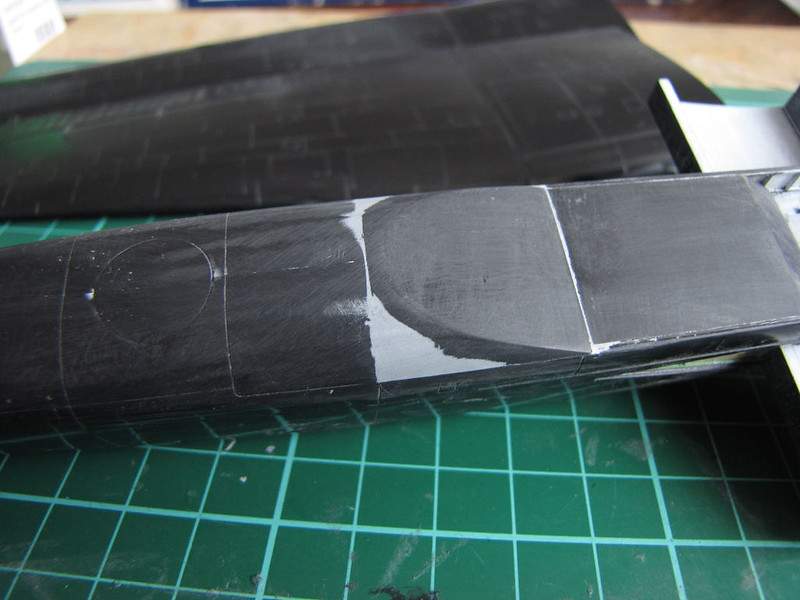
I've also wagged the wings... so many ways of increasing the dihedral of the outer wing panel, so I took a stab..
First way I thought I'd razor saw through the top of the wing and relieve just inside the top cut underneath.. then bend the wing up, cement on top and pack underneath... but this just broke the wing outer panel away completely..
and I was left with fiddly bit of plastic to cement back at the side of the wheel bay, and a hole that I've got to pack.
So the second way I tried, (which I thought I saw somewhere on the web but cannot find) is one saw cut through the top surface of the wing and then pulled together with tape stretched form wing tip to wing root and cemented..
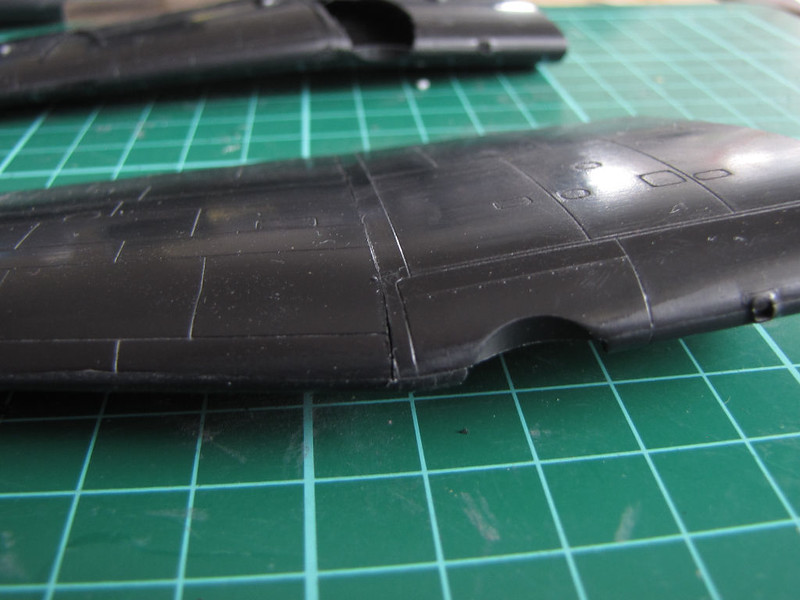
I found this way much easier to do, and has left a very small seam to fill as well.
So a touch more fill and sand ahead.
Cheers
Jim
The rear fairing, after digesting your replies, I totally bashed on with another way
Cut the rear faing away from the insert that goes across the bomb bay, and then sanded on a slant so the rear was brought down but kept the forward edge roughly the same width, then filler applied.
I've also wagged the wings... so many ways of increasing the dihedral of the outer wing panel, so I took a stab..
First way I thought I'd razor saw through the top of the wing and relieve just inside the top cut underneath.. then bend the wing up, cement on top and pack underneath... but this just broke the wing outer panel away completely..
and I was left with fiddly bit of plastic to cement back at the side of the wheel bay, and a hole that I've got to pack.
So the second way I tried, (which I thought I saw somewhere on the web but cannot find) is one saw cut through the top surface of the wing and then pulled together with tape stretched form wing tip to wing root and cemented..
I found this way much easier to do, and has left a very small seam to fill as well.
So a touch more fill and sand ahead.
Cheers
Jim
-
lancfan

- Avro's Rivet Rhapsodizer
- Posts: 8761
- Joined: May 2nd, 2011, 3:55 pm
- Location: Nelson, Lancashire
Re: Jim's AJ A
Jim, I like the way you have addressed this area as it seems to me to be most likely way they would have done this on the full-size with the bomb bay roof structure still showing in the gap between the two fairings. I only had one Revell Dambuster kit in the stash which I decided to build here as another variant just to be different and the Chastise parts are now safely stashed away to be used on a normal Lancaster kit later. Even with the minor flaws built into the normal kit I was amazed by the step created when this grossly misshapen part was fitted here in the GB and the work everyone has had to do to correct this one. Perhaps the kit makers should abandon CAD and buy a few new rise-and-fall A0 drawing boards (assuming of course that the drawing office staff still know how to hold a pencilJagewa wrote:After throwing a man tanty, I've got a couple of progress piccies..
The rear fairing, after digesting your replies, I totally bashed on with another way
-
David.
David.
If you forget the past, you may lose the future.
If you forget the past, you may lose the future.
-
ShaunW
- NOT the sheep
- Posts: 26180
- Joined: November 26th, 2011, 6:11 pm
- Location: Pontefract West Yorkshire
Re: Jim's AJ A
Some good solutions Jim - I'm sure it'll all look good under paint!
Doing - Tamiya 1/35th Universal Carrier.
Work is the curse of the modelling classes!
IPMS#12300
Work is the curse of the modelling classes!
IPMS#12300