
Panzer 3 Ausf M
Re: Panzer 3 Ausf M
Putty off, green on!

Re: Panzer 3 Ausf M
I'm so impressed with this kit I'm going to haul the tiger 2 out of the stash and give that a bash plus the tiger two Porsche turret off my shelf of shame and get that finished.
-
ShaunW
- NOT the sheep
- Posts: 26188
- Joined: November 26th, 2011, 6:11 pm
- Location: Pontefract West Yorkshire
Re: Panzer 3 Ausf M
Nice one Spearjig, that is shaping up very well.
Doing - Tamiya 1/35th Universal Carrier.
Work is the curse of the modelling classes!
IPMS#12300
Work is the curse of the modelling classes!
IPMS#12300
Re: Panzer 3 Ausf M
Quick update.


-
Softscience

- Staring out the window
- Posts: 7481
- Joined: April 5th, 2011, 4:34 pm
- Location: Maryland, near Washington DC
Re: Panzer 3 Ausf M
Your model looks pretty nice. I imagine a light overspray or very light drybrush of the base color could go a long way to bringing all of the camo elements together. Its a neat little trick. The effect is very subtle, but it really brings the kit to the next level.
By light drybrush I mean LIGHT. You don't want to produce a dusted effect, just catch the edges, corners and other high spots.
Similarly, if you do an overspray, thin out your base color with 7 parts thinner to 1 part paint, and then just mist the coat on from about 10-15 cm away from the kit.
A light touch will be key with either approach. When you think you need just a bit more, that means you've got enough.
-
ShaunW
- NOT the sheep
- Posts: 26188
- Joined: November 26th, 2011, 6:11 pm
- Location: Pontefract West Yorkshire
Re: Panzer 3 Ausf M
Nice one Spearjig, this kit really does build up into a great looking Mark III. Softscience's advice is very good but as he says, subtelty is the key.
Doing - Tamiya 1/35th Universal Carrier.
Work is the curse of the modelling classes!
IPMS#12300
Work is the curse of the modelling classes!
IPMS#12300
Re: Panzer 3 Ausf M
Thanks for the tips, I usually do give my kits a misting of base coat however with this being mostly rattle cans I may have to modify my technique. Anyway I'm now going to try and get it finished over the week end. Dog is fine (easily out runs me!) but my 84yr mother in law has now took a fall so that's me on taxi/ delivery services for the foreseeable future!
-
ntrocket88

- Active Participant
- Posts: 827
- Joined: July 2nd, 2012, 11:49 pm
- Location: New Jersey, USA
Re: Panzer 3 Ausf M
Nice work on the camo!
Neil
'With every model I learn a little more...and then the next one takes longer!'
'With every model I learn a little more...and then the next one takes longer!'
Re: Panzer 3 Ausf M
OK after a panic thinking the build was finishing on the 8th, I can now report latest progress. wheels and tracks on, support framing for the body is almost on , rather fiddly , only part of the kit that the instructions let down being rather vague. The turret is now complete with additional armour. The carpet monster has claimed a few parts as well. Photos to follow when my phone charges.
Re: Panzer 3 Ausf M
Now finished - photos to be posted tonight
Re: Panzer 3 Ausf M
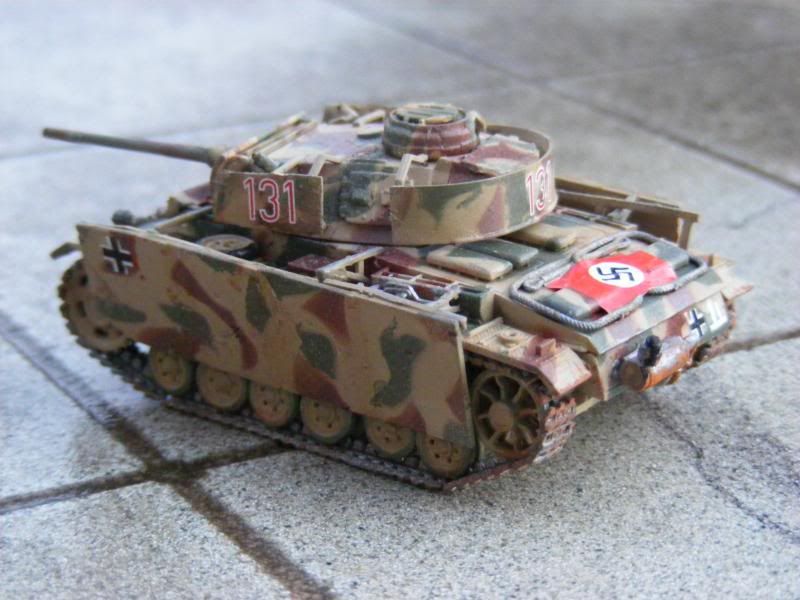
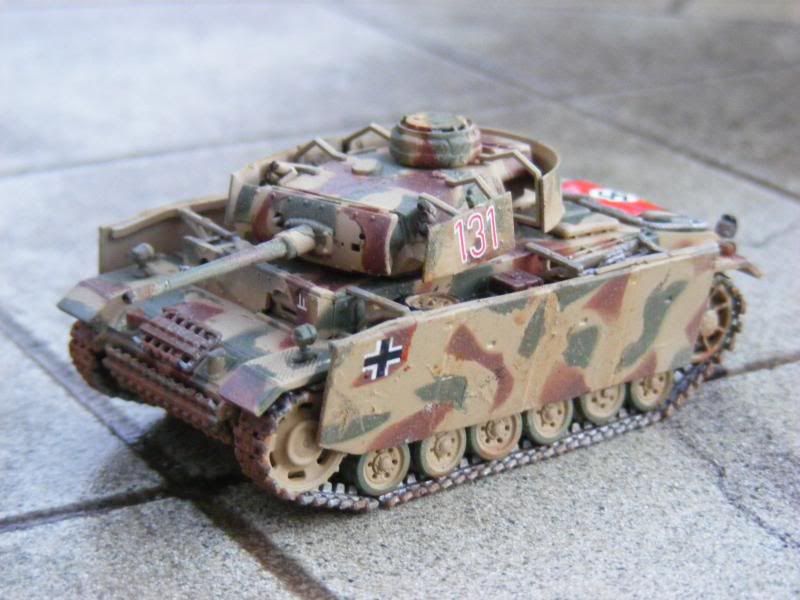
Finished!
-
Clashcityrocker

- Modelling Gent and Scholar
- Posts: 10817
- Joined: May 1st, 2011, 12:31 am
- Location: Adelaide. South Australia
Re: Panzer 3 Ausf M
Looks very nice.
Nigel
Nigel