On the bright side, fit issues aside, this old kit certainly has the right lines hidden in there and your persistence is really bringing those out. Keep up the good work mate
Shaun's Ghostly Gunfighter *DNF*
-
Dazzled

- Modelling Gent and Scholar
- Posts: 9592
- Joined: October 1st, 2011, 11:08 pm
- Location: Mid Glamorgan, South Wales
- Contact:
Re: Shaun's Ghostly Gunfighter
Glad your getting away from the sanding phase Shaun. Slippers full of dust can be so irritating  .
.
On the bright side, fit issues aside, this old kit certainly has the right lines hidden in there and your persistence is really bringing those out. Keep up the good work mate
On the bright side, fit issues aside, this old kit certainly has the right lines hidden in there and your persistence is really bringing those out. Keep up the good work mate
COLD WAR S.I.G. LEADER
Wherever there's danger, wherever there's trouble, wherever there's important work to be done....I'll be somewhere else building a model!
Wherever there's danger, wherever there's trouble, wherever there's important work to be done....I'll be somewhere else building a model!
-
ShaunW
- NOT the sheep
- Posts: 26180
- Joined: November 26th, 2011, 6:11 pm
- Location: Pontefract West Yorkshire
Re: Shaun's Ghostly Gunfighter
Many thanks folks, your kind comments are really appreciated. I have managed a bit more progress tonight and have sorted the other intake and finished off the gun fairing, although I didn't think it was worth putting up more pics tonight as they wouldn't look vastly different to last night's post.
The right lines are basically there Dazzled in that OOB it would look something like an F-4E but I felt it was worth trying to correct some of the shape issues, especially that nose section, the gun fairing and the intakes. In fairness, I think the other versions offered by the kit would look better OOB as the nose section looks more accurate. It's also dawned on me that the OOB inner wing pylons are wrong for the USAF/Israeli options in that only Navy pylons are supplied, which have a straight leading edge to them, whilst the Air Force inner pylons have a curved leading edge. And, yes, I will have to alter or replace them
The right lines are basically there Dazzled in that OOB it would look something like an F-4E but I felt it was worth trying to correct some of the shape issues, especially that nose section, the gun fairing and the intakes. In fairness, I think the other versions offered by the kit would look better OOB as the nose section looks more accurate. It's also dawned on me that the OOB inner wing pylons are wrong for the USAF/Israeli options in that only Navy pylons are supplied, which have a straight leading edge to them, whilst the Air Force inner pylons have a curved leading edge. And, yes, I will have to alter or replace them
Doing - Tamiya 1/35th Universal Carrier.
Work is the curse of the modelling classes!
IPMS#12300
Work is the curse of the modelling classes!
IPMS#12300
-
Sissel

- Modelling Lady and Scholar
- Posts: 4097
- Joined: October 31st, 2011, 12:39 pm
- Location: Island in Norway
Re: Shaun's Ghostly Gunfighter
You sure are beating this up to a great looking aircraft! I'm still very impressed.
Great work with the intakes too (just saw photo). You've really done your research here. This will have turned into a fine model when I get home.
Great work with the intakes too (just saw photo). You've really done your research here. This will have turned into a fine model when I get home.
Confused as always, and somewhere in hiding on the Scandinavian peninsula...
-
Chris

- Modelling Gent and Scholar
- Posts: 2917
- Joined: March 15th, 2013, 7:18 pm
- Location: In your head
- Contact:
Re: Shaun's Ghostly Gunfighter
I would have bought an old ESCI kit instead.ShaunW wrote:Many thanks folks, your kind comments are really appreciated. I have managed a bit more progress tonight and have sorted the other intake and finished off the gun fairing, although I didn't think it was worth putting up more pics tonight as they wouldn't look vastly different to last night's post.
The right lines are basically there Dazzled in that OOB it would look something like an F-4E but I felt it was worth trying to correct some of the shape issues, especially that nose section, the gun fairing and the intakes. In fairness, I think the other versions offered by the kit would look better OOB as the nose section looks more accurate. It's also dawned on me that the OOB inner wing pylons are wrong for the USAF/Israeli options in that only Navy pylons are supplied, which have a straight leading edge to them, whilst the Air Force inner pylons have a curved leading edge. And, yes, I will have to alter or replace them
Honcho of ASMMF
-
ShaunW
- NOT the sheep
- Posts: 26180
- Joined: November 26th, 2011, 6:11 pm
- Location: Pontefract West Yorkshire
Re: Shaun's Ghostly Gunfighter
Cheers Sissel. Hopefully it will be done by the time you get back. I see that you're going to Cuba, from what I've heard it is very interesting over there, so you should have a good timePrisca wrote:You sure are beating this up to a great looking aircraft! I'm still very impressed.
Great work with the intakes too (just saw photo). You've really done your research here. This will have turned into a fine model when I get home.
Doing - Tamiya 1/35th Universal Carrier.
Work is the curse of the modelling classes!
IPMS#12300
Work is the curse of the modelling classes!
IPMS#12300
-
ShaunW
- NOT the sheep
- Posts: 26180
- Joined: November 26th, 2011, 6:11 pm
- Location: Pontefract West Yorkshire
Re: Shaun's Ghostly Gunfighter
What I should have done is use a Hasegawa kit, but where's the challenge in that?Chris wrote: I would have bought an old ESCI kit instead.
Doing - Tamiya 1/35th Universal Carrier.
Work is the curse of the modelling classes!
IPMS#12300
Work is the curse of the modelling classes!
IPMS#12300
-
ShaunW
- NOT the sheep
- Posts: 26180
- Joined: November 26th, 2011, 6:11 pm
- Location: Pontefract West Yorkshire
Re: Shaun's Ghostly Gunfighter
I haven't blogged for a few days on this build, but one or two things have been happening.
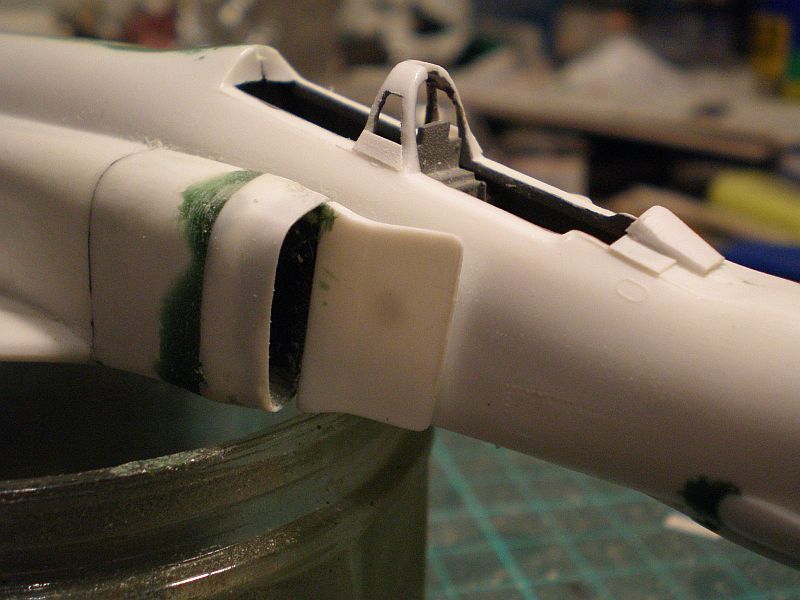
I've been busy adding one or two additional bits of detail. Starting at the front, I sanded off the OOB moulded on chin intakes as they were no where near butch enough and have added replacements. The add-ons were made from plastic tube, which was flattened out in my pliers before being sanded to shape and blended into the fuselage with filler. I also added a missing intake on the top of the nose from square section plastic rod.

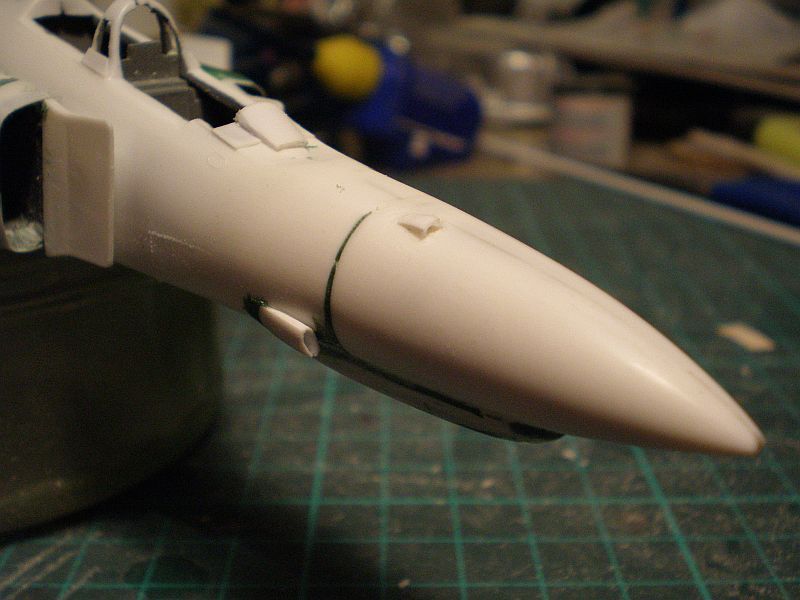
At the cockpit I have begun to add in a new HUD section using thin plastic card and cut plastic tubing, which required careful sanding and checking under the front canopy section to ensure that the latter would fit correctly. The side windows have also received lower sections made from thin plastic card which will be blended into the fuselage. The engine intake has also been completed on this side using the same method as used earlier on the left hand side intake.
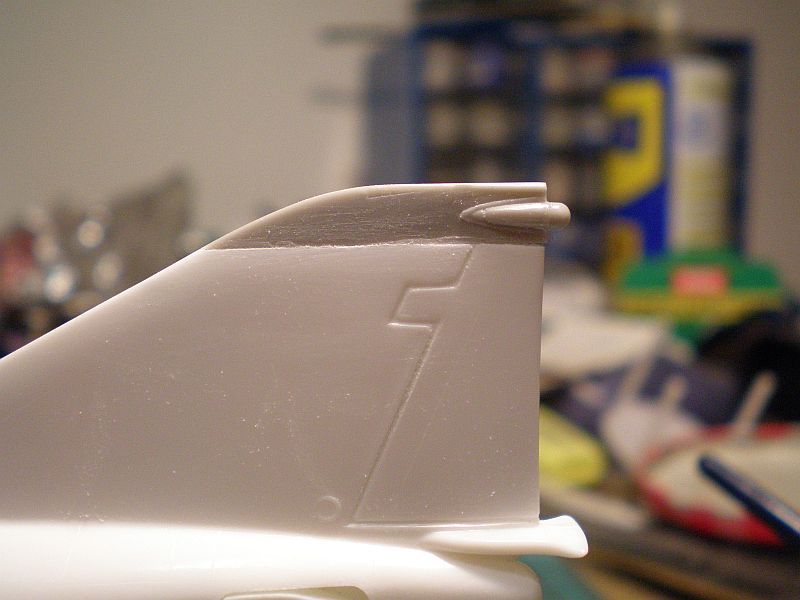
Moving on to the rear and the tail has received attention. The OOB fin cap is plain and is wrong really for any of the versions that the kit is supposed to build up into. Fortunately my Hasegawa F-4J kit came to the rescue once again as the sprues contain three more fin caps in addition to the one to be used for the J model. I selected one which looked right for the F-4E and filed down the kit tail to the top of the rudder before adding the replacement Hase fin cap. This wasn't a difficult exercise and has resulted in a far more accurate tail. As you can see from the sanding marks, the fin cap is currently being blended in but has not required filler.
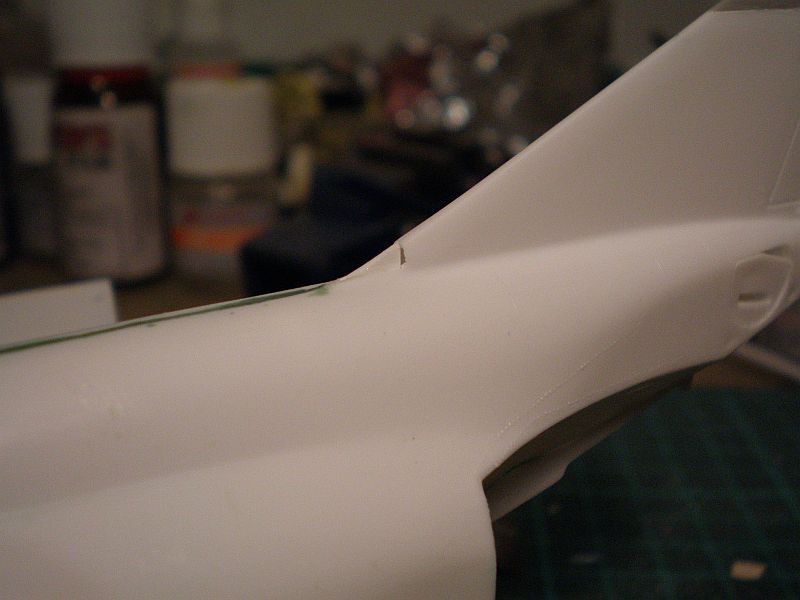
Finally at the base of the tail on all types of F-4 there is an intake, which is possibly an air con intake for cooling electricals or something. This intake is not moulded into the kit tail and I decided to give replicating it a go. Firstly I cut a notch into the tail using triangular and square section files before carefully drilling out the intake. It was then necessary to replicate the thin splitter that bifurcates the intake using plastic card which was then blended into the tail. Not perfect but at least it looks something like.
And finally here is an overall view showing how the model now looks with this additional work.
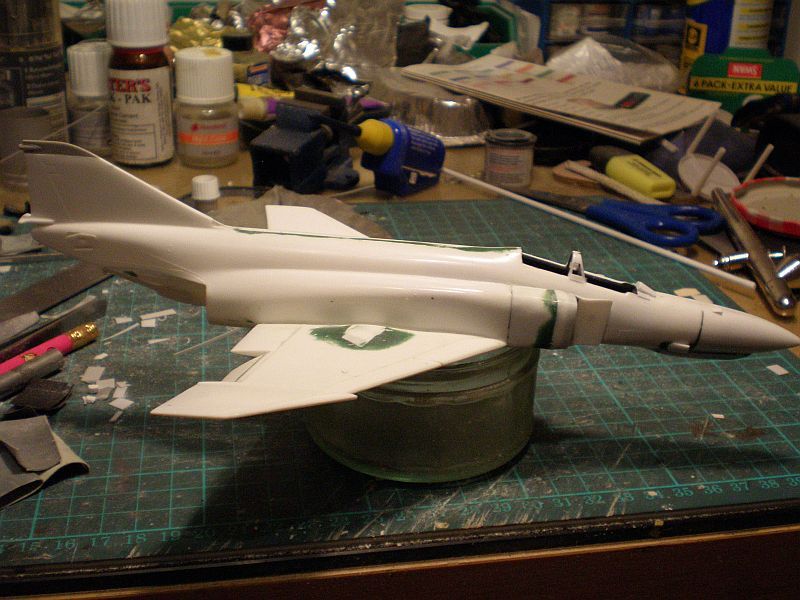
I think it at least now looks more like an F-4E than when I started!
Thanks for looking.
I've been busy adding one or two additional bits of detail. Starting at the front, I sanded off the OOB moulded on chin intakes as they were no where near butch enough and have added replacements. The add-ons were made from plastic tube, which was flattened out in my pliers before being sanded to shape and blended into the fuselage with filler. I also added a missing intake on the top of the nose from square section plastic rod.


At the cockpit I have begun to add in a new HUD section using thin plastic card and cut plastic tubing, which required careful sanding and checking under the front canopy section to ensure that the latter would fit correctly. The side windows have also received lower sections made from thin plastic card which will be blended into the fuselage. The engine intake has also been completed on this side using the same method as used earlier on the left hand side intake.

Moving on to the rear and the tail has received attention. The OOB fin cap is plain and is wrong really for any of the versions that the kit is supposed to build up into. Fortunately my Hasegawa F-4J kit came to the rescue once again as the sprues contain three more fin caps in addition to the one to be used for the J model. I selected one which looked right for the F-4E and filed down the kit tail to the top of the rudder before adding the replacement Hase fin cap. This wasn't a difficult exercise and has resulted in a far more accurate tail. As you can see from the sanding marks, the fin cap is currently being blended in but has not required filler.

Finally at the base of the tail on all types of F-4 there is an intake, which is possibly an air con intake for cooling electricals or something. This intake is not moulded into the kit tail and I decided to give replicating it a go. Firstly I cut a notch into the tail using triangular and square section files before carefully drilling out the intake. It was then necessary to replicate the thin splitter that bifurcates the intake using plastic card which was then blended into the tail. Not perfect but at least it looks something like.

And finally here is an overall view showing how the model now looks with this additional work.

I think it at least now looks more like an F-4E than when I started!
Thanks for looking.
Doing - Tamiya 1/35th Universal Carrier.
Work is the curse of the modelling classes!
IPMS#12300
Work is the curse of the modelling classes!
IPMS#12300
-
Clashcityrocker

- Modelling Gent and Scholar
- Posts: 10806
- Joined: May 1st, 2011, 12:31 am
- Location: Adelaide. South Australia
Re: Shaun's Ghostly Gunfighter
Choofin 'eck. That's dedication to the cause. I've got one of these in the stash. My E model was going to be done using the bits Airfix provided and then just add some Australian roundels. Time to relegate it further down the build pile.
Nigel
Nigel

Re: Shaun's Ghostly Gunfighter
And it now looks nothing like the Airfix kit! Lovely work, Shaun. Nice to see a 'proper' modeller going about his work.
I'm a mostly full-time modeller put a part-time poster....
-
TobyC

- Modelling Gent and Scholar
- Posts: 5540
- Joined: January 15th, 2013, 2:13 pm
- Location: Cobham, Surrey. Blighty
Re: Shaun's Ghostly Gunfighter
Blimey. That is some serious remodelling. I tried doing some on my Skyraider and got it wrong. Still it's staying the way it is.
Enjoyment over accuracy. That's my motto
-
ShaunW
- NOT the sheep
- Posts: 26180
- Joined: November 26th, 2011, 6:11 pm
- Location: Pontefract West Yorkshire
Re: Shaun's Ghostly Gunfighter
Many thanks for the kind words boys, your interest is always appreciated. It is a lot of work, all done voluntarily of course, but I'm really enjoying trying to knock this old girl into some kind of shape.
TBH Nigel most of this work is not totally necessary to produce a reasonable F-4E from the box, it's just what I enjoy doing with these old kits. It's also worth bearing in mind that a degree of risk is involved as some of the mods would possibly ruin the kit, or make repairs substantially difficult, if they didn't work out. If you want a quicker build but want to carry out some corrections, IMHO the three most glaring errors are the nose profile, the missing side windows in the cockpit and the weapons pylons. Some sanding can work wonders on the nose (which really does look a bit pants OOB) and the windows and pylons could be casually ignored but again are a relatively easy fix - I hadn't even noticed the missing windows to start with until it was pointed out to me!
TBH Nigel most of this work is not totally necessary to produce a reasonable F-4E from the box, it's just what I enjoy doing with these old kits. It's also worth bearing in mind that a degree of risk is involved as some of the mods would possibly ruin the kit, or make repairs substantially difficult, if they didn't work out. If you want a quicker build but want to carry out some corrections, IMHO the three most glaring errors are the nose profile, the missing side windows in the cockpit and the weapons pylons. Some sanding can work wonders on the nose (which really does look a bit pants OOB) and the windows and pylons could be casually ignored but again are a relatively easy fix - I hadn't even noticed the missing windows to start with until it was pointed out to me!
Doing - Tamiya 1/35th Universal Carrier.
Work is the curse of the modelling classes!
IPMS#12300
Work is the curse of the modelling classes!
IPMS#12300
-
splash

- Senior Service Rotorhead
- Posts: 13828
- Joined: May 1st, 2011, 11:02 am
- Location: Somerset England
Re: Shaun's Ghostly Gunfighter
Great work Shaun it's coming on great.
Regards Splash
Regards Splash
My work bench is starting to look like Portsmouth Naval Dockyard.
-
ShaunW
- NOT the sheep
- Posts: 26180
- Joined: November 26th, 2011, 6:11 pm
- Location: Pontefract West Yorkshire
Re: Shaun's Ghostly Gunfighter
Cheers Splash.
Due to other commitments (i.e. obeying the One Who Must Be Obeyed in order to keep the matrimonial peace ) I was a little short of bench time today but I have had a reasonably productive evening session.
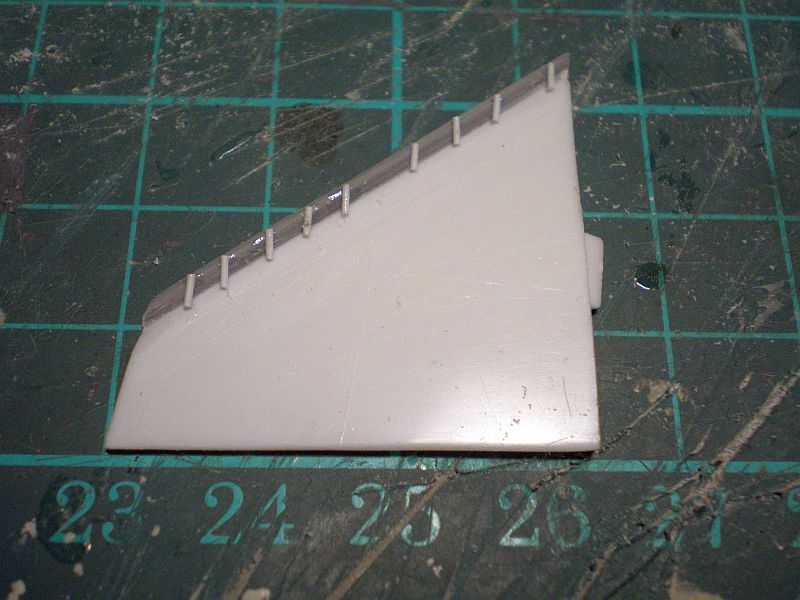
First up, I decided to have a look at the wing pylons. As I have mentioned previously, the kit inner wing pylons are incorrect for an Air Force F-4 (and, TBH, aren't that great for a Navy/USMC aircraft either!). In the photo below, the kit pylon is at the top of the shot and below is my replacement part, shaped after making reference to various photos. This took a while to sort out as, in addition to the shaping exercise, I experimented with two or three thicknesses of plastic card before settling on some of my thickest, as it was more forgiving for the amount of cutting and shaping required. As you can see, the kit pylon is approximately 0.5cm too long (the squares on my cutting mat are in centimetres) and is totally the wrong shape, although it better approximates a Navy pylon.
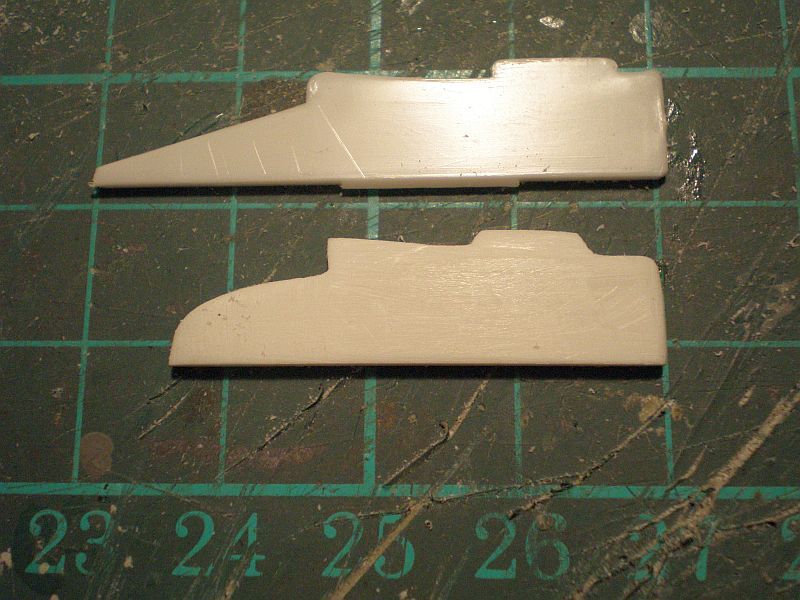
After a fair amount of trial and error I managed to achieve a reasonable fit to the underside of the wing - certainly no worse than the kit pylon.
All I have to do now is make another one
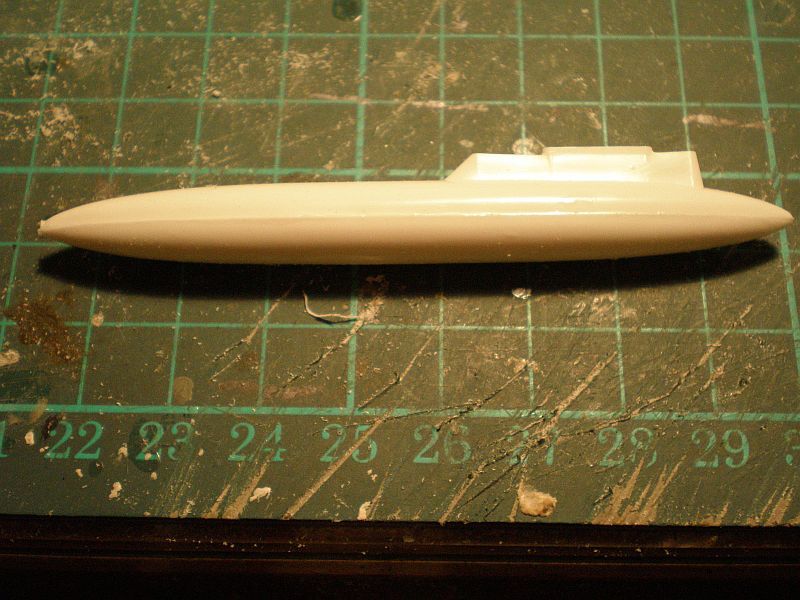
The outer pylons are less of an issue and are moulded onto the wing tanks. Both the outer pylons and tanks are in fact quite reasonable in shape although the tanks lack detail and will need strakes applying from thin rod or similar, but I hope that won't be too taxing.
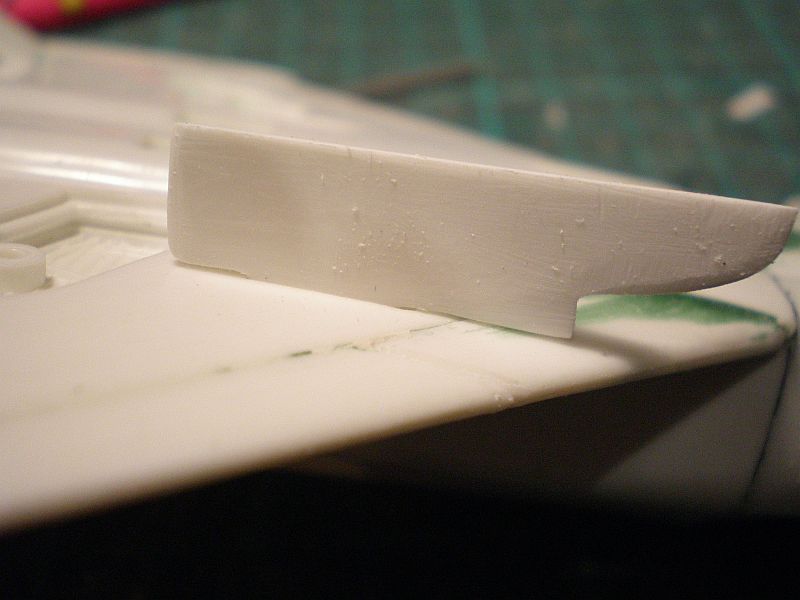
Moving on to the rear of the aircraft I am having a bash at converting the incorrect plain tail planes (stabilators in McDonnell Douglas speak) to slotted ones. To commence this I decided to add a new leading edge using some plastic strut material as shown below. This material has a lip and curved edge which is perfect for this particular job.
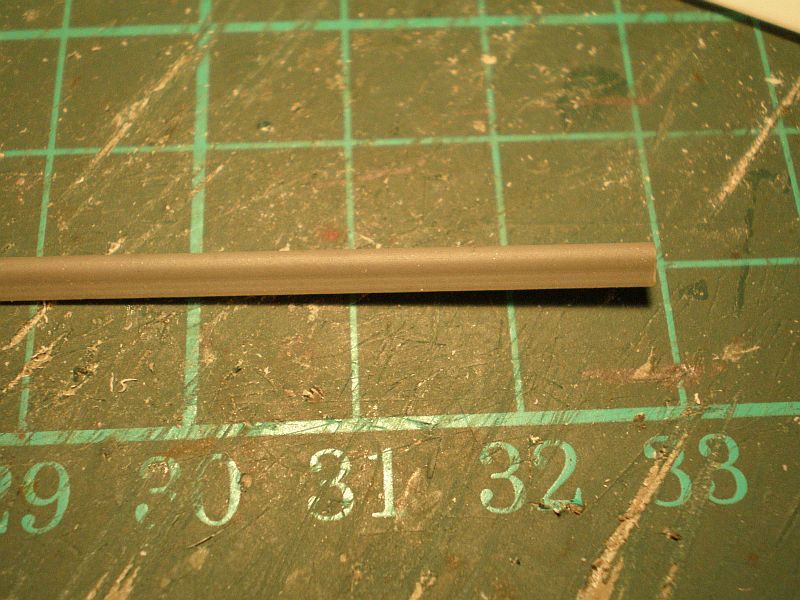
I applied the strut material to the underside of the stab and blended it in and re-shaped it using photos. I then cut a groove into the top of the stab directly behind the strut material using triangular and round files. Thereafter I cut and added a total of 9 bars using 0.5mm plastic rod as you can see in the photo below.
The rods are only tacked on and need a bit of straightening out before a final coat of Mekpak to fully cement them on. Although this all looks a little crude, I think a few passes with light grade sand paper and micromesh should blend it all together.
Thanks for looking.
Due to other commitments (i.e. obeying the One Who Must Be Obeyed in order to keep the matrimonial peace
First up, I decided to have a look at the wing pylons. As I have mentioned previously, the kit inner wing pylons are incorrect for an Air Force F-4 (and, TBH, aren't that great for a Navy/USMC aircraft either!). In the photo below, the kit pylon is at the top of the shot and below is my replacement part, shaped after making reference to various photos. This took a while to sort out as, in addition to the shaping exercise, I experimented with two or three thicknesses of plastic card before settling on some of my thickest, as it was more forgiving for the amount of cutting and shaping required. As you can see, the kit pylon is approximately 0.5cm too long (the squares on my cutting mat are in centimetres) and is totally the wrong shape, although it better approximates a Navy pylon.

After a fair amount of trial and error I managed to achieve a reasonable fit to the underside of the wing - certainly no worse than the kit pylon.

All I have to do now is make another one
The outer pylons are less of an issue and are moulded onto the wing tanks. Both the outer pylons and tanks are in fact quite reasonable in shape although the tanks lack detail and will need strakes applying from thin rod or similar, but I hope that won't be too taxing.

Moving on to the rear of the aircraft I am having a bash at converting the incorrect plain tail planes (stabilators in McDonnell Douglas speak) to slotted ones. To commence this I decided to add a new leading edge using some plastic strut material as shown below. This material has a lip and curved edge which is perfect for this particular job.

I applied the strut material to the underside of the stab and blended it in and re-shaped it using photos. I then cut a groove into the top of the stab directly behind the strut material using triangular and round files. Thereafter I cut and added a total of 9 bars using 0.5mm plastic rod as you can see in the photo below.

The rods are only tacked on and need a bit of straightening out before a final coat of Mekpak to fully cement them on. Although this all looks a little crude, I think a few passes with light grade sand paper and micromesh should blend it all together.
Thanks for looking.
Doing - Tamiya 1/35th Universal Carrier.
Work is the curse of the modelling classes!
IPMS#12300
Work is the curse of the modelling classes!
IPMS#12300
-
Dazzled
- Modelling Gent and Scholar
- Posts: 9592
- Joined: October 1st, 2011, 11:08 pm
- Location: Mid Glamorgan, South Wales
- Contact:
Re: Shaun's Ghostly Gunfighter
You're getting some great results from all this remodelling work Shaun. It's kind of like Grand Designs in 1/72nd scale
Into paint soon?
Into paint soon?
COLD WAR S.I.G. LEADER
Wherever there's danger, wherever there's trouble, wherever there's important work to be done....I'll be somewhere else building a model!
Wherever there's danger, wherever there's trouble, wherever there's important work to be done....I'll be somewhere else building a model!
Re: Shaun's Ghostly Gunfighter
Like the tail plane. Great idea.
I'm a mostly full-time modeller put a part-time poster....