Zee's Chevrolet Z/47 Thundermaro *FINISHED*

Custom cars built/painted with an aeroplane theme.
Runs 23rd Nov to 29th Dec.
GB Leader is Narayan
User avatar
Zee28
Modelling Gent and Scholar
Posts: 2834
Joined: March 8th, 2013, 10:21 pm
Location: South London

Re: Zee's Chevrolet Z/47 Thundermaro

Post by Zee28 »

splash wrote:I'm not a lover of American muscle cars, but I must admit that is one smooooooooooooooth looking car.
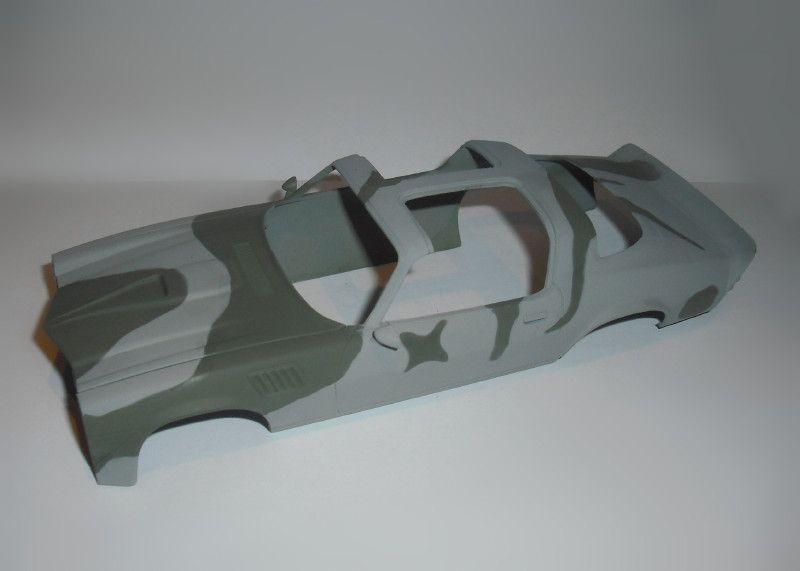
I know what you mean Splash, I think some American Muscle Machines were a bit too flamboyant and over-the-top for more conservative European tastes, some people saw them as a bit 'Vulgar'. But where Chevrolet scored well with the Second Generation Camaro is they kept it smooth and pure. No 'bling', no external chrome bits and bobs (even the window surrounds were devoid of a chrome insert on the Z/28, just plain black), no silly scoops and things, they kept the lines pure throughout it's production run giving it a cohesive and tasteful finish. Yes the orange Z/28 stripes were a bit much (but were nothing in comparison to Pontiacs huge bird on their Firebird Trans Am hood!), but you could always tick the 'Decal Delete' option on the order form :grin:

Pontiac's Firebird and Chevrolet's Camaro are sister cars, but for me the Camaro was always the more tasteful of the two. And the common components on these Second Generation cars are far less than people think, the only shared sheet metal on Firebirds and Camaros was the trunk lid and roof, every other panel was different! Plus different engines, suspension, interior etc. etc.

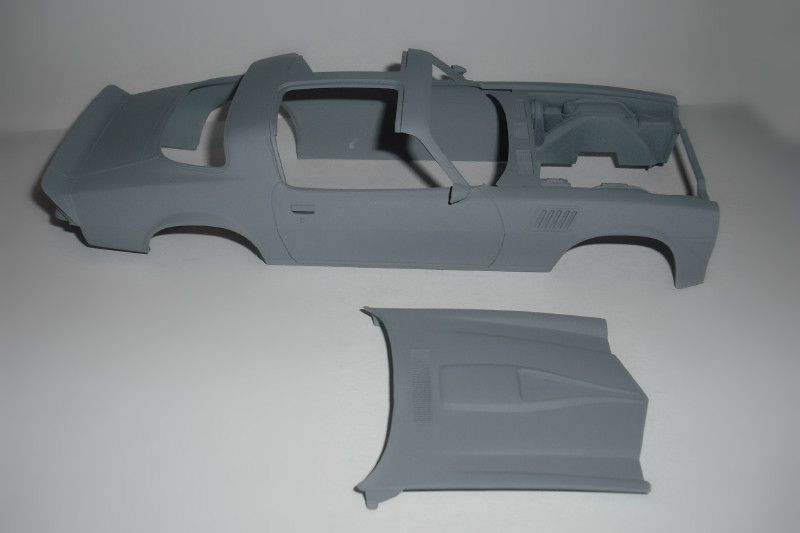
Another styling cue that makes the Camaro look good is that it hasn't got the 'flat' hood (bonnet) like the Firebird, it has those lovely long scooped out channels than run right down to the front smaller inboard side lights. A very nice (and complex) pressing.
splash wrote:I'm looking forward to seeing this build.
Thanks Splash, appreciated, updates later to day!

Zee
User avatar
Zee28
Modelling Gent and Scholar
Posts: 2834
Joined: March 8th, 2013, 10:21 pm
Location: South London

Re: Zee's Chevrolet Z/47 Thundermaro

Post by Zee28 »

At last, an update! (See, I have done something!)

First of all, I am a bit of a geek about 2nd Generation Camaros and can sometimes go into Anorak mode. Apologies in advance!

Right, first up was to construct the engine. The ubiquitous Small Block Chevy V8.

It's an engine that's been in production since 1955 and was improved year in year out culminating in some modern hi-tech all alloy V8s with staggering performance. It is arguably one of the finest mass produced car engines ever, and certainly the most produced ever.

Now I have built many of these Small Block Chevy V8 engines, but they've all been 1/1 scale and involve gaskets, spanners and lots of heaving and grunting. this little 1/24th example went together beautifully and was simple and quick to build.

Chevrolet V8s were always traditionally painted at the factory in 'Chevy Orange' which looked very cool, but some time in the 1970s they changed to a rather insipid blue colour which I have tried to reproduce here, as per the era of the car.

The opportunity for super-detailers is good here. The distributor cap is present so ignition wires could easily be formed out of fuse wire or similar, plus there's opportunity for battery leads, additional hoses etc. etc. None of which I will do because I am too lazy and unskilled.

It was also nice to see the starter motor present, and the oil filter too. A neat little kit so far.

It would never have come from the factory with chrome valve covers, but hey, a bit of bling under the hood won't do any harm!

Anyway, here's the engine, OOB, mated to a 4 speed manual transmission, ready to go in, just awaiting it's air cleaner assembly and thermostat housing.

Image


Suspension components were painted satin black, exhaust simply sprayed silver, all ready to go underneath.

Image


The body components were given a coat of a suitable mid-grey to suit the P47 colour scheme. The door mirrors are body coloured, so I glued them on first before spraying.

Image


The glazing was badly scratched where it had been kicking around loose in the box so I gave it a rudimentary polish and then dipped it in Klear like I would an aircraft canopy. Is this right? Do you car builders dip your glazing like us plane builders? Anyway, it doesn't seem to have done them any harm and the look quite clear now.

The tail lights were painted on the inside and then dipped in Klear.

Image


And that's where we are at the moment, more coming soon, thanks for looking!

Zee
User avatar
Sissel
Modelling Lady and Scholar
Posts: 4097
Joined: October 31st, 2011, 12:39 pm
Location: Island in Norway

Re: Zee's Chevrolet Z/47 Thundermaro

Post by Sissel »

Great start! It seems like you've done this before. :grin:

Yes, I also Klear the windscreens.
Your engine looks great, and I agree you can't go wrong with bling under the hood. :lol:
Confused as always, and somewhere in hiding on the Scandinavian peninsula...
User avatar
splash
Senior Service Rotorhead
Posts: 13828
Joined: May 1st, 2011, 11:02 am
Location: Somerset England

Re: Zee's Chevrolet Z/47 Thundermaro

Post by splash »

Nice engine, if you ask Dirk nicely he will show you how to add HT leads they make a huge difference, There is an example of how he did it here

Regards Splash
My work bench is starting to look like Portsmouth Naval Dockyard.
User avatar
Miss-Stang
Active Participant
Posts: 833
Joined: March 9th, 2013, 4:48 pm

Re: Zee's Chevrolet Z/47 Thundermaro

Post by Miss-Stang »

Wow, that's looking great Zee!!

I've been lucky enough to do some work on the real thing, but I've never completely re-built an engine. I have to say, that I do think the detailing on the kit engine is really quite amazing and the other components are looking spot-on too :grin:

Great photography work, I'm looking forward to your next update!
Regards,

Miss-Stang
User avatar
TimJ
Modelling Gent and Scholar
Posts: 4292
Joined: May 1st, 2011, 12:54 am
Location: Oldbury, West Midlands

Re: Zee's Chevrolet Z/47 Thundermaro

Post by TimJ »

Great looking engine.
2020 A:35 B:18. 2021 A: 51 B:25 C:21 2022 A:63 B:23 C:11 2024 A:9 B:4 C:15
User avatar
Clashcityrocker
Modelling Gent and Scholar
Posts: 10823
Joined: May 1st, 2011, 12:31 am
Location: Adelaide. South Australia

Re: Zee's Chevrolet Z/47 Thundermaro

Post by Clashcityrocker »

Coming along nicely Zee.

Nigel
User avatar
Narayan
If anyone needs me, I'll be in my office
Posts: 2602
Joined: April 10th, 2011, 7:01 pm
Location: The Middle of Nowhere in Ireland

Re: Zee's Chevrolet Z/47 Thundermaro

Post by Narayan »

Lovely work on that engine Zee.

_________________
Narayan

Last night, Darth Vader came down from planet Vulcan and told me that if I didn't take Lorraine out that he'd melt my brain.

A:B 2013 38:11 2012 20:05 2011 11:10 2010 44:12 2009 19:16 2008 16:03 Overall 231:62
User avatar
Molly-new
Modelling Gent and Scholar
Posts: 2355
Joined: May 4th, 2011, 8:42 pm
Location: Stoke-on-Trent, England

Re: Zee's Chevrolet Z/47 Thundermaro

Post by Molly-new »

Looking good so far.
Airfix WWII Aircraft Of The Aces.
Completed - 10
Building -
Pending -4
User avatar
Zee28
Modelling Gent and Scholar
Posts: 2834
Joined: March 8th, 2013, 10:21 pm
Location: South London

Re: Zee's Chevrolet Z/47 Thundermaro

Post by Zee28 »

Thanks for all the encouraging words everybody! :)
splash wrote:Nice engine, if you ask Dirk nicely he will show you how to add HT leads they make a huge difference, There is an example of how he did it here
Thanks Splash, but I won't be doing any extra detailing. If I was a serious car modeller then I would try to learn to do these extras, but this is my first ever car model and will probably be my last (I only do planes really), I'm only doing it because I liked the theme of the GB, and, for me, this GB is more about having fun with the paint scheme and such.

I am please to report that there has been some more progress on the Thundermaro. We now have a rolling chassis. Once again, parts fit was excellent throughout and it fell together really easily. Even the exhaust pipe lined up perfectly with the headers (exhaust manifolds in English), the chrome wheels, although not entirely accurate, look super, so I'm happy with them! I painted the areas between the spokes (that should be open) black to give the illusion of a space between each spoke.

The floor/chassis was simply shot with matt black. The floor shape has been somewhat simplified for the kit, but the floor pressing on the real Second Generation Camaros was one of the most complex ever attempted by GM at the time. The designers would not allow the production engineers change anything that would spoil the very low sleek look, but the production engineers still had to package the rear suspension, axle, fuel tank, rear 2+2 seating and trunk space without destroying the lines of the car. Consequently the real floor pressing is very complex indeed, as one production engineer so eloquently put it "We've never done a floor like this before, one where the differential is stuck right up the rear passenger's butt". :-D

Here we are:

Image


Next up for attention was the interior. Once again super parts fit (better than the real ones!) and it went together without issues. Very nicely detailed with separate armrests/door pulls and the dashboard even has the radio, ashtray, glovebox, air vents, everything! Very nice!

On the real car one could order any interior colour from quite a large choice (Carmine, Saddle, Black, Cream etc.) and for those of you unfamiliar with how American cars could be 'optioned up' in those days, if you ordered a coloured interior absolutely everything on the interior was in that colour, not just the major upholstery. The carpets, dash-pad, headlining, parcel shelf, everything! Even the seatbelts were colour matched to your choice of interior colour! So spraying the interior all one colour is quite scale-like.

But..... being that this is an Aero-themed GB I didn't pick a scale car colour, instead I wanted to go for a typical P47 cockpit colour and it seemed that a lot of them were that rather bright green (much brighter than typical British WW2 cockpit green), a bright green also often seen inside P51s as well. The P47 at Duxford confirmed this. So a suitable American cockpit green was found and the interior was sprayed with that (Hu80).

Here it is:

Image


That's where I am at the moment, now to turn my attention to doing the camouflage on the body shell. More later Dudes and Dudettes! Thanks for looking.

Zee
User avatar
Miss-Stang
Active Participant
Posts: 833
Joined: March 9th, 2013, 4:48 pm

Re: Zee's Chevrolet Z/47 Thundermaro

Post by Miss-Stang »

Looking great Zee!

The work you've done on the wheels looks very convincing and the chassis looks brilliant, very impressive :grin:

I quite like the interior sprayed interior green, can't wait to see the body shell in the camo!
Regards,

Miss-Stang
User avatar
Zee28
Modelling Gent and Scholar
Posts: 2834
Joined: March 8th, 2013, 10:21 pm
Location: South London

Re: Zee's Chevrolet Z/47 Thundermaro

Post by Zee28 »

Thanks everyone!

More updates. Work has started on the camouflage for the body shell, the grey and green have been sprayed, now it awaits detail painting (window rubbers, door handles, under the hood, etc. etc.)

Image


More later! :)

Zee
User avatar
Sissel
Modelling Lady and Scholar
Posts: 4097
Joined: October 31st, 2011, 12:39 pm
Location: Island in Norway

Re: Zee's Chevrolet Z/47 Thundermaro

Post by Sissel »

That looks wicked! Very cool! :)
Confused as always, and somewhere in hiding on the Scandinavian peninsula...
User avatar
Zee28
Modelling Gent and Scholar
Posts: 2834
Joined: March 8th, 2013, 10:21 pm
Location: South London

Re: Zee's Chevrolet Z/47 Thundermaro

Post by Zee28 »

Prisca wrote:That looks wicked! Very cool! :)
Thanks Prisca! I'm glad somebody understands me....... :-D

Zee28
User avatar
Ian
Blitzbau hero
Posts: 5137
Joined: May 4th, 2011, 10:01 am

Re: Zee's Chevrolet Z/47 Thundermaro

Post by Ian »

That's cool!
I'm a mostly full-time modeller put a part-time poster....
Locked

Return to “Aero-themed Autos”