Belated welcome to the group build Mike. A very interesting choice you have made for this one.
The cockpit and overall start you've made is amazing.
_________________
Narayan
Last night, Darth Vader came down from planet Vulcan and told me that if I didn't take Lorraine out that he'd melt my brain.
A:B 2013 38:11 2012 20:05 2011 11:10 2010 44:12 2009 19:16 2008 16:03 Overall 231:62
Migrant's Flying Ford, (finally) Finished.
-
Molly-new

- Modelling Gent and Scholar
- Posts: 2355
- Joined: May 4th, 2011, 8:42 pm
- Location: Stoke-on-Trent, England
Re: Migrant's flying Ford.
Fantastic work Mike, I love it.
Airfix WWII Aircraft Of The Aces.
Completed - 10
Building -
Pending -4
Completed - 10
Building -
Pending -4
-
Migrant

- Happily Landed after Many Circuits and Bumps
- Posts: 2428
- Joined: April 5th, 2011, 8:33 pm
- Location: Calgary, Canada
Re: Migrant's flying Ford.
Thanks for your interest and encouragement guys, I appreciate it. Unfortunately work/real life have kept me away from the bench for the last couple of days but this morning I had some downtime so made a little bit of progress.
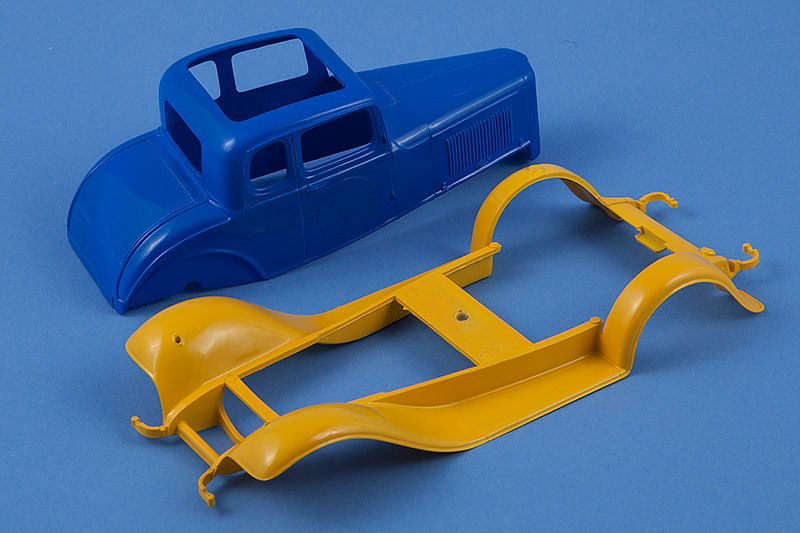
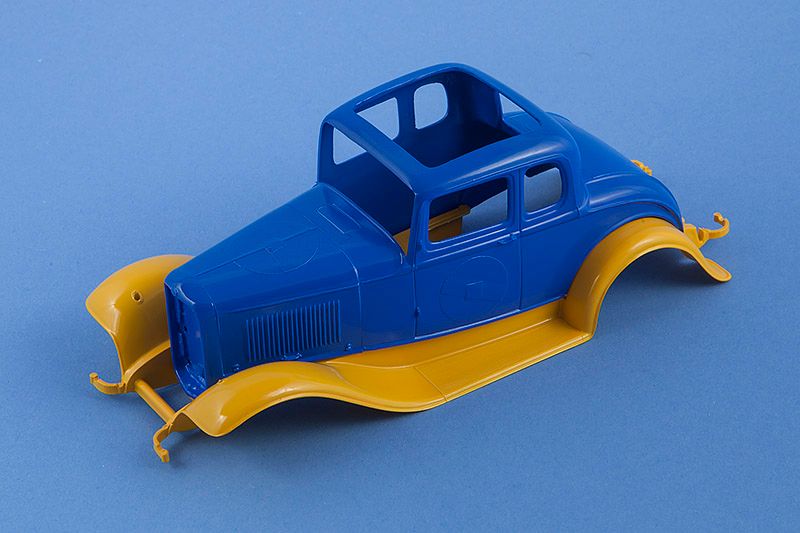
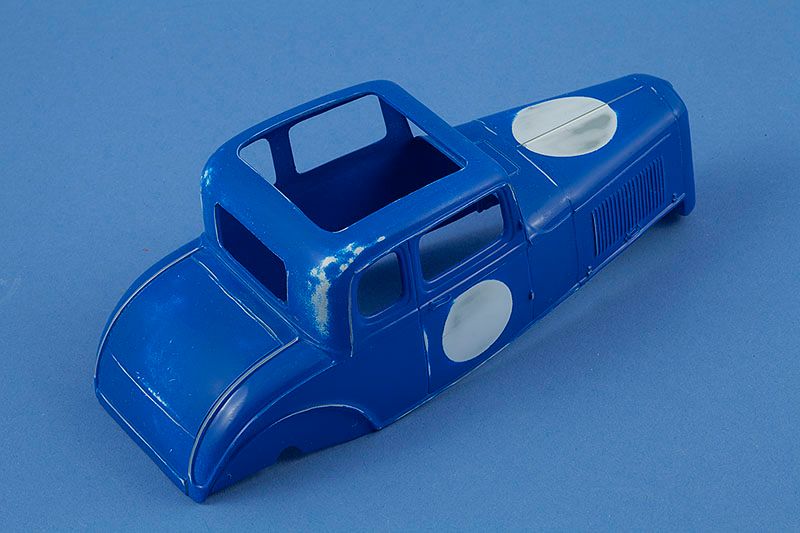
I attached the bonnet/hood and the radiator grille. This wasn't as straightforward as gluing 3 parts ought to have been. I attached them with superglue and once they were in position, I ran liquid superglue along the seams from the inside to strengthen them. Unfortunately I didn't notice that I'd applied way too much until I noticed that there was wet glue all down one side of the body, and that my fingers were securely attached to it. Lots of debonder eventually removed most of the excess glue, followed by some sanding/polishing, then a retouch of the white primer, then re-application of the roundel mask which had been destroyed in the process.

Then followed the spraying of the main colors, using Tamiya rattle cans. A light splattered pass first to create a key, then a heavier wet coat about half an hour later. I also decanted some of each colour into small bottles for the inevitable touch-ups, as the rattle cans don't allow for much fine control.
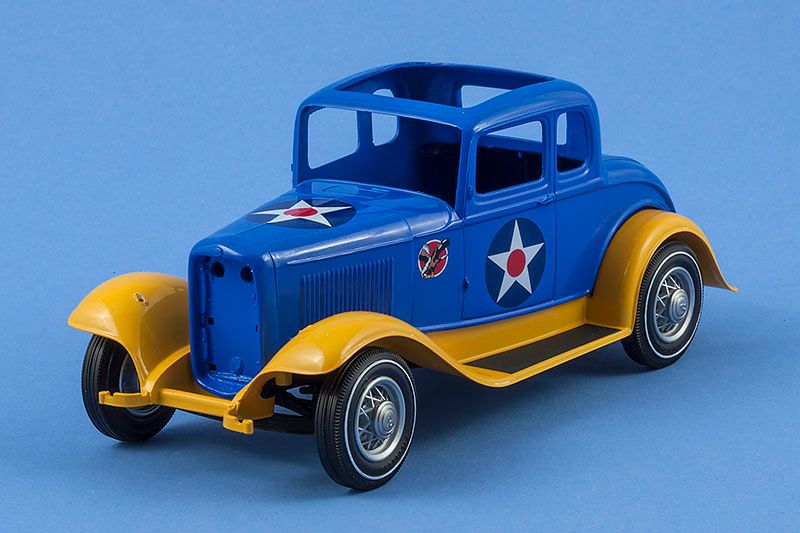
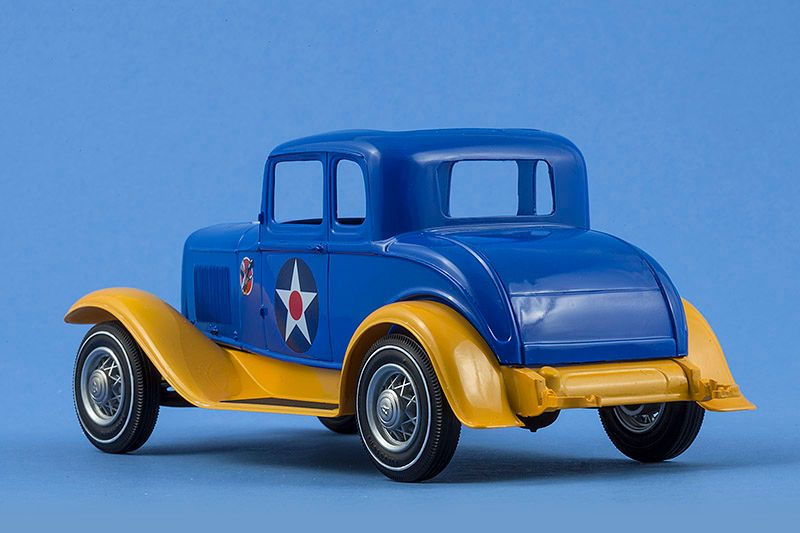
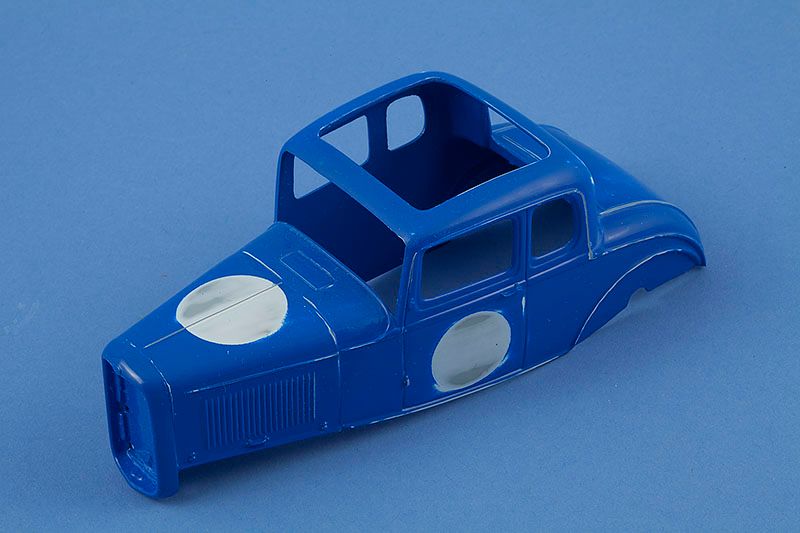
Here are the two main assemblies painted, and then dry-fitted together to get an overall impression:
Now it's a case of leaving them to fully cure for a day or so before polishing/buffing the paint. In the meantime it's on to painting some of the other bits like wheels and exhausts.
I attached the bonnet/hood and the radiator grille. This wasn't as straightforward as gluing 3 parts ought to have been. I attached them with superglue and once they were in position, I ran liquid superglue along the seams from the inside to strengthen them. Unfortunately I didn't notice that I'd applied way too much until I noticed that there was wet glue all down one side of the body, and that my fingers were securely attached to it. Lots of debonder eventually removed most of the excess glue, followed by some sanding/polishing, then a retouch of the white primer, then re-application of the roundel mask which had been destroyed in the process.
Then followed the spraying of the main colors, using Tamiya rattle cans. A light splattered pass first to create a key, then a heavier wet coat about half an hour later. I also decanted some of each colour into small bottles for the inevitable touch-ups, as the rattle cans don't allow for much fine control.
Here are the two main assemblies painted, and then dry-fitted together to get an overall impression:
Now it's a case of leaving them to fully cure for a day or so before polishing/buffing the paint. In the meantime it's on to painting some of the other bits like wheels and exhausts.
-
BlohmWolf

- Modelling Gent and Scholar
- Posts: 2355
- Joined: May 15th, 2013, 11:21 pm
- Location: Down under, TAS.
Re: Migrant's flying Ford.
Shiny!
You know, the idea of Auto mobiles' cosplaying as Aircraft is a really interesting subject. You could try seeing if you could putting your build into AMW HQ and see if you can get another article. Thousands of modellers would probably love seeing this.
You know, the idea of Auto mobiles' cosplaying as Aircraft is a really interesting subject. You could try seeing if you could putting your build into AMW HQ and see if you can get another article. Thousands of modellers would probably love seeing this.
"Can not finish a model at all"
"You can get more of what you want, with a kind word and a wallet, than just a kind word".
Currently Building: FROG Wildcat, Fokker DR1 Red baron and some other things...
"You can get more of what you want, with a kind word and a wallet, than just a kind word".
Currently Building: FROG Wildcat, Fokker DR1 Red baron and some other things...
-
Zee28

- Modelling Gent and Scholar
- Posts: 2834
- Joined: March 8th, 2013, 10:21 pm
- Location: South London
Re: Migrant's flying Ford.
Looking great Mike! Love the colours.
Zee28
Zee28
-
Sissel

- Modelling Lady and Scholar
- Posts: 4097
- Joined: October 31st, 2011, 12:39 pm
- Location: Island in Norway
Re: Migrant's flying Ford.
Oh I love those colors, excellent paint result!
But it looks too much like Sweden.
But it looks too much like Sweden.
Confused as always, and somewhere in hiding on the Scandinavian peninsula...
-
Migrant
- Happily Landed after Many Circuits and Bumps
- Posts: 2428
- Joined: April 5th, 2011, 8:33 pm
- Location: Calgary, Canada
Re: Migrant's flying Ford.
Thanks for the comments!

Thanks BlohmWolf. Even assuming it turns out well, most magazines (including AMW) insist on previously unpublished builds, which includes those documented online, which is understandable. But, it's worth considering for a future build as I'm enjoying mixing the car/plane metaphorsBlohmWolf wrote:Shiny! You know, the idea of Auto mobiles' cosplaying as Aircraft is a really interesting subject. You could try seeing if you could putting your build into AMW HQ and see if you can get another article. Thousands of modellers would probably love seeing this.
You're right! I'm going to re-do the cockpit in hardwood with a leather sofa & potted plant, and stick IKEA logos on the doors. (I actually based the scheme on a pre-war B-10 bomber, although I've seen P-26s with a blue fuselage/yellow wings as well. Hopefully the addition of U.S. cockades will negate the Scandinavian look...)Prisca wrote:Oh I love those colors, excellent paint result!
But it looks too much like Sweden.

Re: Migrant's flying Ford.
Lovely, Mike. Seeing this with the wood and Ikea logos would be even cooler than what you're already doing!
I'm a mostly full-time modeller put a part-time poster....
-
BlohmWolf
- Modelling Gent and Scholar
- Posts: 2355
- Joined: May 15th, 2013, 11:21 pm
- Location: Down under, TAS.
Re: Migrant's flying Ford.
Migrant wrote:Thanks for the comments!
Thanks BlohmWolf. Even assuming it turns out well, most magazines (including AMW) insist on previously unpublished builds, which includes those documented online, which is understandable. But, it's worth considering for a future build as I'm enjoying mixing the car/plane metaphorsBlohmWolf wrote:Shiny! You know, the idea of Auto mobiles' cosplaying as Aircraft is a really interesting subject. You could try seeing if you could putting your build into AMW HQ and see if you can get another article. Thousands of modellers would probably love seeing this.
Whoops, I should have said 'Put in an idea of doing another Aviation themed Automobile'. No harm though.
"Can not finish a model at all"
"You can get more of what you want, with a kind word and a wallet, than just a kind word".
Currently Building: FROG Wildcat, Fokker DR1 Red baron and some other things...
"You can get more of what you want, with a kind word and a wallet, than just a kind word".
Currently Building: FROG Wildcat, Fokker DR1 Red baron and some other things...
-
Dirkpitt289

- NUMA's Auto Mechanic
- Posts: 8724
- Joined: May 2nd, 2011, 1:55 am
- Location: New jersey USA
- Contact:
Re: Migrant's flying Ford.
I love the color combination
.... Dirk
Beware of the DOG's of WAR
My Youtube Channel
https://www.youtube.com/user/ModelingGu ... rid&view=0
Beware of the DOG's of WAR
My Youtube Channel
https://www.youtube.com/user/ModelingGu ... rid&view=0
-
Clashcityrocker

- Modelling Gent and Scholar
- Posts: 10806
- Joined: May 1st, 2011, 12:31 am
- Location: Adelaide. South Australia
Re: Migrant's flying Ford.
Yeah, looking very Leeds United in those colours.
Nigel
Nigel
-
Migrant
- Happily Landed after Many Circuits and Bumps
- Posts: 2428
- Joined: April 5th, 2011, 8:33 pm
- Location: Calgary, Canada
Re: Migrant's flying Ford.
Leeds United, Sweden, IKEA... so much for my between-the-wars aircraft scheme 

Today's been a 1-step forward, 3-steps back kind of scenario. When I removed the circle masks for the roundels, there was a huge build-up of paint around the edges, so I had to get rid of that. Unfortunately I had to sand it quite a way back to eradicate the edge, and then I noticed a few small dust specks embedded in the paint so it ended up like this:
Sigh. Back to the spray booth for another session, although this time I airbrushed the decanted blue paint to prevent the same thing happening again. It looks much better now but again I'll leave it 24 hours before handling it.
OTOH, the yellow wings looked pretty smooth once they were cured so I polished them with Tamiya's compounds, and they came out very shiny.
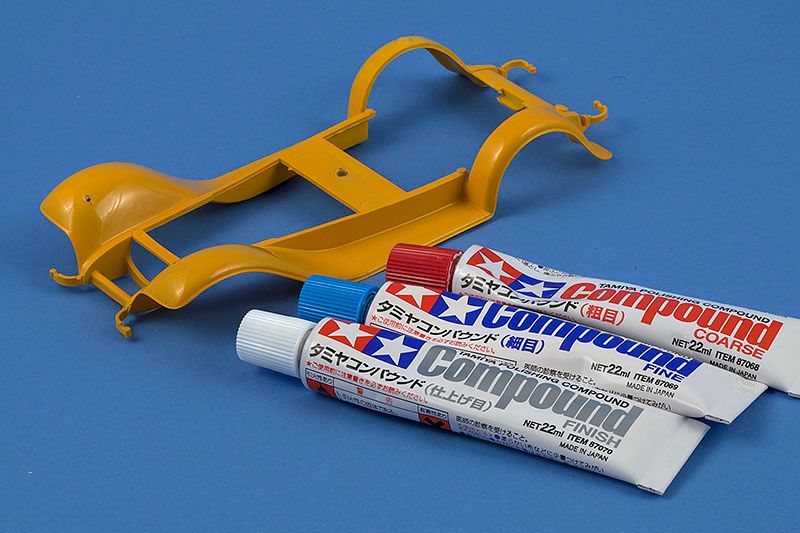
The treads on the running boards were then masked and painted dark grey.
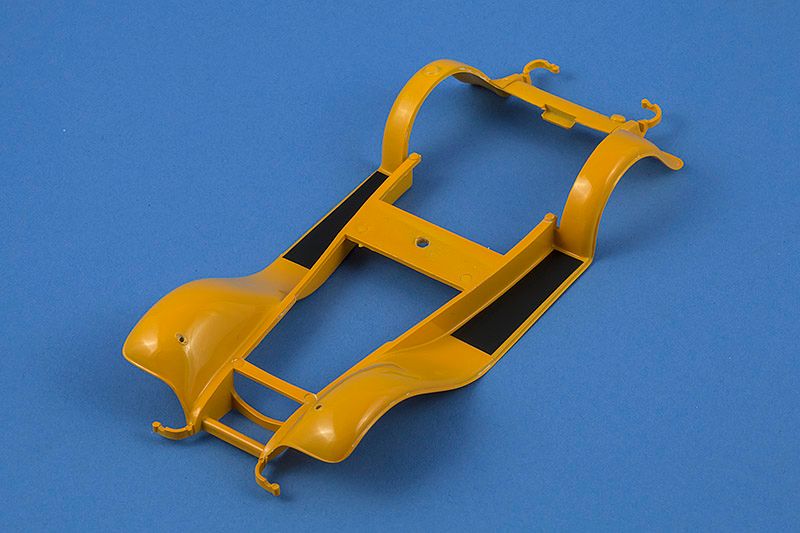
There are various small parts and assemblies now awaiting clean-up and paint, hoping to get some of that done tomorrow. I managed to drop one of the hub caps down the kitchen sink(!) so I'll have to address that somehow too.
Today's been a 1-step forward, 3-steps back kind of scenario. When I removed the circle masks for the roundels, there was a huge build-up of paint around the edges, so I had to get rid of that. Unfortunately I had to sand it quite a way back to eradicate the edge, and then I noticed a few small dust specks embedded in the paint so it ended up like this:
Sigh. Back to the spray booth for another session, although this time I airbrushed the decanted blue paint to prevent the same thing happening again. It looks much better now but again I'll leave it 24 hours before handling it.
OTOH, the yellow wings looked pretty smooth once they were cured so I polished them with Tamiya's compounds, and they came out very shiny.
The treads on the running boards were then masked and painted dark grey.
There are various small parts and assemblies now awaiting clean-up and paint, hoping to get some of that done tomorrow. I managed to drop one of the hub caps down the kitchen sink(!) so I'll have to address that somehow too.
Re: Migrant's flying Ford.
It's probably in the U-bend. Just take it off and check.
If anyone asks, you are just doing some man-type maintenance!
If anyone asks, you are just doing some man-type maintenance!
I'm a mostly full-time modeller put a part-time poster....
-
JohnRatzenberger

- Why is he so confused ?
- Posts: 15728
- Joined: April 5th, 2011, 3:42 pm
- Location: Living on a sandbar - Nags Head, NC.
Re: Migrant's flying Ford.
This was from your fingers, right - the car looks just fine !Migrant wrote:Lots of debonder eventually removed most of the excess glue, followed by some sanding/polishing, then a retouch of the white primer .....
John Ratzenberger 
It's my model and I'll do what I want with it.
It's my model and I'll do what I want with it.
-
Migrant
- Happily Landed after Many Circuits and Bumps
- Posts: 2428
- Joined: April 5th, 2011, 8:33 pm
- Location: Calgary, Canada
Re: Migrant's flying Ford.
Thanks John, although the superglue was all down the side of the car toojRatz wrote:This was from your fingers, right - the car looks just fine !Migrant wrote:Lots of debonder eventually removed most of the excess glue, followed by some sanding/polishing, then a retouch of the white primer .....
 Debonder did a nice job of removing it, but removed most of the paint too.
State-of-play: decals are on and sealed with Future, I'll again need to leave it to cure overnight before handling. Painting the white pinstripes on the wheels required much holding of breath and sticking-my-tongue-out-the-corner-of-my-mouth, but they look OK from a distance. (There was a raised line on the tyres, so I didn't have to freehand them
I'm hoping it all goes together OK although based on the build so far I'm not entirely optimistic; it's a really old, cheap kit with soft detail and so-so engineering.