However, if you must build one, the method I'm thinking of for the camouflage is to use a black permanent marker pen to affect the disruptive pattern, then seal it in with varnish.
Dazzled's Wocka
-
Dazzled

- Modelling Gent and Scholar
- Posts: 9592
- Joined: October 1st, 2011, 11:08 pm
- Location: Mid Glamorgan, South Wales
- Contact:
Re: Dazzled's Wocka
My advice to anyone planning to build this kit would be, at this point, DON'T! 
However, if you must build one, the method I'm thinking of for the camouflage is to use a black permanent marker pen to affect the disruptive pattern, then seal it in with varnish.
However, if you must build one, the method I'm thinking of for the camouflage is to use a black permanent marker pen to affect the disruptive pattern, then seal it in with varnish.
COLD WAR S.I.G. LEADER
Wherever there's danger, wherever there's trouble, wherever there's important work to be done....I'll be somewhere else building a model!
Wherever there's danger, wherever there's trouble, wherever there's important work to be done....I'll be somewhere else building a model!
-
splash

- Senior Service Rotorhead
- Posts: 13828
- Joined: May 1st, 2011, 11:02 am
- Location: Somerset England
Re: Dazzled's Wocka
Try out the marker pen trick out first on scrap, as my experience of using marker pens and acrylics was the marker ink looked good when it went on but over night it had bleed into a big black blob that reacted every time I tried to paint over it.

My work bench is starting to look like Portsmouth Naval Dockyard.
-
Dazzled
- Modelling Gent and Scholar
- Posts: 9592
- Joined: October 1st, 2011, 11:08 pm
- Location: Mid Glamorgan, South Wales
- Contact:
Re: Dazzled's Wocka
I think it depends on the type of pen Splash. I've used them with some success before particularly Staedler Lumicolour pens and Sharpie markers. I don't paint over them unless it's the same colour as the marker. They're quite good for neatly edging the solid tyres on tank wheels before applying the black paint. I thought that over a matt surface they could work here but, warning in mind, I'll have a go on a trial model first.
Thanks
Thanks
COLD WAR S.I.G. LEADER
Wherever there's danger, wherever there's trouble, wherever there's important work to be done....I'll be somewhere else building a model!
Wherever there's danger, wherever there's trouble, wherever there's important work to be done....I'll be somewhere else building a model!
-
philp

- Modelling Gent and Scholar
- Posts: 1279
- Joined: May 1st, 2011, 12:14 am
- Location: Kearns, Utah
- Contact:
Re: Dazzled's Wocka
I have used the Sharpie before on a Hawk Missile system and it bled like crazy when I sprayed Dullcote over it.
Though markers of some type is the option I have been batting around for a while.
Though markers of some type is the option I have been batting around for a while.
-
Molly-new

- Modelling Gent and Scholar
- Posts: 2355
- Joined: May 4th, 2011, 8:42 pm
- Location: Stoke-on-Trent, England
Re: Dazzled's Wocka
Seems to be fighting you all the way, the Matchbox kit is just as bad.Dazzled wrote:My advice to anyone planning to build this kit would be, at this point, DON'T!
Airfix WWII Aircraft Of The Aces.
Completed - 10
Building -
Pending -4
Completed - 10
Building -
Pending -4
-
Migrant

- Happily Landed after Many Circuits and Bumps
- Posts: 2428
- Joined: April 5th, 2011, 8:33 pm
- Location: Calgary, Canada
Re: Dazzled's Wocka
Based on this thread my Airfix Chinook has just been quietly moved from the stash to the 'sell' pile... You might as well finish it now Dazzled, and you'll probably find that the disruptive streaky camo hides a multitude of sins. I'm sure it'll look great when it's done 
-
Old_Tonto

- Modelling Gent and Scholar
- Posts: 8057
- Joined: May 1st, 2011, 7:41 pm
- Location: Middlesbrough, Peoples Republic of Teesside.
Re: Dazzled's Wocka
I am sure you will do it justice mate. You have gone too far to can it now.
2023 - A:0 B:0 C:0
Current Projects:
East German Air Force (1956-90)
South African Air Force (1958-93)
Current Projects:
East German Air Force (1956-90)
South African Air Force (1958-93)
-
Dazzled
- Modelling Gent and Scholar
- Posts: 9592
- Joined: October 1st, 2011, 11:08 pm
- Location: Mid Glamorgan, South Wales
- Contact:
Re: Dazzled's Wocka
Thanks guys.
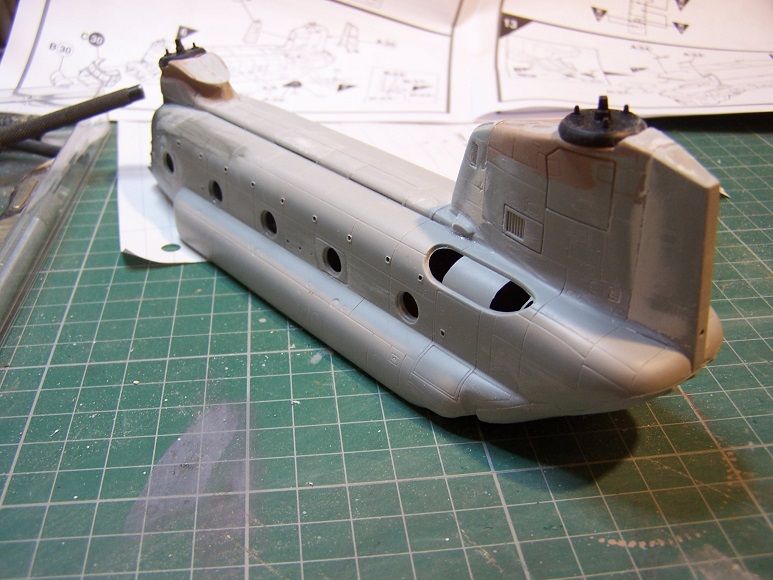
After seriously considering consigning this kit to the spares box via a short swift flight against the wall I have decide to plug away at it a little more. As Mike points out, the camo will help to disguise the filling, sanding and subsequent lack of detail.
So, after what seemed an interminable sanding session, sat on the sofa with my tray, I got to a point where I could look at it and assess where I needed to fill.
This is the first round of filler....
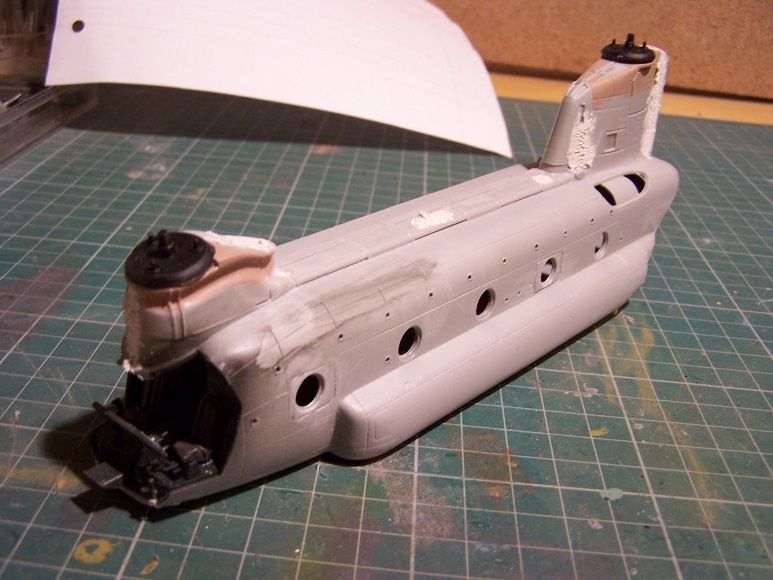
It sucked up a fair amount of Squadron White Putty plus, as can be seen in the last picture, a double strip of 40 and 30 thou plasticard to fill the hole at the base of the cargo door.
I have a feeling that it would have been as simple to carve a Chinook out of a solid block of filler and I still have a lot of sanding to do.
As a change from wrestling with this, and aside from the anti-Chinook therapy provided by my Revell U-boat, I decided to conduct an experiment. Heeding the warnings about using marker pens for camouflage I set this up.
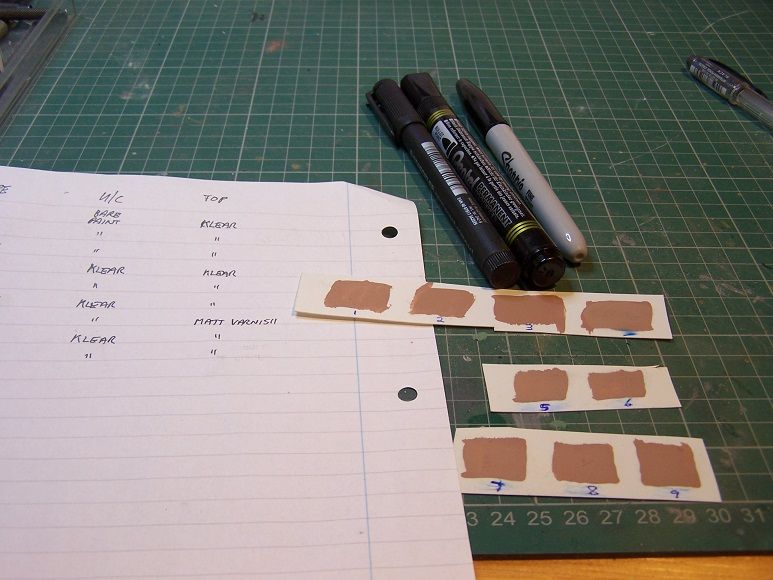
Nine patches of Humbrol 250 and 3 different makes of permanent marker. 3 on bare paint, 6 on Klear. Then all overcoated with Klear or Humbrol matt varnish to ascertain bleed or diffusion.
I'll have some results by tomorrow and will share these in my next update.
After seriously considering consigning this kit to the spares box via a short swift flight against the wall I have decide to plug away at it a little more. As Mike points out, the camo will help to disguise the filling, sanding and subsequent lack of detail.
So, after what seemed an interminable sanding session, sat on the sofa with my tray, I got to a point where I could look at it and assess where I needed to fill.
This is the first round of filler....


It sucked up a fair amount of Squadron White Putty plus, as can be seen in the last picture, a double strip of 40 and 30 thou plasticard to fill the hole at the base of the cargo door.
I have a feeling that it would have been as simple to carve a Chinook out of a solid block of filler and I still have a lot of sanding to do.
As a change from wrestling with this, and aside from the anti-Chinook therapy provided by my Revell U-boat, I decided to conduct an experiment. Heeding the warnings about using marker pens for camouflage I set this up.

Nine patches of Humbrol 250 and 3 different makes of permanent marker. 3 on bare paint, 6 on Klear. Then all overcoated with Klear or Humbrol matt varnish to ascertain bleed or diffusion.
I'll have some results by tomorrow and will share these in my next update.
COLD WAR S.I.G. LEADER
Wherever there's danger, wherever there's trouble, wherever there's important work to be done....I'll be somewhere else building a model!
Wherever there's danger, wherever there's trouble, wherever there's important work to be done....I'll be somewhere else building a model!

-
splash
- Senior Service Rotorhead
- Posts: 13828
- Joined: May 1st, 2011, 11:02 am
- Location: Somerset England
Re: Dazzled's Wocka
I had a thought when I had a reaction from the pen bleed, it was on Tamiya paint, so it might have been the spirit in the ink reacting with the Tamiya paint as Tamiya is alcohol based not water based like others.
So this will be a good experiment to watch.
Regards Splash
So this will be a good experiment to watch.
Regards Splash
My work bench is starting to look like Portsmouth Naval Dockyard.
-
Sissel

- Modelling Lady and Scholar
- Posts: 4097
- Joined: October 31st, 2011, 12:39 pm
- Location: Island in Norway
Re: Dazzled's Wocka
Another putty devil?
Don't think I'll rush out to get this one. Cracking job though! Keep up the good work. And I'm glad you didn't wall it.
Don't think I'll rush out to get this one. Cracking job though! Keep up the good work. And I'm glad you didn't wall it.
Confused as always, and somewhere in hiding on the Scandinavian peninsula...
-
Dazzled
- Modelling Gent and Scholar
- Posts: 9592
- Joined: October 1st, 2011, 11:08 pm
- Location: Mid Glamorgan, South Wales
- Contact:
Re: Dazzled's Wocka
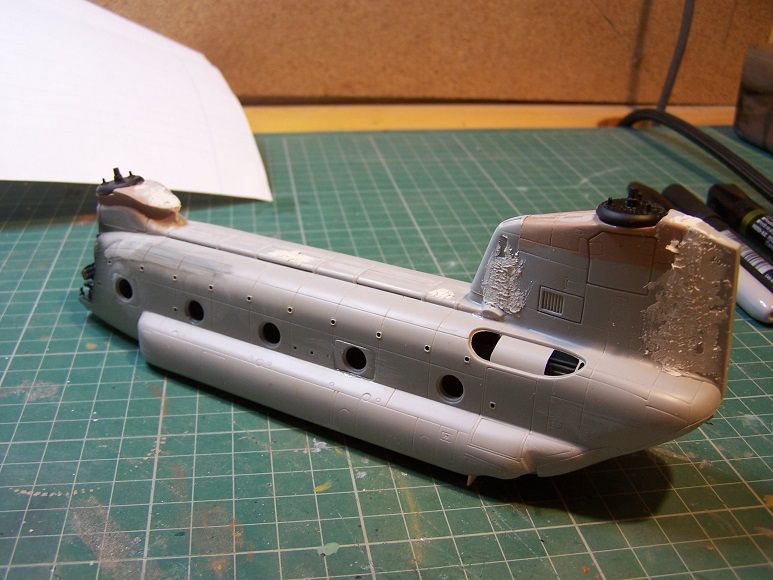
Rather a lot of sanding today resulted in this.
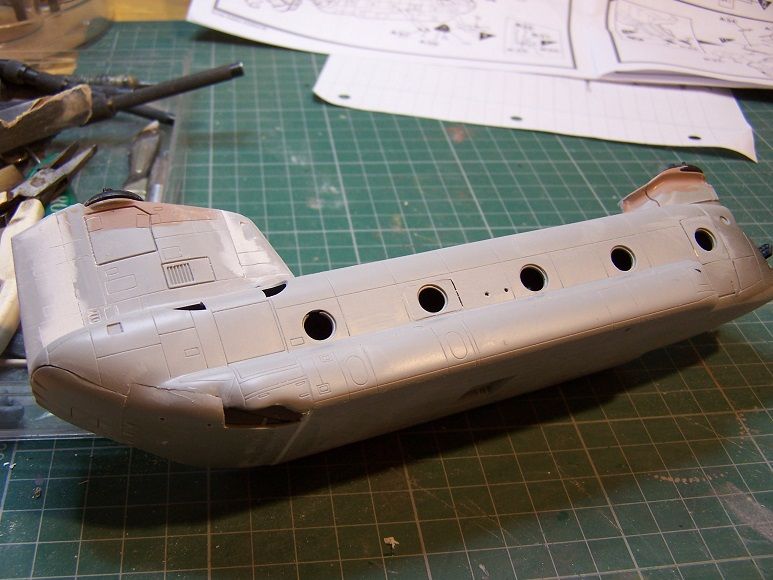
There are less gaps if nothing else. A coat of paint will give me some ideas about what extra filling and sanding will be required. If I wasn't unimpressed enough I'm also starting to have some doubts about the accuracy of the forward part of the rear rotor mounting. Time for a bit of research I think.
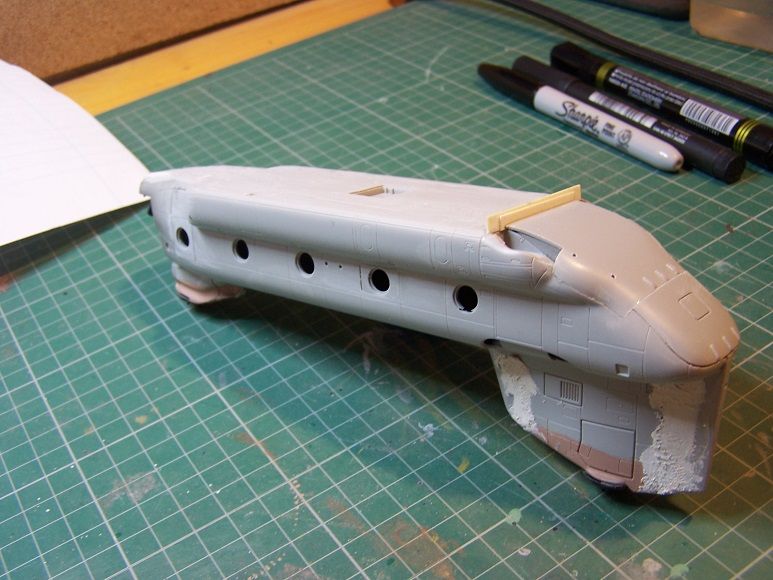
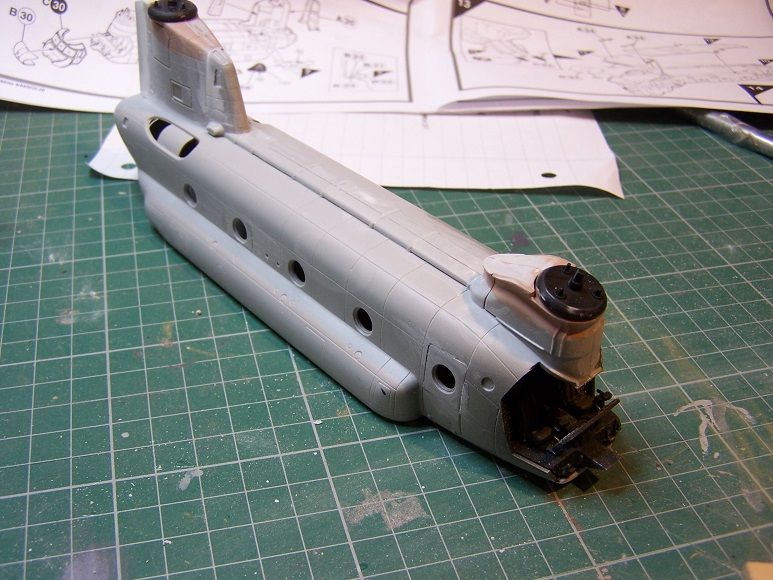
And, as if I didn't have enough dodgy seams to think about, there are the engine nacelles.
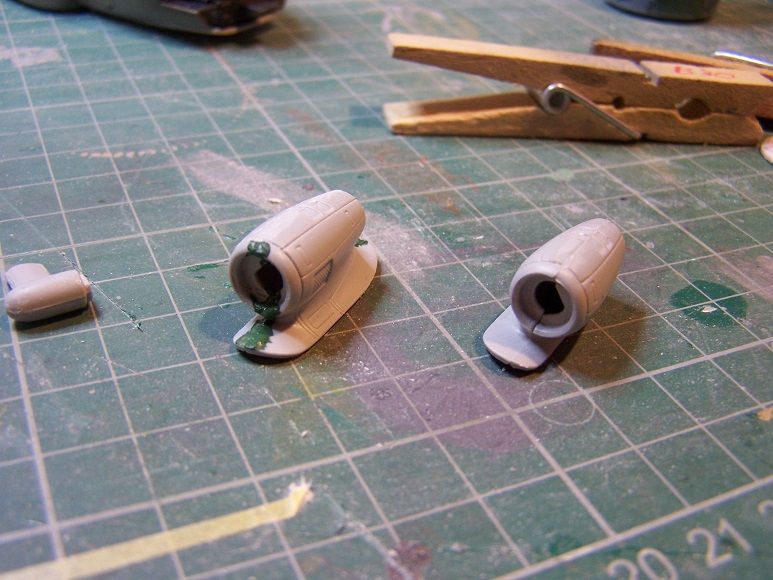
Not exactly seamless are they. I've opted to try a little Citadel Green stuff on these.
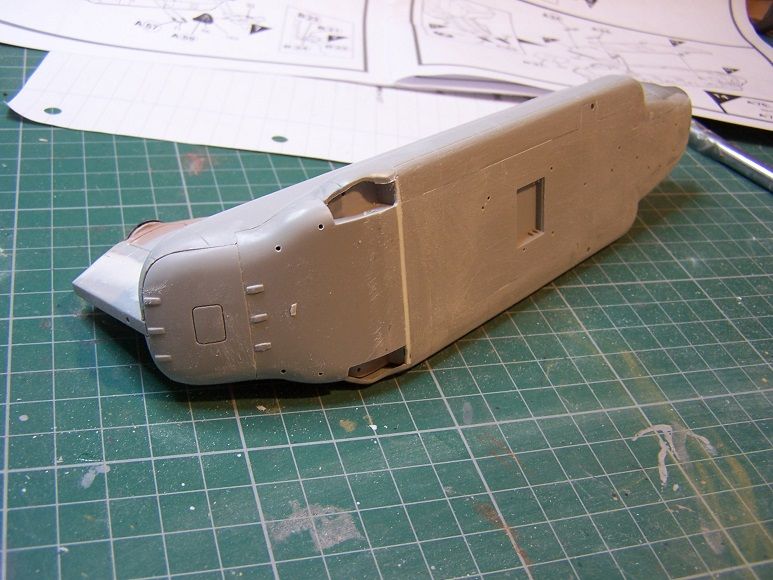
Next, I thought I'd try the nose glazing for size. This was going to be a make or break moment. If this was going to require major surgery then the Chinook was headed for the breakers yard. However. it did fit reasonably well after I'd pared away the flash, but....
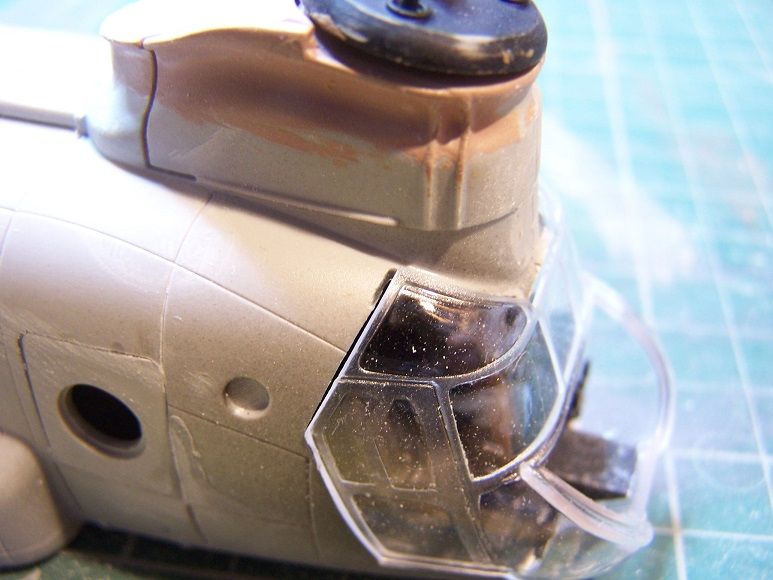
There are a couple of weird little gaps at the top rear corners, one on each side. There's no reason for them to be there so there'll be a bit more filling to blend this in .
So, in preparation for this.....
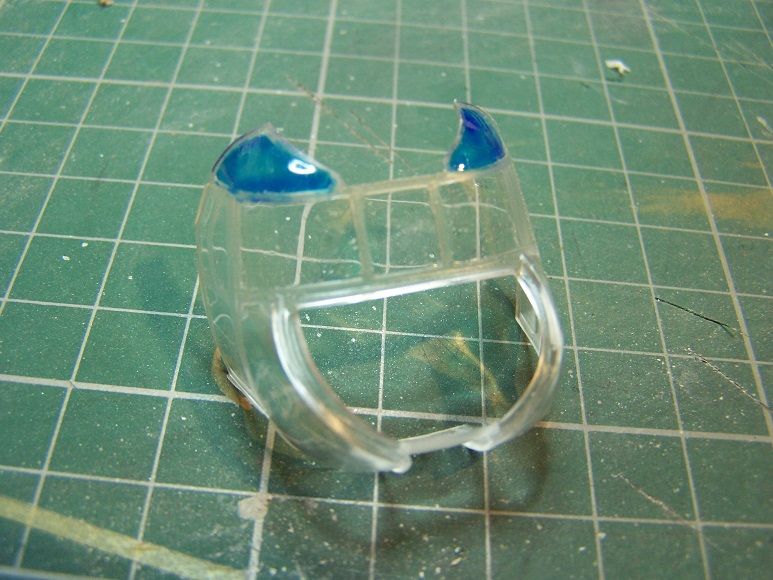
I tinted the upper windows with Tamiya Clear Blue. When it dries fully I can have a bash at getting the glazing fixed on.
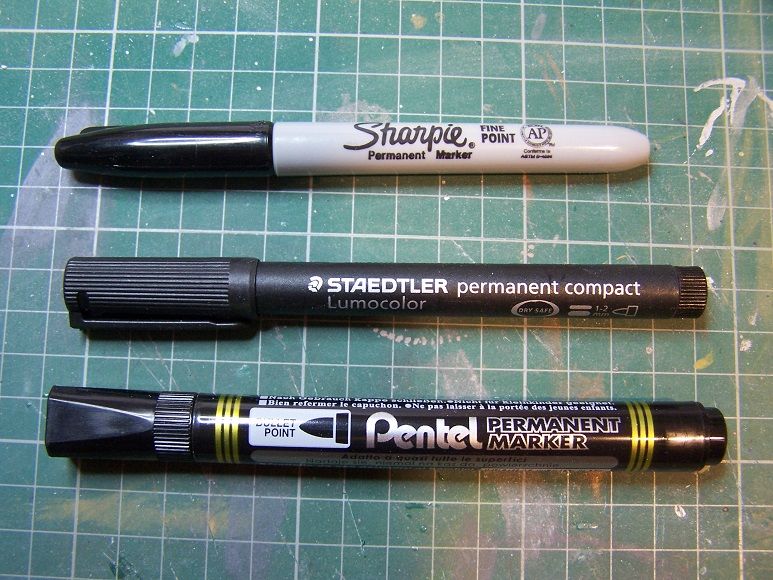
And now, the part everyone's been waiting for.....The results of the marker pen experiment.
I tried three different types of marker pen.
On 9 prepared painted patches. This is the result.
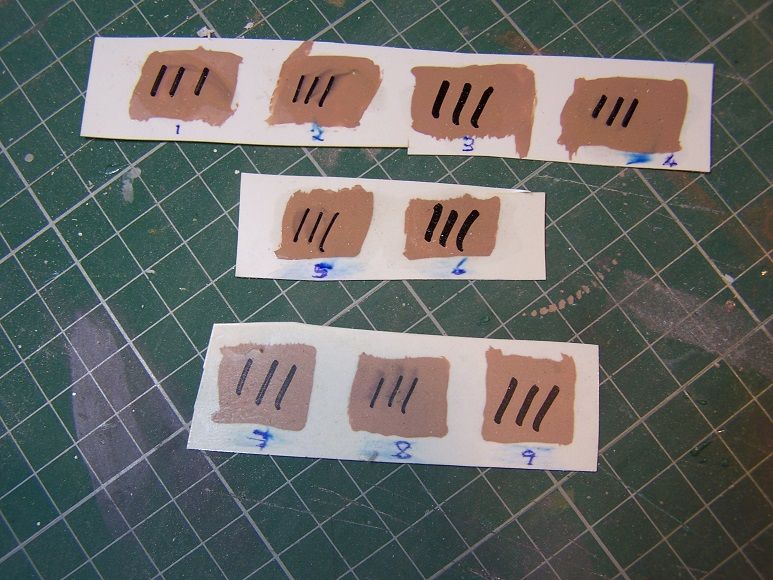
Patches 1 to 3 are bare paint, pen, then Klear.
Patches 4 to 6 are Paint, Klear, pen, then Klear.
Patches 7 to 9 are Paint, Klear, pen, then Humbrol Matt Varnish.
And there are clearly significant results.
The Staedtler Lumoclour (2, 5 and 8) smudged to some extent under all circumstances.
The Sharpie marker (1, 4 and 7) varied in performance being better on the varnished surface and smudging a little on bare paint. This bears out Splash's theory of the pen ink reacting with the paint although, in this case, the paint is enamel.
And, in the Pentel permanent marker (3, 6 and 9), I have a winner. It didn't smudge significantly under any of the test conditions, and not at all when applied over Klear. It also kept excellent colour density and matted down properly under the Humbrol varnish. It's only real issue is that it has the largest tip size but I'm sure that a delicate touch will compensate for this.
So, the marker pen plan is on.


There are less gaps if nothing else. A coat of paint will give me some ideas about what extra filling and sanding will be required. If I wasn't unimpressed enough I'm also starting to have some doubts about the accuracy of the forward part of the rear rotor mounting. Time for a bit of research I think.
And, as if I didn't have enough dodgy seams to think about, there are the engine nacelles.

Not exactly seamless are they. I've opted to try a little Citadel Green stuff on these.
Next, I thought I'd try the nose glazing for size. This was going to be a make or break moment. If this was going to require major surgery then the Chinook was headed for the breakers yard. However. it did fit reasonably well after I'd pared away the flash, but....

There are a couple of weird little gaps at the top rear corners, one on each side. There's no reason for them to be there so there'll be a bit more filling to blend this in
So, in preparation for this.....

I tinted the upper windows with Tamiya Clear Blue. When it dries fully I can have a bash at getting the glazing fixed on.
And now, the part everyone's been waiting for.....The results of the marker pen experiment.
I tried three different types of marker pen.

On 9 prepared painted patches. This is the result.

Patches 1 to 3 are bare paint, pen, then Klear.
Patches 4 to 6 are Paint, Klear, pen, then Klear.
Patches 7 to 9 are Paint, Klear, pen, then Humbrol Matt Varnish.
And there are clearly significant results.
The Staedtler Lumoclour (2, 5 and 8) smudged to some extent under all circumstances.
The Sharpie marker (1, 4 and 7) varied in performance being better on the varnished surface and smudging a little on bare paint. This bears out Splash's theory of the pen ink reacting with the paint although, in this case, the paint is enamel.
And, in the Pentel permanent marker (3, 6 and 9), I have a winner. It didn't smudge significantly under any of the test conditions, and not at all when applied over Klear. It also kept excellent colour density and matted down properly under the Humbrol varnish. It's only real issue is that it has the largest tip size but I'm sure that a delicate touch will compensate for this.
So, the marker pen plan is on.
COLD WAR S.I.G. LEADER
Wherever there's danger, wherever there's trouble, wherever there's important work to be done....I'll be somewhere else building a model!
Wherever there's danger, wherever there's trouble, wherever there's important work to be done....I'll be somewhere else building a model!
-
splash
- Senior Service Rotorhead
- Posts: 13828
- Joined: May 1st, 2011, 11:02 am
- Location: Somerset England
Re: Dazzled's Wocka
Well done for doing the pen test in such detail, I'm now out looking for fine Pentel markers.
Can I suggest you add you excellent research work to the "Finishing Tip" section as this needs to be see by others who might not have looked in on our GB.
Thanks again for sharing your hard work.
Regards Splash
Can I suggest you add you excellent research work to the "Finishing Tip" section as this needs to be see by others who might not have looked in on our GB.
Thanks again for sharing your hard work.
Regards Splash
My work bench is starting to look like Portsmouth Naval Dockyard.
-
philp
- Modelling Gent and Scholar
- Posts: 1279
- Joined: May 1st, 2011, 12:14 am
- Location: Kearns, Utah
- Contact:
Re: Dazzled's Wocka
And if you can't find a fine tip, you can always trim the larger tip down.
-
Dazzled
- Modelling Gent and Scholar
- Posts: 9592
- Joined: October 1st, 2011, 11:08 pm
- Location: Mid Glamorgan, South Wales
- Contact:
Re: Dazzled's Wocka
splash wrote:Well done for doing the pen test in such detail, I'm now out looking for fine Pentel markers.
Can I suggest you add you excellent research work to the "Finishing Tip" section as this needs to be see by others who might not have looked in on our GB.
Thanks again for sharing your hard work.
Regards Splash
I didn't think of that Splash.
Consider it done
COLD WAR S.I.G. LEADER
Wherever there's danger, wherever there's trouble, wherever there's important work to be done....I'll be somewhere else building a model!
Wherever there's danger, wherever there's trouble, wherever there's important work to be done....I'll be somewhere else building a model!