Simon's Affichage En Papier **DNF**
-
SJPONeill

- Modelling Gent and Scholar
- Posts: 3525
- Joined: May 1st, 2011, 12:01 am
- Location: Near the Spiral, NZ.
- Contact:
Re: Simon's Affichage En Papier
Nice!! I have it but have not built it (story of my hobby!!) but it has a reputation of being a nice build as do all the Saenger designs...
Please critique my posts honestly i.e. say what you think so I can learn and improve...
The World According To Me
The World According To Me
-
SJPONeill
- Modelling Gent and Scholar
- Posts: 3525
- Joined: May 1st, 2011, 12:01 am
- Location: Near the Spiral, NZ.
- Contact:
Re: Simon's Affichage En Papier
Getting into some of the fiddlier stuff last night...
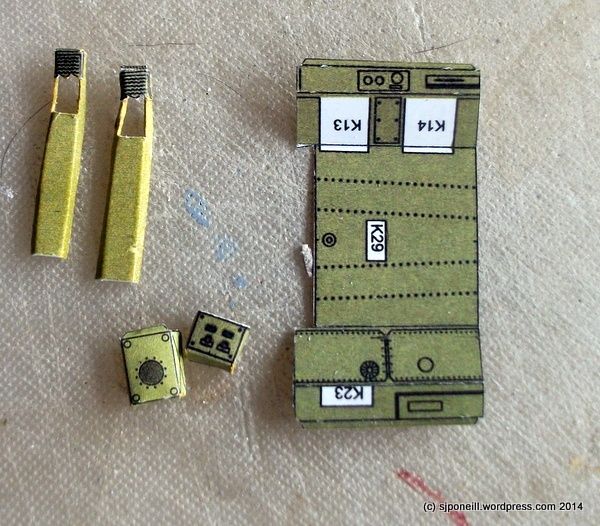
L-R are the pilot's footrests: the one on the left is OK but I think that the one on the right shifted after I left it for the night and is skewed - I don't think that much of these will be seen so am not planning on doing it again...the greater part of these us concealed under the cockpit floor anyway; the two little box thingies are parts K13 and K14 for fitting tonight to the lower cockpit wall; and on the right is the single piece cockpit floor and lower walls which has been creased for folding and which will start to slip into shape as I add K13 and K14 on the starboard side.
I am still trying to decipher the relationship between this part and the upper cockpit walls, specifically how they fit together and then fit into the cockpit framework...
Please critique my posts honestly i.e. say what you think so I can learn and improve...
The World According To Me
The World According To Me
-
SJPONeill
- Modelling Gent and Scholar
- Posts: 3525
- Joined: May 1st, 2011, 12:01 am
- Location: Near the Spiral, NZ.
- Contact:
Re: Simon's Affichage En Papier
The parts are slightly different colours because they come from different test print batches...it is not as distinct a difference in the flesh but I will pay more attention to colour matching for more visible parts...I'm using my water colour pencils to colour the white edges...
Please critique my posts honestly i.e. say what you think so I can learn and improve...
The World According To Me
The World According To Me
-
BlohmWolf

- Modelling Gent and Scholar
- Posts: 2355
- Joined: May 15th, 2013, 11:21 pm
- Location: Down under, TAS.
Re: Simon's Affichage En Papier
Going good Simon.
"Can not finish a model at all"
"You can get more of what you want, with a kind word and a wallet, than just a kind word".
Currently Building: FROG Wildcat, Fokker DR1 Red baron and some other things...
"You can get more of what you want, with a kind word and a wallet, than just a kind word".
Currently Building: FROG Wildcat, Fokker DR1 Red baron and some other things...
-
JohnRatzenberger

- Why is he so confused ?
- Posts: 15734
- Joined: April 5th, 2011, 3:42 pm
- Location: Living on a sandbar - Nags Head, NC.
Re: Simon's Affichage En Papier
This is interesting, especially your use of clamps.
John Ratzenberger 
It's my model and I'll do what I want with it.
It's my model and I'll do what I want with it.
-
SJPONeill
- Modelling Gent and Scholar
- Posts: 3525
- Joined: May 1st, 2011, 12:01 am
- Location: Near the Spiral, NZ.
- Contact:
Re: Simon's Affichage En Papier

Parts K13 and K14 in place...they look a little wobbly and this is largely a result of it being too long since my last paper modelling build. I should have cut off the tabs that are meant to provide a larger glueing surface for each part as they really just get in the way and skew the shape of the part. I am not too worried, though as I don't think that the wobbliness will be that visible inside the cockpit.

Due to the flimsiness of the cockpit floor, I have decided to add reinforcing strips along the interior edges of the folds...

...and am using these low-res copies to make templates to go inside these parts to provide a firm edge along which to bend the sides...

I unashamedly stole this idea from these parts, which are laminated onto thing card to strengthen parts K15 and K19 on the upper cockpit walls...
Please critique my posts honestly i.e. say what you think so I can learn and improve...
The World According To Me
The World According To Me
-
Molly-new

- Modelling Gent and Scholar
- Posts: 2355
- Joined: May 4th, 2011, 8:42 pm
- Location: Stoke-on-Trent, England
Re: Simon's Affichage En Papier
This is great, a build and tutorial all in one. Keep the top tips coming Simon.
Airfix WWII Aircraft Of The Aces.
Completed - 10
Building -
Pending -4
Completed - 10
Building -
Pending -4
-
SJPONeill
- Modelling Gent and Scholar
- Posts: 3525
- Joined: May 1st, 2011, 12:01 am
- Location: Near the Spiral, NZ.
- Contact:
Re: Simon's Affichage En Papier
I chronicled my first paper model build and you might some useful tips and lessons learned in the thread at PM [http://www.papermodelers.com/forum/avia ... omber.html], Chip.
This model is another good build that I was really enjoying until the toddlers decided to inflict some 'battle damage'...it still languishes in the garage but I will probably start it from scratch if I decide to finish it...
This model is another good build that I was really enjoying until the toddlers decided to inflict some 'battle damage'...it still languishes in the garage but I will probably start it from scratch if I decide to finish it...
Please critique my posts honestly i.e. say what you think so I can learn and improve...
The World According To Me
The World According To Me

Re: Simon's Affichage En Papier
This is so cool. I am getting pumped to do one (a simple one).
Besting 60 years of mediocre building of average kits in the stand off scale
-
SJPONeill
- Modelling Gent and Scholar
- Posts: 3525
- Joined: May 1st, 2011, 12:01 am
- Location: Near the Spiral, NZ.
- Contact:
Re: Simon's Affichage En Papier
Fiddlers Green has a large range of simplified aircraft, vehicle and building models...they are fairly generic in terms of accuracy but are very good intro paper models [http://www.fiddlersgreen.net] - you can choose up to three free paper models from a pool of 75 when you register on the FG site...might be a good place to start, Jeff...
Please critique my posts honestly i.e. say what you think so I can learn and improve...
The World According To Me
The World According To Me
-
SJPONeill
- Modelling Gent and Scholar
- Posts: 3525
- Joined: May 1st, 2011, 12:01 am
- Location: Near the Spiral, NZ.
- Contact:
Re: Simon's Affichage En Papier
More fiddly cockpit bits last night...
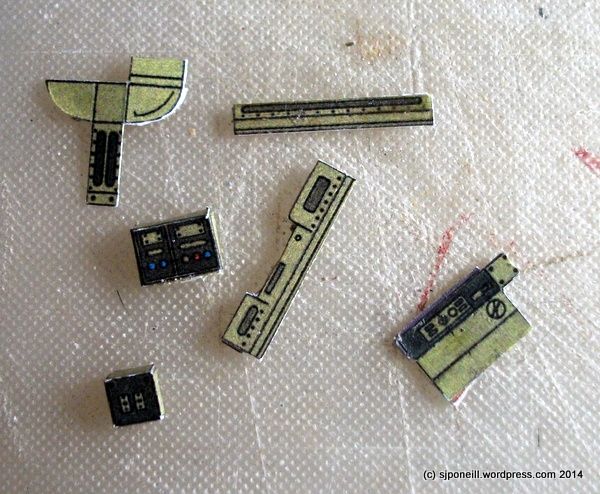
The camera is a bit harsh on the print resolution and paper grain...these parts are all quite small and actually look OK in the flesh...

The camera is a bit harsh on the print resolution and paper grain...these parts are all quite small and actually look OK in the flesh...
Please critique my posts honestly i.e. say what you think so I can learn and improve...
The World According To Me
The World According To Me
-
SJPONeill
- Modelling Gent and Scholar
- Posts: 3525
- Joined: May 1st, 2011, 12:01 am
- Location: Near the Spiral, NZ.
- Contact:
Re: Simon's Affichage En Papier

Added the greeble boxes to the cockpit sides...

Fixed the pilot's footrest to the cockpit floor but...uh-oh...as they appear to go on the instructions, they are too long by a long way to fit between the cockpit bulkheads...I've cut these off and will shorten so that they fit into the gap. Probably there should be spaces in the bulkhead for the pilots legs to extend into...

Assembled the instrument panel...if I had the time I would have sandwiched this under an instrument fascia with the holes for the instruments punched out and filled with Kleer but next time...as near as I can figure the base of the instrument panel sits on the cockpit floor and the cockpit wall parts wrap around it...
Please critique my posts honestly i.e. say what you think so I can learn and improve...
The World According To Me
The World According To Me
-
Migrant

- Happily Landed after Many Circuits and Bumps
- Posts: 2428
- Joined: April 5th, 2011, 8:33 pm
- Location: Calgary, Canada
Re: Simon's Affichage En Papier
Looking really good Simon. I'm really impressed with the level of detail, and your ability to neatly fold really small parts. I bet you're a whizz with photo-etch too...
-
lancfan

- Avro's Rivet Rhapsodizer
- Posts: 8763
- Joined: May 2nd, 2011, 3:55 pm
- Location: Nelson, Lancashire
Re: Simon's Affichage En Papier
This is certainly a different way of working, will be interesting to have a go at this for the Card Models GB later this year.
David.
David.
David.
If you forget the past, you may lose the future.
If you forget the past, you may lose the future.
-
SJPONeill
- Modelling Gent and Scholar
- Posts: 3525
- Joined: May 1st, 2011, 12:01 am
- Location: Near the Spiral, NZ.
- Contact:
Re: Simon's Affichage En Papier

In preparation for bodging the cockpit parts together, I have added some strip to support the seam between the lower cockpit sidewalls and the upper sidewalls. I will probably add at least one more layer so that there is a broad surface for the mating surface...

I have trimmed off the supports for the pilot's footrests...although the instrructions seem to show them as fitting to the underside of the cockpit floor, test-fitting the cockpit parts today shows that this will make the instrument panel too high. I think that these supports are meant to go (despite the instruction drawings) on the cockpit floor where the double dotted lines are and that these then lift the seat above the level of the floor. I am making new supports for the pilot's footrests and will shorten theses slightly so that they fit into the available space...

The seat was a bit fiddly but not that difficult even though it is a 90 degree edge joint that is difficult to reinforce because there is an external facing to go over the top...I got it all together by semi rolling the areas of the seat bases where it curves with the sidewalls and then inching along the join using superglue and accelerator for the join. It is difficult to see from this angle but there is a 2mm lip of excess material at the front of the seat that I will need to trim off.

Another shot of the seat and the exterior facing that fits (Hopefully!) around the outside...

I have now started to prepare the turret parts for the next phase...I can still not find my circle cutter and forgot to get another while in town on Friday so have had to cut the curves freehand...this is not that hard but (for me anyway) means that the cuts are not as smooth as they could be...
Please critique my posts honestly i.e. say what you think so I can learn and improve...
The World According To Me
The World According To Me