Rob's tame 109 *Finished*

An "off the books" special GB for those wishing to build a model to support this children's charity. Normal GB guidelines are suspended in here.
Runs: 1st January 2014 to 1st April 2014. GB Leader is DirkPitt289
rob_van_riel
Modelling Gent and Scholar
Posts: 3325
Joined: November 4th, 2012, 11:28 am
Location: The Netherlands
Contact:

Rob's tame 109 *Finished*

Post by rob_van_riel »

The LHS had some water damaged kits destined for the skip which they offered up to the regulars for rescue, and among those I saved was this bird:
Image
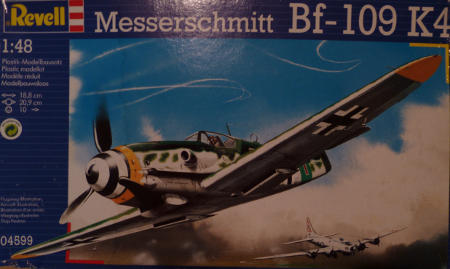
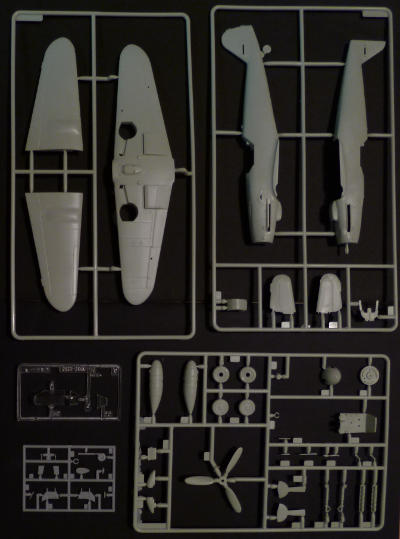
Inside the tattered box is a classic; although this kit was issued in (according to Scalemates) 1991, the basic kit is much older; the sixties, according to scalemates, and I can personally confirm it was around in 1980. This particular boxing contains an extra sprue to create a K-4 model, but this is originally a G-10, which is how I'll build it. The extra K-4 sprue will go straight to the spares bin.
Image
The 109 is of course a fierce and brutal beast of an airplane, but mine will be quite domesticated. Ordinarily, I'd deck it out in operational luftwaffe colours, complete with swastikas on the tail, but in this context, I fear that might cause some issues. I simply refuse to do a WWII luftwaffe plane without them, so an alternative was found in the form of markings for an Me109G-10 captured by the Canadians. This plane was overall light blue, with roundels slapped roughly over the balkenkreuze on the wings, and the tailflash neatly covering the naughty bits. It should look properly tamed in that outfit, although the ends of the crosses sticking out from under the roundels will be warning that it might not be entirely tame after all :twisted:

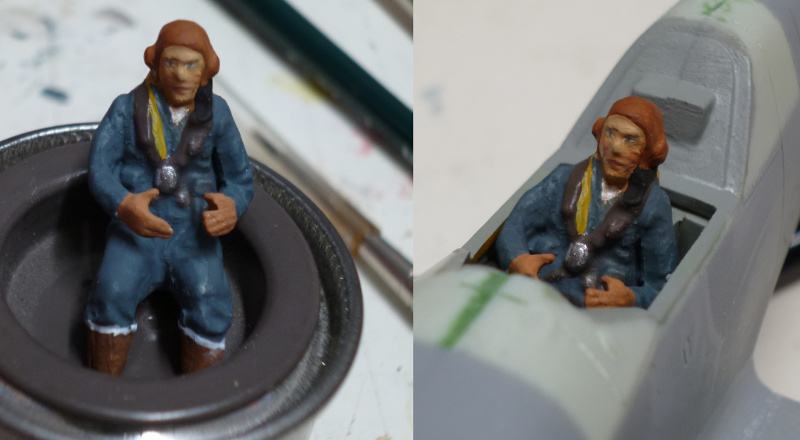
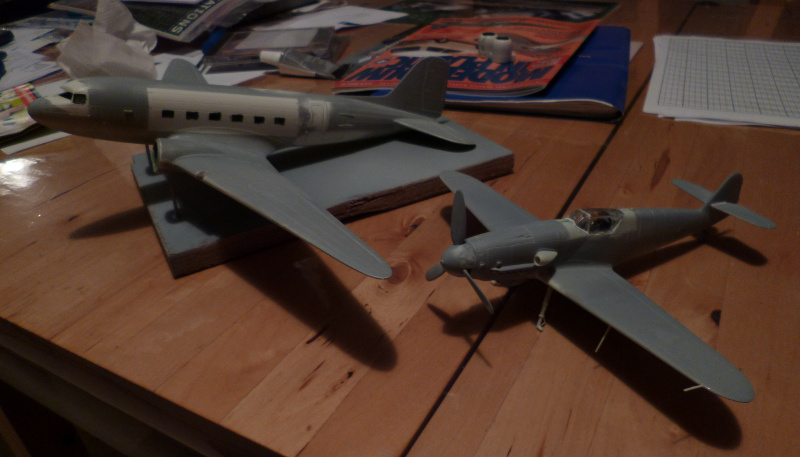
Despite it's age, this kit always had recessed panel lines, and although basic, fit appears to be good (except some warping of the fuselage halves, but easily fixed). I've assembled the cockpit module (bare by current standards, but quite good in it's day), and hope to paint it over the next week. The main wing has also been assembled. For some reason, one of the horizontal stabilisers had a copyright notice embossed on it which needed sanding off; very odd for a 1991 kit.
rob_van_riel
Modelling Gent and Scholar
Posts: 3325
Joined: November 4th, 2012, 11:28 am
Location: The Netherlands
Contact:

Re: Rob's tame 109

Post by rob_van_riel »

The minimal interior has been built and painted, and the fuselage assembled and joined to the wings. The wings fit very well, but the fuselage had a seam between the halves that needed some hammering into submission. 's OK, plenty of hammers :twisted:
I was going to leave the cockpit mostly bare, since I didn't expect to see much of it with the canopy closed, but the transparent parts are delightfully clear and provide a great view of the interior, even with the lid down. I guess I'll have to put some more effort into this.
rob_van_riel
Modelling Gent and Scholar
Posts: 3325
Joined: November 4th, 2012, 11:28 am
Location: The Netherlands
Contact:

Re: Rob's tame 109

Post by rob_van_riel »

I decided the most efficient way to clutter up the cockpit was to put a pilot inside. Problem was, I didn't have any spare pilots, and the rules of engagement prevented me from buying an aftermarket figure (not that I managed to find any, but that's another matter..). So, with the spares box uncooperative and no alternatives available, I decided to break out the supply of RTV rubber, and make a mould from a suitable pilot. The donor kit was an Airfix Spitfire Vc. Not the finest pilot figure ever, but the rather better new Tamiya figures were too wide to squeeze into the cockpit. After some mucking about with rubber and metal, I ended up with this rather nice batch.

Image

I had another candidate for the figure, but that one was wearing Luftwaffe kit, which would have been better for any 109 but this one...

The 109 itself sprung a nasty little surprise on me. The fit between wings and fuselage was tight, but I hadn't realised it was so tight the port wing had little or no dihedral left, which looked just plane horrible. With much trepidation, I made a cut with the razor saw almost entirely through the wing along the join, which took the tension off and restored symmetry to the wings, but some filler was then required of course to smooth over the cut. Once that was dealt with, the plane was ready for a first coat of primer. As expected and intended, this revealed some minor issues for fixing.
User avatar
splash
Senior Service Rotorhead
Posts: 13828
Joined: May 1st, 2011, 11:02 am
Location: Somerset England

Re: Rob's tame 109

Post by splash »

That was a cunning plan making new pilots and sticking by the rules. Image
Well done they look great.

Regards Splash
My work bench is starting to look like Portsmouth Naval Dockyard.
User avatar
AndrewR
In the basement lab
Posts: 24064
Joined: April 5th, 2011, 4:13 pm
Location: Ottawa, Ontario, The Great White North
Contact:

Re: Rob's tame 109

Post by AndrewR »

Great idea Rob! :)
Up in the Great White North
rob_van_riel
Modelling Gent and Scholar
Posts: 3325
Joined: November 4th, 2012, 11:28 am
Location: The Netherlands
Contact:

Re: Rob's tame 109

Post by rob_van_riel »

Thanks for the kind words about the pilot guys. I think he looks better with some colour though ;-)
Meet the chap who's going to take this heap of Hun airplane parts for a spin on behalf of 401sqn RAF..
Image
User avatar
Clashcityrocker
Modelling Gent and Scholar
Posts: 10798
Joined: May 1st, 2011, 12:31 am
Location: Adelaide. South Australia

Re: Rob's tame 109

Post by Clashcityrocker »

Nice pilot.

Nigel
rob_van_riel
Modelling Gent and Scholar
Posts: 3325
Joined: November 4th, 2012, 11:28 am
Location: The Netherlands
Contact:

Re: Rob's tame 109

Post by rob_van_riel »

Slightly more progress here than on the Dakota; I've sealed up the canopy (this involved filing off the top the pilot's head; these cockpits are claustrofobic..), and attached the legs and some of the smaller odds and sods. That means it's ready for masking and painting.

Image

This one should be ready on time, so Andrew won't have to carry all of the load by himself.
User avatar
AndrewR
In the basement lab
Posts: 24064
Joined: April 5th, 2011, 4:13 pm
Location: Ottawa, Ontario, The Great White North
Contact:

Re: Rob's tame 109

Post by AndrewR »

Assuming I can finish mine in time... :omg
Up in the Great White North
User avatar
Dirkpitt289
NUMA's Auto Mechanic
Posts: 8724
Joined: May 2nd, 2011, 1:55 am
Location: New jersey USA
Contact:

Re: Rob's tame 109

Post by Dirkpitt289 »

Great work Rob
.... Dirk

Beware of the DOG's of WAR

My Youtube Channel
https://www.youtube.com/user/ModelingGu ... rid&view=0
rob_van_riel
Modelling Gent and Scholar
Posts: 3325
Joined: November 4th, 2012, 11:28 am
Location: The Netherlands
Contact:

Re: Rob's tame 109

Post by rob_van_riel »

Ever since I put the paint on last weekend, I've been slapping on coat after coat of Humbrol Clear, to get a nice glossy surface for the decals to stick to. To it's credit, it levels out perfectly, not a brushstroke in sight, but is it really alright to reach a nice eggshell sheen after six coats, with who knows how many more to go before it actually becomes nice and shiny? I must admit to getting somewhat tired of that bottle by now :roll:
rob_van_riel
Modelling Gent and Scholar
Posts: 3325
Joined: November 4th, 2012, 11:28 am
Location: The Netherlands
Contact:

Re: Rob's tame 109

Post by rob_van_riel »

Final assembly of the plane and decalling are in progress. In case anyone else is working with Rising decals: be carefull, they are extremely thin and really like to curl up on you..
User avatar
Dirkpitt289
NUMA's Auto Mechanic
Posts: 8724
Joined: May 2nd, 2011, 1:55 am
Location: New jersey USA
Contact:

Re: Rob's tame 109

Post by Dirkpitt289 »

Times ticking away....
.... Dirk

Beware of the DOG's of WAR

My Youtube Channel
https://www.youtube.com/user/ModelingGu ... rid&view=0
rob_van_riel
Modelling Gent and Scholar
Posts: 3325
Joined: November 4th, 2012, 11:28 am
Location: The Netherlands
Contact:

Re: Rob's tame 109

Post by rob_van_riel »

Dirkpitt289 wrote:Times ticking away....
Let it tick all it wants, nothing short of me ending up in hospital can prevent completion now. Mind you, with drying times and such taken into account, that will be on Monday evening.
User avatar
Dirkpitt289
NUMA's Auto Mechanic
Posts: 8724
Joined: May 2nd, 2011, 1:55 am
Location: New jersey USA
Contact:

Re: Rob's tame 109

Post by Dirkpitt289 »

rob_van_riel wrote:
Dirkpitt289 wrote:Times ticking away....
Let it tick all it wants, nothing short of me ending up in hospital can prevent completion now. Mind you, with drying times and such taken into account, that will be on Monday evening.

Haha, you go Rob., ;-)
.... Dirk

Beware of the DOG's of WAR

My Youtube Channel
https://www.youtube.com/user/ModelingGu ... rid&view=0
Locked

Return to “Jimmy's Fund Charity GB”